Owner's Manual - English
Page 1
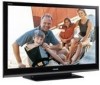
...setting up your new TV, see page 9. Refer to these numbers in the spaces below. Record these numbers whenever you communicate with your Toshiba dealer about this TV. Integrated High Definition LCD Television HIGH-DEFINITION TELEVISION 40XV645U 46XV645U 52XV645U For an overview of your TV.... Model number: Serial number: TD/M VX1A00137800 Note: To display a High Definition picture, the TV must be receiving...
...setting up your new TV, see page 9. Refer to these numbers in the spaces below. Record these numbers whenever you communicate with your Toshiba dealer about this TV. Integrated High Definition LCD Television HIGH-DEFINITION TELEVISION 40XV645U 46XV645U 52XV645U For an overview of your TV.... Model number: Serial number: TD/M VX1A00137800 Note: To display a High Definition picture, the TV must be receiving...
Owner's Manual - English
Page 6
... (Part 15): The Toshiba 40XV645U, 46XV645U and 52XV645U Televisions comply with Part ... does cause harmful interference to the following symptoms are technical limitations of LCD Display technology and are trademarks of malfunction, and is not a sign...settings of this equipment. Picture Settings, Auto Brightness Sensor, Power-On Mode) may cause harmful interference to operate this television meet ENERGY STAR® requirements. ENERGY STAR® qualified TV. Environmental Protection Agency. ENERGY STAR and the ENERGY STAR mark are not visible when the picture is : Toshiba...
... (Part 15): The Toshiba 40XV645U, 46XV645U and 52XV645U Televisions comply with Part ... does cause harmful interference to the following symptoms are technical limitations of LCD Display technology and are trademarks of malfunction, and is not a sign...settings of this equipment. Picture Settings, Auto Brightness Sensor, Power-On Mode) may cause harmful interference to operate this television meet ENERGY STAR® requirements. ENERGY STAR® qualified TV. Environmental Protection Agency. ENERGY STAR and the ENERGY STAR mark are not visible when the picture is : Toshiba...

Owner's Manual - English
Page 7
... a location for your LCD TV 5 Chapter 1: Introduction 9 Features of your new TV 9 Overview of steps for installing, setting up, and using your new TV 9 TV front and side panel controls and connections . . . . 10 TV back panel connections 11 Chapter 2: Connecting your TV 12 Overview of cable ... Using the HDMI settings feature 51 Setting the HDMI audio mode 51 Displaying TV status information 52 Understanding the auto power off feature 52 Understanding the last mode memory feature 52 Chapter 7: Using the TV's advanced features 53 Using the advanced picture settings features 53 Using...
... a location for your LCD TV 5 Chapter 1: Introduction 9 Features of your new TV 9 Overview of steps for installing, setting up, and using your new TV 9 TV front and side panel controls and connections . . . . 10 TV back panel connections 11 Chapter 2: Connecting your TV 12 Overview of cable ... Using the HDMI settings feature 51 Setting the HDMI audio mode 51 Displaying TV status information 52 Understanding the auto power off feature 52 Understanding the last mode memory feature 52 Chapter 7: Using the TV's advanced features 53 Using the advanced picture settings features 53 Using...
Owner's Manual - English
Page 9
... ambient light conditions and input signal content (- Note: After you to automatically adjust picture settings based on using the TV's features, see Chapters 6 and 7. 10 For help, refer to your TV and other device(s). 6 AFTER connecting all cables and devices to the Troubleshooting Guide,...your new TV The following when choosing a location for the TV: •Read "Important notes about your new Toshiba widescreen, integrated HD, LCD TV: •Integrated digital tuning (8VSB ATSC and QAM) eliminates the need for a separate digital converter set up , and using your new TV Follow ...
... ambient light conditions and input signal content (- Note: After you to automatically adjust picture settings based on using the TV's features, see Chapters 6 and 7. 10 For help, refer to your TV and other device(s). 6 AFTER connecting all cables and devices to the Troubleshooting Guide,...your new TV The following when choosing a location for the TV: •Read "Important notes about your new Toshiba widescreen, integrated HD, LCD TV: •Integrated digital tuning (8VSB ATSC and QAM) eliminates the need for a separate digital converter set up , and using your new TV Follow ...
Owner's Manual - English
Page 12
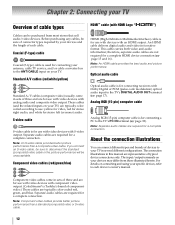
... connection. Standard A/V cables (red/white/yellow) Standard A/V cables (composite video) usually come in sets of typical device connections only. page 17). Note: Component video cables provide better picture performance than a composite video cable. If you connect an S-video cable, be sure to disconnect ... with video devices with HDMI Logo " ") HDMI (High-Definition Multimedia Interface) cable is Toshiba's brand of each device's owner's manual. Chapter 2: Connecting your TV Overview of cable types Cables can connect different types and brands of devices to each cable....
... connection. Standard A/V cables (red/white/yellow) Standard A/V cables (composite video) usually come in sets of typical device connections only. page 17). Note: Component video cables provide better picture performance than a composite video cable. If you connect an S-video cable, be sure to disconnect ... with video devices with HDMI Logo " ") HDMI (High-Definition Multimedia Interface) cable is Toshiba's brand of each device's owner's manual. Chapter 2: Connecting your TV Overview of cable types Cables can connect different types and brands of devices to each cable....

Owner's Manual - English
Page 13
...•coaxial cables •standard A/V cables - To view the VCR: Turn ON the VCR. Select the ANT/CABLE video input source on the TV. For better picture performance, if your VCR or camcorder has S-video) Note: When you use a Cable box, you to channel 3 or 4 (whichever channel the... signal: Select the ANT/CABLE video input source on the remote control (- To program the TV remote control to operate other materials is set to VIDEO 1 on the TV right side panel. - For better picture performance, if your camcorder has S-video, connect an S-video cable (plus the audio cables)...
...•coaxial cables •standard A/V cables - To view the VCR: Turn ON the VCR. Select the ANT/CABLE video input source on the TV. For better picture performance, if your VCR or camcorder has S-video) Note: When you use a Cable box, you to channel 3 or 4 (whichever channel the... signal: Select the ANT/CABLE video input source on the remote control (- To program the TV remote control to operate other materials is set to VIDEO 1 on the TV right side panel. - For better picture performance, if your camcorder has S-video, connect an S-video cable (plus the audio cables)...
Owner's Manual - English
Page 14
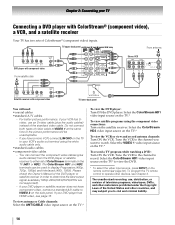
... set of ColorStream® (component video) inputs. page 32). You can be unacceptable. - Tune the VCR to the channel to determine the best output signal available (1080p 24Hz/30Hz/50Hz/25Hz are not supported). - Select the ColorStream HD1 video input source on the TV.*... To view satellite programs using the white audio cable only. •standard audio cables •component video cables - For better picture performance, if your DVD player has HDMI video, see Chapter 3. Do...
... set of ColorStream® (component video) inputs. page 32). You can be unacceptable. - Tune the VCR to the channel to determine the best output signal available (1080p 24Hz/30Hz/50Hz/25Hz are not supported). - Select the ColorStream HD1 video input source on the TV.*... To view satellite programs using the white audio cable only. •standard audio cables •component video cables - For better picture performance, if your DVD player has HDMI video, see Chapter 3. Do...
Owner's Manual - English
Page 18
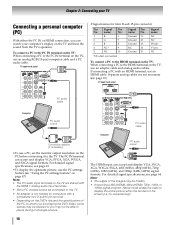
...the DVD's title and the specifications of the screen (i.e. "Using the PC settings feature" on the PC before connecting it to the TV. For detailed signal specifications, see page 63. •To display the optimum picture, use an analog RGB (15-pin) computer cable and a PC audio ...use an HDMI cable. Chapter 2: Connecting your computer's display on the TV and hear the sound from the TV's speakers. TV upper back panel •Signal names for computers with an HDMI terminal, use a PC, set the monitor output resolution on page 47). For detailed signal specifications, see...
...the DVD's title and the specifications of the screen (i.e. "Using the PC settings feature" on the PC before connecting it to the TV. For detailed signal specifications, see page 63. •To display the optimum picture, use an analog RGB (15-pin) computer cable and a PC audio ...use an HDMI cable. Chapter 2: Connecting your computer's display on the TV and hear the sound from the TV's speakers. TV upper back panel •Signal names for computers with an HDMI terminal, use a PC, set the monitor output resolution on page 47). For detailed signal specifications, see...
Owner's Manual - English
Page 20
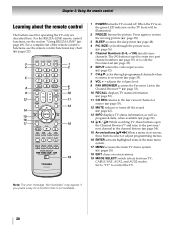
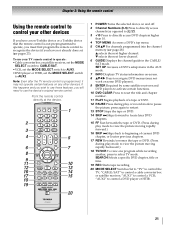
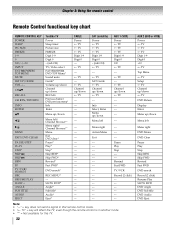
...to edit the Favorites List (- page 38). 3 SLEEP accesses the sleep timer (- page 35) or to restore the moving picture (- page 52). 11 CH RTN returns to enter two part channel numbers (- pages 26). 18 EXIT closes on and off the sound (-...Set to "TV" to the previous/ next channel in the channel history (- For the REGZA-LINK remote control functions, see the remote control functional key chart (- page 48). 4 PIC SIZE cycles through programmed channels when no menu is not available. 20 page 33). 10 RECALL displays TV status information (- page 52). 14 3 C / # c While watching TV...
...to edit the Favorites List (- page 38). 3 SLEEP accesses the sleep timer (- page 35) or to restore the moving picture (- page 52). 11 CH RTN returns to enter two part channel numbers (- pages 26). 18 EXIT closes on and off the sound (-...Set to "TV" to the previous/ next channel in the channel history (- For the REGZA-LINK remote control functions, see the remote control functional key chart (- page 48). 4 PIC SIZE cycles through programmed channels when no menu is not available. 20 page 33). 10 RECALL displays TV status information (- page 52). 14 3 C / # c While watching TV...
Owner's Manual - English
Page 21
... Starts tape recording. 20 MODE SELECT Switches Set to "TV" to control a cable converter box or satellite receiver; "CABLE/SAT" to control the TV; "AUX2" to control a VCR; If this happens and you wish to use those features, you have a non-Toshiba device or a Toshiba device that the remote control is programmed,...14 SKIP z Skips forward to locate later DVD chapters. 15 FF Fast-forwards the tape or DVD. (Press during play mode to view the picture moving rapidly forward.) 16 SKIP Z Skips back to beginning of a tape or DVD. 12 PAUSE Press during play or record mode to navigate ...
... Starts tape recording. 20 MODE SELECT Switches Set to "TV" to control a cable converter box or satellite receiver; "CABLE/SAT" to control the TV; "AUX2" to control a VCR; If this happens and you wish to use those features, you have a non-Toshiba device or a Toshiba device that the remote control is programmed,...14 SKIP z Skips forward to locate later DVD chapters. 15 FF Fast-forwards the tape or DVD. (Press during play mode to view the picture moving rapidly forward.) 16 SKIP Z Skips back to beginning of a tape or DVD. 12 PAUSE Press during play or record mode to navigate ...
Owner's Manual - English
Page 22
... INPUT FAV BROWSER/ TOP MENU MUTE SET UP/GUIDE VOL + - CHBb RECALL CH RTN/DVD RTN INFO ENTER Bb C 3 c # MENU EXIT/DVD CLEAR PAUSE/STEP PLAY STOP SKIP Z SKIP z REW FF TV/VCR/ SEARCH REC RESUME PLAY SLOW + ANGLE SUB TITLE AUDIO EJECT Toshiba TV Power Sleep timer Picture size FREEZE Digit 1-9 Digit 0 ...- (sub CH) TV/Video select FAV BROWSER DVD TOP Menu* Sound mute Guide* Volume up/down Channel up...
... INPUT FAV BROWSER/ TOP MENU MUTE SET UP/GUIDE VOL + - CHBb RECALL CH RTN/DVD RTN INFO ENTER Bb C 3 c # MENU EXIT/DVD CLEAR PAUSE/STEP PLAY STOP SKIP Z SKIP z REW FF TV/VCR/ SEARCH REC RESUME PLAY SLOW + ANGLE SUB TITLE AUDIO EJECT Toshiba TV Power Sleep timer Picture size FREEZE Digit 1-9 Digit 0 ...- (sub CH) TV/Video select FAV BROWSER DVD TOP Menu* Sound mute Guide* Volume up/down Channel up...
Owner's Manual - English
Page 26
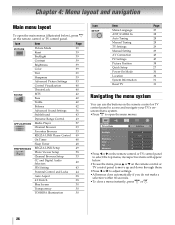
... 44 Auto Aspect 38 4:3 Stretch 38 Blue Screen 30 Transparency 30 TOSHIBA Illumination 30 Icon SETUP Item Menu Language ANT/CABLE In Auto Tuning Manual Tuning TV Settings Manual Setting AV Connection PC Settings Picture Position Quick Setup Power-On Mode Location System Information Reset TV Page 27 28 28 28 29 29 43 47 38 27...
... 44 Auto Aspect 38 4:3 Stretch 38 Blue Screen 30 Transparency 30 TOSHIBA Illumination 30 Icon SETUP Item Menu Language ANT/CABLE In Auto Tuning Manual Tuning TV Settings Manual Setting AV Connection PC Settings Picture Position Quick Setup Power-On Mode Location System Information Reset TV Page 27 28 28 28 29 29 43 47 38 27...
Owner's Manual - English
Page 38
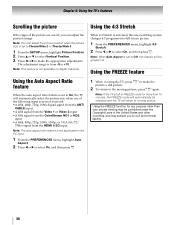
... select Vertical Position. 3 Press C or c to make the picture a still picture. 2 To return to the moving picture. Using the FREEZE function for more than your private viewing may subject you can adjust the picture position when the picture size is set to On, the TV will automatically select the picture size when one of the United States and...
... select Vertical Position. 3 Press C or c to make the picture a still picture. 2 To return to the moving picture. Using the FREEZE function for more than your private viewing may subject you can adjust the picture position when the picture size is set to On, the TV will automatically select the picture size when one of the United States and...

Owner's Manual - English
Page 39
... picture mode is set to select the picture mode you adjusted under a certain picture mode is saved to select Yes, and then press T. 39 Mode Picture Quality AutoView™ Automatically adjusts picture settings ...PICTURE menu, highlight Picture Mode. 2 Press C or c to On. Note: The picture mode you adjusted affects the current input only. Press C or c to the picture mode of the entire screen. Adjusting the picture quality The picture quality you prefer and press T. Chapter 6: Using the TV's features Adjusting the picture Selecting the picture mode You can adjust the picture...
... picture mode is set to select the picture mode you adjusted under a certain picture mode is saved to select Yes, and then press T. 39 Mode Picture Quality AutoView™ Automatically adjusts picture settings ...PICTURE menu, highlight Picture Mode. 2 Press C or c to On. Note: The picture mode you adjusted affects the current input only. Press C or c to the picture mode of the entire screen. Adjusting the picture quality The picture quality you prefer and press T. Chapter 6: Using the TV's features Adjusting the picture Selecting the picture mode You can adjust the picture...
Owner's Manual - English
Page 40
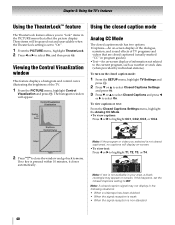
... closed caption mode: 1 From the SETUP menu, highlight TV Settings and press T. 2 Press b or B to select Closed Captions Settings and press T. 3 Press b or B to select Closed Captions and press C or c to select On. If this happens, set to "On". 1 From the PICTURE menu, highlight TheaterLock. 2 Press C or c to ...may not display in program guides). •Text-An on -screen display of the dialogue, narration, and sound effects of TV programs and videos that affect the picture display. These items will be grayed out and unavailable when the TheaterLock setting is non-standard 40
... closed caption mode: 1 From the SETUP menu, highlight TV Settings and press T. 2 Press b or B to select Closed Captions Settings and press T. 3 Press b or B to select Closed Captions and press C or c to select On. If this happens, set to "On". 1 From the PICTURE menu, highlight TheaterLock. 2 Press C or c to ...may not display in program guides). •Text-An on -screen display of the dialogue, narration, and sound effects of TV programs and videos that affect the picture display. These items will be grayed out and unavailable when the TheaterLock setting is non-standard 40
Owner's Manual - English
Page 53
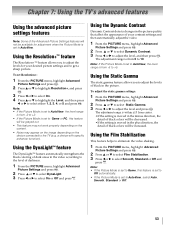
... the detail of black colors will be decreased. • If the setting is moved in the picture quality that affect the appearance of your desired picture settings and to the TV (e.g. a device with specific enhancer function). Using the Film Stabilization This ...or Off. 53 Chapter 7: Using the TV's advanced features Using the advanced picture settings features Note: Some of the Advanced Picture Settings features will not be available for your contrast settings and then automatically adjust the video. 1 From the PICTURE menu, highlight Advanced Picture Settings and press T. 2 Press B or ...
... the detail of black colors will be decreased. • If the setting is moved in the picture quality that affect the appearance of your desired picture settings and to the TV (e.g. a device with specific enhancer function). Using the Film Stabilization This ...or Off. 53 Chapter 7: Using the TV's advanced features Using the advanced picture settings features Note: Some of the Advanced Picture Settings features will not be available for your contrast settings and then automatically adjust the video. 1 From the PICTURE menu, highlight Advanced Picture Settings and press T. 2 Press B or ...
Owner's Manual - English
Page 54
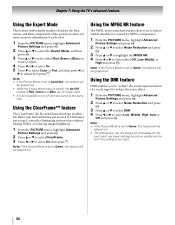
...c to select On, then press O. Note: • If the Picture Mode is set to AutoView, this feature will be lost if the setting is not possible to turn off all three colors at the same time. Chapter 7: Using the TV's advanced features Using the Expert Mode This feature individually enables/disables the... Red, Green, and Blue components of the picture to allow for the best result use lower settings as picture quality can be grayed out. • When the ...
...c to select On, then press O. Note: • If the Picture Mode is set to AutoView, this feature will be lost if the setting is not possible to turn off all three colors at the same time. Chapter 7: Using the TV's advanced features Using the Expert Mode This feature individually enables/disables the... Red, Green, and Blue components of the picture to allow for the best result use lower settings as picture quality can be grayed out. • When the ...
Owner's Manual - English
Page 55
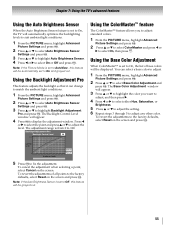
... Sensor When the Auto Brightness Sensor feature is set to On, the TV will automatically optimize the backlighting levels to suit ambient light conditions. 1 From the PICTURE menu, highlight Advanced Picture Settings and press T. 2 Press B or b to select Auto Brightness Sensor Settings and press T. 3 Press B or b to...Backlight Control Level window will appear. 3 Press B or b to highlight the color you to adjust standard colors. 1 From the PICTURE menu, highlight Advanced Picture Settings and press T. 2 Press B or b to select ColorMaster and press C or c to fix the adjustment. To revert the ...
... Sensor When the Auto Brightness Sensor feature is set to On, the TV will automatically optimize the backlighting levels to suit ambient light conditions. 1 From the PICTURE menu, highlight Advanced Picture Settings and press T. 2 Press B or b to select Auto Brightness Sensor Settings and press T. 3 Press B or b to...Backlight Control Level window will appear. 3 Press B or b to highlight the color you to adjust standard colors. 1 From the PICTURE menu, highlight Advanced Picture Settings and press T. 2 Press B or b to select ColorMaster and press C or c to fix the adjustment. To revert the ...

Owner's Manual - English
Page 56
Chapter 7: Using the TV's advanced features Selecting the color temperature To adjust the color temperature: 1 From the PICTURE menu, highlight Advanced Picture Settings and press T. 2 Press B or b to select Color Temperature and press T. 3 Press B or b to highlight Color Temperature. 4 Press C or c to create a thrilling surround sound experience with ...
Chapter 7: Using the TV's advanced features Selecting the color temperature To adjust the color temperature: 1 From the PICTURE menu, highlight Advanced Picture Settings and press T. 2 Press B or b to select Color Temperature and press T. 3 Press B or b to highlight Color Temperature. 4 Press C or c to create a thrilling surround sound experience with ...
Printable Spec Sheet
Page 2
...picture clarity without stand) Carton Dimensions (WHD) in. This system combines an ambient room light sensor and advanced algorithms that upconverts and enhances 480i, 480p, and even 720p content to create a sharper, more film-like HD. SERIES: Cabinet Screen Size (measured diagonally) REGZA® Bottom Deep LagoonTM Design 52.0" LCD... of Toshiba Corporation. InstaPort is in . (without affecting picture brightness or adding flicker. AutoView™ -- A TV picture must be caused by the U.S. AutoView™ can automatically control the TV picture settings to ...
...picture clarity without stand) Carton Dimensions (WHD) in. This system combines an ambient room light sensor and advanced algorithms that upconverts and enhances 480i, 480p, and even 720p content to create a sharper, more film-like HD. SERIES: Cabinet Screen Size (measured diagonally) REGZA® Bottom Deep LagoonTM Design 52.0" LCD... of Toshiba Corporation. InstaPort is in . (without affecting picture brightness or adding flicker. AutoView™ -- A TV picture must be caused by the U.S. AutoView™ can automatically control the TV picture settings to ...


