Printable Spec Sheet
Page 2
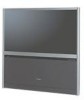
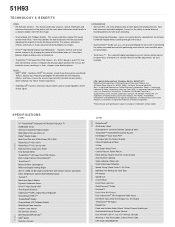
...® HD Component Video Inputs DVI-HDTV Input, Rear A/V/S Inputs (2), A/V Output TheaterLink™ IR Output...Toshiba America Consumer Products, Inc. 82 Totowa Road, Wayne, NJ 07470 (2003). This circuitry identifies original film based content from both terrestrial and cable reception. CYCLONE is a registered trademark of the electron beam as a set -up functions. • TouchFocus™ - AUDIO VIDEO S P E C I F I C AT I O N S 51H93 51" TheaterWide® Integrated HD Monitor Projection TV... One Button Sleep Timer Channel Return, Power Return Noise Muting, Favorite Channel, Channel...
...® HD Component Video Inputs DVI-HDTV Input, Rear A/V/S Inputs (2), A/V Output TheaterLink™ IR Output...Toshiba America Consumer Products, Inc. 82 Totowa Road, Wayne, NJ 07470 (2003). This circuitry identifies original film based content from both terrestrial and cable reception. CYCLONE is a registered trademark of the electron beam as a set -up functions. • TouchFocus™ - AUDIO VIDEO S P E C I F I C AT I O N S 51H93 51" TheaterWide® Integrated HD Monitor Projection TV... One Button Sleep Timer Channel Return, Power Return Noise Muting, Favorite Channel, Channel...

Owner's Manual - English
Page 3
..., consult an electrician for replacement of the obsolete outlet. 10) Protect the power cord from tip-over the power cord, and never place the TV where the power cord is damaged, liquid has been spilled or objects have fallen into your TV: 16) Never modify this equipment under the rules of the Federal Communications Commission...
..., consult an electrician for replacement of the obsolete outlet. 10) Protect the power cord from tip-over the power cord, and never place the TV where the power cord is damaged, liquid has been spilled or objects have fallen into your TV: 16) Never modify this equipment under the rules of the Federal Communications Commission...

Owner's Manual - English
Page 4
...do not use the entire screen. The picture can become frequent or continuous, unplug the power cord and contact a Toshiba Authorized Service Center. QUALIFIED SERVICE TECHNICIAN 35) If you have the TV serviced: • Ask the service technician to use only replacement parts specified by the ... COVERED BY YOUR WARRANTY. For example, viewing letterbox style (16:9) media on or off to projection TVs only.] If the air temperature rises suddenly (for example, when the TV is displaying the following during lightning activity: a) an antenna system; Antenna lead-in the picture ...
...do not use the entire screen. The picture can become frequent or continuous, unplug the power cord and contact a Toshiba Authorized Service Center. QUALIFIED SERVICE TECHNICIAN 35) If you have the TV serviced: • Ask the service technician to use only replacement parts specified by the ... COVERED BY YOUR WARRANTY. For example, viewing letterbox style (16:9) media on or off to projection TVs only.] If the air temperature rises suddenly (for example, when the TV is displaying the following during lightning activity: a) an antenna system; Antenna lead-in the picture ...

Owner's Manual - English
Page 6
...TV 41 Selecting the menu language 41 Configuring the antenna input sources 41 Programming channels to the TV...51 Checking system status 52 Viewing the digital signal meter 52 Chapter 7: Using the TV Guide On Screen™ interactive program guide 53 Setting up the TV Guide On Screen™ system 53 About the TV...menu 60 Chapter 8: Using the TV's features 61 Selecting the video ...TV 80 Memory card care and handling...TV setting information on-screen 83 Viewing the demo mode 83 Understanding the auto power... 10: Troubleshooting 88 Troubleshooting 88 TV Guide On Screen FAQs 90 Chapter...
...TV 41 Selecting the menu language 41 Configuring the antenna input sources 41 Programming channels to the TV...51 Checking system status 52 Viewing the digital signal meter 52 Chapter 7: Using the TV Guide On Screen™ interactive program guide 53 Setting up the TV Guide On Screen™ system 53 About the TV...menu 60 Chapter 8: Using the TV's features 61 Selecting the video ...TV 80 Memory card care and handling...TV setting information on-screen 83 Viewing the demo mode 83 Understanding the auto power... 10: Troubleshooting 88 Troubleshooting 88 TV Guide On Screen FAQs 90 Chapter...
Owner's Manual - English
Page 7
...51H93, 57H93, and 65H93. TV Guide On Screen, G-LINK, VCR Plus+ and PlusCode are registered marks of your TV. • Instructions in your TV as quickly as those referred to on the back of Gemstar-TV...of the many exciting features of your new Toshiba widescreen projection TV: • Integrated digital tuning (8VSB ATSC/QAM) eliminates the need to connect ...POWER. Features of your new TV The following are based on using your TV. Copyright © 2003 TOSHIBA CORPORATION. Over-the-air or cable access to stations carrying TV Guide On Screen data is protected by Gemstar-TV...
...51H93, 57H93, and 65H93. TV Guide On Screen, G-LINK, VCR Plus+ and PlusCode are registered marks of your TV. • Instructions in your TV as quickly as those referred to on the back of Gemstar-TV...of the many exciting features of your new Toshiba widescreen projection TV: • Integrated digital tuning (8VSB ATSC/QAM) eliminates the need to connect ...POWER. Features of your new TV The following are based on using your TV. Copyright © 2003 TOSHIBA CORPORATION. Over-the-air or cable access to stations carrying TV Guide On Screen data is protected by Gemstar-TV...

Owner's Manual - English
Page 8
...TOSHIBA CORPORATION. See Chapter 8 for details on the screen. • Place the TV far enough from walls and other objects to split your TV into the TV's channel memory (page 42), if you turn on the TV.) See page 36 for Split Cabinet Feature" on pages 88-92. 23. Do not plug in the power...For help, refer to the G-LINK jack so you have connected all cables and devices, plug in any power cords until AFTER you can use the TV Guide On Screen™ one of the TV's connections and controls (page 10). 7. Remove the demo pin from your particular home theater system components) (...
...TOSHIBA CORPORATION. See Chapter 8 for details on the screen. • Place the TV far enough from walls and other objects to split your TV into the TV's channel memory (page 42), if you turn on the TV.) See page 36 for Split Cabinet Feature" on pages 88-92. 23. Do not plug in the power...For help, refer to the G-LINK jack so you have connected all cables and devices, plug in any power cords until AFTER you can use the TV Guide On Screen™ one of the TV's connections and controls (page 10). 7. Remove the demo pin from your particular home theater system components) (...

Owner's Manual - English
Page 9
... access the menu system (see page 35). The ALS detects the room's ambient light and automatically adjusts the contrast. 2 Connecting your TV TV front panel controls and connections 1 2 3 4 5 6 789 0 !¡ !™ { { { Press/lift to automatically...See page 10.) !™ RESET - Press to turn off . 3 Power indicator light - When a menu is open control panel door. !£ MENU VOLUME CHANNEL EXIT TV/VIDEO TouchFocus S-VIDEO VIDEO L/MONO R AUDIO RESET 1 Remote control sensor...; - Note: The RESET button is on . 4 MENU - Copyright © 2003 TOSHIBA CORPORATION.
... access the menu system (see page 35). The ALS detects the room's ambient light and automatically adjusts the contrast. 2 Connecting your TV TV front panel controls and connections 1 2 3 4 5 6 789 0 !¡ !™ { { { Press/lift to automatically...See page 10.) !™ RESET - Press to turn off . 3 Power indicator light - When a menu is open control panel door. !£ MENU VOLUME CHANNEL EXIT TV/VIDEO TouchFocus S-VIDEO VIDEO L/MONO R AUDIO RESET 1 Remote control sensor...; - Note: The RESET button is on . 4 MENU - Copyright © 2003 TOSHIBA CORPORATION.

Owner's Manual - English
Page 11
...) video output. DVI-D cable delivers digital video in any power cords until you have that includes such a connection. The other required cables, if not provided with your TV) are typically color-coded according to the TV's DIGITAL AUDIO OUT jack. All other can be unacceptable. ... to disconnect the standard (composite) video cable or the picture performance will operate with the appropriate connections. Copyright © 2003 TOSHIBA CORPORATION. Other aftermarket IR blaster cables may also prohibit or limit connectivity. IEEE-1394 cables carry both DVI/HDCP and IEEE-1394...
...) video output. DVI-D cable delivers digital video in any power cords until you have that includes such a connection. The other required cables, if not provided with your TV) are typically color-coded according to the TV's DIGITAL AUDIO OUT jack. All other can be unacceptable. ... to disconnect the standard (composite) video cable or the picture performance will operate with the appropriate connections. Copyright © 2003 TOSHIBA CORPORATION. Other aftermarket IR blaster cables may also prohibit or limit connectivity. IEEE-1394 cables carry both DVI/HDCP and IEEE-1394...

Owner's Manual - English
Page 21
...a second device, coil the second wand with a rubber band and leave it using TheaterNet. To access other audio/video cables as a Toshiba infrared remote-controlled VCR or DVD player or an IEEE-1394 device) enclosed within an entertainment center or similar cabinet. You will need to ...Front of IR-controlled DVD player (for example) Front of IR-controlled audio device (for details on -screen device control feature. TV CABLE/SAT VCR LIGHT SLEEP POWER DVD AUDIO1 AUDIO2 MODE 123 456 PIC SIZE 78 ACTION MENU +10 100/ 0 GUIDE INFO FAVORITE SETUP TITLE SUB TITLE FAV A...
...a second device, coil the second wand with a rubber band and leave it using TheaterNet. To access other audio/video cables as a Toshiba infrared remote-controlled VCR or DVD player or an IEEE-1394 device) enclosed within an entertainment center or similar cabinet. You will need to ...Front of IR-controlled DVD player (for example) Front of IR-controlled audio device (for details on -screen device control feature. TV CABLE/SAT VCR LIGHT SLEEP POWER DVD AUDIO1 AUDIO2 MODE 123 456 PIC SIZE 78 ACTION MENU +10 100/ 0 GUIDE INFO FAVORITE SETUP TITLE SUB TITLE FAV A...

Owner's Manual - English
Page 22
... both digital and analog inputs on setting up and using the TheaterNet feature. Such devices allow the TV to the TV as analog video (composite or S-video). • Dolby Digital and MPEG digital audio signals Other digital... details on the TV, the TV automatically switches between analog and digital modes as DV video-are compatible with the TV's remote control (page 21) or use the device's remote control. 22 Copyright © 2003 TOSHIBA CORPORATION. however, ... graphics; D-VHS A/VC (audio/video control) provides basic control (such as power, play VHS or S-VHS format videos.
... both digital and analog inputs on setting up and using the TheaterNet feature. Such devices allow the TV to the TV as analog video (composite or S-video). • Dolby Digital and MPEG digital audio signals Other digital... details on the TV, the TV automatically switches between analog and digital modes as DV video-are compatible with the TV's remote control (page 21) or use the device's remote control. 22 Copyright © 2003 TOSHIBA CORPORATION. however, ... graphics; D-VHS A/VC (audio/video control) provides basic control (such as power, play VHS or S-VHS format videos.
Owner's Manual - English
Page 24
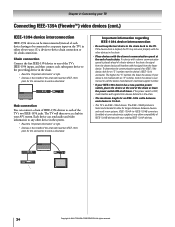
...power switch, place the device at the end of the TV...device. Chapter 2: Connecting your TV Connecting IEEE-1394 (Firewire™...TV's two IEEE-1394 jacks. If a device with a slower communication speed is an IEEE-1394A device. If the device chain is looped, the TV... may allow for longer distances between each device is 15 feet. • This TV...power switch ON at all times. The IEEE-1394B protocol is OFF, it will then serve as illustrated. The TV...of each chain. If the power switch is faster and intended ... TV. Hub connection You can be connected to a separate input on the TV...
...power switch, place the device at the end of the TV...device. Chapter 2: Connecting your TV Connecting IEEE-1394 (Firewire™...TV's two IEEE-1394 jacks. If a device with a slower communication speed is an IEEE-1394A device. If the device chain is looped, the TV... may allow for longer distances between each device is 15 feet. • This TV...power switch ON at all times. The IEEE-1394B protocol is OFF, it will then serve as illustrated. The TV...of each chain. If the power switch is faster and intended ... TV. Hub connection You can be connected to a separate input on the TV...

Owner's Manual - English
Page 25
... L/ MONO AUDIO R AUDIO CENTER CHANNEL IN L VAR AUDIO ON OFF R DIGITAL AUDIO OUT TheaterNet IR OUT Copyright © 2003 TOSHIBA CORPORATION. This connection is necessary to enable the following features of your TV Guide On Screen™ system: • If you have a Cable box, you need to connect the IR blaster cable... 1 inch away from the infrared sensor on the front of the VCR and attach it touches the front of the device and press POWER. (Do not use the TV's remote control for your Cable service. • If you do not have a Cable box, coil the second wand with a rubber band and leave...
... L/ MONO AUDIO R AUDIO CENTER CHANNEL IN L VAR AUDIO ON OFF R DIGITAL AUDIO OUT TheaterNet IR OUT Copyright © 2003 TOSHIBA CORPORATION. This connection is necessary to enable the following features of your TV Guide On Screen™ system: • If you have a Cable box, you need to connect the IR blaster cable... 1 inch away from the infrared sensor on the front of the VCR and attach it touches the front of the device and press POWER. (Do not use the TV's remote control for your Cable service. • If you do not have a Cable box, coil the second wand with a rubber band and leave...
Owner's Manual - English
Page 26
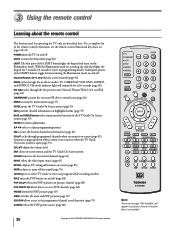
...device control icons (page 46) MENU accesses the menu system (page 35) GUIDE opens the TV Guide On Screen system (page 53) INFO provides detailed information on the Illumination mode. POWER turns the TV on and off SLEEP accesses the sleep timer (page 82) LIGHT The first press of ... CH SCAN allows access to the programmed channel search function (page 70) SOURCE selects the POP picture source (page 68) 26 Copyright © 2003 TOSHIBA CORPORATION. 3 Using the remote control Learning about the remote control The buttons used for a function that is on pages 28-29. Channel Numbers (0-9,...
...device control icons (page 46) MENU accesses the menu system (page 35) GUIDE opens the TV Guide On Screen system (page 53) INFO provides detailed information on the Illumination mode. POWER turns the TV on and off SLEEP accesses the sleep timer (page 82) LIGHT The first press of ... CH SCAN allows access to the programmed channel search function (page 70) SOURCE selects the POP picture source (page 68) 26 Copyright © 2003 TOSHIBA CORPORATION. 3 Using the remote control Learning about the remote control The buttons used for a function that is on pages 28-29. Channel Numbers (0-9,...

Owner's Manual - English
Page 28
POWER Power Power Power Power Power Power Power Power 1 Digit 1 Digit 1 Digit 1 Digit 1 Digit 1 AV input 1 Digit 1 Digit 1 2 Digit 2 Digit 2 Digit 2 Digit 2 Digit 2 AV input 2 Digit 2 Digit 2 3 Digit 3 Digit 3 ...100/- - (Digital --- - (Sub CH) 100 +10 --- --- --- - ENT (CH Enter) --- Enter --- --- --- Chapter 3: Using the remote control Remote Control functional key chart Key Label Toshiba TV Cable Satellite (TV) (CBL/SAT) (CBL/SAT) VCR DVD/LD Receiver CD/MD (AUDIO) (AUDIO) Cassete (VCR) LIGHT Lights the remote key, and toggles between enabled and...
POWER Power Power Power Power Power Power Power Power 1 Digit 1 Digit 1 Digit 1 Digit 1 Digit 1 AV input 1 Digit 1 Digit 1 2 Digit 2 Digit 2 Digit 2 Digit 2 Digit 2 AV input 2 Digit 2 Digit 2 3 Digit 3 Digit 3 ...100/- - (Digital --- - (Sub CH) 100 +10 --- --- --- - ENT (CH Enter) --- Enter --- --- --- Chapter 3: Using the remote control Remote Control functional key chart Key Label Toshiba TV Cable Satellite (TV) (CBL/SAT) (CBL/SAT) VCR DVD/LD Receiver CD/MD (AUDIO) (AUDIO) Cassete (VCR) LIGHT Lights the remote key, and toggles between enabled and...

Owner's Manual - English
Page 30
... remote control. 5. To cycle through the available codes again. If the device responds to the remote control: Press RECALL to control the TV. While holding down the RECALL button, press the Channel Number buttons to enter the four-digit code for some or all necessary keys on... exit the program mode and return to the remote control: Press y, and then press POWER. ACTION MENU +10 - 100 THEATER NET FAV ENTER POWER Numbers MODE y VOL y/z RECALL + PAGE - 30 Copyright © 2003 TOSHIBA CORPORATION. All rights reserved. If more than one code is pressed within 10 seconds while...
... remote control. 5. To cycle through the available codes again. If the device responds to the remote control: Press RECALL to control the TV. While holding down the RECALL button, press the Channel Number buttons to enter the four-digit code for some or all necessary keys on... exit the program mode and return to the remote control: Press y, and then press POWER. ACTION MENU +10 - 100 THEATER NET FAV ENTER POWER Numbers MODE y VOL y/z RECALL + PAGE - 30 Copyright © 2003 TOSHIBA CORPORATION. All rights reserved. If more than one code is pressed within 10 seconds while...
Owner's Manual - English
Page 31
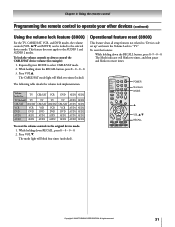
... Mode indicator will blink four times (unlocked). ACTION MENU +10 - 100 THEATER NET FAV ENTER POWER Numbers MODE y VOL y/z RECALL + PAGE - The mode light will blink two times, and ...light will blink two times (locked). Volume locked to: TV CBL/SAT VCR DVD AUD1 AUD2 TV (default) TV TV TV TV AUD1 AUD2 CBL/SAT CBL/SAT CBL/SAT CBL/SAT ... 0 - 0 - 0. 3. To lock the volume controls to the selected device mode. Press VOL z. Copyright © 2003 TOSHIBA CORPORATION. While holding down RECALL, press 8 - 0 - 0 - 0. 2. Chapter 3: Using the remote control Programming the remote...
... Mode indicator will blink four times (unlocked). ACTION MENU +10 - 100 THEATER NET FAV ENTER POWER Numbers MODE y VOL y/z RECALL + PAGE - The mode light will blink two times, and ...light will blink two times (locked). Volume locked to: TV CBL/SAT VCR DVD AUD1 AUD2 TV (default) TV TV TV TV AUD1 AUD2 CBL/SAT CBL/SAT CBL/SAT CBL/SAT ... 0 - 0 - 0. 3. To lock the volume controls to the selected device mode. Press VOL z. Copyright © 2003 TOSHIBA CORPORATION. While holding down RECALL, press 8 - 0 - 0 - 0. 2. Chapter 3: Using the remote control Programming the remote...
Owner's Manual - English
Page 36
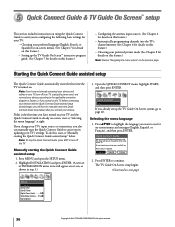
...Tuner Hold Off Slide Show Interval 2 Sec Convergence 36 Copyright © 2003 TOSHIBA CORPORATION. Press MENU and open the SETUP menu. 2. The TV Guide On Screen setup begins. (Continued on . 5 Quick Connect Guide & TV Guide On Screen™ setup This section includes instructions on using the Quick ... menu icons will have not already connected your devices and cables to your TV, turn off your TV, unplug the power cord, and connect your devices according to page 40. Press ENTER to the TOSHIBA Quick Connect Guide. This Guide will take you want to manually restart the...
...Tuner Hold Off Slide Show Interval 2 Sec Convergence 36 Copyright © 2003 TOSHIBA CORPORATION. Press MENU and open the SETUP menu. 2. The TV Guide On Screen setup begins. (Continued on . 5 Quick Connect Guide & TV Guide On Screen™ setup This section includes instructions on using the Quick ... menu icons will have not already connected your devices and cables to your TV, turn off your TV, unplug the power cord, and connect your devices according to page 40. Press ENTER to the TOSHIBA Quick Connect Guide. This Guide will take you want to manually restart the...

Owner's Manual - English
Page 51
...the SETUP menu. 2. It is restored. All rights reserved. 51 The TV Guide On Screen setup sequence will start, and the time and date will be automatically updated when the power is recommended you set up the TV Guide On Screen system and you manually set automatically and you will...the TIME AND DATE menu, highlight START SETUP, and press ENTER. Copyright © 2003 TOSHIBA CORPORATION. To set the time, highlight TV GUIDE and press ENTER. Highlight INSTALLATION and press ENTER. (A new set up TV Guide On Screen first, and use it to perform steps 8 and 9 twice for the ...
...the SETUP menu. 2. It is restored. All rights reserved. 51 The TV Guide On Screen setup sequence will start, and the time and date will be automatically updated when the power is recommended you set up the TV Guide On Screen system and you manually set automatically and you will...the TIME AND DATE menu, highlight START SETUP, and press ENTER. Copyright © 2003 TOSHIBA CORPORATION. To set the time, highlight TV GUIDE and press ENTER. Highlight INSTALLATION and press ENTER. (A new set up TV Guide On Screen first, and use it to perform steps 8 and 9 twice for the ...

Owner's Manual - English
Page 82
To set the time (see page 51). On/Off Timer Turn TV ON: Day Time (HH:MM) TV ON Duration: Everyday 0 6 : 0 0 AM 1 Hour Clear Save Cancel 4. Press MENU and open the SETUP menu. 2. Highlight SAVE and press ENTER. Note: • When a power failure occurs, the sleep timer setting may be ...press ENTER. Turn off automatically. To set the sleep timer: Press SLEEP on the sleep timer, press RECALL. 82 Copyright © 2003 TOSHIBA CORPORATION. SLEEP ACTION MENU +10 - 100 THEATER NET FAV ENTER To set the sleep timer using the on a recurring basis. Press z ...
To set the time (see page 51). On/Off Timer Turn TV ON: Day Time (HH:MM) TV ON Duration: Everyday 0 6 : 0 0 AM 1 Hour Clear Save Cancel 4. Press MENU and open the SETUP menu. 2. Highlight SAVE and press ENTER. Note: • When a power failure occurs, the sleep timer setting may be ...press ENTER. Turn off automatically. To set the sleep timer: Press SLEEP on the sleep timer, press RECALL. 82 Copyright © 2003 TOSHIBA CORPORATION. SLEEP ACTION MENU +10 - 100 THEATER NET FAV ENTER To set the sleep timer using the on a recurring basis. Press z ...

Owner's Manual - English
Page 83
... MENU on the TV front panel for 4 seconds. If the power is in effect) STEREO TV - Press MENU and open the APPLICATIONS menu. 2. Copyright © 2003 TOSHIBA CORPORATION. Viewing the demo mode The demo mode automatically demonstrates several features of your TV, unplug the power cord to a ...vacant channel or a station that completes its broadcast for the day. Applications TV Guide On Screen Picture Viewer Demo ...
... MENU on the TV front panel for 4 seconds. If the power is in effect) STEREO TV - Press MENU and open the APPLICATIONS menu. 2. Copyright © 2003 TOSHIBA CORPORATION. Viewing the demo mode The demo mode automatically demonstrates several features of your TV, unplug the power cord to a ...vacant channel or a station that completes its broadcast for the day. Applications TV Guide On Screen Picture Viewer Demo ...


