User Guide
Page 11
... HDMI® CEC connection 29 Connecting a computer 30 Connection to the TV's HDMI® terminal 30 Chapter 3: Using the Remote Control 32 Installing batteries 32 Remote control effective range 33 Learning about the remote control 34 Chapter 4: Menu Layout and Navigation 37 Main menu layout 37 Navigating the menu system 39 Chapter 5: Setting...
... HDMI® CEC connection 29 Connecting a computer 30 Connection to the TV's HDMI® terminal 30 Chapter 3: Using the Remote Control 32 Installing batteries 32 Remote control effective range 33 Learning about the remote control 34 Chapter 4: Menu Layout and Navigation 37 Main menu layout 37 Navigating the menu system 39 Chapter 5: Setting...
User Guide
Page 14
... Sensor 93 DynaLightTM 93 Dynamic Contrast 93 Cinema Mode 93 Noise Reduction 94 Chapter 8: Troubleshooting 96 General troubleshooting 96 Picture problems 97 Sound problems 98 Remote control problems 99 Channel tuning problems 99 Closed caption problems 100 Rating blocking (V-Chip) problems 100 No HDMI® CEC operation 100 HDMI® problems...
... Sensor 93 DynaLightTM 93 Dynamic Contrast 93 Cinema Mode 93 Noise Reduction 94 Chapter 8: Troubleshooting 96 General troubleshooting 96 Picture problems 97 Sound problems 98 Remote control problems 99 Channel tuning problems 99 Closed caption problems 100 Rating blocking (V-Chip) problems 100 No HDMI® CEC operation 100 HDMI® problems...
User Guide
Page 17
...-Allows you to view photo files and play music files, see "Cinema Mode" on page 93 v DynaLightTM-Backlight control monitors the brightness of your new Toshiba wide screen, integrated HD LED TV: v Integrated digital tuning (8VSB ATSC and QAM) - Eliminates the need for a separate digital converter set-top box (in most.... This technology is ideal for clean, crystal-clear images, see "DNR" on page 94 v HDMI® CEC-Allows control of external devices from the TV remote via HDMI® connection, see "Using HDMI® CEC" on page 78 v ENERGY STAR® qualified
...-Allows you to view photo files and play music files, see "Cinema Mode" on page 93 v DynaLightTM-Backlight control monitors the brightness of your new Toshiba wide screen, integrated HD LED TV: v Integrated digital tuning (8VSB ATSC and QAM) - Eliminates the need for a separate digital converter set-top box (in most.... This technology is ideal for clean, crystal-clear images, see "DNR" on page 94 v HDMI® CEC-Allows control of external devices from the TV remote via HDMI® connection, see "Using HDMI® CEC" on page 78 v ENERGY STAR® qualified

User Guide
Page 18
...functions of the TV's connections and controls, see "Overview of cable types" on page 21 5 Connect your other immovable structure, see 26) on the remote control. 8 After connecting all cables and devices, connect the power cord to the TV and plug in any power cords until after you cannot turn...information. v Place the TV in and try again. 9 See "Navigating the menu system" on page 39 for the TV: v Read "Important notes about the remote control" on page 34 for an overview of the buttons on page 5. Keep this document for future reference. 2 To choose a location for a quick overview of...
...functions of the TV's connections and controls, see "Overview of cable types" on page 21 5 Connect your other immovable structure, see 26) on the remote control. 8 After connecting all cables and devices, connect the power cord to the TV and plug in any power cords until after you cannot turn...information. v Place the TV in and try again. 9 See "Navigating the menu system" on page 39 for the TV: v Read "Important notes about the remote control" on page 34 for an overview of the buttons on page 5. Keep this document for future reference. 2 To choose a location for a quick overview of...

User Guide
Page 19
... channel up or down. • In Source mode, the buttons toggle the input from one source to optimize the backlighting levels. 2 Remote sensor (embedded)-Point the remote control toward this remote sensor. 3 POWER-Turns the TV On/Off. If the TV stops responding to the buttons on the... remote control or TV control panel and you are viewing, depending on page 106 TV front and side panel controls and connections Left side panel TV front 3 TV top 4 5 6 1 7 2 (Sample Illustration) 50L1450U - 19 Introduction TV front and side panel controls...
... channel up or down. • In Source mode, the buttons toggle the input from one source to optimize the backlighting levels. 2 Remote sensor (embedded)-Point the remote control toward this remote sensor. 3 POWER-Turns the TV On/Off. If the TV stops responding to the buttons on the... remote control or TV control panel and you are viewing, depending on page 106 TV front and side panel controls and connections Left side panel TV front 3 TV top 4 5 6 1 7 2 (Sample Illustration) 50L1450U - 19 Introduction TV front and side panel controls...

User Guide
Page 24
...dish Y PB PR AUDIO OUT L Satellite COMPONENT VIDEO S-VIDEO VIDEO R IN OUT OUT Satellite receiver, Blu-rayTM or DVD player (Sample Illustration) 50L1450U-Connecting a Blu-ray™ /DVD player or Satellite receiver with ColorstreamTM (or VCR). Connecting a Blu-ray™ / DVD player, satellite ... or camcorder video. Select VIDEO input source on the TV.* *To select the video input source, press the INPUT button on the remote control, see "Selecting the video input source" on page 47 The unauthorized recording, use, distribution, or revision of television programs, videotapes...
...dish Y PB PR AUDIO OUT L Satellite COMPONENT VIDEO S-VIDEO VIDEO R IN OUT OUT Satellite receiver, Blu-rayTM or DVD player (Sample Illustration) 50L1450U-Connecting a Blu-ray™ /DVD player or Satellite receiver with ColorstreamTM (or VCR). Connecting a Blu-ray™ / DVD player, satellite ... or camcorder video. Select VIDEO input source on the TV.* *To select the video input source, press the INPUT button on the remote control, see "Selecting the video input source" on page 47 The unauthorized recording, use, distribution, or revision of television programs, videotapes...

User Guide
Page 26
... ConnectingYourTV Connecting an HDMI® or DVI device to the HDMI® input *To select the video input source, press the INPUT button on the remote control, see "Connection to the TV's HDMI® terminal" on page 30 To connect an HDMI® device, you to civil and criminal liability. The...
... ConnectingYourTV Connecting an HDMI® or DVI device to the HDMI® input *To select the video input source, press the INPUT button on the remote control, see "Connection to the TV's HDMI® terminal" on page 30 To connect an HDMI® device, you to civil and criminal liability. The...
User Guide
Page 27
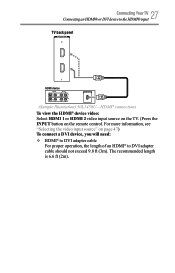
27 Connecting Your TV Connecting an HDMI® or DVI device to the HDMI® input TV back panel HDMI device (Sample Illustration) 50L1450U-HDMI® connections To view the HDMI® device video: Select HDMI 1 or HDMI 2 video input source on the TV. (Press the INPUT button on ... DVI adapter cable should not exceed 9.8 ft (3m). The recommended length is 6.6 ft (2m). For more information, see "Selecting the video input source" on the remote control.
27 Connecting Your TV Connecting an HDMI® or DVI device to the HDMI® input TV back panel HDMI device (Sample Illustration) 50L1450U-HDMI® connections To view the HDMI® device video: Select HDMI 1 or HDMI 2 video input source on the TV. (Press the INPUT button on ... DVI adapter cable should not exceed 9.8 ft (3m). The recommended length is 6.6 ft (2m). For more information, see "Selecting the video input source" on the remote control.
User Guide
Page 29
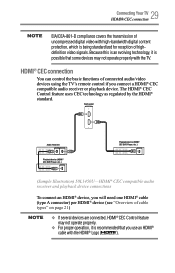
... panel Audio Receiver Playback device (HDMI® CEC DVD Player, etc.) Playback device (HDMI® CEC DVD Player, etc.) (Sample Illustration) 50L1450U-HDMI® CEC compatible audio receiver and playback device connections To connect an HDMI® device, you connect a HDMI® CEC compatible audio ...receiver or playback device. HDMI® CEC connection You can control the basic functions of connected audio/video devices using the TV's remote control if you will need one HDMI® cable (type A connector) per HDMI® device (see "Overview of cable types" on ...
... panel Audio Receiver Playback device (HDMI® CEC DVD Player, etc.) Playback device (HDMI® CEC DVD Player, etc.) (Sample Illustration) 50L1450U-HDMI® CEC compatible audio receiver and playback device connections To connect an HDMI® device, you connect a HDMI® CEC compatible audio ...receiver or playback device. HDMI® CEC connection You can control the basic functions of connected audio/video devices using the TV's remote control if you will need one HDMI® cable (type A connector) per HDMI® device (see "Overview of cable types" on ...

User Guide
Page 32
Chapter 3 Using the Remote Control Installing batteries To install batteries : 1 Remove the battery cover from the back of the remote control. Do not expose batteries to the (+) and (-) markings on the battery compartment. (Sample Illustration) Installing the batteries 3 Replace the battery cover. Squeeze tab and lift cover (Sample Illustration) Removing the remote back cover 2 Insert two AAA batteries, corresponding to excessive heat such as sunshine, fire, etc. 32
Chapter 3 Using the Remote Control Installing batteries To install batteries : 1 Remove the battery cover from the back of the remote control. Do not expose batteries to the (+) and (-) markings on the battery compartment. (Sample Illustration) Installing the batteries 3 Replace the battery cover. Squeeze tab and lift cover (Sample Illustration) Removing the remote back cover 2 Insert two AAA batteries, corresponding to excessive heat such as sunshine, fire, etc. 32

User Guide
Page 33
...range is no obstruction between the remote control and the TV. 16.4 ft (5m) (Sample Illustration) Remote control effective range v Always replace both batteries with new ones. This prevents battery acid from the remote if they are dead or if the remote control is not to use new...for an extended period of time. v Always consider the environment when disposing of batteries in a designated disposal area. Remote control effective range For optimum performance, aim the remote control directly at the TV and make sure there is reduced, replace the batteries. v Always remove batteries from ...
...range is no obstruction between the remote control and the TV. 16.4 ft (5m) (Sample Illustration) Remote control effective range v Always replace both batteries with new ones. This prevents battery acid from the remote if they are dead or if the remote control is not to use new...for an extended period of time. v Always consider the environment when disposing of batteries in a designated disposal area. Remote control effective range For optimum performance, aim the remote control directly at the TV and make sure there is reduced, replace the batteries. v Always remove batteries from ...

User Guide
Page 34
For the HDMI® CEC remote control functions, see "HDMI® CEC playback device (Blu-rayTTMMPlPalyaeyre/rD/DVVDDplpalyaeyre,re,tect.c).c)ocnotnrtorlo"l"onon page 85 (Sample Illustration) Remote control overview The error message "NOT AVAILABLE" may appear if you press a button for operating the TV are described below. 34 UsingtheRemoteControl Learning about the remote control Learning about the remote control The buttons used for a function that is not available.
For the HDMI® CEC remote control functions, see "HDMI® CEC playback device (Blu-rayTTMMPlPalyaeyre/rD/DVVDDplpalyaeyre,re,tect.c).c)ocnotnrtorlo"l"onon page 85 (Sample Illustration) Remote control overview The error message "NOT AVAILABLE" may appear if you press a button for operating the TV are described below. 34 UsingtheRemoteControl Learning about the remote control Learning about the remote control The buttons used for a function that is not available.

User Guide
Page 35
... Favorites List, see "Favorites browser" on page 51 8 The FAV button accesses the Favorites List in the main menu system. 35 Using the Remote Control Learning about the remote control 1 The POWER button turns the TV On/Off. When the TV is on, the power LED indicator on the TV front glows...
... Favorites List, see "Favorites browser" on page 51 8 The FAV button accesses the Favorites List in the main menu system. 35 Using the Remote Control Learning about the remote control 1 The POWER button turns the TV On/Off. When the TV is on, the power LED indicator on the TV front glows...

User Guide
Page 36
... playback device. (Press during play mode to view the picture moving rapidly backward.). See "Using HDMI® CEC" on -screen. 36 UsingtheRemoteControl Learning about the remote control 17 The CH RTN button returns to the last viewed channel or source, see "Switching between two channels using the Channel Browser" on page... 39. The following key functions allow you to pause the picture; Press during play or record mode to control Toshiba HDMI® CEC compatible devices via HDMI® connection.
... playback device. (Press during play mode to view the picture moving rapidly backward.). See "Using HDMI® CEC" on -screen. 36 UsingtheRemoteControl Learning about the remote control 17 The CH RTN button returns to the last viewed channel or source, see "Switching between two channels using the Channel Browser" on page... 39. The following key functions allow you to pause the picture; Press during play or record mode to control Toshiba HDMI® CEC compatible devices via HDMI® connection.

User Guide
Page 37
... the TV is set to Store in the initial menu or Store in the Home Mode. To open the menus (illustrated below and on the remote control. Reverts to Store Mode at initial setup. NOTE When the TV is set will always reset to Store Picture Mode. Chapter 4 Menu Layout and...
... the TV is set to Store in the initial menu or Store in the Home Mode. To open the menus (illustrated below and on the remote control. Reverts to Store Mode at initial setup. NOTE When the TV is set will always reset to Store Picture Mode. Chapter 4 Menu Layout and...

User Guide
Page 39
The menu background may sometimes appear black, depending on the remote control to move in the corresponding direction in the menu. 4 All menus close automatically if you do not make a selection within approximately 60 seconds. 5 To ... a menu is receiving. Navigating the menu system You can use the arrow) buttons on the signal the TV is open, use the buttons on the remote control to Store mode. Icon Get Help Item System Information Auto Demo 39 Menu Layout and Navigation Navigating the menu system Option Opens the System...
The menu background may sometimes appear black, depending on the remote control to move in the corresponding direction in the menu. 4 All menus close automatically if you do not make a selection within approximately 60 seconds. 5 To ... a menu is receiving. Navigating the menu system You can use the arrow) buttons on the signal the TV is open, use the buttons on the remote control to Store mode. Icon Get Help Item System Information Auto Demo 39 Menu Layout and Navigation Navigating the menu system Option Opens the System...
User Guide
Page 42
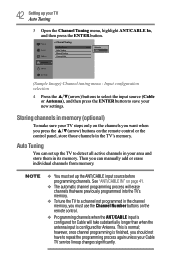
... is finished, you should not have to detect all active channels in the channel memory, you press the ▲/▼(arrow) buttons on the remote control or the control panel, store those channels in the TV's memory. v To tune the TV to save your area and store them in... memory (optional) To make sure your Cable TV service lineup changes significantly. Storing channels in its memory. See "ANT/CABLE IN" on the remote control. 42 SettingupyourTV Auto Tuning 3 Open the Channel Tuning menu, highlight ANT/CABLE In, and then press the ENTER button. (Sample Image) Channel tuning...
... is finished, you should not have to detect all active channels in the channel memory, you press the ▲/▼(arrow) buttons on the remote control or the control panel, store those channels in the TV's memory. v To tune the TV to save your area and store them in... memory (optional) To make sure your Cable TV service lineup changes significantly. Storing channels in its memory. See "ANT/CABLE IN" on the remote control. 42 SettingupyourTV Auto Tuning 3 Open the Channel Tuning menu, highlight ANT/CABLE In, and then press the ENTER button. (Sample Image) Channel tuning...

User Guide
Page 43
... The TV will automatically cycle through the channels, the message "Scanning channels, please wait" appears. 5 To cancel channel programming, press the EXIT button on the remote control or highlight Cancel in the channel memory. While the TV is complete, press the CH / (arrow) buttons to begin channel programming. ! Cable Scanning channels...
... The TV will automatically cycle through the channels, the message "Scanning channels, please wait" appears. 5 To cancel channel programming, press the EXIT button on the remote control or highlight Cancel in the channel memory. While the TV is complete, press the CH / (arrow) buttons to begin channel programming. ! Cable Scanning channels...

User Guide
Page 44
Type: Description: ATV Analog channel. To remove the check, press the ENTER button again. A check will appear. 4 Use buttons 0-9 on the remote control to enter the channel number (for example, 56) 5 Press the ENTER button to start Manual Tuning. The list of channels appears. (Sample Illustration) Channel ...
Type: Description: ATV Analog channel. To remove the check, press the ENTER button again. A check will appear. 4 Use buttons 0-9 on the remote control to enter the channel number (for example, 56) 5 Press the ENTER button to start Manual Tuning. The list of channels appears. (Sample Illustration) Channel ...

User Guide
Page 45
... up your TV. however, they cannot be unchecked. Setting the AV input mode This setting determines the configuration of the shared AV input on the remote control to save your region. Add the following descriptions: To set the AV Input mode: 1 From Options menu, highlight Input Options, and then press the... will be added to the list and the box will be tuned until you to remove the check. For information, see "Locking channels" on the remote control. This feature allows the TV status information to select the region, and then press the ENTER button.
... up your TV. however, they cannot be unchecked. Setting the AV input mode This setting determines the configuration of the shared AV input on the remote control to save your region. Add the following descriptions: To set the AV Input mode: 1 From Options menu, highlight Input Options, and then press the... will be added to the list and the box will be tuned until you to remove the check. For information, see "Locking channels" on the remote control. This feature allows the TV status information to select the region, and then press the ENTER button.


