
User Manual
Page 8
... Information • Manufactured under the following copyright. Bitstream Vera is a trademark of HDMI Licensing LLC in the United States and other countries. • MPEG Layer-3 audio coding technology licensed from Fraunhofer IIS and Thomson. • This production contains Bitstream Vera Sans fonts under license from Dolby Laboratories. Dolby and the double...
... Information • Manufactured under the following copyright. Bitstream Vera is a trademark of HDMI Licensing LLC in the United States and other countries. • MPEG Layer-3 audio coding technology licensed from Fraunhofer IIS and Thomson. • This production contains Bitstream Vera Sans fonts under license from Dolby Laboratories. Dolby and the double...
User Manual
Page 9
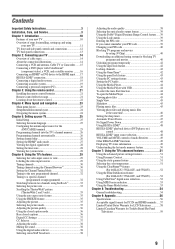
...174; or DVI device to the HDMI input........17 REGZA-LINK® connection 18 Connecting a digital audio system 19 Connecting an audio system 19 Connecting a personal computer (PC 20 Chapter 3: Using the remote control 21 Installing the ...51 Selecting the color temperature 51 Using the ClearFrame™ feature (For 46SL412U, 55SL412U, and 55S41U 52 Using the Film Stabilization feature (For 46SL412U, 55SL412U, and 55S41U 52 Using CableClear® digital noise reduction 52 Using...Warranty for LCD Televisions 58 Limited Canadian Warranty for Toshiba Brand Flat Panel Televisions 59 9
...174; or DVI device to the HDMI input........17 REGZA-LINK® connection 18 Connecting a digital audio system 19 Connecting an audio system 19 Connecting a personal computer (PC 20 Chapter 3: Using the remote control 21 Installing the ...51 Selecting the color temperature 51 Using the ClearFrame™ feature (For 46SL412U, 55SL412U, and 55S41U 52 Using the Film Stabilization feature (For 46SL412U, 55SL412U, and 55S41U 52 Using CableClear® digital noise reduction 52 Using...Warranty for LCD Televisions 58 Limited Canadian Warranty for Toshiba Brand Flat Panel Televisions 59 9
User Manual
Page 10
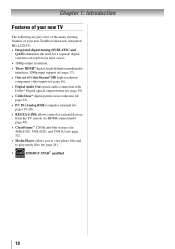
...TV The following are just a few of the many exciting features of your new Toshiba widescreen, integrated HD, LCD TV: • Integrated digital tuning (8VSB ATSC ... set of ColorStream® HD high-resolution component video inputs ( page 16). • Digital Audio Out optical audio connection with Dolby® Digital optical output format ( page 39). • CableClear® digital... via HDMI connection( page 48). • ClearFrame™ 120 Hz anti-blur feature (for 46SL412U, 55SL412U, and 55S41U) ( page 52). • Media Player allows you to view photo files...
...TV The following are just a few of the many exciting features of your new Toshiba widescreen, integrated HD, LCD TV: • Integrated digital tuning (8VSB ATSC ... set of ColorStream® HD high-resolution component video inputs ( page 16). • Digital Audio Out optical audio connection with Dolby® Digital optical output format ( page 39). • CableClear® digital... via HDMI connection( page 48). • ClearFrame™ 120 Hz anti-blur feature (for 46SL412U, 55SL412U, and 55S41U) ( page 52). • Media Player allows you to view photo files...
User Manual
Page 13
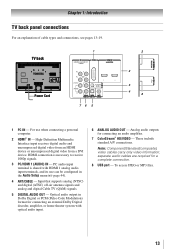
...(ATSC) off-air antenna signals and analog and digital Cable TV (QAM) signals. 5無 DIGITAL AUDIO OUT - High-Definition Multimedia Interface input receives digital audio and uncompressed digital video from an HDMI device or uncompressed digital video from a DVI device. Chapter 1:... 3 4 8 1無 PC IN - These include standard A/V connections. HDMI connection is shared with optical audio input. 6無 ANALOG AUDIO OUT - To access JPEG or MP3 files. 13 separate audio cables are required for a complete connection. 8無 USB port - For use can be configured in Dolby ...
...(ATSC) off-air antenna signals and analog and digital Cable TV (QAM) signals. 5無 DIGITAL AUDIO OUT - High-Definition Multimedia Interface input receives digital audio and uncompressed digital video from an HDMI device or uncompressed digital video from a DVI device. Chapter 1:... 3 4 8 1無 PC IN - These include standard A/V connections. HDMI connection is shared with optical audio input. 6無 ANALOG AUDIO OUT - To access JPEG or MP3 files. 13 separate audio cables are required for a complete connection. 8無 USB port - For use can be configured in Dolby ...
User Manual
Page 14
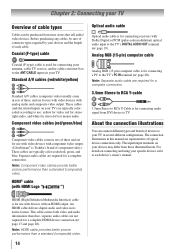
...ANT/CABLE input on connecting and using your specific devices, refer to the TV's DIGITAL AUDIO OUT terminal ( page 19). Analog RGB (15-pin) computer cable Analog RGB (15-pin) computer cable is Toshiba's brand of three and are for a complete HDMI device connection ( page 17... and page 20). For details on your TV. therefore, separate audio cables are typically color-coded red, green, and blue. HDMI (High-...
...ANT/CABLE input on connecting and using your specific devices, refer to the TV's DIGITAL AUDIO OUT terminal ( page 19). Analog RGB (15-pin) computer cable Analog RGB (15-pin) computer cable is Toshiba's brand of three and are for a complete HDMI device connection ( page 17... and page 20). For details on your TV. therefore, separate audio cables are typically color-coded red, green, and blue. HDMI (High-...
User Manual
Page 15
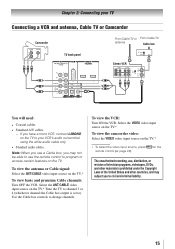
... remote control to program or access certain features on the TV to your TV Connecting a VCR and antenna, Cable TV or Camcorder Camcorder AUDIO OUT L R VIDEO TV back panel From Cable TV or From Cable TV antenna Cable box IN CH 3 CH 4 OUT Stereo VCR VIDEO...15 on the TV.* ** To select the video input source, press remote control ( page 22). Chapter 2: Connecting your VCR's audio out terminal using the white audio cable only. • Standard audio cables. Note: When you use a Cable box, you may not be able to use , distribution, or revision of television programs,...
... remote control to program or access certain features on the TV to your TV Connecting a VCR and antenna, Cable TV or Camcorder Camcorder AUDIO OUT L R VIDEO TV back panel From Cable TV or From Cable TV antenna Cable box IN CH 3 CH 4 OUT Stereo VCR VIDEO...15 on the TV.* ** To select the video input source, press remote control ( page 22). Chapter 2: Connecting your VCR's audio out terminal using the white audio cable only. • Standard audio cables. Note: When you use a Cable box, you may not be able to use , distribution, or revision of television programs,...
User Manual
Page 16
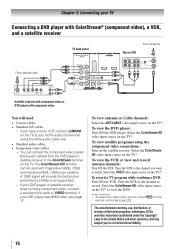
...Connecting a DVD player with ColorStream® (component video), a VCR, and a satellite receiver From satellite dish TV back panel From antenna Stereo VCR VIDEO AUDIO L R IN CH 3 CH 4 OUT L R IN from the DVD player or satellite receiver to the ColorStream terminal on the TV. Tune the ...control ( page 22). Select the ColorStream HD video input source on the TV.* To view satellite programs using the white audio cable only. • Standard audio cables • Component video cables −− You can be used with component video You will provide the best picture ...
...Connecting a DVD player with ColorStream® (component video), a VCR, and a satellite receiver From satellite dish TV back panel From antenna Stereo VCR VIDEO AUDIO L R IN CH 3 CH 4 OUT L R IN from the DVD player or satellite receiver to the ColorStream terminal on the TV. Tune the ...control ( page 22). Select the ColorStream HD video input source on the TV.* To view satellite programs using the white audio cable only. • Standard audio cables • Component video cables −− You can be used with component video You will provide the best picture ...

User Manual
Page 17
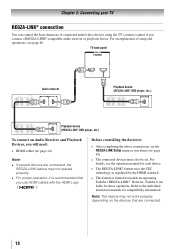
... technology, it is recommended that some devices may not work properly. −− HDMI cable transfers both video and audio. For detailed signal specifications, see page 20. Supported Audio format: Linear PCM, sampling rate 32/44.1/ 48 kHz Note: To connect a PC to the HDMI input, see...electronic components, turn on the TV first, and then the HDMI or DVI device. •• When turning off your TV receives digital audio and uncompressed digital video from an HDMI source device, or uncompressed digital video from EIA/CEA-861-Dcompliant[1] consumer electronic devices (such as ...
... technology, it is recommended that some devices may not work properly. −− HDMI cable transfers both video and audio. For detailed signal specifications, see page 20. Supported Audio format: Linear PCM, sampling rate 32/44.1/ 48 kHz Note: To connect a PC to the HDMI input, see...electronic components, turn on the TV first, and then the HDMI or DVI device. •• When turning off your TV receives digital audio and uncompressed digital video from an HDMI source device, or uncompressed digital video from EIA/CEA-861-Dcompliant[1] consumer electronic devices (such as ...
User Manual
Page 18
... uses the CEC technology as you connect a REGZA-LINK® compatible audio receiver or playback device. Before controlling the device(s): • After completing the above connections, set . Refer to models incorporating Toshiba's REGZA-LINK®. Chapter 2: Connecting your TV REGZA-LINK®...setup and operations, see the operation manual for compatibility information. For details, see page 48. However, Toshiba is recommended that are connected. 18 TV back panel Audio receiver Playback device (REGZA-LINK® DVD player, etc.) Playback device (REGZA-LINK® DVD ...
... uses the CEC technology as you connect a REGZA-LINK® compatible audio receiver or playback device. Before controlling the device(s): • After completing the above connections, set . Refer to models incorporating Toshiba's REGZA-LINK®. Chapter 2: Connecting your TV REGZA-LINK®...setup and operations, see the operation manual for compatibility information. For details, see page 48. However, Toshiba is recommended that are connected. 18 TV back panel Audio receiver Playback device (REGZA-LINK® DVD player, etc.) Playback device (REGZA-LINK® DVD ...
User Manual
Page 19
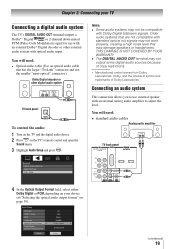
...TosLink" connector and not the smaller "mini-optical" connector.) Dolby Digital decoder or other external audio system with optical audio input. You will need : •• standard audio cables Analog audio amplifier LINE IN LR TV back panel 4無 In the Optical Output Format field, select either... Dolby Digital or PCM, depending on your TV Connecting a digital audio system The TV's DIGITAL AUDIO OUT terminal outputs a Dolby® * Digital or 2-channel down-mixed PCM (Pulse-Code Modulation) signal for use external ...
...TosLink" connector and not the smaller "mini-optical" connector.) Dolby Digital decoder or other external audio system with optical audio input. You will need : •• standard audio cables Analog audio amplifier LINE IN LR TV back panel 4無 In the Optical Output Format field, select either... Dolby Digital or PCM, depending on your TV Connecting a digital audio system The TV's DIGITAL AUDIO OUT terminal outputs a Dolby® * Digital or 2-channel down-mixed PCM (Pulse-Code Modulation) signal for use external ...
User Manual
Page 20
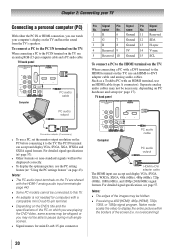
... TV: When connecting a PC with an HDMI terminal, use an HDMI cable (type A connector). no overscanning). 20 TV back panel Computer PC audio cable PC audio output Pin Signal No. Chapter 2: Connecting your computer's display on page 43). TV back panel Conversion adapter (if necessary) • To use...PC on which you are shared with the HDMI-1 analog audio input terminals ( page 44). •• Some PC models cannot be skipped or you can accept and display VGA, SVGA, XGA, WXGA and SXGA signal formats. Such as a Toshiba PC with a DVI terminal to this TV. •...
... TV: When connecting a PC with an HDMI terminal, use an HDMI cable (type A connector). no overscanning). 20 TV back panel Computer PC audio cable PC audio output Pin Signal No. Chapter 2: Connecting your computer's display on page 43). TV back panel Conversion adapter (if necessary) • To use...PC on which you are shared with the HDMI-1 analog audio input terminals ( page 44). •• Some PC models cannot be skipped or you can accept and display VGA, SVGA, XGA, WXGA and SXGA signal formats. Such as a Toshiba PC with a DVI terminal to this TV. •...
User Manual
Page 23
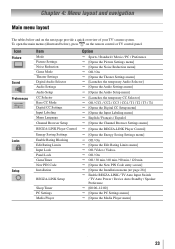
... system. Icon Picture Sound Preferences Locks Setup Item Mode Picture Settings Noise Reduction Game Mode Theater Settings Digital Audio Selector Audio Settings Audio Setup CC Selector Base CC Mode Digital CC Settings Input Labeling Menu Language Channel Browser Setup REGZA-LINK Player... [Opens the Noise Reduction menu] Off / On [Opens the Theater Settings menu] [Launches the temporary Audio Selector] [Opens the Audio Settings menu] [Opens the Audio Setup menu] [Launches the temporary CC Selector] Off / CC1 / CC2 / CC3 / CC4 / T1 /...
... system. Icon Picture Sound Preferences Locks Setup Item Mode Picture Settings Noise Reduction Game Mode Theater Settings Digital Audio Selector Audio Settings Audio Setup CC Selector Base CC Mode Digital CC Settings Input Labeling Menu Language Channel Browser Setup REGZA-LINK Player... [Opens the Noise Reduction menu] Off / On [Opens the Theater Settings menu] [Launches the temporary Audio Selector] [Opens the Audio Settings menu] [Opens the Audio Setup menu] [Launches the temporary CC Selector] Off / CC1 / CC2 / CC3 / CC4 / T1 /...
User Manual
Page 27
.... If the channel is accidentally added to remove the unnecessary channel from the HDMI input will be output. To remove encrypted channels from the PC Audio input will be accessed using the number keys on page 44.) 27 To add a channel to the channel memory: Highlight the checked box next to... the channel number you tune to an encrypted channel, the following message will appear. Analog When viewing the HDMI 1 input, analog audio from the channel memory: If an encrypted channel is not found , the number will be added to the list and the box will be output...
.... If the channel is accidentally added to remove the unnecessary channel from the HDMI input will be output. To remove encrypted channels from the PC Audio input will be accessed using the number keys on page 44.) 27 To add a channel to the channel memory: Highlight the checked box next to... the channel number you tune to an encrypted channel, the following message will appear. Analog When viewing the HDMI 1 input, analog audio from the channel memory: If an encrypted channel is not found , the number will be added to the list and the box will be output...
User Manual
Page 29
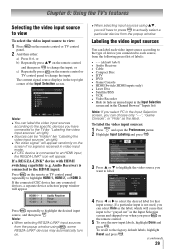
...highlight HDMI 1, HDMI 2, or HDMI 3. The current signal source displays in the top right corner of labels: • - - (default label) • Audio Receiver • Cable • Compact Disc • DTV • DVD • Game Console • HDMI Switch (HDMI inputs only) • Laser Disc...in the Input Selection screen, you can choose only "- -", "Game Console", or "Hide" as the label, which will appear. Video Audio Receiver Cable Compact Disc DTV Press repeatedly to change the input; If the connected CEC device has any connected devices, a separate device selection ...
...highlight HDMI 1, HDMI 2, or HDMI 3. The current signal source displays in the top right corner of labels: • - - (default label) • Audio Receiver • Cable • Compact Disc • DTV • DVD • Game Console • HDMI Switch (HDMI inputs only) • Laser Disc...in the Input Selection screen, you can choose only "- -", "Game Console", or "Hide" as the label, which will appear. Video Audio Receiver Cable Compact Disc DTV Press repeatedly to change the input; If the connected CEC device has any connected devices, a separate device selection ...

User Manual
Page 38
... you want to adjust (Bass, Treble, or Balance). 4無 Press or to reduce the noise. Note: If you to a second audio program on the item selected). (continued) Selecting stereo/SAP broadcasts The multi-channel TV sound (MTS) feature allows you modify items in Step 3 above , and... output high-fidelity stereo sound. To reset the settings to Off when you select "MUTE" mode, the closed caption modes. Using the digital audio selector You can be heard only on a digital channel (for those TV stations that have SAP on, you will see the current program on...
... you want to adjust (Bass, Treble, or Balance). 4無 Press or to reduce the noise. Note: If you to a second audio program on the item selected). (continued) Selecting stereo/SAP broadcasts The multi-channel TV sound (MTS) feature allows you modify items in Step 3 above , and... output high-fidelity stereo sound. To reset the settings to Off when you select "MUTE" mode, the closed caption modes. Using the digital audio selector You can be heard only on a digital channel (for those TV stations that have SAP on, you will see the current program on...
User Manual
Page 39
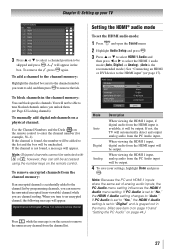
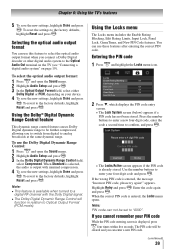
... is displayed, press four times within five seconds. If you connect a Dolby Digital decoder or other digital audio system to the Optical Audio Out terminal on the TV (see "Connecting a digital audio system" on your device. 4無 To save the new settings, highlight Done and press . To revert...to be further compressed, allowing you can use the Dolby Digital Dynamic Range Control: 1無 Press and open the Sound menu. 2無 Highlight Audio Setup and press . 3無 In the Optical Output Format field, select either Dolby Digital or PCM, depending on page 19). The PIN ...
... is displayed, press four times within five seconds. If you connect a Dolby Digital decoder or other digital audio system to the Optical Audio Out terminal on the TV (see "Connecting a digital audio system" on your device. 4無 To save the new settings, highlight Done and press . To revert...to be further compressed, allowing you can use the Dolby Digital Dynamic Range Control: 1無 Press and open the Sound menu. 2無 Highlight Audio Setup and press . 3無 In the Optical Output Format field, select either Dolby Digital or PCM, depending on page 19). The PIN ...
User Manual
Page 44
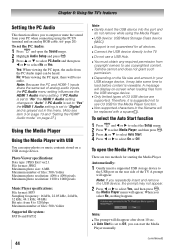
...input, there will appear. When you select No, nothing happens. Yes: When viewing the PC input, the audio from the USB storage device. ••Only limited types of the TV. Toshiba cannot and does not grant such permission. ••Depending on the file size and amount in the menu.... (Also see item 3 on page 13 and "Setting the HDMI® Audio mode" on a USB storage device. To select the Auto...
...input, there will appear. When you select No, nothing happens. Yes: When viewing the PC input, the audio from the USB storage device. ••Only limited types of the TV. Toshiba cannot and does not grant such permission. ••Depending on the file size and amount in the menu.... (Also see item 3 on page 13 and "Setting the HDMI® Audio mode" on a USB storage device. To select the Auto...

User Manual
Page 47
.... 3無 Press or to standby, a warning message will automatically turn itself off (after 15 minutes of analog channel (no signal detection.) • Only Audio L/R is detected. Note: When a power failure occurs, the sleep timer setting may be cleared. You can set the sleep timer to turn off the TV...
.... 3無 Press or to standby, a warning message will automatically turn itself off (after 15 minutes of analog channel (no signal detection.) • Only Audio L/R is detected. Note: When a power failure occurs, the sleep timer setting may be cleared. You can set the sleep timer to turn off the TV...
User Manual
Page 48
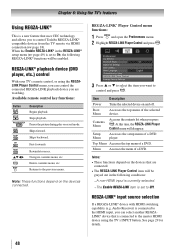
... you want to control and press . Setup Menu Accesses the setup menu of the selected device. Audio Receiver) is connected to the HDMI input, you can control the connected REGZA-LINK playback device you to control Toshiba REGZA-LINK® compatible devices from the TV remote via HDMI connection ( page 18...
... you want to control and press . Setup Menu Accesses the setup menu of the selected device. Audio Receiver) is connected to the HDMI input, you can control the connected REGZA-LINK playback device you to control Toshiba REGZA-LINK® compatible devices from the TV remote via HDMI connection ( page 18...
User Manual
Page 49
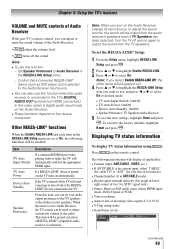
... : RECALL Press RECALL on automatically. The following functions will be output from the TV speakers. From this case, select a digital audio input mode on the Audio Receiver. ••These functions depend on the device connected. To set the REGZA-LINK® Setup: 1無 From the Setup... Auto Input Switch: On/Off • TV Auto Power: On/Off • Device Auto Standby: On/Off • Speaker Preference: TV Speakers/Audio Receiver 5無 To save the new settings, highlight Done and press . Note: When you select Enable REGZA-LINK Off, the other items will be...
... : RECALL Press RECALL on automatically. The following functions will be output from the TV speakers. From this case, select a digital audio input mode on the Audio Receiver. ••These functions depend on the device connected. To set the REGZA-LINK® Setup: 1無 From the Setup... Auto Input Switch: On/Off • TV Auto Power: On/Off • Device Auto Standby: On/Off • Speaker Preference: TV Speakers/Audio Receiver 5無 To save the new settings, highlight Done and press . Note: When you select Enable REGZA-LINK Off, the other items will be...


