
Owner's Manual - English
Page 7
... 3 Choosing a location for your LCD TV 5 Chapter 1: Introduction 9 Features of your new TV 9 Overview of steps for installing, setting up, and using your new TV 9 TV front and side panel controls and connections . . . . 10 TV back panel connections 11 Chapter 2: Connecting your TV 12 Overview of cable types 12...TOSHIBA Illumination mode 39 Selecting the Power-On Mode 40 Using Blue Screen 40 Setting the screen transparency 40 Viewing the system status 40 Reset Factory Defaults 40 Chapter 6: Using the TV's features 41 Selecting the video input source to view 41 Tuning channels 42...
... 3 Choosing a location for your LCD TV 5 Chapter 1: Introduction 9 Features of your new TV 9 Overview of steps for installing, setting up, and using your new TV 9 TV front and side panel controls and connections . . . . 10 TV back panel connections 11 Chapter 2: Connecting your TV 12 Overview of cable types 12...TOSHIBA Illumination mode 39 Selecting the Power-On Mode 40 Using Blue Screen 40 Setting the screen transparency 40 Viewing the system status 40 Reset Factory Defaults 40 Chapter 6: Using the TV's features 41 Selecting the video input source to view 41 Tuning channels 42...
Owner's Manual - English
Page 9
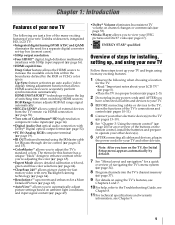
...changes or commercials (page 53). •Media Player allows you to increase the available colors bits within the boundaries defined by default. 7 See "Menu layout and navigation" for a quick overview of navigating the TV's menu system (- page 19). •IR OUT infrared terminal using your new Toshiba widescreen, integrated HD, LCD TV... STAR® qualified Overview of steps for fast motion video with 1080p input support (- page 49). •Dolby® Volume eliminates Inconsistent TV volume on the TV, the Initial Setup menu appears automatically by the RGB or YCbCr color space...
...changes or commercials (page 53). •Media Player allows you to increase the available colors bits within the boundaries defined by default. 7 See "Menu layout and navigation" for a quick overview of navigating the TV's menu system (- page 19). •IR OUT infrared terminal using your new Toshiba widescreen, integrated HD, LCD TV... STAR® qualified Overview of steps for fast motion video with 1080p input support (- page 49). •Dolby® Volume eliminates Inconsistent TV volume on the TV, the Initial Setup menu appears automatically by the RGB or YCbCr color space...
Owner's Manual - English
Page 10
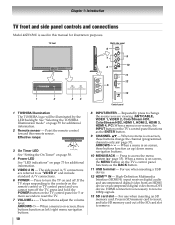
... side panel controls and connections Model 42ZV650U is used in SD memory card to insert, and take SD memory card out of the SD card slot to remove. Point the remote control toward this manual for 5 or more seconds to turn off . Press to reset the TV. 7 VOLUME+ - - When a ... panel 6 7 9 10 8 11 12 5 1 2 34 13 Control panel 1 TOSHIBA Illumination The TOSHIBA logo will be illuminated by the LED backlight. When no menu is on-screen, the INPUT button on -screen, these buttons change the source you cannot turn the TV on and off the TV, press and hold the POWER button on the...
... side panel controls and connections Model 42ZV650U is used in SD memory card to insert, and take SD memory card out of the SD card slot to remove. Point the remote control toward this manual for 5 or more seconds to turn off . Press to reset the TV. 7 VOLUME+ - - When a ... panel 6 7 9 10 8 11 12 5 1 2 34 13 Control panel 1 TOSHIBA Illumination The TOSHIBA logo will be illuminated by the LED backlight. When no menu is on-screen, the INPUT button on -screen, these buttons change the source you cannot turn the TV on and off the TV, press and hold the POWER button on the...

Owner's Manual - English
Page 13
...input source, press INPUT on the TV.* To view basic and premium Cable channels: Turn OFF the VCR. If you may subject you to VIDEO 1 on the TV back instead of the VIDEO 2 on the TV right side panel. - Do not connect both types of television programs, videotapes, DVDs, and other materials is set to change... time or the picture performance will need: •coaxial cables •standard A/V cables - Select the ANT/CABLE video input source on the TV.* Tune the TV to channel 3 or 4 (whichever channel the Cable box output is prohibited under the Copyright Laws of the standard video cable...
...input source, press INPUT on the TV.* To view basic and premium Cable channels: Turn OFF the VCR. If you may subject you to VIDEO 1 on the TV back instead of the VIDEO 2 on the TV right side panel. - Do not connect both types of television programs, videotapes, DVDs, and other materials is set to change... time or the picture performance will need: •coaxial cables •standard A/V cables - Select the ANT/CABLE video input source on the TV.* Tune the TV to channel 3 or 4 (whichever channel the Cable box output is prohibited under the Copyright Laws of the standard video cable...
Owner's Manual - English
Page 21
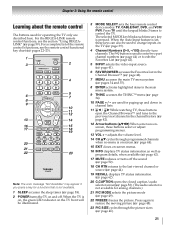
..." may appear if you press a key for analog channels.) 21 PIC MODE selects the picture mode (- The = button is used to change inputs on the TV (- pages 34 and 35). 8 ENTER activates highlighted items in the Channel Browser™ (- page 50). (The audio selector is not available...buttons select or adjust programming menus. 13 VOL + - When the Auto Input feature is pressed. page 39). 4 Channel Numbers (0-9, -/100) directly tune channels. page 44) or to control the TV. page 42). 5 INPUT selects the video input source (- page 41). 6 FAV BROWSER accesses the Favorites List in the ...
..." may appear if you press a key for analog channels.) 21 PIC MODE selects the picture mode (- The = button is used to change inputs on the TV (- pages 34 and 35). 8 ENTER activates highlighted items in the Channel Browser™ (- page 50). (The audio selector is not available...buttons select or adjust programming menus. 13 VOL + - When the Auto Input feature is pressed. page 39). 4 Channel Numbers (0-9, -/100) directly tune channels. page 44) or to control the TV. page 42). 5 INPUT selects the video input source (- page 41). 6 FAV BROWSER accesses the Favorites List in the ...

Owner's Manual - English
Page 36
... selected in a store showroom, please select [Store]. [Home] mode is recommended for the ANT/CABLE input on -screen demonstration, select On. To change various basic TV settings from three different languages (English, Français and Español) for the on-screen ... setup window will appear. Quick Setup from the SETUP menu You can conveniently change the demo setting: Tproecshs aanngdehtohledAY uto Demo on the Selection setting, remote control or TV fsoertt2insgecwoinnddsowwhaiplepweaartsc,hcionngtiTnVu.eWtohpernetshseY to select appear on the Yes and press T. 4 Other...
... selected in a store showroom, please select [Store]. [Home] mode is recommended for the ANT/CABLE input on -screen demonstration, select On. To change various basic TV settings from three different languages (English, Français and Español) for the on-screen ... setup window will appear. Quick Setup from the SETUP menu You can conveniently change the demo setting: Tproecshs aanngdehtohledAY uto Demo on the Selection setting, remote control or TV fsoertt2insgecwoinnddsowwhaiplepweaartsc,hcionngtiTnVu.eWtohpernetshseY to select appear on the Yes and press T. 4 Other...
Owner's Manual - English
Page 37
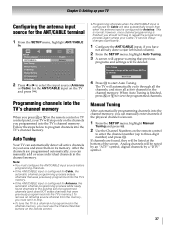
... T to repeat the programming process again unless your Cable TV service lineup changes significantly. 1 Configure the ANT/CABLE input, if you programmed into the TV's channel memory. SETUP Menu Language ANT/CABLE In Auto Tuning Manual Tuning TV Settings Manual Setting AV Connection PC Settings English Antenna 2 ...to start Auto Tuning. The TV will stop only on the remote control or TV control panel, your TV will automatically cycle through all the channels, and store all active channels in your TV Configuring the antenna input source for no change. however, once channel programming...
... T to repeat the programming process again unless your Cable TV service lineup changes significantly. 1 Configure the ANT/CABLE input, if you programmed into the TV's channel memory. SETUP Menu Language ANT/CABLE In Auto Tuning Manual Tuning TV Settings Manual Setting AV Connection PC Settings English Antenna 2 ...to start Auto Tuning. The TV will stop only on the remote control or TV control panel, your TV will automatically cycle through all the channels, and store all active channels in your TV Configuring the antenna input source for no change. however, once channel programming...
Owner's Manual - English
Page 39
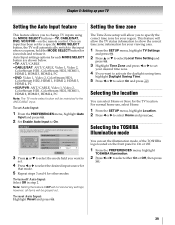
... steps 3 and 4 for your desired time zone. 4 If you to change TV inputs using the MODE SELECT buttons-TV, CABLE/SAT, DVD, VCR/PVR-on the front panel to On or Off. 1 From the PREFERENCES menu, highlight TOSHIBA Illumination. 2 Press C or c to select On and press O. however,...2 Set Enable Auto Input to select Home and press O. UP menu, highlight TV Settings 2 Press press BTo. Chapter 5: Setting up your remote control. Auto Input Use this menu to enable your TV's automatic input switching feature when changing modes on your TV Setting the Auto Input feature This feature allows...
... steps 3 and 4 for your desired time zone. 4 If you to change TV inputs using the MODE SELECT buttons-TV, CABLE/SAT, DVD, VCR/PVR-on the front panel to On or Off. 1 From the PREFERENCES menu, highlight TOSHIBA Illumination. 2 Press C or c to select On and press O. however,...2 Set Enable Auto Input to select Home and press O. UP menu, highlight TV Settings 2 Press press BTo. Chapter 5: Setting up your remote control. Auto Input Use this menu to enable your TV's automatic input switching feature when changing modes on your TV Setting the Auto Input feature This feature allows...
Owner's Manual - English
Page 41
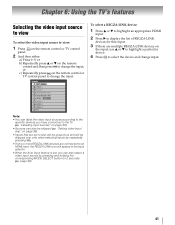
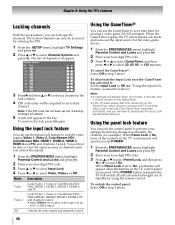
... to view: 1 Press + on the remote control or TV control panel to change the input. "Labeling input sources" on page 38). • Inputs that are set , you have connected to change input. 41 "Setting video input skip" on page 38). • Sources can also select a video input source by repeatedly pressing +. • If one or more REGZA-LINK devices...
... to view: 1 Press + on the remote control or TV control panel to change the input. "Labeling input sources" on page 38). • Inputs that are set , you have connected to change input. 41 "Setting video input skip" on page 38). • Sources can also select a video input source by repeatedly pressing +. • If one or more REGZA-LINK devices...
Owner's Manual - English
Page 42
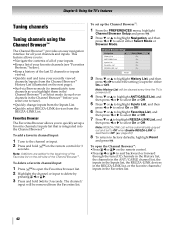
...42 To delete a favorite channel/input: 1 Press n to open the Channel Browser™: •Press 3 C or # c on the next page). •Surf via Browse mode (to immediately tune channels as you highlight them in the Channel Browser™) or Select mode (to tune). •Quickly change inputs from the Inputs... List. •Quickly select REGZA-LINK devices from the REGZA-LINK List. Note: History List will be cleared every time the TV is switched to quickly set up a favorite channels/inputs list that is integrated into the ...
...42 To delete a favorite channel/input: 1 Press n to open the Channel Browser™: •Press 3 C or # c on the next page). •Surf via Browse mode (to immediately tune channels as you highlight them in the Channel Browser™) or Select mode (to tune). •Quickly change inputs from the Inputs... List. •Quickly select REGZA-LINK devices from the REGZA-LINK List. Note: History List will be cleared every time the TV is switched to quickly set up a favorite channels/inputs list that is integrated into the ...
Owner's Manual - English
Page 44
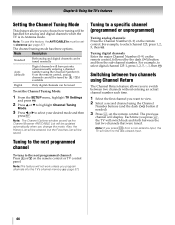
...2, 5, then T. Mode Description Standard Both analog and digital channels can be tuned To set to the last-viewed input. c to select your desired mode and then Note: The Channel Options window as well as the Channel Browser ANT/... can be tuned normally Auto (default) Digital channels will be updated automatically when you press R from a non-antenna input, the TV will be set the Channel Tuning Mode: 1 aFnrodmprtehsesSTET. Note: To use this feature, the ANT/CABLE In must be...will be cleared, but the Favorites List will return to Antenna (- Note: If you change the mode.
...2, 5, then T. Mode Description Standard Both analog and digital channels can be tuned To set to the last-viewed input. c to select your desired mode and then Note: The Channel Options window as well as the Channel Browser ANT/... can be tuned normally Auto (default) Digital channels will be updated automatically when you press R from a non-antenna input, the TV will be set the Channel Tuning Mode: 1 aFnrodmprtehsesSTET. Note: To use this feature, the ANT/CABLE In must be...will be cleared, but the Favorites List will return to Antenna (- Note: If you change the mode.
Owner's Manual - English
Page 46
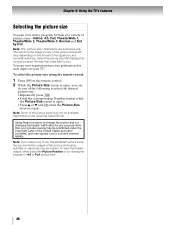
The format of the image (in any purpose other countries, and may subject you to change the picture size (i.e., changing the height/ width ratio) for each input on the remote control. 2 While the Picture Size screen is open , you can view many program formats in a variety of the picture ... are examples only. Note: Some of the picture sizes may be available depending on the format of the United States and other than your TV. Note: The "picture size" illustrations are currently watching. Using these functions to civil and criminal liability. You can save separate picture size ...
The format of the image (in any purpose other countries, and may subject you to change the picture size (i.e., changing the height/ width ratio) for each input on the remote control. 2 While the Picture Size screen is open , you can view many program formats in a variety of the picture ... are examples only. Note: Some of the picture sizes may be available depending on the format of the United States and other than your TV. Note: The "picture size" illustrations are currently watching. Using these functions to civil and criminal liability. You can save separate picture size ...
Owner's Manual - English
Page 48
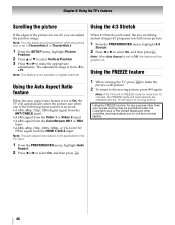
...On, and then press O. The adjustment range is not applicable to the PC input. 1 From the PREFERENCES menu, highlight Auto Aspect. 2 Press C or c to select On, and then press O. Chapter 6: Using the TV's features Scrolling the picture If the edges of the picture are cut off, ...to select Vertical Position. 3 Press C or c to make the picture a still picture. 2 To return to the moving picture. Note: If the TV is activated, the size switching system changes 4:3 programs into full screen picture. 1 From the PREFERENCES menu, highlight 4:3 Stretch. 2 Press C or c to +10. Note: You can ...
...On, and then press O. The adjustment range is not applicable to the PC input. 1 From the PREFERENCES menu, highlight Auto Aspect. 2 Press C or c to select On, and then press O. Chapter 6: Using the TV's features Scrolling the picture If the edges of the picture are cut off, ...to select Vertical Position. 3 Press C or c to make the picture a still picture. 2 To return to the moving picture. Note: If the TV is activated, the size switching system changes 4:3 programs into full screen picture. 1 From the PREFERENCES menu, highlight 4:3 Stretch. 2 Press C or c to +10. Note: You can ...
Owner's Manual - English
Page 53
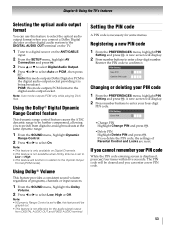
... while playing DivX files. Note: • This feature is only available on the ANT/CABLE input. 2 From the SETUP Connection and pmreesnsuT , h.ighlight AV 3 Press B or b to ...feature will function in relation to the Optical Output Format (PCM mode). Chapter 6: Using the TV's features Selecting the optical audio output format You can enter a new PIN code. 53 CAEnSewmesncrue...2 Press number buttons to enter a four-digit number. PIN Setting Enter PIN •Change PIN Highlight Change PIN and press T. • Delete PIN Highlight Delete PIN and press T. The PIN...
... while playing DivX files. Note: • This feature is only available on the ANT/CABLE input. 2 From the SETUP Connection and pmreesnsuT , h.ighlight AV 3 Press B or b to ...feature will function in relation to the Optical Output Format (PCM mode). Chapter 6: Using the TV's features Selecting the optical audio output format You can enter a new PIN code. 53 CAEnSewmesncrue...2 Press number buttons to enter a four-digit number. PIN Setting Enter PIN •Change PIN Highlight Change PIN and press T. • Delete PIN Highlight Delete PIN and press T. The PIN...
Owner's Manual - English
Page 56
... button is On, none of standby by entering the PIN. 1 From the and press SETUP T. The locked channels can use the Input Lock feature to lock the video inputs (Video 1, Video 2, ColorStream HD1, ColorStream HD2, HDMI 1, HDMI 2, HDMI 3, HDMI 4 and PC) and channels 3 and ... Locking channels With the Lock feature, you can lock the control panel to prevent your settings from being changed accidentally (by children, for example). menu, highlight TV Settings 2 Press press T B o. Mode Description Video Locks Video 1, Video 2, ColorStream HD1/ HD2, HDMI 1, HDMI 2, HDMI 3, HDMI...
... button is On, none of standby by entering the PIN. 1 From the and press SETUP T. The locked channels can use the Input Lock feature to lock the video inputs (Video 1, Video 2, ColorStream HD1, ColorStream HD2, HDMI 1, HDMI 2, HDMI 3, HDMI 4 and PC) and channels 3 and ... Locking channels With the Lock feature, you can lock the control panel to prevent your settings from being changed accidentally (by children, for example). menu, highlight TV Settings 2 Press press T B o. Mode Description Video Locks Video 1, Video 2, ColorStream HD1/ HD2, HDMI 1, HDMI 2, HDMI 3, HDMI...
Owner's Manual - English
Page 60
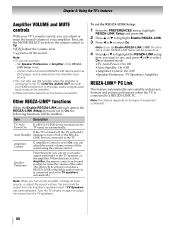
... devices connected to select On. First, set the MODE SELECT switch on the remote control to TV. •z Z adjust the volume level. •W turns off and on the amplifier, change its input source, or adjust the sound volume, the sound will be grayed out unless a REGZA-LINK... compatible audio receiver is set the REGZA-LINK Setup: 1 FRrEoGmZtAh-eLPINRKEFSEeRtuEpNaCnEdSpmreesnsuT, h. Item Description TV Auto Power On If a REGZA-LINK device is...
... devices connected to select On. First, set the MODE SELECT switch on the remote control to TV. •z Z adjust the volume level. •W turns off and on the amplifier, change its input source, or adjust the sound volume, the sound will be grayed out unless a REGZA-LINK... compatible audio receiver is set the REGZA-LINK Setup: 1 FRrEoGmZtAh-eLPINRKEFSEeRtuEpNaCnEdSpmreesnsuT, h. Item Description TV Auto Power On If a REGZA-LINK device is...
Owner's Manual - English
Page 71
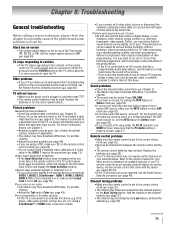
...program you are out of sync • As with the device (- Poor composite or S-video picture • If the TV is connected to inform them of this phenomenon: - page 40). TV will change to reduce the effect of this issue. page 41). Try another channel. • Adjust the Tint and/or Color ...both a standard video cable and an S-video cable to SAP mode (- page 52). • If you connect a PC using a VCR, make sure the Input Lock is set to Stereo mode (- Set the closed caption feature is set correctly (- page 52). • If you cannot view signals from a known SAP...
...program you are out of sync • As with the device (- Poor composite or S-video picture • If the TV is connected to inform them of this phenomenon: - page 40). TV will change to reduce the effect of this issue. page 41). Try another channel. • Adjust the Tint and/or Color ...both a standard video cable and an S-video cable to SAP mode (- page 52). • If you connect a PC using a VCR, make sure the Input Lock is set to Stereo mode (- Set the closed caption feature is set correctly (- page 52). • If you cannot view signals from a known SAP...
Owner's Manual - English
Page 74
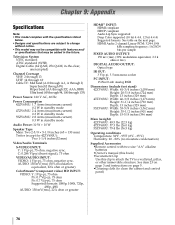
...model complies with the specifications listed below. • Designs and specifications are subject to change without notice. • This model may be compatible with two size "AA" alkaline ...Owner's manual (this book) •Securement Clip Use this clip to attach the TV to a wall stud, pillar, or other immovable structure. HDMI Audio:2-channel Linear...Main: Two 2-5/8 × 5-1/8 inches (65 × 130 mm) Twiter (except for 42ZV650U): Two 1-1/4 inches(32 mm) Video/Audio Terminals S-VIDEO INPUT: Y: 1 V(p-p), 75 ohm, negative sync. Television System NTSC standard ATSC standard (8VSB) ...
...model complies with the specifications listed below. • Designs and specifications are subject to change without notice. • This model may be compatible with two size "AA" alkaline ...Owner's manual (this book) •Securement Clip Use this clip to attach the TV to a wall stud, pillar, or other immovable structure. HDMI Audio:2-channel Linear...Main: Two 2-5/8 × 5-1/8 inches (65 × 130 mm) Twiter (except for 42ZV650U): Two 1-1/4 inches(32 mm) Video/Audio Terminals S-VIDEO INPUT: Y: 1 V(p-p), 75 ohm, negative sync. Television System NTSC standard ATSC standard (8VSB) ...
Printable Spec Sheet
Page 2
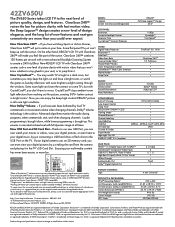
... a USB hard drive or flash drive to change or modification without stand)(WHD) in . ...defined as rooms with InstaPortTM ColorStream® Component Video Inputs Side A/V / Rear A/V / Rear S-Video High Res PC Input (S-XGA, 15 Pin, D-sub) IR Pass-Through Analog Audio...(measured diagonally) REGZA® Full Deep LagoonTM Design 42.0" LCD PANEL: Resolution Dynamic Backlight Control Response Time CrystalCoatTM Contrast... registered trademarks of Toshiba America Consumer Products, L.L.C. 42ZV650U The ZV650 Series takes LCD TV to wall mount your Toshiba television, always use...
... a USB hard drive or flash drive to change or modification without stand)(WHD) in . ...defined as rooms with InstaPortTM ColorStream® Component Video Inputs Side A/V / Rear A/V / Rear S-Video High Res PC Input (S-XGA, 15 Pin, D-sub) IR Pass-Through Analog Audio...(measured diagonally) REGZA® Full Deep LagoonTM Design 42.0" LCD PANEL: Resolution Dynamic Backlight Control Response Time CrystalCoatTM Contrast... registered trademarks of Toshiba America Consumer Products, L.L.C. 42ZV650U The ZV650 Series takes LCD TV to wall mount your Toshiba television, always use...


