Owner's Manual - English
Page 6
... of Conformity Compliance Statement (Part 15): The Toshiba 42LX177, 46LX177, 52LX177, and 57LX177 Televisions comply with...Labs, Inc. • Manufactured under your LCD TV The following symptoms are technical limitations of LCD Display technology and are trademarks or registered trademarks of HDMI Licensing LLC. • Deep Color is ...Connect the equipment into an outlet on the screen if a fixed, non- therefore, Toshiba is connected. • Consult the dealer or an experienced radio/TV technician for perceived issues resulting from Dolby Laboratories. However, there is : Toshiba...
... of Conformity Compliance Statement (Part 15): The Toshiba 42LX177, 46LX177, 52LX177, and 57LX177 Televisions comply with...Labs, Inc. • Manufactured under your LCD TV The following symptoms are technical limitations of LCD Display technology and are trademarks or registered trademarks of HDMI Licensing LLC. • Deep Color is ...Connect the equipment into an outlet on the screen if a fixed, non- therefore, Toshiba is connected. • Consult the dealer or an experienced radio/TV technician for perceived issues resulting from Dolby Laboratories. However, there is : Toshiba...
Owner's Manual - English
Page 7
...Toshiba 9 Features of your new TV 9 Overview of steps for installing, setting up, and using your new TV 10 TV front and side panel controls and connections 11 TV back panel connections 12 Chapter 2: Connecting your TV 14 Overview of cable types 14 About the connection illustrations 14 Connecting a VCR and antenna or Cable TV...Connecting a camcorder 19 Connecting an HDMI™ or DVI device to the HDMI input 20 CE-Link connection 21 Connecting a digital audio system 22 Connecting an audio system 22 Connecting a personal computer (PC 23 Connecting... 42 Chapter 5: Setting up your TV ...
...Toshiba 9 Features of your new TV 9 Overview of steps for installing, setting up, and using your new TV 10 TV front and side panel controls and connections 11 TV back panel connections 12 Chapter 2: Connecting your TV 14 Overview of cable types 14 About the connection illustrations 14 Connecting a VCR and antenna or Cable TV...Connecting a camcorder 19 Connecting an HDMI™ or DVI device to the HDMI input 20 CE-Link connection 21 Connecting a digital audio system 22 Connecting an audio system 22 Connecting a personal computer (PC 23 Connecting... 42 Chapter 5: Setting up your TV ...
Owner's Manual - English
Page 9
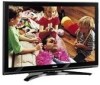
... features of your new Toshiba widescreen, integrated HD, LCD TV: • Integrated digital tuning (8VSB ATSC and QAM) eliminates the need for purchasing this Toshiba LCD TV, one of receiving analog basic, digital basic and digital premium cable television programming by direct connection to a cable system providing...CE-Link allows control of external devices from HDMI source. • Two sets of a set -top box (in the HDMI signals, then allows sending wider color signals from the TV via HDMI connection (- page 20). • HDMI new capabilities Lip-Sync Latency feature activates an ...
... features of your new Toshiba widescreen, integrated HD, LCD TV: • Integrated digital tuning (8VSB ATSC and QAM) eliminates the need for purchasing this Toshiba LCD TV, one of receiving analog basic, digital basic and digital premium cable television programming by direct connection to a cable system providing...CE-Link allows control of external devices from HDMI source. • Two sets of a set -top box (in the HDMI signals, then allows sending wider color signals from the TV via HDMI connection (- page 20). • HDMI new capabilities Lip-Sync Latency feature activates an ...

Owner's Manual - English
Page 11
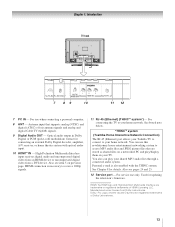
... panel for additional information. 2 Remote sensor - Press to turn off . The side panel A/V connections are viewing (ANT, VIDEO 1, VIDEO 2, ColorStream HD1, ColorStream HD2, HDMI 1, HDMI 2, HDMI 3, PC) (- pages 40-41). Chapter 1: Introduction TV front and side panel controls and connections TV front Right side panel 4 8 POWER 5 9 6 7 10 Control panel 3 1 2 1 Green and Yellow LEDs Green = Power indicator Yellow...
... panel for additional information. 2 Remote sensor - Press to turn off . The side panel A/V connections are viewing (ANT, VIDEO 1, VIDEO 2, ColorStream HD1, ColorStream HD2, HDMI 1, HDMI 2, HDMI 3, PC) (- pages 40-41). Chapter 1: Introduction TV front and side panel controls and connections TV front Right side panel 4 8 POWER 5 9 6 7 10 Control panel 3 1 2 1 Green and Yellow LEDs Green = Power indicator Yellow...
Owner's Manual - English
Page 12
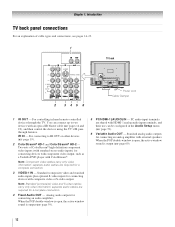
... window sound is output (- separate audio cables are shared with HDMI-1 analog audio input terminals, and their use can connect up to IR OUT on other devices (- Chapter 1: Introduction TV back panel connections For an explanation of ColorStream® high-definition component video inputs... (with standard stereo audio inputs) for connecting devices with component video output, such as a Toshiba DVD player ...
... window sound is output (- separate audio cables are shared with HDMI-1 analog audio input terminals, and their use can connect up to IR OUT on other devices (- Chapter 1: Introduction TV back panel connections For an explanation of ColorStream® high-definition component video inputs... (with standard stereo audio inputs) for connecting devices with component video output, such as a Toshiba DVD player ...
Owner's Manual - English
Page 13
...stored as shared files on a networked PC and play your shared MP3 audio files through a connected audio system. Personal e-mail is necessary to your Toshiba TV to connect to access MP3 audio files and JPEG picture files that supports analog (NTSC) and digital (ATSC... system. HDMI connection is also enabled with optical audio input. 10 HDMI™ IN - For use only. High-Definition Multimedia Interface input receives digital audio and uncompressed digital video from an HDMI device or uncompressed digital video from Dolby Laboratories. Chapter 1: Introduction TV back 7...
...stored as shared files on a networked PC and play your shared MP3 audio files through a connected audio system. Personal e-mail is necessary to your Toshiba TV to connect to access MP3 audio files and JPEG picture files that supports analog (NTSC) and digital (ATSC... system. HDMI connection is also enabled with optical audio input. 10 HDMI™ IN - For use only. High-Definition Multimedia Interface input receives digital audio and uncompressed digital video from an HDMI device or uncompressed digital video from Dolby Laboratories. Chapter 1: Introduction TV back 7...
Owner's Manual - English
Page 14
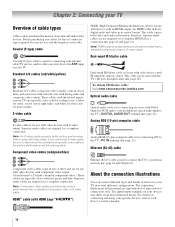
... color-coded red, green, and blue. If you connect an S-video cable, be sure to your TV in its native format. HDMI™ cable (with HDMI Logo " ") HDMI (High-Definition Multimedia Interface) cable is Toshiba's brand of component video.) These cables are representative of typical device connections only. An HDMI cable delivers digital audio and video in several...
... color-coded red, green, and blue. If you connect an S-video cable, be sure to your TV in its native format. HDMI™ cable (with HDMI Logo " ") HDMI (High-Definition Multimedia Interface) cable is Toshiba's brand of component video.) These cables are representative of typical device connections only. An HDMI cable delivers digital audio and video in several...
Owner's Manual - English
Page 17
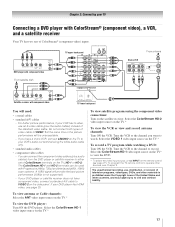
...satellite receiver to VIDEO 2 on the side panel. Select the ColorStream HD-2 video input source on the TV.* To record a TV program while watching a DVD: Turn ON the VCR. Do not connect both types of video cable to watch. If you want to VIDEO 1 at the same time or the...If your DVD player has HDMI video, see Chapter 3. Select the ColorStream HD-1 video input source on the satellite receiver. To program the TV remote control to operate other countries, and may subject you to your VCR's audio out terminal using the component video connections: Turn on the TV* to record. To view...
...satellite receiver to VIDEO 2 on the side panel. Select the ColorStream HD-2 video input source on the TV.* To record a TV program while watching a DVD: Turn ON the VCR. Do not connect both types of video cable to watch. If you want to VIDEO 1 at the same time or the...If your DVD player has HDMI video, see Chapter 3. Select the ColorStream HD-1 video input source on the satellite receiver. To program the TV remote control to operate other countries, and may subject you to your VCR's audio out terminal using the component video connections: Turn on the TV* to record. To view...

Owner's Manual - English
Page 20
... page 109. If your HDMI connection is capable of legacy HDMI sources may not work properly with HDMI or DVI output). HDMI cable transfers both video and audio. TV lower back panel HDMI device VIDEO AUDIO L R IN IN OUT L R HDMI OUT To view the HDMI device video: Select the HDMI 1, HDMI 2, or HDMI 3 video input source on the TV.* * To select the video...
... page 109. If your HDMI connection is capable of legacy HDMI sources may not work properly with HDMI or DVI output). HDMI cable transfers both video and audio. TV lower back panel HDMI device VIDEO AUDIO L R IN IN OUT L R HDMI OUT To view the HDMI device video: Select the HDMI 1, HDMI 2, or HDMI 3 video input source on the TV.* * To select the video...

Owner's Manual - English
Page 21
... to individual instruction manuals for each device. • The CE-Link feature uses CEC technology as you use HDMI cables with the HDMI Logo ( ). Refer to models incorporating Toshiba's CE-Link. Chapter 2: Connecting your TV CE-Link connection You can control the basic functions of setup and operations, see the operation manual for compatibility information. 21...
... to individual instruction manuals for each device. • The CE-Link feature uses CEC technology as you use HDMI cables with the HDMI Logo ( ). Refer to models incorporating Toshiba's CE-Link. Chapter 2: Connecting your TV CE-Link connection You can control the basic functions of setup and operations, see the operation manual for compatibility information. 21...

Owner's Manual - English
Page 22
... digital audio system LINE IN LR Optical Audio IN TV lower back panel Note: • Some audio systems may not be set to adjust the sound level. page 66). Chapter 2: Connecting your device (- Audio Setup PC Audio HDMI 1 Audio MTS Language Speakers Optical Output Format Dolby ...will need : • standard audio cables Analog audio amplifier To control the audio: 1 Turn on the TV and the digital audio device. 2 Press Y on your TV Connecting a digital audio system The TV's DIGITAL AUDIO OUT terminal outputs a Dolby®* Digital or 2-channel down-mixed PCM (pulse-code modulation)...
... digital audio system LINE IN LR Optical Audio IN TV lower back panel Note: • Some audio systems may not be set to adjust the sound level. page 66). Chapter 2: Connecting your device (- Audio Setup PC Audio HDMI 1 Audio MTS Language Speakers Optical Output Format Dolby ...will need : • standard audio cables Analog audio amplifier To control the audio: 1 Turn on the TV and the digital audio device. 2 Press Y on your TV Connecting a digital audio system The TV's DIGITAL AUDIO OUT terminal outputs a Dolby®* Digital or 2-channel down-mixed PCM (pulse-code modulation)...
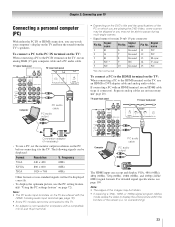
Owner's Manual - English
Page 23
... 5 NC 10 Ground 15 NC *NC=Not connected To connect a PC to the HDMI terminal on the TV: When connecting a PC to display the entire picture within the borders of the PC on which you are not necessary (- Chapter 2: Connecting your TV Connecting a personal computer (PC) With either the PC IN or HDMI connection, you may not be hidden. •...
... 5 NC 10 Ground 15 NC *NC=Not connected To connect a PC to the HDMI terminal on the TV: When connecting a PC to display the entire picture within the borders of the PC on which you are not necessary (- Chapter 2: Connecting your TV Connecting a personal computer (PC) With either the PC IN or HDMI connection, you may not be hidden. •...
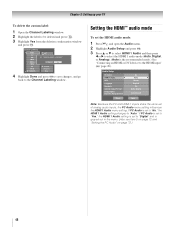
Owner's Manual - English
Page 48
... Audio Setup and press T. 3 Press B or b to select HDMI 1 Audio and then press C or c to the HDMI input" (- Setting the HDMI™ audio mode To set to "Digital" and is the recommended mode.) See "Connecting an HDMI or DVI device to select the HDMI 1 audio mode (Auto, Digital, or Analog). (Auto is grayed... out in the menu. (Also see item 5 on page 12 and "Setting the PC Audio" on page 72.) 48 Chapter 5: Setting up your TV To delete the custom label...
... Audio Setup and press T. 3 Press B or b to select HDMI 1 Audio and then press C or c to the HDMI input" (- Setting the HDMI™ audio mode To set to "Digital" and is the recommended mode.) See "Connecting an HDMI or DVI device to select the HDMI 1 audio mode (Auto, Digital, or Analog). (Auto is grayed... out in the menu. (Also see item 5 on page 12 and "Setting the PC Audio" on page 72.) 48 Chapter 5: Setting up your TV To delete the custom label...
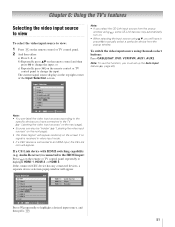
Owner's Manual - English
Page 51
...can also be "hidden" (- Note: To use this function, you will have connected to the TV (- Chapter 6: Using the TV's features Selecting the video input source to view To select the video input source to an HDMI input, the CE-Link icon will appear. or b) Repeatedly press Bb on the ..., a separate device selection popup window will appear randomly on the screen if no signal is connected to the HDMI input: Press + on the remote control or TV control panel to actually select a particular device from the popup window. "Labeling the video input sources" on . • When ...
...can also be "hidden" (- Note: To use this function, you will have connected to the TV (- Chapter 6: Using the TV's features Selecting the video input source to view To select the video input source to an HDMI input, the CE-Link icon will appear. or b) Repeatedly press Bb on the ..., a separate device selection popup window will appear randomly on the screen if no signal is connected to the HDMI input: Press + on the remote control or TV control panel to actually select a particular device from the popup window. "Labeling the video input sources" on . • When ...
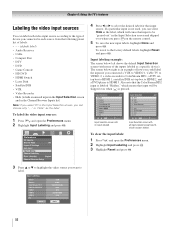
Owner's Manual - English
Page 52
...) Note: If you select PC in the Input Selection screen and skipped over when you connected a VCR to VIDEO 1, Cable TV to VIDEO 2, a video recorder to ColorStream HD1, a DTV settop box to HDMI 1, a satellite/DSS set-top box to HDMI 2, and a DVD player to Select Navigate Input Selection screen with no inputs labeled. Input...
...) Note: If you select PC in the Input Selection screen and skipped over when you connected a VCR to VIDEO 1, Cable TV to VIDEO 2, a video recorder to ColorStream HD1, a DTV settop box to HDMI 1, a satellite/DSS set-top box to HDMI 2, and a DVD player to Select Navigate Input Selection screen with no inputs labeled. Input...

Owner's Manual - English
Page 66
...Connecting an audio system" on your TV (- To turn off the built-in speakers You can use this feature to turn on page 22). To turn off the built-in speakers: 1 Press Y and open the Audio menu. 2 Highlight Audio Setup and press T. 3 In the Speakers field, select Off. Audio Setup PC Audio HDMI... and press T. To use this feature to select the optical audio output format when you connect a Dolby Digital decoder or other digital audio system to the Optical Audio Out terminal on the TV (see "Connecting a digital audio system" on the built-in speakers: Select On in relation to your ...
...Connecting an audio system" on your TV (- To turn off the built-in speakers You can use this feature to turn on page 22). To turn off the built-in speakers: 1 Press Y and open the Audio menu. 2 Highlight Audio Setup and press T. 3 In the Speakers field, select Off. Audio Setup PC Audio HDMI... and press T. To use this feature to select the optical audio output format when you connect a Dolby Digital decoder or other digital audio system to the Optical Audio Out terminal on the TV (see "Connecting a digital audio system" on the built-in speakers: Select On in relation to your ...

Owner's Manual - English
Page 73
... the on the remote control to a maximum of 180 minutes). To display the remaining sleep time: Press [. To set to control Toshiba CE-Link compatible devices from the TV remote via HDMI connection (- Sleep Timer Enter total minutes until it is set to On, individual CE-Link functions also set length of time (maximum...
... the on the remote control to a maximum of 180 minutes). To display the remaining sleep time: Press [. To set to control Toshiba CE-Link compatible devices from the TV remote via HDMI connection (- Sleep Timer Enter total minutes until it is set to On, individual CE-Link functions also set length of time (maximum...

Owner's Manual - English
Page 74
... (not HDMI connection). Audio Receiver VOLUME and MUTE control With your audio output preference to the TV. • Speaker Preference From this function: - First, select TV mode by setting them to On. • TV Auto Input Switch If a connected HDMI device starts playing video or audio, the TV will automatically switch to the appropriate HDMI input. • TV Auto Power...
... (not HDMI connection). Audio Receiver VOLUME and MUTE control With your audio output preference to the TV. • Speaker Preference From this function: - First, select TV mode by setting them to On. • TV Auto Input Switch If a connected HDMI device starts playing video or audio, the TV will automatically switch to the appropriate HDMI input. • TV Auto Power...
Owner's Manual - English
Page 75
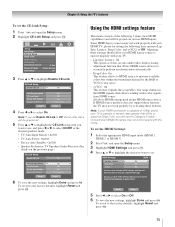
... To set . Note: If your HDMI connection is capable of 1080p and/or your TV is capable of the following three options (LipSync Latency, Deep Color, and xvYCC) to set the CE-Link Setup: 1 Press Y and open the Setup menu. 3 Highlight HDMI Settings and press T. 4 Press B or ... accurately perform synchronization automatically. • Deep Color: On This feature allows to HDMI source to select On. Conventional HDMI/DVI cables may not work properly with your HDMI TV, please try setting the following 3 items (new HDMI capabilities) and will be grayed out. 5 Press B or b to highlight...
... To set . Note: If your HDMI connection is capable of 1080p and/or your TV is capable of the following three options (LipSync Latency, Deep Color, and xvYCC) to set the CE-Link Setup: 1 Press Y and open the Setup menu. 3 Highlight HDMI Settings and press T. 4 Press B or ... accurately perform synchronization automatically. • Deep Color: On This feature allows to HDMI source to select On. Conventional HDMI/DVI cables may not work properly with your HDMI TV, please try setting the following 3 items (new HDMI capabilities) and will be grayed out. 5 Press B or b to highlight...

Owner's Manual - English
Page 115
... 44 Audio player 98 Audio quality adjustments 65 Audio system connection 22 Auto aspect 58 Auto Input 46 Auto power off 76 B Back of the TV 11 G Game Mode feature 83 GameTimer 71 H HDMI audio mode 48 HDMI cable 14 HDMI settings 75 Deep Color 75 Lip-Sync Latency 75 xvYCC ...75 HDMI™ connection 20 Help feature 85 Home file server setup 93 Home network connection 24 I INFO button 76 INPUT button...
... 44 Audio player 98 Audio quality adjustments 65 Audio system connection 22 Auto aspect 58 Auto Input 46 Auto power off 76 B Back of the TV 11 G Game Mode feature 83 GameTimer 71 H HDMI audio mode 48 HDMI cable 14 HDMI settings 75 Deep Color 75 Lip-Sync Latency 75 xvYCC ...75 HDMI™ connection 20 Help feature 85 Home file server setup 93 Home network connection 24 I INFO button 76 INPUT button...


