Owner's Manual - English
Page 3
... Do not install near water. 6) Clean only with an extension cord, receptacle, or other open flames away from the damaged television. The LCD panel inside the TV contains glass and a toxic liquid. or • in a confined space such as a bookcase, built-in cabinet, or any ventilation openings... into the apparatus, the apparatus has been exposed to qualified service personnel. Leave a space of the obsolete outlet. 10) Protect the power cord from being walked on the floor or a sturdy, level, stable surface that can be exposed to dripping or splashing and that produce...
... Do not install near water. 6) Clean only with an extension cord, receptacle, or other open flames away from the damaged television. The LCD panel inside the TV contains glass and a toxic liquid. or • in a confined space such as a bookcase, built-in cabinet, or any ventilation openings... into the apparatus, the apparatus has been exposed to qualified service personnel. Leave a space of the obsolete outlet. 10) Protect the power cord from being walked on the floor or a sturdy, level, stable surface that can be exposed to dripping or splashing and that produce...
Owner's Manual - English
Page 4
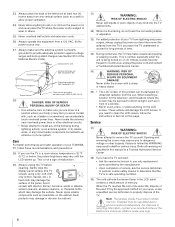
... page. This is being turned on this product can accidentally touch overhead power lines. Avoid contact with a sharp or heavy object. 36) • The LCD screen of your TOSHIBA TV, follow this manual to a Toshiba Authorized Service Center. 38) If you have the TV serviced: • Ask the service technician to use only replacement parts specified...
... page. This is being turned on this product can accidentally touch overhead power lines. Avoid contact with a sharp or heavy object. 36) • The LCD screen of your TOSHIBA TV, follow this manual to a Toshiba Authorized Service Center. 38) If you have the TV serviced: • Ask the service technician to use only replacement parts specified...
Owner's Manual - English
Page 6
... TV is no guarantee that interference will disappear in a short period of time. 2) The LCD panel contained in a particular installation. Important notes about your warranty. therefore, Toshiba is...there may be determined by removing and applying power to the equipment, the user is encouraged to try to correct the interference by Toshiba could void the user's authority to the...the FCC rules. FCC Declaration of Conformity Compliance Statement (Part 15): The Toshiba 26HL67, 32HL67, 37HL67, 42HL67, and 32HL67U Televisions comply with the instructions, may cause harmful interference to ...
... TV is no guarantee that interference will disappear in a short period of time. 2) The LCD panel contained in a particular installation. Important notes about your warranty. therefore, Toshiba is...there may be determined by removing and applying power to the equipment, the user is encouraged to try to correct the interference by Toshiba could void the user's authority to the...the FCC rules. FCC Declaration of Conformity Compliance Statement (Part 15): The Toshiba 26HL67, 32HL67, 37HL67, 42HL67, and 32HL67U Televisions comply with the instructions, may cause harmful interference to ...
Owner's Manual - English
Page 7
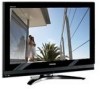
...Toshiba 8 Features of your new TV 8 Overview of steps for installing, setting up, and using your new TV 9 TV front and side panel controls and connections 10 TV back panel connections 11 Chapter 2: Connecting your TV...meter 33 Viewing the system status 33 Selecting the Power-On Mode 34 Chapter 6: Using the TV's features 35 Selecting the video input source to view...(480i and 1080i signals 41 Adjusting the picture 42 Selecting the picture mode 42 Adjusting the picture quality 42 Using the closed caption mode 43 Base closed ... LCD Televisions 26" and Larger 62 Limited Canada Warranty for...
...Toshiba 8 Features of your new TV 8 Overview of steps for installing, setting up, and using your new TV 9 TV front and side panel controls and connections 10 TV back panel connections 11 Chapter 2: Connecting your TV...meter 33 Viewing the system status 33 Selecting the Power-On Mode 34 Chapter 6: Using the TV's features 35 Selecting the video input source to view...(480i and 1080i signals 41 Adjusting the picture 42 Selecting the picture mode 42 Adjusting the picture quality 42 Using the closed caption mode 43 Base closed ... LCD Televisions 26" and Larger 62 Limited Canada Warranty for...
Owner's Manual - English
Page 9
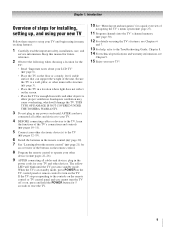
...14 For technical specifications and warranty information, see Chapter 9. 15 Enjoy your new TV! 9 pages 10-11). 5 Connect your LCD TV" (- page 20). 7 See "Learning about your other immovable structure (- The yellow LED will damage the TV. page 30). 12 For details on the floor or a sturdy, level, ... POWER on the TV control panel or remote control to turn the TV off or on the remote control. 8 Program the remote control to operate your TV and other objects to the TV, learn the functions of the TV's connections and controls (- THIS TYPE OF DAMAGE IS NOT COVERED UNDER THE TOSHIBA...
...14 For technical specifications and warranty information, see Chapter 9. 15 Enjoy your new TV! 9 pages 10-11). 5 Connect your LCD TV" (- page 20). 7 See "Learning about your other immovable structure (- The yellow LED will damage the TV. page 30). 12 For details on the floor or a sturdy, level, ... POWER on the TV control panel or remote control to turn the TV off or on the remote control. 8 Program the remote control to operate your TV and other objects to the TV, learn the functions of the TV's connections and controls (- THIS TYPE OF DAMAGE IS NOT COVERED UNDER THE TOSHIBA...

Owner's Manual - English
Page 10
... the ENTER button. 7 EXIT - Chapter 1: Introduction TV front and side panel controls and connections Model 42HL67 is used in this remote sensor (- If the TV stops responding to reset the TV. 5 ARROWS BbC c - TV top TV front POWER Right side panel 4 8 5 9 6 7 10 Control panel 3 1 2 1 Green and Yellow LEDs Green = Power indicator Yellow = Power-On Mode indicator (- pages 27-28...
... the ENTER button. 7 EXIT - Chapter 1: Introduction TV front and side panel controls and connections Model 42HL67 is used in this remote sensor (- If the TV stops responding to reset the TV. 5 ARROWS BbC c - TV top TV front POWER Right side panel 4 8 5 9 6 7 10 Control panel 3 1 2 1 Green and Yellow LEDs Green = Power indicator Yellow = Power-On Mode indicator (- pages 27-28...
Owner's Manual - English
Page 11
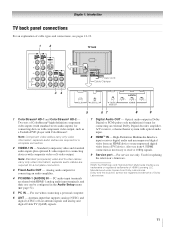
... connecting an audio amplifier. 4 PC/HDMI-1 (AUDIO) IN - Optical audio output in the Audio Setup menu (- Also see pages 12-19. 1 2 TV back 34 Power cord Cable Clamper 5 67 8 9 1 ColorStream® HD-1 and ColorStream® HD-2 - separate audio cables are required for a complete connection. 3 ...174; high-definition component video inputs (with standard stereo audio inputs) for connecting devices with component video output, such as a Toshiba DVD player with HDMI-1 analog audio input terminals, and their use can be configured in Dolby Digital or PCM (pulse-code modulation...
... connecting an audio amplifier. 4 PC/HDMI-1 (AUDIO) IN - Optical audio output in the Audio Setup menu (- Also see pages 12-19. 1 2 TV back 34 Power cord Cable Clamper 5 67 8 9 1 ColorStream® HD-1 and ColorStream® HD-2 - separate audio cables are required for a complete connection. 3 ...174; high-definition component video inputs (with standard stereo audio inputs) for connecting devices with component video output, such as a Toshiba DVD player with HDMI-1 analog audio input terminals, and their use can be configured in Dolby Digital or PCM (pulse-code modulation...
Owner's Manual - English
Page 21
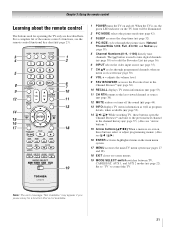
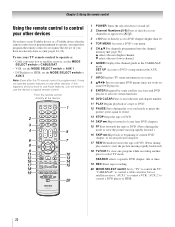
Chapter 3: Using the remote control Learning about the remote control The buttons used to control the TV. page 42). 3 SLEEP accesses the sleep timer (- page 36). 10 RECALL displays TV status information (- pages 27 and 28). 18 EXIT closes on -screen (- Note: The error message "Not Available"...functional key chart (- page 44). 13 INFO displays TV status information as well as program details, when available (- page 23). 1 POWER turns the TV on the TV front will be illuminated. 2 PIC MODE selects the picture mode (- When the TV is used for a function that is not available...
Chapter 3: Using the remote control Learning about the remote control The buttons used to control the TV. page 42). 3 SLEEP accesses the sleep timer (- page 36). 10 RECALL displays TV status information (- pages 27 and 28). 18 EXIT closes on -screen (- Note: The error message "Not Available"...functional key chart (- page 44). 13 INFO displays TV status information as well as program details, when available (- page 23). 1 POWER turns the TV on the TV front will be illuminated. 2 PIC MODE selects the picture mode (- When the TV is used for a function that is not available...
Owner's Manual - English
Page 22
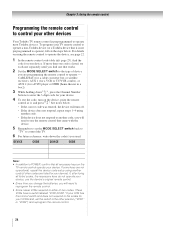
... control is not preprogrammed to operate, you have not already done so) (- "AUX 1" to control the TV; Point the remote control directly at the device. 16 17 18 19 1 POWER Turns the selected device on and off. 2 Channel Numbers (0-9) Press to directly access channels (as opposed to < ,). 3 +10 Press to ... to beginning of a tape or DVD. 12 PAUSE Press during play or record mode to recognize the device (if you have a non-Toshiba device or a Toshiba device that the remote control is programmed, it may not work on any other devices If you must first program the remote control to...
... control is not preprogrammed to operate, you have not already done so) (- "AUX 1" to control the TV; Point the remote control directly at the device. 16 17 18 19 1 POWER Turns the selected device on and off. 2 Channel Numbers (0-9) Press to directly access channels (as opposed to < ,). 3 +10 Press to ... to beginning of a tape or DVD. 12 PAUSE Press during play or record mode to recognize the device (if you have a non-Toshiba device or a Toshiba device that the remote control is programmed, it may not work on any other devices If you must first program the remote control to...

Owner's Manual - English
Page 23
... Toshiba TV CABLE SAT (satellite) POWER SLEEP PIC SIZE PIC MODE Power Sleep timer Picture size PIC MODE Power s TV s TV s TV Power s TV s TV s TV 1-9 Digit 1-9 Digit 1-9 Digit 1-9 0 Digit 0 Digit 0 Digit 0 100/-/+10 INPUT - (sub CH) TV/Video select --s TV - (sub CH) s TV FAV BROWSER/ TOP MENU MUTE FAV BROWSER DVD TOP Menu* Sound mute --s TV --s TV SET UP/GUIDE VOL + - PLAY Play* --- --- s TV --s TV Channel up /down s TV...
... Toshiba TV CABLE SAT (satellite) POWER SLEEP PIC SIZE PIC MODE Power Sleep timer Picture size PIC MODE Power s TV s TV s TV Power s TV s TV s TV 1-9 Digit 1-9 Digit 1-9 Digit 1-9 0 Digit 0 Digit 0 Digit 0 100/-/+10 INPUT - (sub CH) TV/Video select --s TV - (sub CH) s TV FAV BROWSER/ TOP MENU MUTE FAV BROWSER DVD TOP Menu* Sound mute --s TV --s TV SET UP/GUIDE VOL + - PLAY Play* --- --- s TV --s TV Channel up /down s TV...
Owner's Manual - English
Page 24
...page 22. 1 In the remote control code table (- If, after trying all necessary keys on the TV remote control operate your device. To program your TV remote control to operate a non-Toshiba device (or a Toshiba device that came with the device. 5 Remember to set the switch to the other devices Your... player or HTIB [home theater in a box]). 3 While holding down the code(s) you used: DEVICE CODE DEVICE CODE Note: • In addition to POWER, confirm that works. 2 Set the MODE SELECT switch to the type of device you will need to reprogram the remote control. • Some newer VCRs...
...page 22. 1 In the remote control code table (- If, after trying all necessary keys on the TV remote control operate your device. To program your TV remote control to operate a non-Toshiba device (or a Toshiba device that came with the device. 5 Remember to set the switch to the other devices Your... player or HTIB [home theater in a box]). 3 While holding down the code(s) you used: DEVICE CODE DEVICE CODE Note: • In addition to POWER, confirm that works. 2 Set the MODE SELECT switch to the type of device you will need to reprogram the remote control. • Some newer VCRs...
Owner's Manual - English
Page 27
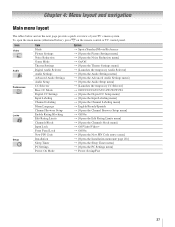
... Language Channel Browser Setup Enable Rating Blocking Edit Rating Limits Channels Block Input Lock Front Panel Lock New PIN Code Installation Sleep Timer PC Settings Power-On Mode Option S Sports/Standard/Movie/Preference S [Opens the Picture Settings menu] S [Opens the Noise Reduction menu] S On/Off S [Opens the... Code entry screen] S [Opens the Installation menu (- To open the main menus (illustrated below and on the remote control or TV control panel. Chapter 4: Menu layout and navigation Main menu layout The tables below ), press Y on the next page provide a quick overview of your...
... Language Channel Browser Setup Enable Rating Blocking Edit Rating Limits Channels Block Input Lock Front Panel Lock New PIN Code Installation Sleep Timer PC Settings Power-On Mode Option S Sports/Standard/Movie/Preference S [Opens the Picture Settings menu] S [Opens the Noise Reduction menu] S On/Off S [Opens the... Code entry screen] S [Opens the Installation menu (- To open the main menus (illustrated below and on the remote control or TV control panel. Chapter 4: Menu layout and navigation Main menu layout The tables below ), press Y on the next page provide a quick overview of your...
Owner's Manual - English
Page 29
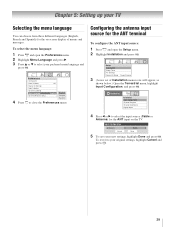
..., highlight Input Configuration, and press T. To revert to close the Preferences menu. Setup Installation Sleep Timer PC Settings Power-On Mode Power-Saving 3 (A new set of menus and messages. Input Configuration Antenna In Cancel Cable Done 5 To save your preferred... menu language and press T. Chapter 5: Setting up your TV Selecting the menu language You can choose from three different languages (English, French and Spanish) for the on the TV...
..., highlight Input Configuration, and press T. To revert to close the Preferences menu. Setup Installation Sleep Timer PC Settings Power-On Mode Power-Saving 3 (A new set of menus and messages. Input Configuration Antenna In Cancel Cable Done 5 To save your preferred... menu language and press T. Chapter 5: Setting up your TV Selecting the menu language You can choose from three different languages (English, French and Spanish) for the on the TV...

Owner's Manual - English
Page 30
... shown below .) Open the Terrestrial menu, highlight Channel Add/Delete, and then press T. Setup Installation Sleep Timer PC Settings Power-On Mode Power-Saving 4 (A new set of Installation menu icons will take substantially longer than when the antenna input is cycling through all ...the antenna channels, and store all active channels in your Cable TV service lineup changes significantly. Installation Terrestrial Input Configuration...
... shown below .) Open the Terrestrial menu, highlight Channel Add/Delete, and then press T. Setup Installation Sleep Timer PC Settings Power-On Mode Power-Saving 4 (A new set of Installation menu icons will take substantially longer than when the antenna input is cycling through all ...the antenna channels, and store all active channels in your Cable TV service lineup changes significantly. Installation Terrestrial Input Configuration...

Owner's Manual - English
Page 34
...the reset: Highlight No and press T. As a result, the TV will turn on quicker. Setup Installation Sleep Timer PC Settings Power-On Mode Power-Saving Power-Saving Fast 34 To set the Power-On Mode feature: 1 Press Y, and open the Setup menu. 2 Highlight Power-On Mode and press c. 3 Press B or b to ...turn on the TV front will be lit. The TV will turn off , unplug the TV power cord and then...
...the reset: Highlight No and press T. As a result, the TV will turn on quicker. Setup Installation Sleep Timer PC Settings Power-On Mode Power-Saving Power-Saving Fast 34 To set the Power-On Mode feature: 1 Press Y, and open the Setup menu. 2 Highlight Power-On Mode and press c. 3 Press B or b to ...turn on the TV front will be lit. The TV will turn off , unplug the TV power cord and then...

Owner's Manual - English
Page 36
... your inputs. • Keep a list of your channels and inputs. Channel Browser Setup Navigation History List ANT List Inputs List Favorites List Reset Select Mode Power Off Clear (On) On On On Done 36 Input Selection ANT 0 ANT 1 Video 1 2 Video 2 3 ColorStream HD1 4 ColorStream HD2 5 HDMI 1 6 HDMI 2 7 HDMI 3...you to: • Navigate the contents of all your favorite channels (see "Favorites Browser," below right is pressed. Chapter 6: Using the TV's features 4 Press C or c to select the desired label for that input to be "grayed out" in the Channel Browser™ ...
... your inputs. • Keep a list of your channels and inputs. Channel Browser Setup Navigation History List ANT List Inputs List Favorites List Reset Select Mode Power Off Clear (On) On On On Done 36 Input Selection ANT 0 ANT 1 Video 1 2 Video 2 3 ColorStream HD1 4 ColorStream HD2 5 HDMI 1 6 HDMI 2 7 HDMI 3...you to: • Navigate the contents of all your favorite channels (see "Favorites Browser," below right is pressed. Chapter 6: Using the TV's features 4 Press C or c to select the desired label for that input to be "grayed out" in the Channel Browser™ ...

Owner's Manual - English
Page 37
...tune to the channel or input. 2 Press O to close the Channel Browser™. The Channel Browser™ will be saved every power on /off the left side. Chapter 6: Using the TV's features 4 Press b to highlight History List, and then press C or c to select the setting you must press T to ... defaults, highlight Reset and press T. Elements of the Channel Browser™. To tune to a channel or input in Select mode: 1 While watching TV, press 3 C or # c to open in the History List, but you prefer: either Power Off Clear (On), On, or Off. Press 3 C to On and the Power-On Mode (-
...tune to the channel or input. 2 Press O to close the Channel Browser™. The Channel Browser™ will be saved every power on /off the left side. Chapter 6: Using the TV's features 4 Press b to highlight History List, and then press C or c to select the setting you must press T to ... defaults, highlight Reset and press T. Elements of the Channel Browser™. To tune to a channel or input in Select mode: 1 While watching TV, press 3 C or # c to open in the History List, but you prefer: either Power Off Clear (On), On, or Off. Press 3 C to On and the Power-On Mode (-
Owner's Manual - English
Page 38
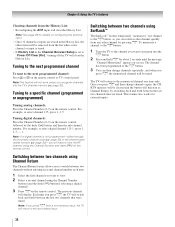
... control. Tuning to the next programmed channel: Press < or , on configuring the antenna input. • Once 32 channels or inputs are tuned. The TV will switch back and forth between two channels using the Channel Number buttons (and the dash (=) button if selecting a digital channel). 3 Press R on... the remote control. Each time you want to "Power Off Clear (On)," turning off the TV will clear the History List. This feature also works for external inputs. 38 Note: If a digital channel is set to program into...
... control. Tuning to the next programmed channel: Press < or , on configuring the antenna input. • Once 32 channels or inputs are tuned. The TV will switch back and forth between two channels using the Channel Number buttons (and the dash (=) button if selecting a digital channel). 3 Press R on... the remote control. Each time you want to "Power Off Clear (On)," turning off the TV will clear the History List. This feature also works for external inputs. 38 Note: If a digital channel is set to program into...
Owner's Manual - English
Page 51
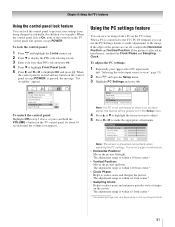
.../right. When the control panel is locked and any button on the control panel (except POWER) is On, none of the controls on the TV screen. When a PC is no pc input signal, this feature will operate except POWER. To lock the control panel: 1 Press Y and highlight the Locks menu icon. 2 Press ... be grayed out in step 5 above, or press and hold the VOLUME - Setup Installation Sleep Timer PC Settings Power-On Mode Power-Saving Note: If a PC is not connected or there is connected to the TV's PC IN terminal, you want to adjust. 5 Press C or c to make adjustments to make the appropriate...
.../right. When the control panel is locked and any button on the control panel (except POWER) is On, none of the controls on the TV screen. When a PC is no pc input signal, this feature will operate except POWER. To lock the control panel: 1 Press Y and highlight the Locks menu icon. 2 Press ... be grayed out in step 5 above, or press and hold the VOLUME - Setup Installation Sleep Timer PC Settings Power-On Mode Power-Saving Note: If a PC is not connected or there is connected to the TV's PC IN terminal, you want to adjust. 5 Press C or c to make adjustments to make the appropriate...

Owner's Manual - English
Page 52
...: Press [ on page 32.) Setting the sleep timer You can set the sleep timer to turn off . Setup Installation Sleep Timer PC Settings Power-On Mode Power-Saving 3 Press the Number buttons to enter the length of analog audio inputs, the PC Audio menu setting influences the HDMI 1 Audio menu setting... Note: A message will display on-screen when there is set of time in 10-minute increments, to a maximum of 180 minutes). Chapter 6: Using the TV's features Setting the PC Audio This function allows you to output the sound from your PC (if connected) or mute the sound from your PC...
...: Press [ on page 32.) Setting the sleep timer You can set the sleep timer to turn off . Setup Installation Sleep Timer PC Settings Power-On Mode Power-Saving 3 Press the Number buttons to enter the length of analog audio inputs, the PC Audio menu setting influences the HDMI 1 Audio menu setting... Note: A message will display on-screen when there is set of time in 10-minute increments, to a maximum of 180 minutes). Chapter 6: Using the TV's features Setting the PC Audio This function allows you to output the sound from your PC (if connected) or mute the sound from your PC...


