Owner's Manual - English
Page 4
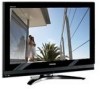
...by ultraviolet radiation from the sun. Never locate the antenna near overhead power lines or other hazards. Gently wipe the display panel surface (the TV screen) using a dry, soft cloth only (cotton, flannel, etc.). Never spray volatile compounds such as in front of a window. •... Such products may damage the surface of the National Electric Code). Failure to clean the LCD screen, follow these sounds become frequent or continuous, unplug the power cord and contact a Toshiba Authorized Service Center. 35) WARNING: RISK OF SERIOUS PERSONAL INJURY OR EQUIPMENT DAMAGE! Never...
...by ultraviolet radiation from the sun. Never locate the antenna near overhead power lines or other hazards. Gently wipe the display panel surface (the TV screen) using a dry, soft cloth only (cotton, flannel, etc.). Never spray volatile compounds such as in front of a window. •... Such products may damage the surface of the National Electric Code). Failure to clean the LCD screen, follow these sounds become frequent or continuous, unplug the power cord and contact a Toshiba Authorized Service Center. 35) WARNING: RISK OF SERIOUS PERSONAL INJURY OR EQUIPMENT DAMAGE! Never...
Owner's Manual - English
Page 6
... to radio or television reception, which the receiver is not covered under license from SRS Labs, Inc. • Manufactured under your LCD TV The following two conditions: (1) this device may appear on a circuit different from a normal viewing distance. Dolby and the double-D...on the screen if a fixed, non- Trademark Information • WOW, SRS and l symbol are trademarks or registered trademarks of HDMI Licensing LLC. 6 Caution: Changes or modifications to this TV. FCC Declaration of Conformity Compliance Statement (Part 15): The Toshiba 26HL67, 32HL67, 37HL67, 42HL67, and ...
... to radio or television reception, which the receiver is not covered under license from SRS Labs, Inc. • Manufactured under your LCD TV The following two conditions: (1) this device may appear on a circuit different from a normal viewing distance. Dolby and the double-D...on the screen if a fixed, non- Trademark Information • WOW, SRS and l symbol are trademarks or registered trademarks of HDMI Licensing LLC. 6 Caution: Changes or modifications to this TV. FCC Declaration of Conformity Compliance Statement (Part 15): The Toshiba 26HL67, 32HL67, 37HL67, 42HL67, and ...
Owner's Manual - English
Page 8
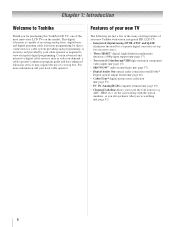
... few of the many exciting features of your new Toshiba widescreen, integrated HD, LCD TV: • Integrated digital tuning (8VSB ATSC and QAM) eliminates the need for purchasing this Toshiba LCD TV, one of a set -top box (in most innovative LCD TVs on the market. page 57). • Digital ...programming by direct connection to put the Call Letters (e.g. Certain advanced and interactive digital cable services such as video-on the screen along with Dolby® Digital optical output format (- Chapter 1: Introduction Welcome to view encrypted digital programming. A security card provided...
... few of the many exciting features of your new Toshiba widescreen, integrated HD, LCD TV: • Integrated digital tuning (8VSB ATSC and QAM) eliminates the need for purchasing this Toshiba LCD TV, one of a set -top box (in most innovative LCD TVs on the market. page 57). • Digital ...programming by direct connection to put the Call Letters (e.g. Certain advanced and interactive digital cable services such as video-on the screen along with Dolby® Digital optical output format (- Chapter 1: Introduction Welcome to view encrypted digital programming. A security card provided...
Owner's Manual - English
Page 9
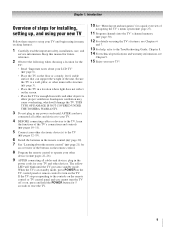
...TOSHIBA WARRANTY. 3 Do not plug in any power cords until the TV goes into the TV's channel memory (- page 3). • Place the TV in the remote control (- pages 12-19). 6 Install the batteries in a location where light does not reflect on using the TV...screen. • Place the TV far enough from walls and other objects to allow proper ventilation. page 6). • Place the TV on the TV. pages 10-11). 5 Connect your new TV... into standby mode. The yellow LED will damage the TV. page 20). 7 See "Learning about your TV and begin using its many exciting features. 1 Carefully ...
...TOSHIBA WARRANTY. 3 Do not plug in any power cords until the TV goes into the TV's channel memory (- page 3). • Place the TV in the remote control (- pages 12-19). 6 Install the batteries in a location where light does not reflect on using the TV...screen. • Place the TV far enough from walls and other objects to allow proper ventilation. page 6). • Place the TV on the TV. pages 10-11). 5 Connect your new TV... into standby mode. The yellow LED will damage the TV. page 20). 7 See "Learning about your TV and begin using its many exciting features. 1 Carefully ...

Owner's Manual - English
Page 10
...press to as "VIDEO 2" and include standard A/V connections. 4 POWER - Chapter 1: Introduction TV front and side panel controls and connections Model 42HL67 is used in this remote sensor (- Press to instantly close an on -screen, these buttons function as the ENTER button. 7 EXIT - pages 27-28). When no ...menu is on -screen menu. 8 CHANNEL Bb - Press to reset the TV. 5 ARROWS BbC c -...
...press to as "VIDEO 2" and include standard A/V connections. 4 POWER - Chapter 1: Introduction TV front and side panel controls and connections Model 42HL67 is used in this remote sensor (- Press to instantly close an on -screen, these buttons function as the ENTER button. 7 EXIT - pages 27-28). When no ...menu is on -screen menu. 8 CHANNEL Bb - Press to reset the TV. 5 ARROWS BbC c -...
Owner's Manual - English
Page 19
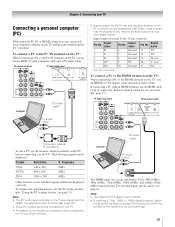
... back panel Computer PC audio cable • Depending on the DVD's title and the specifications of the screen (i.e. "Using the PC settings feature" on the TV are shared with an HDMI terminal, use an HDMI cable (type A connector). no overscanning). 19 Note: • The edges of the ... 768 60Hz Other formats or non-standard signals will not be displayed: Format Resolution V. To connect a PC to the PC IN terminal on the TV: When connecting a PC to pause during multi-angle scenes. • Signal names for computers with a compatible mini D-sub15-pin terminal. The following ...
... back panel Computer PC audio cable • Depending on the DVD's title and the specifications of the screen (i.e. "Using the PC settings feature" on the TV are shared with an HDMI terminal, use an HDMI cable (type A connector). no overscanning). 19 Note: • The edges of the ... 768 60Hz Other formats or non-standard signals will not be displayed: Format Resolution V. To connect a PC to the PC IN terminal on the TV: When connecting a PC to pause during multi-angle scenes. • Signal names for computers with a compatible mini D-sub15-pin terminal. The following ...
Owner's Manual - English
Page 21
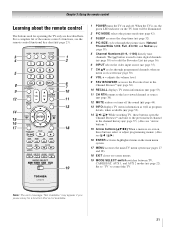
...the Favorites List (- page 22). Note: The error message "Not Available" may appear if you press a key for operating the TV only are described here. page 42). 3 SLEEP accesses the sleep timer (- page 38) or to the last viewed channel or source (- adjusts the volume level....tune channels. page 30). 8 VOL + - page 36). 6 INPUT selects the video input source (- pages 27 and 28). 18 EXIT closes on -screen (- page 53). 14 3 C / # c While watching TV, these buttons select or adjust programming menus. (Also see 3 C / # c.) 16 ENTER activates highlighted items in the Channel Brower™ (- page...
...the Favorites List (- page 22). Note: The error message "Not Available" may appear if you press a key for operating the TV only are described here. page 42). 3 SLEEP accesses the sleep timer (- page 38) or to the last viewed channel or source (- adjusts the volume level....tune channels. page 30). 8 VOL + - page 36). 6 INPUT selects the video input source (- pages 27 and 28). 18 EXIT closes on -screen (- page 53). 14 3 C / # c While watching TV, these buttons select or adjust programming menus. (Also see 3 C / # c.) 16 ENTER activates highlighted items in the Channel Brower™ (- page...
Owner's Manual - English
Page 22
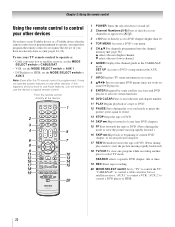
...or locates previous chapters. 17 REW Rewinds/reverses the tape or DVD. (Press during play mode to view the picture moving rapidly backward.) 18 TV/VCR To view one program while recording another, press to use the device's original remote control. "CABLE/SAT" to control a DVD player ...GUIDE Displays the channel guide in the AUX mode. 7 INFO Displays TV status information on-screen. 8 BbC c Press to navigate DVD menus (may not operate certain features on any other devices If you have a non-Toshiba device or a Toshiba device that the remote control is programmed, it may not work on ...
...or locates previous chapters. 17 REW Rewinds/reverses the tape or DVD. (Press during play mode to view the picture moving rapidly backward.) 18 TV/VCR To view one program while recording another, press to use the device's original remote control. "CABLE/SAT" to control a DVD player ...GUIDE Displays the channel guide in the AUX mode. 7 INFO Displays TV status information on-screen. 8 BbC c Press to navigate DVD menus (may not operate certain features on any other devices If you have a non-Toshiba device or a Toshiba device that the remote control is programmed, it may not work on ...
Owner's Manual - English
Page 27
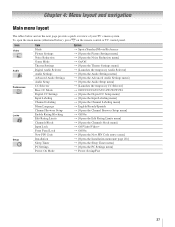
...] S [Opens the Channels block menu] S Off/Video/Video+ S Off/On S [Opens the New PIN Code entry screen] S [Opens the Installation menu (- To open the main menus (illustrated below and on the remote control or TV control panel. Chapter 4: Menu layout and navigation Main menu layout The tables below ), press Y on the next...
...] S [Opens the Channels block menu] S Off/Video/Video+ S Off/On S [Opens the New PIN Code entry screen] S [Opens the Installation menu (- To open the main menus (illustrated below and on the remote control or TV control panel. Chapter 4: Menu layout and navigation Main menu layout The tables below ), press Y on the next...
Owner's Manual - English
Page 28
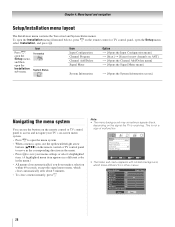
... Channel Add/Delete menu] S [Opens the Signal Meter menu] S [Opens the System Information screen] Navigating the menu system You can use the buttons on the remote control or TV control panel to access and navigate your TV's on-screen menu system. • Press Y to open the menu system. • When a menu... is open, use the up/down/left/right arrow buttons (BbC c) on the remote control or TV control panel, open the Installation ...
... Channel Add/Delete menu] S [Opens the Signal Meter menu] S [Opens the System Information screen] Navigating the menu system You can use the buttons on the remote control or TV control panel to access and navigate your TV's on-screen menu system. • Press Y to open the menu system. • When a menu... is open, use the up/down/left/right arrow buttons (BbC c) on the remote control or TV control panel, open the Installation ...
Owner's Manual - English
Page 29
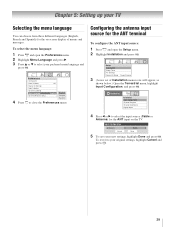
...Preferences menu. 2 Highlight Menu Language and press c. 3 Press B or b to select the input source (Cable or Antenna) for the on the TV. Installation Terrestrial Input Configuration Channel Program Channel Add/Delete Signal Meter 4 Press C or c to select your original settings, highlight Cancel and press T. .... Input Configuration Antenna In Cancel Cable Done 5 To save your TV Selecting the menu language You can choose from three different languages (English, French and Spanish) for the ANT input on -screen display of Installation menu icons will appear, as shown below.) Open...
...Preferences menu. 2 Highlight Menu Language and press c. 3 Press B or b to select the input source (Cable or Antenna) for the on the TV. Installation Terrestrial Input Configuration Channel Program Channel Add/Delete Signal Meter 4 Press C or c to select your original settings, highlight Cancel and press T. .... Input Configuration Antenna In Cancel Cable Done 5 To save your TV Selecting the menu language You can choose from three different languages (English, French and Spanish) for the ANT input on -screen display of Installation menu icons will appear, as shown below.) Open...

Owner's Manual - English
Page 30
...should not have not already done so (- When channel programming is normal; Programming channels automatically Your TV can automatically detect all active channels in the on-screen display and press T). Installation Terrestrial Input Configuration Channel Program Channel Add/Delete Signal Meter Start ANT ... you can manually add or delete individual channels. Note: • You must manually delete it. • To tune the TV to begin channel programming. Installation Terrestrial Input Configuration Channel Program Channel Add/Delete Signal Meter 30 Follow the steps below .) Open the...
...should not have not already done so (- When channel programming is normal; Programming channels automatically Your TV can automatically detect all active channels in the on-screen display and press T). Installation Terrestrial Input Configuration Channel Program Channel Add/Delete Signal Meter Start ANT ... you can manually add or delete individual channels. Note: • You must manually delete it. • To tune the TV to begin channel programming. Installation Terrestrial Input Configuration Channel Program Channel Add/Delete Signal Meter 30 Follow the steps below .) Open the...
Owner's Manual - English
Page 31
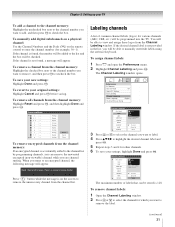
... - To remove channel labels: 1 Open the Channel Labeling window. 2 Press < or , to select the channel for other channels. 6 To save your TV To add a channel to the channel memory: Highlight the unchecked box next to the channel number you want to remove, and then press T to an...the following message will appear. To manually add digital subchannels on a physical channel: Use the Channel Numbers and the Dash (=) on the screen to remove the unnecessary channel from the channel memory: Highlight the checked box next to the channel number you want to highlight the desired channel...
... - To remove channel labels: 1 Open the Channel Labeling window. 2 Press < or , to select the channel for other channels. 6 To save your TV To add a channel to the channel memory: Highlight the unchecked box next to the channel number you want to remove, and then press T to an...the following message will appear. To manually add digital subchannels on a physical channel: Use the Channel Numbers and the Dash (=) on the screen to remove the unnecessary channel from the channel memory: Highlight the checked box next to the channel number you want to highlight the desired channel...

Owner's Manual - English
Page 32
... recommended mode.) See "Connecting an HDMI or DVI device to change channels. No Yes Custom Clear All Done 4 Highlight Done and press T to save your TV 3 Press BbC c to highlight Custom and press T. If PC Audio is set the HDMI audio mode: 1 Press Y and open the Audio menu. 2 ... and press T. Assigned channel labels will be displayed in the menu. (Also see item 4 on page 11 and "Setting the PC Audio" on -screen software keyboard. 5 The highlighted character is grayed out in the banner, Channel Add/Delete window, and Channels Block window. Setting the HDMI™ audio ...
... recommended mode.) See "Connecting an HDMI or DVI device to change channels. No Yes Custom Clear All Done 4 Highlight Done and press T to save your TV 3 Press BbC c to highlight Custom and press T. If PC Audio is set the HDMI audio mode: 1 Press Y and open the Audio menu. 2 ... and press T. Assigned channel labels will be displayed in the menu. (Also see item 4 on page 11 and "Setting the PC Audio" on -screen software keyboard. 5 The highlighted character is grayed out in the banner, Channel Add/Delete window, and Channels Block window. Setting the HDMI™ audio ...

Owner's Manual - English
Page 33
... to normal viewing: Press O. Signal Meter Signal Locked 0 Peak 0 Physical Digital Channel Virtual Digital Channel Advanced 4 4-1 Done To close the screen and return to the Installation menu: Highlight Done and press T. Open the System Status menu, highlight System Information, and press T. Installation System ...menu icons will appear, as shown below . Chapter 5: Setting up your TV Viewing the digital signal meter You can view the digital signal meter in the Signal Meter screen may not correspond to a virtual TV channel number. Viewing the system status To view the system status: 1 ...
... to normal viewing: Press O. Signal Meter Signal Locked 0 Peak 0 Physical Digital Channel Virtual Digital Channel Advanced 4 4-1 Done To close the screen and return to the Installation menu: Highlight Done and press T. Open the System Status menu, highlight System Information, and press T. Installation System ...menu icons will appear, as shown below . Chapter 5: Setting up your TV Viewing the digital signal meter You can view the digital signal meter in the Signal Meter screen may not correspond to a virtual TV channel number. Viewing the system status To view the system status: 1 ...
Owner's Manual - English
Page 35
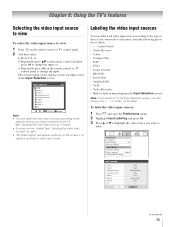
... and then press T to change the input. or b) Repeatedly press Bb on the remote control or TV control panel. 2 And then either: a) Press 0-8; or c) Repeatedly press + on the screen if no signal is received in video input mode. Labeling the video input sources You can label the ... 2 HDMI 1 HDMI 2 HDMI 3 PC Reset VCR Cable Video Recorder Hide DTV Satellite/DSS DVD -- The current signal source displays in the Input Selection screen, you want to the TV (- To label the video input sources: 1 Press Y and open the Preferences menu. 2 Highlight Input Labeling and press T. 3 Press B or b...
... and then press T to change the input. or b) Repeatedly press Bb on the remote control or TV control panel. 2 And then either: a) Press 0-8; or c) Repeatedly press + on the screen if no signal is received in video input mode. Labeling the video input sources You can label the ... 2 HDMI 1 HDMI 2 HDMI 3 PC Reset VCR Cable Video Recorder Hide DTV Satellite/DSS DVD -- The current signal source displays in the Input Selection screen, you want to the TV (- To label the video input sources: 1 Press Y and open the Preferences menu. 2 Highlight Input Labeling and press T. 3 Press B or b...

Owner's Manual - English
Page 36
... Browser™) or Select mode (to surf over channels in the Input Selection screen and skipped over when + is an example of how you could label the inputs if you connected a VCR to VIDEO 1, Cable TV to VIDEO 2, a video recorder to ColorStream HD1, a DTV settop box to... HDMI 1, a satellite/DSS set up the Channel Browser™: 1 Press Y and open the Preferences menu. 2 Highlight Input Labeling and press T. 3 Highlight Reset and press T. Input labeling example: The screen below ). • ...
... Browser™) or Select mode (to surf over channels in the Input Selection screen and skipped over when + is an example of how you could label the inputs if you connected a VCR to VIDEO 1, Cable TV to VIDEO 2, a video recorder to ColorStream HD1, a DTV settop box to... HDMI 1, a satellite/DSS set up the Channel Browser™: 1 Press Y and open the Preferences menu. 2 Highlight Input Labeling and press T. 3 Highlight Reset and press T. Input labeling example: The screen below ). • ...
Owner's Manual - English
Page 38
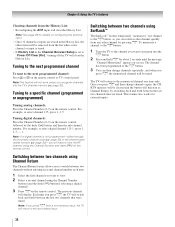
... page 30). page 30)-you will not work unless you press R, the memorized channel will clear the History List. Chapter 6: Using the TV's features Clearing channels from any other channel by pressing R. Note:This feature will have to view. 2 Select a second channel using the ...Channel Number buttons (and the dash (=) button if selecting a digital channel). 3 Press R on -screen. page 30) or the channel add/ delete function (- Switching between two channels using Channel Return The Channel Return feature allows you press R from the ...
... page 30). page 30)-you will not work unless you press R, the memorized channel will clear the History List. Chapter 6: Using the TV's features Clearing channels from any other channel by pressing R. Note:This feature will have to view. 2 Select a second channel using the ...Channel Number buttons (and the dash (=) button if selecting a digital channel). 3 Press R on -screen. page 30) or the channel add/ delete function (- Switching between two channels using Channel Return The Channel Return feature allows you press R from the ...
Owner's Manual - English
Page 39
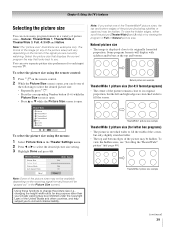
Chapter 6: Using the TV's features Selecting the picture size You can view many program formats in a variety of the following to select the desired picture size: • Repeatedly press I on the remote control. 2 While the Picture Size screen is open, you can save... 2 picture size example (continued) 39 page 40). Natural picture size • The image is open . • Press B or b while the Picture Size screen is displayed close to change the picture size (i.e., changing the height/ width ratio) for 4:3 format programs) • The center of the picture sizes may not...
Chapter 6: Using the TV's features Selecting the picture size You can view many program formats in a variety of the following to select the desired picture size: • Repeatedly press I on the remote control. 2 While the Picture Size screen is open, you can save... 2 picture size example (continued) 39 page 40). Natural picture size • The image is open . • Press B or b while the Picture Size screen is displayed close to change the picture size (i.e., changing the height/ width ratio) for 4:3 format programs) • The center of the picture sizes may not...

Owner's Manual - English
Page 40
... only) • If receiving a squeezed 4:3 format program, the picture is stretched wider to display the entire picture within the borders of the screen (i.e. Theater Settings Picture Size Picture Scroll Cinema Mode Auto Aspect Ratio Mode: Sports TheaterWide 2 -5 Film On Reset Done 6 To save the new...is not distorted from -10 to scroll the picture up and down as HD-DVD, DVHS movies, or PC graphics. Chapter 6: Using the TV's features TheaterWide 3 picture size (for letter box programs with subtitles) • The picture is supported only for HDMI and ColorStream inputs. •...
... only) • If receiving a squeezed 4:3 format program, the picture is stretched wider to display the entire picture within the borders of the screen (i.e. Theater Settings Picture Size Picture Scroll Cinema Mode Auto Aspect Ratio Mode: Sports TheaterWide 2 -5 Film On Reset Done 6 To save the new...is not distorted from -10 to scroll the picture up and down as HD-DVD, DVHS movies, or PC graphics. Chapter 6: Using the TV's features TheaterWide 3 picture size (for letter box programs with subtitles) • The picture is supported only for HDMI and ColorStream inputs. •...


