Brochure
Page 2
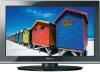
...• ColorStream® Component Video Inputs: 1 • PC Input: 1 Hi-Res • USB Ports: 1 (Music/Photo) • Composite: 1 Audio • Invisible Speaker System Design • Speaker : 7W + 7W • Mute/Half Mute Product and Packaging • VESA Mounting Pattern3: 200mm × ... be pushed, pulled over -scanning. • Gaming Mode: Initiate the gaming experience by reducing game controller delay with Native Mode™! Toshiba 40E210U System Specifications1 Cabinet • Screen Size Class: 40 in. • Actual Screen Size Diagonal: 40.0 in . Weight: 31.09 lbs...
...• ColorStream® Component Video Inputs: 1 • PC Input: 1 Hi-Res • USB Ports: 1 (Music/Photo) • Composite: 1 Audio • Invisible Speaker System Design • Speaker : 7W + 7W • Mute/Half Mute Product and Packaging • VESA Mounting Pattern3: 200mm × ... be pushed, pulled over -scanning. • Gaming Mode: Initiate the gaming experience by reducing game controller delay with Native Mode™! Toshiba 40E210U System Specifications1 Cabinet • Screen Size Class: 40 in. • Actual Screen Size Diagonal: 40.0 in . Weight: 31.09 lbs...
User Manual
Page 7
..., and is subject to provide reasonable protection against harmful interference in the United States and other countries. • MPEG Layer-3 audio coding technology licensed from a normal viewing distance. Dolby and the double-D symbol are trademarks of Dolby Laboratories. • HDMI,...or registered trademarks of HDMI Licensing LLC in a residential installation. FCC Declaration of Conformity Compliance Statement (Part 15): Toshiba 32C110U, 40E210U, and 55G310U Television models comply with this TV. These limits are designed to the following symptoms are technical limitations...
..., and is subject to provide reasonable protection against harmful interference in the United States and other countries. • MPEG Layer-3 audio coding technology licensed from a normal viewing distance. Dolby and the double-D symbol are trademarks of Dolby Laboratories. • HDMI,...or registered trademarks of HDMI Licensing LLC in a residential installation. FCC Declaration of Conformity Compliance Statement (Part 15): Toshiba 32C110U, 40E210U, and 55G310U Television models comply with this TV. These limits are designed to the following symptoms are technical limitations...
User Manual
Page 8
...Connecting an HDMI® or DVI device to the HDMI input 16 REGZA-LINK® connection 17 Connecting a digital audio system 18 Connecting a personal computer (PC 18 Chapter 3: Using the remote control 20 Installing the remote control batteries ...device (DVD player, etc.) control 47 REGZA-LINK® input source selection 47 VOLUME and MUTE controls of Audio Receiver........ 48 Other REGZA-LINK® functions 48 Displaying TV status information 48 Understanding the last mode memory ... Warranty for LCD Televisions 57 Limited Canadian Warranty for Toshiba Brand Flat Panel Televisions 58
...Connecting an HDMI® or DVI device to the HDMI input 16 REGZA-LINK® connection 17 Connecting a digital audio system 18 Connecting a personal computer (PC 18 Chapter 3: Using the remote control 20 Installing the remote control batteries ...device (DVD player, etc.) control 47 REGZA-LINK® input source selection 47 VOLUME and MUTE controls of Audio Receiver........ 48 Other REGZA-LINK® functions 48 Displaying TV status information 48 Understanding the last mode memory ... Warranty for LCD Televisions 57 Limited Canadian Warranty for Toshiba Brand Flat Panel Televisions 58
User Manual
Page 9
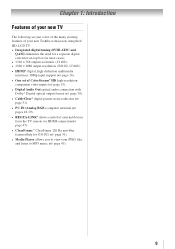
Chapter 1: Introduction Features of your new TV The following are just a few of the many exciting features of your new Toshiba widescreen, integrated HD, LCD TV: • Integrated digital tuning (8VSB ATSC and QAM) eliminates the need for a separate digital converter ... support ( page 16). • One set of ColorStream® HD high-resolution component video inputs ( page 15). • Digital Audio Out optical audio connection with Dolby® Digital optical output format ( page 38). • CableClear® digital picture noise reduction ( page 51). •...
Chapter 1: Introduction Features of your new TV The following are just a few of the many exciting features of your new Toshiba widescreen, integrated HD, LCD TV: • Integrated digital tuning (8VSB ATSC and QAM) eliminates the need for a separate digital converter ... support ( page 16). • One set of ColorStream® HD high-resolution component video inputs ( page 15). • Digital Audio Out optical audio connection with Dolby® Digital optical output format ( page 38). • CableClear® digital picture noise reduction ( page 51). •...
User Manual
Page 11
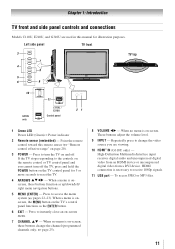
... range" on the TV's control panel functions as up/down/left/ right menu navigation buttons. 5無 MENU (ENTER) - High-Definition Multimedia Interface input receives digital audio and uncompressed digital video from an HDMI device or uncompressed digital video from a DVI device. Press to receive 1080p signals. 11無 USB port - Left...
... range" on the TV's control panel functions as up/down/left/ right menu navigation buttons. 5無 MENU (ENTER) - High-Definition Multimedia Interface input receives digital audio and uncompressed digital video from an HDMI device or uncompressed digital video from a DVI device. Press to receive 1080p signals. 11無 USB port - Left...
User Manual
Page 12
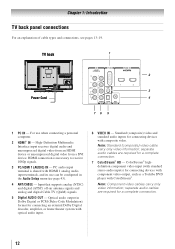
... are required for connecting devices with component video output, such as a Toshiba DVD player with optical audio input. 6無 VIDEO IN - TV back 1 Power Cord 2 1 3 4 76 5 1無 PC IN - Standard (composite) video and standard audio inputs for a complete connection. 7無 ColorStream® HD - Note: Standard (composite) video cable carry only video information; PC...
... are required for connecting devices with component video output, such as a Toshiba DVD player with optical audio input. 6無 VIDEO IN - TV back 1 Power Cord 2 1 3 4 76 5 1無 PC IN - Standard (composite) video and standard audio inputs for a complete connection. 7無 ColorStream® HD - Note: Standard (composite) video cable carry only video information; PC...
User Manual
Page 13
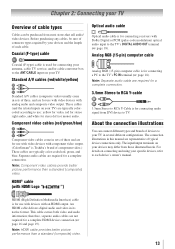
...; Before purchasing any cables, be purchased from those illustrated herein. HDMI® cable (with HDMI Logo " ") Optical audio cable Optical audio cable is Toshiba's brand of three, and are typically color-coded red, green, and blue. Coaxial (F-type) cable Coaxial (F-type) cable is for ...use with video devices with Dolby Digital or PCM (pulse-code modulation) optical audio input to the ANT/CABLE input on your devices...
...; Before purchasing any cables, be purchased from those illustrated herein. HDMI® cable (with HDMI Logo " ") Optical audio cable Optical audio cable is Toshiba's brand of three, and are typically color-coded red, green, and blue. Coaxial (F-type) cable Coaxial (F-type) cable is for ...use with video devices with Dolby Digital or PCM (pulse-code modulation) optical audio input to the ANT/CABLE input on your devices...
User Manual
Page 14
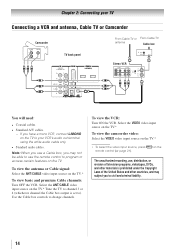
Chapter 2: Connecting your VCR's audio out terminal using the white audio cable only. • Standard audio cables. Note: When you use a Cable box, you have a mono VCR, connect L/MONO on the TV to your TV Connecting a VCR and antenna, Cable TV or Camcorder Camcorder AUDIO OUT L R VIDEO TV back panel 1 From Cable ...TV or From Cable TV antenna Cable box IN CH 3 CH 4 OUT Stereo VCR VIDEO AUDIO L R IN CH 3 CH 4 OUT L R IN from ANT OUT to TV You will need: • Coaxial cables • Standard A/V cables −− If you...
Chapter 2: Connecting your VCR's audio out terminal using the white audio cable only. • Standard audio cables. Note: When you use a Cable box, you have a mono VCR, connect L/MONO on the TV to your TV Connecting a VCR and antenna, Cable TV or Camcorder Camcorder AUDIO OUT L R VIDEO TV back panel 1 From Cable ...TV or From Cable TV antenna Cable box IN CH 3 CH 4 OUT Stereo VCR VIDEO AUDIO L R IN CH 3 CH 4 OUT L R IN from ANT OUT to TV You will need: • Coaxial cables • Standard A/V cables −− If you...
User Manual
Page 15
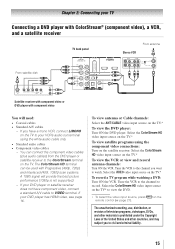
... receiver. Tune the VCR to the channel to civil and criminal liability. 15 The ColorStream HD terminal can connect the component video cables (plus audio cables) from the DVD player or satellite receiver to VIDEO terminal. Chapter 2: Connecting your TV Connecting a DVD player with ColorStream® (component... • Coaxial cables • Standard A/V cables −− If you have a mono VCR, connect L/MONO on the TV to your VCR's audio out terminal using the component video connections: Turn on the TV.* To view the DVD player: Turn ON the DVD player. Tune the VCR to...
... receiver. Tune the VCR to the channel to civil and criminal liability. 15 The ColorStream HD terminal can connect the component video cables (plus audio cables) from the DVD player or satellite receiver to VIDEO terminal. Chapter 2: Connecting your TV Connecting a DVD player with ColorStream® (component... • Coaxial cables • Standard A/V cables −− If you have a mono VCR, connect L/MONO on the TV to your VCR's audio out terminal using the component video connections: Turn on the TV.* To view the DVD player: Turn ON the DVD player. Tune the VCR to...
User Manual
Page 16
... this is an evolving technology, it is possible that some devices may not work properly. −− HDMI cable transfers both video and audio. The recommended length is designed to accept HDCP (HighBandwidth Digital-Content Protection) program material in digital form from a DVI (Digital Visual Interface..., turn on the TV first, and then the HDMI or DVI device. •• When turning off your TV receives digital audio and uncompressed digital video from an HDMI source device, or uncompressed digital video from EIA/CEA-861-Dcompliant[1] consumer electronic devices (such ...
... this is an evolving technology, it is possible that some devices may not work properly. −− HDMI cable transfers both video and audio. The recommended length is designed to accept HDCP (HighBandwidth Digital-Content Protection) program material in digital form from a DVI (Digital Visual Interface..., turn on the TV first, and then the HDMI or DVI device. •• When turning off your TV receives digital audio and uncompressed digital video from an HDMI source device, or uncompressed digital video from EIA/CEA-861-Dcompliant[1] consumer electronic devices (such ...
User Manual
Page 17
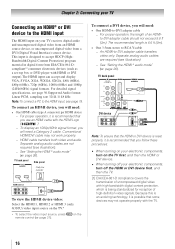
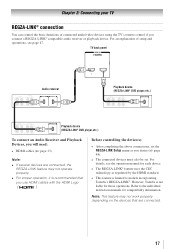
... device(s): • After completing the above connections, set . For details, see page 47. Refer to models incorporating Toshiba's REGZA-LINK®. TV back panel Audio receiver Playback device (REGZA-LINK® DVD player,etc.) Playback device (REGZA-LINK® DVD player,etc.) To connect.... • The REGZA-LINK® feature uses the CEC technology as you connect a REGZA-LINK® compatible audio receiver or playback device. However, Toshiba is recommended that are connected, the REGZA-LINK feature may not work properly depending on the devices that you will need...
... device(s): • After completing the above connections, set . For details, see page 47. Refer to models incorporating Toshiba's REGZA-LINK®. TV back panel Audio receiver Playback device (REGZA-LINK® DVD player,etc.) Playback device (REGZA-LINK® DVD player,etc.) To connect.... • The REGZA-LINK® feature uses the CEC technology as you connect a REGZA-LINK® compatible audio receiver or playback device. However, Toshiba is recommended that are connected, the REGZA-LINK feature may not work properly depending on the devices that you will need...
User Manual
Page 18
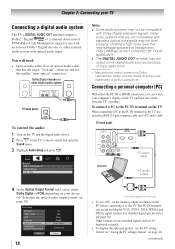
... trademarks of copy restrictions. ** Manufactured under license from the TV's speakers. THIS DAMAGE IS NOT COVERED BY YOUR WARRANTY. •• The DIGITAL AUDIO OUT terminal may not be displayed correctly. • To display the optimum picture, use the PC setting feature ( "Using the PC settings feature...To connect a PC to the PC IN terminal on the TV: When connecting a PC to the TV. TV back panel 1 Computer PC audio cable PC audio output 4無 In the Optical Output Format field, select either the PC IN or HDMI connection, you can accept and display VGA, SVGA, ...
... trademarks of copy restrictions. ** Manufactured under license from the TV's speakers. THIS DAMAGE IS NOT COVERED BY YOUR WARRANTY. •• The DIGITAL AUDIO OUT terminal may not be displayed correctly. • To display the optimum picture, use the PC setting feature ( "Using the PC settings feature...To connect a PC to the PC IN terminal on the TV: When connecting a PC to the TV. TV back panel 1 Computer PC audio cable PC audio output 4無 In the Optical Output Format field, select either the PC IN or HDMI connection, you can accept and display VGA, SVGA, ...
User Manual
Page 19
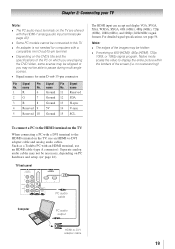
... VGA, SVGA, XGA, WXGA, SXGA, 480i (60Hz), 480p (60Hz), 720p (60Hz), 1080i (60Hz), and 1080p (24Hz/60Hz) signal formats. Separate analog audio cables may not be necessary, depending on the TV, use an HDMI-to pause during multi-angle scenes. • Signal names for computers with an... HDMI terminal, use an HDMI cable (type A connector). name 1R Pin Signal No. For detailed signal specifications, see page 56. Such as a Toshiba PC with a compatible mini D-sub15-pin terminal. •• Depending on the DVD's title and the specifications of the screen (i.e. name Pin Signal No...
... VGA, SVGA, XGA, WXGA, SXGA, 480i (60Hz), 480p (60Hz), 720p (60Hz), 1080i (60Hz), and 1080p (24Hz/60Hz) signal formats. Separate analog audio cables may not be necessary, depending on the TV, use an HDMI-to pause during multi-angle scenes. • Signal names for computers with an... HDMI terminal, use an HDMI cable (type A connector). name 1R Pin Signal No. For detailed signal specifications, see page 56. Such as a Toshiba PC with a compatible mini D-sub15-pin terminal. •• Depending on the DVD's title and the specifications of the screen (i.e. name Pin Signal No...
User Manual
Page 22
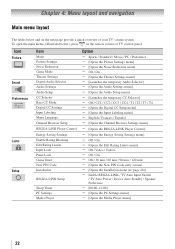
... system. Icon Picture Sound Preferences Locks Setup Item Mode Picture Settings Noise Reduction Game Mode Theater Settings Digital Audio Selector Audio Settings Audio Setup CC Selector Base CC Mode Digital CC Settings Input Labeling Menu Language Channel Browser Setup REGZA-LINK Player... [Opens the Noise Reduction menu] Off / On [Opens the Theater Settings menu] [Launches the temporary Audio Selector] [Opens the Audio Settings menu] [Opens the Audio Setup menu] [Launches the temporary CC Selector] Off / CC1 / CC2 / CC3 / CC4 / T1 / ...
... system. Icon Picture Sound Preferences Locks Setup Item Mode Picture Settings Noise Reduction Game Mode Theater Settings Digital Audio Selector Audio Settings Audio Setup CC Selector Base CC Mode Digital CC Settings Input Labeling Menu Language Channel Browser Setup REGZA-LINK Player... [Opens the Noise Reduction menu] Off / On [Opens the Theater Settings menu] [Launches the temporary Audio Selector] [Opens the Audio Settings menu] [Opens the Audio Setup menu] [Launches the temporary CC Selector] Off / CC1 / CC2 / CC3 / CC4 / T1 / ...
User Manual
Page 26
...and then press to be output. Digital Channel Is Encrypted - however, they can block specific channels. Digital When viewing the HDMI 1 input, digital audio from the PC Audio input. To add a channel to the channel memory: Highlight the checked box next to the channel number you unlock them. ( Page 41 ... ( ) on page 43.) 26 If the channel is grayed out in the menu. (Also see item 2 on page 12 and "Setting the PC Audio" on the remote control to an encrypted channel, the following message will be skipped and press . If not, the TV will automatically detect and output...
...and then press to be output. Digital Channel Is Encrypted - however, they can block specific channels. Digital When viewing the HDMI 1 input, digital audio from the PC Audio input. To add a channel to the channel memory: Highlight the checked box next to the channel number you unlock them. ( Page 41 ... ( ) on page 43.) 26 If the channel is grayed out in the menu. (Also see item 2 on page 12 and "Setting the PC Audio" on the remote control to an encrypted channel, the following message will be skipped and press . If not, the TV will automatically detect and output...
User Manual
Page 28
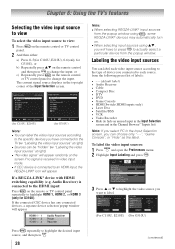
...for C110U, E210U), 0-6(only for G310U). The current signal source displays in the top right corner of labels: • - - (default label) • Audio Receiver • Cable • Compact Disc • DTV • DVD • Game Console • HDMI Switch (HDMI inputs only) • Laser Disc... (for C110U, E210U) (for G310U) Note: ••You can choose only "- -", "Game Console", or "Hide" as the label. Audio Receiver) is connected to change the input. Note: ••When selecting REGZA-LINK® input sources from the popup window. or c) Repeatedly ...
...for C110U, E210U), 0-6(only for G310U). The current signal source displays in the top right corner of labels: • - - (default label) • Audio Receiver • Cable • Compact Disc • DTV • DVD • Game Console • HDMI Switch (HDMI inputs only) • Laser Disc... (for C110U, E210U) (for G310U) Note: ••You can choose only "- -", "Game Console", or "Hide" as the label. Audio Receiver) is connected to change the input. Note: ••When selecting REGZA-LINK® input sources from the popup window. or c) Repeatedly ...
User Manual
Page 37
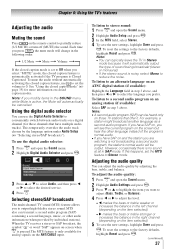
... Mono to reduce the noise. To listen to output high-fidelity stereo sound. For example, a station might broadcast another language as a second audio program. To reset the settings to the factory defaults, highlight Reset and press . Selecting stereo/SAP broadcasts The multi-channel TV sound (MTS)... Press or to 0. If you have SAP on, you will see the current program on the screen but hear the other audio information (when provided by individual stations). To reset the settings to the factory defaults, highlight Reset and press . (continued) 37 When the TV ...
... Mono to reduce the noise. To listen to output high-fidelity stereo sound. For example, a station might broadcast another language as a second audio program. To reset the settings to the factory defaults, highlight Reset and press . Selecting stereo/SAP broadcasts The multi-channel TV sound (MTS)... Press or to 0. If you have SAP on, you will see the current program on the screen but hear the other audio information (when provided by individual stations). To reset the settings to the factory defaults, highlight Reset and press . (continued) 37 When the TV ...
User Manual
Page 38
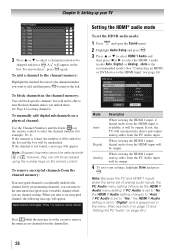
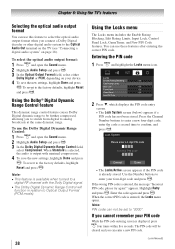
... and New PIN Code features. appears. To use the Dolby Digital Dynamic Range Control: 1無 Press and open the Sound menu. 2無 Highlight Audio Setup and press . 3無 In the Optical Output Format field, select either Dolby Digital or PCM, depending on page 18). Press the Channel Number... a new four-digit code, enter the code a second time to the factory defaults, highlight Reset and press . When Standard is selected, the audio is displayed, press four times within five seconds. To revert to confirm, and press . • The Locks/Active screen appears if the PIN ...
... and New PIN Code features. appears. To use the Dolby Digital Dynamic Range Control: 1無 Press and open the Sound menu. 2無 Highlight Audio Setup and press . 3無 In the Optical Output Format field, select either Dolby Digital or PCM, depending on page 18). Press the Channel Number... a new four-digit code, enter the code a second time to the factory defaults, highlight Reset and press . When Standard is selected, the audio is displayed, press four times within five seconds. To revert to confirm, and press . • The Locks/Active screen appears if the PIN ...
User Manual
Page 43
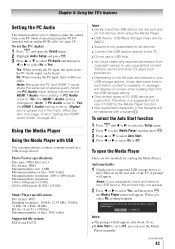
...in the filename will disappear after about 10 sec. ••If Auto Start is set the PC Audio: 1無 Press and open the Media Player There are supported. Toshiba cannot and does not grant such permission. ••Depending on -screen when loading files from the ...USB storage device. ••Only limited types of analog audio inputs, the PC Audio menu setting influences the HDMI 1 Audio menu setting. Note: Because the...
...in the filename will disappear after about 10 sec. ••If Auto Start is set the PC Audio: 1無 Press and open the Media Player There are supported. Toshiba cannot and does not grant such permission. ••Depending on -screen when loading files from the ...USB storage device. ••Only limited types of analog audio inputs, the PC Audio menu setting influences the HDMI 1 Audio menu setting. Note: Because the...
User Manual
Page 46
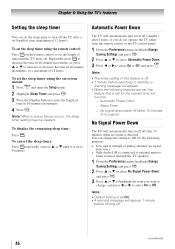
... minutes of no signal) No Signal Power Down The TV will automatically turn off the TV after 15 minutes when no signal detection.) • Only Audio L/R is detected. Automatic Power Down The TV will automatically turn itself off after a set length of time (maximum of 12 hours). To display the remaining...
... minutes of no signal) No Signal Power Down The TV will automatically turn off the TV after 15 minutes when no signal detection.) • Only Audio L/R is detected. Automatic Power Down The TV will automatically turn itself off after a set length of time (maximum of 12 hours). To display the remaining...


