Owner's Manual - English
Page 1
..., cable provider, or satellite provider. © 2008 TOSHIBA CORPORATION All Rights Reserved Owner's Record The model number and serial number are on the back of steps for setting up your new TV, see page 9. Refer to these numbers in the spaces below. Integrated High Definition LCD Television HIGH-DEFINITION TELEVISION 32RV530U 37RV530U 42RV530U 46RV530U...
..., cable provider, or satellite provider. © 2008 TOSHIBA CORPORATION All Rights Reserved Owner's Record The model number and serial number are on the back of steps for setting up your new TV, see page 9. Refer to these numbers in the spaces below. Integrated High Definition LCD Television HIGH-DEFINITION TELEVISION 32RV530U 37RV530U 42RV530U 46RV530U...
Owner's Manual - English
Page 2
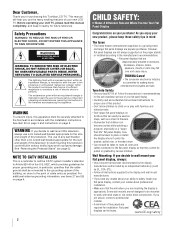
... to walls with furniture and television sets. • Don't place flat panel displays on furniture that can easily be used as steps, such as UL, CSA, ETL). • Follow all enclosed instructions for proper use of your LCD TV, please read and understand all instructions... safe. Wall Mounting: If you decide to wall mount this television, always use a UL Listed wall bracket appropriate for purchasing this Toshiba LCD TV. Before operating your flat panel display. • Carefully read this manual completely, and keep these safety tips in accordance with arrowhead symbol...
... to walls with furniture and television sets. • Don't place flat panel displays on furniture that can easily be used as steps, such as UL, CSA, ETL). • Follow all enclosed instructions for proper use of your LCD TV, please read and understand all instructions... safe. Wall Mounting: If you decide to wall mount this television, always use a UL Listed wall bracket appropriate for purchasing this Toshiba LCD TV. Before operating your flat panel display. • Carefully read this manual completely, and keep these safety tips in accordance with arrowhead symbol...
Owner's Manual - English
Page 7
... and Service 3 Chapter 1: Introduction 9 Features of your new TV 9 Overview of steps for installing, setting up, and using your new TV 9 TV front and side panel controls and connections 10 TV back panel connections 11 Chapter 2: Connecting your TV 12 Overview of cable types 12 About the connection illustrations 12 ... and navigation 27 Main menu layout 27 Setup/Installation menu layout 27 Navigating the menu system 28 Chapter 5: Setting up your TV 29 Selecting the menu language 29 Configuring the antenna input source for the ANT/CABLE terminal 29 Programming channels into the...
... and Service 3 Chapter 1: Introduction 9 Features of your new TV 9 Overview of steps for installing, setting up, and using your new TV 9 TV front and side panel controls and connections 10 TV back panel connections 11 Chapter 2: Connecting your TV 12 Overview of cable types 12 About the connection illustrations 12 ... and navigation 27 Main menu layout 27 Setup/Installation menu layout 27 Navigating the menu system 28 Chapter 5: Setting up your TV 29 Selecting the menu language 29 Configuring the antenna input source for the ANT/CABLE terminal 29 Programming channels into the...
Owner's Manual - English
Page 8
Chapter 7: Using the TV's advanced features 55 Using the advanced picture settings features 55 Using dynamic contrast 55 Using the static gamma feature...noise reduction 56 Using the ColorMaster™ feature 57 Using the Game Mode feature 57 Using the advanced audio settings features 58 Using the surround sound features 58 Chapter 8: Troubleshooting 59 General troubleshooting 59 LED indications 61 Chapter... PC IN and HDMI terminals 63 Limited United States Warranty for LCD Televisions 26" and Larger 64 Limited Canadian Warranty for Toshiba Brand Flat Panel Televisions 65 Index 68 8
Chapter 7: Using the TV's advanced features 55 Using the advanced picture settings features 55 Using dynamic contrast 55 Using the static gamma feature...noise reduction 56 Using the ColorMaster™ feature 57 Using the Game Mode feature 57 Using the advanced audio settings features 58 Using the surround sound features 58 Chapter 8: Troubleshooting 59 General troubleshooting 59 LED indications 61 Chapter... PC IN and HDMI terminals 63 Limited United States Warranty for LCD Televisions 26" and Larger 64 Limited Canadian Warranty for Toshiba Brand Flat Panel Televisions 65 Index 68 8

Owner's Manual - English
Page 9
...9 page 31). • IR OUT infrared terminal using the TV's features, see Chapters 6 and 7. 10 For help, refer to set up your TV and begin using its many exciting features of your new Toshiba widescreen, integrated HD, LCD TV: • Integrated digital tuning (8VSB ATSC and QAM) eliminates ...the need for installing, setting up, and using your TV and other electronic device(s) to enhance...
...9 page 31). • IR OUT infrared terminal using the TV's features, see Chapters 6 and 7. 10 For help, refer to set up your TV and begin using its many exciting features of your new Toshiba widescreen, integrated HD, LCD TV: • Integrated digital tuning (8VSB ATSC and QAM) eliminates ...the need for installing, setting up, and using your TV and other electronic device(s) to enhance...
Owner's Manual - English
Page 11
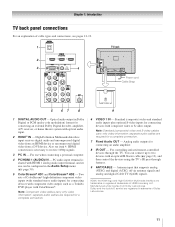
... TV back panel connections For an explanation of Dolby Laboratories. 11 For use can connect up to receive 1080p signals. 3 PC IN - Standard (composite) video and standard audio inputs plus optional S-video inputs for connecting devices with component video output, such as a Toshiba DVD... DVI device. Optical audio output in the Audio Setup menu (- Also see pages 12-19. 1 TV back 2 3 4 Power cord Cable Strap 5 67 8 9 1 DIGITAL AUDIO OUT - Two sets of HDMI Licensing LLC. separate audio cables are trademarks or registered trademarks of ColorStream® high-definition ...
... TV back panel connections For an explanation of Dolby Laboratories. 11 For use can connect up to receive 1080p signals. 3 PC IN - Standard (composite) video and standard audio inputs plus optional S-video inputs for connecting devices with component video output, such as a Toshiba DVD... DVI device. Optical audio output in the Audio Setup menu (- Also see pages 12-19. 1 TV back 2 3 4 Power cord Cable Strap 5 67 8 9 1 DIGITAL AUDIO OUT - Two sets of HDMI Licensing LLC. separate audio cables are trademarks or registered trademarks of ColorStream® high-definition ...
Owner's Manual - English
Page 12
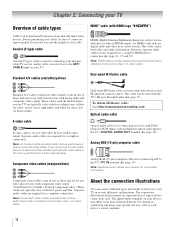
...a composite video cable. To obtain IR blaster cable: Visit http://ceaccessories.toshiba.com/ Optical audio cable Optical audio cable is for connecting receivers with the TV's IR pass-through feature (- Component video cables come in sets of three and are for use : yellow for video, red for ...cable Standard A/V cables (composite video) usually come in sets of three, and are for stereo left (or mono) audio. This cable can be used for a complete connection. If you connect an S-video cable, be sure to the TV's PC IN terminal (- The connection illustrations in its native...
...a composite video cable. To obtain IR blaster cable: Visit http://ceaccessories.toshiba.com/ Optical audio cable Optical audio cable is for connecting receivers with the TV's IR pass-through feature (- Component video cables come in sets of three and are for use : yellow for video, red for ...cable Standard A/V cables (composite video) usually come in sets of three, and are for stereo left (or mono) audio. This cable can be used for a complete connection. If you connect an S-video cable, be sure to the TV's PC IN terminal (- The connection illustrations in its native...
Owner's Manual - English
Page 13
... if your camcorder has S-video, connect an S-video cable (plus the audio cables) instead of television programs, videotapes, DVDs, and other materials is set to). For better picture performance, if your VCR has S-video, use , distribution, or revision of the standard video cable. - Select the ANT/CABLE... side panel. - The unauthorized recording, use an S-video cable (plus the audio cables) to VIDEO 1 on the TV back instead of the VIDEO 2 on the TV.* Tune the TV to channel 3 or 4 (whichever channel the Cable box output is prohibited under the Copyright Laws of video cable to VIDEO ...
... if your camcorder has S-video, connect an S-video cable (plus the audio cables) instead of television programs, videotapes, DVDs, and other materials is set to). For better picture performance, if your VCR has S-video, use , distribution, or revision of the standard video cable. - Select the ANT/CABLE... side panel. - The unauthorized recording, use an S-video cable (plus the audio cables) to VIDEO 1 on the TV back instead of the VIDEO 2 on the TV.* Tune the TV to channel 3 or 4 (whichever channel the Cable box output is prohibited under the Copyright Laws of video cable to VIDEO ...
Owner's Manual - English
Page 14
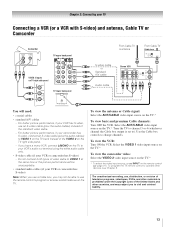
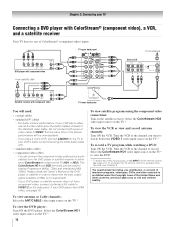
...OUT L Satellite COMPONENT VIDEO S-VIDEO VIDEO R IN OUT OUT Satellite receiver with ColorStream® (component video), a VCR, and a satellite receiver Your TV has two sets of video cable to watch. Please check the Owner's Manual of the DVD player or satellite in order to view the DVD. * To select ...the video input source, press INPUT on the satellite receiver. Select the ColorStream HD1 video input source on the TV.* 14 To ...
...OUT L Satellite COMPONENT VIDEO S-VIDEO VIDEO R IN OUT OUT Satellite receiver with ColorStream® (component video), a VCR, and a satellite receiver Your TV has two sets of video cable to watch. Please check the Owner's Manual of the DVD player or satellite in order to view the DVD. * To select ...the video input source, press INPUT on the satellite receiver. Select the ColorStream HD1 video input source on the TV.* 14 To ...

Owner's Manual - English
Page 16
... INPUT on your electronic components, turn off your TV receives digital audio and uncompressed digital video from an HDMI source device, or uncompressed digital video from EIA/CEA-861-D-compliant[1] consumer electronic devices (such as a set-top box or DVD player with high-bandwidth digital...(see Chapter 3. [1] EIA/CEA-861-D compliance covers the transmission of HDMI Licensing LLC. 16 See "Setting the HDMI™ audio mode" (- page 21). Chapter 2: Connecting your TV Connecting an HDMI™ or DVI device to the HDMI input The HDMI input on your electronic components,...
... INPUT on your electronic components, turn off your TV receives digital audio and uncompressed digital video from an HDMI source device, or uncompressed digital video from EIA/CEA-861-D-compliant[1] consumer electronic devices (such as a set-top box or DVD player with high-bandwidth digital...(see Chapter 3. [1] EIA/CEA-861-D compliance covers the transmission of HDMI Licensing LLC. 16 See "Setting the HDMI™ audio mode" (- page 21). Chapter 2: Connecting your TV Connecting an HDMI™ or DVI device to the HDMI input The HDMI input on your electronic components,...
Owner's Manual - English
Page 17
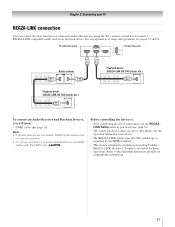
...OUT L R To connect an Audio Receiver and Playback Devices, you desire (- page 52). • The connected devices must also be set the REGZALINK Setup menu as regulated by the HDMI standard. • This feature is recommended that you connect a REGZA-LINK compatible audio receiver... of connected audio/video devices using the TV's remote control if you use HDMI cables with the HDMI Logo ( ). Before controlling the device(s): • After completing the above connections, set . Refer to models incorporating Toshiba's REGZA-LINK. However, Toshiba is not liable for each device. &#...
...OUT L R To connect an Audio Receiver and Playback Devices, you desire (- page 52). • The connected devices must also be set the REGZALINK Setup menu as regulated by the HDMI standard. • This feature is recommended that you connect a REGZA-LINK compatible audio receiver... of connected audio/video devices using the TV's remote control if you use HDMI cables with the HDMI Logo ( ). Before controlling the device(s): • After completing the above connections, set . Refer to models incorporating Toshiba's REGZA-LINK. However, Toshiba is not liable for each device. &#...

Owner's Manual - English
Page 18
... 46). "Selecting the optical audio output format" on the TV's remote control and open the Audio menu. 3 Highlight Audio Setup and press T. LINE IN LR TV upper back panel Audio Digital Audio Selector Audio Settings Advanced Audio Settings Audio Setup 4 In the Optical Output Format field, select ...either Dolby Digital or PCM, depending on the TV and the stereo amplifier. 2 Minimize the sound volume...
... 46). "Selecting the optical audio output format" on the TV's remote control and open the Audio menu. 3 Highlight Audio Setup and press T. LINE IN LR TV upper back panel Audio Digital Audio Selector Audio Settings Advanced Audio Settings Audio Setup 4 In the Optical Output Format field, select ...either Dolby Digital or PCM, depending on the TV and the stereo amplifier. 2 Minimize the sound volume...
Owner's Manual - English
Page 19
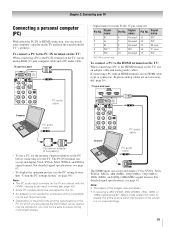
... PC audio cable Computer PC audio output PC audio cable Conversion adapter (if necessary) • To use a PC, set the monitor output resolution on the TV, use an adapter cable and analog audio cables. Signal name 11 NC 12 NC 13 H-sync 14 V-sync 15 NC... name 1 R 2 G 3 B 4 NC * 5 NC Pin No. Note: • The PC audio input terminals on page 50). "Using the PC settings feature" on the TV are not necessary (- For detailed signal specifications, see page 63. Signal name 6 Ground 7 Ground 8 Ground 9 NC 10 Ground Pin No. page 16). Computer PC...
... PC audio cable Computer PC audio output PC audio cable Conversion adapter (if necessary) • To use a PC, set the monitor output resolution on the TV, use an adapter cable and analog audio cables. Signal name 11 NC 12 NC 13 H-sync 14 V-sync 15 NC... name 1 R 2 G 3 B 4 NC * 5 NC Pin No. Note: • The PC audio input terminals on page 50). "Using the PC settings feature" on the TV are not necessary (- For detailed signal specifications, see page 63. Signal name 6 Ground 7 Ground 8 Ground 9 NC 10 Ground Pin No. page 16). Computer PC...

Owner's Manual - English
Page 21
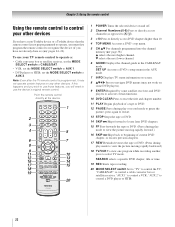
...previous/next channel in the Channel Brower™ (- page 54). 11 CH RTN returns to control the TV. page 39). 12 MUTE reduces or turns off . Set to "TV" to the last viewed channel or source (- page 36). 6 INPUT selects the video input source (- ...page 54). 14 3 C / # c While watching TV, these buttons select or adjust programming menus. (Also see 3 C / # c.) 16 ENTER activates highlighted items in the main menu system. 17 MENU accesses the main TV menu system (- page 37...
...previous/next channel in the Channel Brower™ (- page 54). 11 CH RTN returns to control the TV. page 39). 12 MUTE reduces or turns off . Set to "TV" to the last viewed channel or source (- page 36). 6 INPUT selects the video input source (- ...page 54). 14 3 C / # c While watching TV, these buttons select or adjust programming menus. (Also see 3 C / # c.) 16 ENTER activates highlighted items in the main menu system. 17 MENU accesses the main TV menu system (- page 37...
Owner's Manual - English
Page 22
... control Using the remote control to control your TV remote control to operate a: • Cable converter box or satellite receiver, set the MODE SELECT switch to CABLE/SAT. • VCR, set the MODE SELECT switch to AUX 1. • DVD player or HTIB, set the MODE SELECT switch to AUX 2. SEARCH ... MODE SELECT switch Set to "TV" to control a cable converter box or satellite receiver; pages 24-26). "CABLE/SAT" to control the TV; Note: Even after the TV remote control is programmed, it may not work on any other devices If you have a non-Toshiba device or a Toshiba device that the remote...
... control Using the remote control to control your TV remote control to operate a: • Cable converter box or satellite receiver, set the MODE SELECT switch to CABLE/SAT. • VCR, set the MODE SELECT switch to AUX 1. • DVD player or HTIB, set the MODE SELECT switch to AUX 2. SEARCH ... MODE SELECT switch Set to "TV" to control a cable converter box or satellite receiver; pages 24-26). "CABLE/SAT" to control the TV; Note: Even after the TV remote control is programmed, it may not work on any other devices If you have a non-Toshiba device or a Toshiba device that the remote...
Owner's Manual - English
Page 23
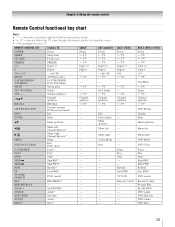
... for your TV. REMOTE CONTROL KEY Toshiba TV CABLE SAT (satellite) POWER SLEEP PIC SIZE FREEZE Power Sleep timer Picture size FREEZE Power s TV s TV s TV Power s TV s TV s TV 1-9 Digit 1-9 Digit 1-9 Digit 1-9 0 Digit 0 Digit 0 Digit 0 100/-/+10 INPUT - (sub CH) TV/Video select --s TV - (sub CH) s TV FAV BROWSER/ TOP MENU MUTE FAV BROWSER DVD TOP Menu* Sound mute --s TV --s TV SET UP/GUIDE...
... for your TV. REMOTE CONTROL KEY Toshiba TV CABLE SAT (satellite) POWER SLEEP PIC SIZE FREEZE Power Sleep timer Picture size FREEZE Power s TV s TV s TV Power s TV s TV s TV 1-9 Digit 1-9 Digit 1-9 Digit 1-9 0 Digit 0 Digit 0 Digit 0 100/-/+10 INPUT - (sub CH) TV/Video select --s TV - (sub CH) s TV FAV BROWSER/ TOP MENU MUTE FAV BROWSER DVD TOP Menu* Sound mute --s TV --s TV SET UP/GUIDE...
Owner's Manual - English
Page 24
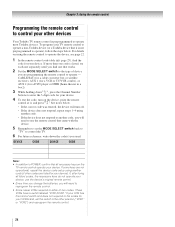
... DEVICE CODE DEVICE CODE Note: • In addition to POWER, confirm that it , and press p. To program your TV remote control to operate a non-Toshiba device (or a Toshiba device that all listed codes, the necessary keys do not operate your device, use the remote control that came with the ...device. 5 Remember to set the switch to the other devices Your Toshiba TV remote control is not preprogrammed to operate), follow the steps below . • If the correct code was entered, the ...
... DEVICE CODE DEVICE CODE Note: • In addition to POWER, confirm that it , and press p. To program your TV remote control to operate a non-Toshiba device (or a Toshiba device that all listed codes, the necessary keys do not operate your device, use the remote control that came with the ...device. 5 Remember to set the switch to the other devices Your Toshiba TV remote control is not preprogrammed to operate), follow the steps below . • If the correct code was entered, the ...
Owner's Manual - English
Page 27
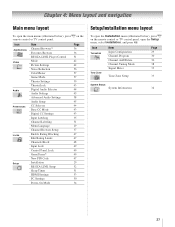
... below ), press Y on the remote control or TV control panel. Icon Applications Video Audio Preferences Locks Setup Item Channel Browser™ Favorites Browser REGZA-LINK Player Control Mode Picture Settings Noise Reduction ColorMaster Game Mode Theater Settings TheaterLock Digital Audio Selector Audio Settings Advanced Audio Settings Audio Setup CC Selector Base CC Mode Digital... Settings Power-On Mode Page 36 36 51 42 42 56 57 57 39 43 44 45 58 45 44 43 43 35 31 29 37 47 47 48 49 49 49 47 29 52 51 53 50 34 Setup/Installation menu layout To open the Setup menu, select Installation,...
... below ), press Y on the remote control or TV control panel. Icon Applications Video Audio Preferences Locks Setup Item Channel Browser™ Favorites Browser REGZA-LINK Player Control Mode Picture Settings Noise Reduction ColorMaster Game Mode Theater Settings TheaterLock Digital Audio Selector Audio Settings Advanced Audio Settings Audio Setup CC Selector Base CC Mode Digital... Settings Power-On Mode Page 36 36 51 42 42 56 57 57 39 43 44 45 58 45 44 43 43 35 31 29 37 47 47 48 49 49 49 47 29 52 51 53 50 34 Setup/Installation menu layout To open the Setup menu, select Installation,...
Owner's Manual - English
Page 28
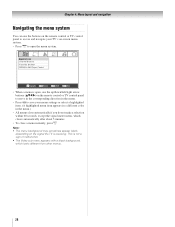
...from other menus. 28 Note: • The menu background may sometimes appear black, depending on -screen menu system. • Press Y to save your menu settings or select a highlighted item. (A highlighted menu item appears in a different color in the menu.) • All menus close a menu instantly, press O. ... in the menu. • Press T to open , use the buttons on the remote control or TV control panel to access and navigate your TV's on the signal the TV is open the menu system. Applications Channel Browser Favorites Browser REGZA-LINK Player Control Navigate ENTER Select CH...
...from other menus. 28 Note: • The menu background may sometimes appear black, depending on -screen menu system. • Press Y to save your menu settings or select a highlighted item. (A highlighted menu item appears in a different color in the menu.) • All menus close a menu instantly, press O. ... in the menu. • Press T to open , use the buttons on the remote control or TV control panel to access and navigate your TV's on the signal the TV is open the menu system. Applications Channel Browser Favorites Browser REGZA-LINK Player Control Navigate ENTER Select CH...

Owner's Manual - English
Page 29
... and press T. Installation Terrestrial Input Configuration Channel Program Channel Add/Delete Channel Tuning Mode Signal Meter Auto 4 Press C or c to select your original settings, highlight Cancel and press T. 29 To revert to close the Preferences menu. Input Configuration ANT/CABLE In Cancel Cable Done 5 To save your... the menu language You can choose from three different languages (English, French and Spanish) for the on the TV. Configuring the antenna input source for the ANT/CABLE input on -screen display of Installation menu icons will appear, as shown below.)...
... and press T. Installation Terrestrial Input Configuration Channel Program Channel Add/Delete Channel Tuning Mode Signal Meter Auto 4 Press C or c to select your original settings, highlight Cancel and press T. 29 To revert to close the Preferences menu. Input Configuration ANT/CABLE In Cancel Cable Done 5 To save your... the menu language You can choose from three different languages (English, French and Spanish) for the on the TV. Configuring the antenna input source for the ANT/CABLE input on -screen display of Installation menu icons will appear, as shown below.)...


