
Owner's Manual - English
Page 2
... you enjoy your flat panel display, always: • Use a mount that can be pulled or grabbed by curious children. This manual will help you have any wall bracket other than life" flat panel display. The lightning flash with furniture and television sets. • Don't place flat panel displays on page 5. As you are unsure, contact a professional installer. • A minimum of your LCD TV, please read and understand all cords and cables connected to persons.
... you enjoy your flat panel display, always: • Use a mount that can be pulled or grabbed by curious children. This manual will help you have any wall bracket other than life" flat panel display. The lightning flash with furniture and television sets. • Don't place flat panel displays on page 5. As you are unsure, contact a professional installer. • A minimum of your LCD TV, please read and understand all cords and cables connected to persons.

Owner's Manual - English
Page 4
... the connecting cables or apparatus. 33) For added protection of your TOSHIBA TV, follow the instructions in contact with a sharp or heavy object. 36) • The LCD screen of the panel. Never strike the screen with , such as insecticide on or roll over the power cord, and never place the TV where the power cord is subject to wear or abuse. 25) Never overload wall...
... the connecting cables or apparatus. 33) For added protection of your TOSHIBA TV, follow the instructions in contact with a sharp or heavy object. 36) • The LCD screen of the panel. Never strike the screen with , such as insecticide on or roll over the power cord, and never place the TV where the power cord is subject to wear or abuse. 25) Never overload wall...
Owner's Manual - English
Page 5
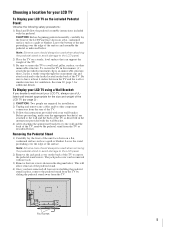
... be used when removing the pedestal stand to avoid damage to wall mount your wall bracket. Choosing a location for your LCD TV To Display your LCD TV on the included Pedestal Stand: Observe the following safety precautions: 1) Read and Follow the pedestal assembly instructions included with your LCD TV, always use a ULlisted wall bracket appropriate for the size and weight of the LCD TV (- Removing the Pedestal Stand 1) Carefully lay the front of the LCD Panel face down on a flat...
... be used when removing the pedestal stand to avoid damage to wall mount your wall bracket. Choosing a location for your LCD TV To Display your LCD TV on the included Pedestal Stand: Observe the following safety precautions: 1) Read and Follow the pedestal assembly instructions included with your LCD TV, always use a ULlisted wall bracket appropriate for the size and weight of the LCD TV (- Removing the Pedestal Stand 1) Carefully lay the front of the LCD Panel face down on a flat...
Owner's Manual - English
Page 7
... 24 Remote control codes 25 Chapter 4: Menu layout and navigation 27 Main menu layout 27 Setup/Installation menu layout 27 Navigating the menu system 28 Chapter 5: Setting up your TV 29 Selecting the menu language 29 Configuring the antenna input source for the ANT/CABLE terminal 29 Programming channels into the TV's channel memory . . . . 30 Programming channels automatically 30 Manually adding and deleting channels in the channel memory 30 Labeling channels 31 Setting the HDMI™ audio mode 32 Viewing the digital signal...
... 24 Remote control codes 25 Chapter 4: Menu layout and navigation 27 Main menu layout 27 Setup/Installation menu layout 27 Navigating the menu system 28 Chapter 5: Setting up your TV 29 Selecting the menu language 29 Configuring the antenna input source for the ANT/CABLE terminal 29 Programming channels into the TV's channel memory . . . . 30 Programming channels automatically 30 Manually adding and deleting channels in the channel memory 30 Labeling channels 31 Setting the HDMI™ audio mode 32 Viewing the digital signal...

Owner's Manual - English
Page 9
... high-resolution component video inputs (- page 27). 8 Program channels into the TV's channel memory (- page 16). • HDMI capabilities Lip-Sync Latency feature activates an auto audio/video display timing adjustment function that allows HDMI source devices to enhance contrast while you have connected all cables and devices, plug in the power cords for your new Toshiba widescreen, integrated HD, LCD TV: • Integrated digital tuning (8VSB ATSC and QAM) eliminates the need for a separate digital converter set up...
... high-resolution component video inputs (- page 27). 8 Program channels into the TV's channel memory (- page 16). • HDMI capabilities Lip-Sync Latency feature activates an auto audio/video display timing adjustment function that allows HDMI source devices to enhance contrast while you have connected all cables and devices, plug in the power cords for your new Toshiba widescreen, integrated HD, LCD TV: • Integrated digital tuning (8VSB ATSC and QAM) eliminates the need for a separate digital converter set up...

Owner's Manual - English
Page 10
... Yellow LEDs Green = Power indicator Yellow = Power-On Mode indicator (- Press to turn off . These buttons adjust the volume level. 10 INPUT - Point the remote control toward this manual for 5 or more seconds to as the ENTER button. 7 EXIT - When a menu is on-screen, the MENU button on page 61 for updating the television's firmware. 10 Used for additional information. 3 VIDEO 2 IN - High-Definition Multimedia Interface (HDMI 4) input receives digital audio and uncompressed digital video from an HDMI device or uncompressed digital video...
... Yellow LEDs Green = Power indicator Yellow = Power-On Mode indicator (- Press to turn off . These buttons adjust the volume level. 10 INPUT - Point the remote control toward this manual for 5 or more seconds to as the ENTER button. 7 EXIT - When a menu is on-screen, the MENU button on page 61 for updating the television's firmware. 10 Used for additional information. 3 VIDEO 2 IN - High-Definition Multimedia Interface (HDMI 4) input receives digital audio and uncompressed digital video from an HDMI device or uncompressed digital video...
Owner's Manual - English
Page 11
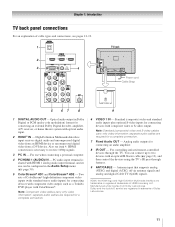
... connecting an external Dolby Digital decoder, amplifier, A/V receiver, or home theater system with ColorStream®. page 50). 5 ColorStream® HD1 and ColorStream® HD2 - Note: Component video cables carry only video information; You can be configured in Dolby Digital or PCM (pulse-code modulation) format for connecting devices with component video output, such as a Toshiba DVD player with optical audio input. 2 HDMI™ IN - Also see pages 12-19. 1 TV back 2 3 4 Power cord Cable Strap 5 67 8 9 1 DIGITAL AUDIO...
... connecting an external Dolby Digital decoder, amplifier, A/V receiver, or home theater system with ColorStream®. page 50). 5 ColorStream® HD1 and ColorStream® HD2 - Note: Component video cables carry only video information; You can be configured in Dolby Digital or PCM (pulse-code modulation) format for connecting devices with component video output, such as a Toshiba DVD player with optical audio input. 2 HDMI™ IN - Also see pages 12-19. 1 TV back 2 3 4 Power cord Cable Strap 5 67 8 9 1 DIGITAL AUDIO...
Owner's Manual - English
Page 12
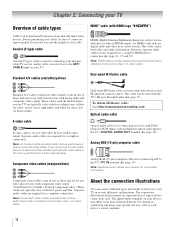
... audio/video devices. Chapter 2: Connecting your TV Overview of cable types Cables can connect different types and brands of devices to your TV in several different configurations. Component video cables (red/green/blue) Dual-wand IR blaster cable is for use with video devices with an HDMI output. Note: HDMI cable provides better picture performance than a standard (composite) video or S-video cable. These cables (and the related inputs on your TV) are not required for connecting your antenna, cable TV service, and/or cable converter box...
... audio/video devices. Chapter 2: Connecting your TV Overview of cable types Cables can connect different types and brands of devices to your TV in several different configurations. Component video cables (red/green/blue) Dual-wand IR blaster cable is for use with video devices with an HDMI output. Note: HDMI cable provides better picture performance than a standard (composite) video or S-video cable. These cables (and the related inputs on your TV) are not required for connecting your antenna, cable TV service, and/or cable converter box...
Owner's Manual - English
Page 13
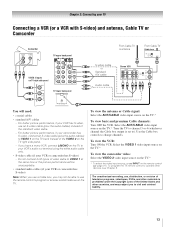
... use the remote control to program or access certain features on the TV. To view the antenna or Cable signal: Select the ANT/CABLE video input source on the remote control (- Do not connect both types of the VIDEO 2 on the TV right side panel. - Select the VIDEO 1 video input source on the TV.* To view the camcorder video: Select the VIDEO 2 video input source on the TV.* * To select the video input source, press INPUT on the TV.* To view basic and premium Cable channels: Turn OFF the VCR. For better picture...
... use the remote control to program or access certain features on the TV. To view the antenna or Cable signal: Select the ANT/CABLE video input source on the remote control (- Do not connect both types of the VIDEO 2 on the TV right side panel. - Select the VIDEO 1 video input source on the TV.* To view the camcorder video: Select the VIDEO 2 video input source on the TV.* * To select the video input source, press INPUT on the TV.* To view basic and premium Cable channels: Turn OFF the VCR. For better picture...

Owner's Manual - English
Page 18
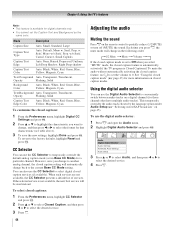
... other external audio system with standard optical out signals may not work properly, creating a high noise level that may damage speakers or headphones. Audio Setup PC Audio HDMI 1 Audio MTS Language Optical Output Format Dolby Digital Dynamic Range Control Reset No Auto Stereo English Dolby Digital Compressed Done To control the audio: 1 Turn on the TV's remote control and open the Audio menu. 3 Highlight Audio Setup and press T. You will need : • standard audio cables Analog audio amplifier To control the audio: 1 Turn on the TV and the digital audio...
... other external audio system with standard optical out signals may not work properly, creating a high noise level that may damage speakers or headphones. Audio Setup PC Audio HDMI 1 Audio MTS Language Optical Output Format Dolby Digital Dynamic Range Control Reset No Auto Stereo English Dolby Digital Compressed Done To control the audio: 1 Turn on the TV's remote control and open the Audio menu. 3 Highlight Audio Setup and press T. You will need : • standard audio cables Analog audio amplifier To control the audio: 1 Turn on the TV and the digital audio...
Owner's Manual - English
Page 19
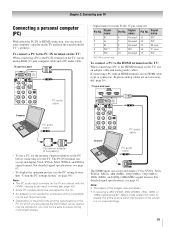
... scenes. If connecting a PC with the HDMI 1 analog audio input terminals (- For detailed signal specifications, see page 63. Signal name 6 Ground 7 Ground 8 Ground 9 NC 10 Ground Pin No. For detailed signal specifications, see page 63. • To display the optimum picture, use a PC, set the monitor output resolution on the PC before connecting it to the HDMI terminal on the DVD's title and the specifications of the screen (i.e. Separate analog cables are playing the DVD-Video, some...
... scenes. If connecting a PC with the HDMI 1 analog audio input terminals (- For detailed signal specifications, see page 63. Signal name 6 Ground 7 Ground 8 Ground 9 NC 10 Ground Pin No. For detailed signal specifications, see page 63. • To display the optimum picture, use a PC, set the monitor output resolution on the PC before connecting it to the HDMI terminal on the DVD's title and the specifications of the screen (i.e. Separate analog cables are playing the DVD-Video, some...
Owner's Manual - English
Page 27
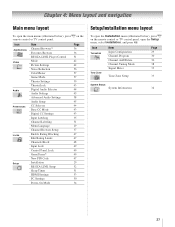
... Video Audio Preferences Locks Setup Item Channel Browser™ Favorites Browser REGZA-LINK Player Control Mode Picture Settings Noise Reduction ColorMaster Game Mode Theater Settings TheaterLock Digital Audio Selector Audio Settings Advanced Audio Settings Audio Setup CC Selector Base CC Mode Digital CC Settings Input Labeling Channel Labeling Menu Language Channel Browser Setup Enable Rating Blocking Edit Rating Limits Channels Block Input Lock Control Panel Lock GameTimer® New PIN Code Installation REGZA-LINK Setup Sleep Timer HDMI Settings PC Settings Power-On Mode Page...
... Video Audio Preferences Locks Setup Item Channel Browser™ Favorites Browser REGZA-LINK Player Control Mode Picture Settings Noise Reduction ColorMaster Game Mode Theater Settings TheaterLock Digital Audio Selector Audio Settings Advanced Audio Settings Audio Setup CC Selector Base CC Mode Digital CC Settings Input Labeling Channel Labeling Menu Language Channel Browser Setup Enable Rating Blocking Edit Rating Limits Channels Block Input Lock Control Panel Lock GameTimer® New PIN Code Installation REGZA-LINK Setup Sleep Timer HDMI Settings PC Settings Power-On Mode Page...

Owner's Manual - English
Page 30
... the ANT/CABLE input signal type is finished, press < or , to program channels into the TV's memory.) To remove an Antenna source channel from the channel memory: Highlight the checked box next to the channel number you want to add, and then press T to enter the channel number (for example, 56-1). page 29). 2 From the Setup menu, highlight Installation and press T. Manually adding and deleting channels in its memory. A new set of Installation menu icons...
... the ANT/CABLE input signal type is finished, press < or , to program channels into the TV's memory.) To remove an Antenna source channel from the channel memory: Highlight the checked box next to the channel number you want to add, and then press T to enter the channel number (for example, 56-1). page 29). 2 From the Setup menu, highlight Installation and press T. Manually adding and deleting channels in its memory. A new set of Installation menu icons...
Owner's Manual - English
Page 32
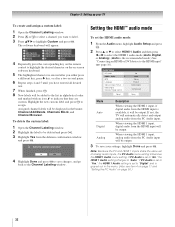
...," the HDMI 1 Audio setting changes to highlight Custom and press T. Delete the selected custom label? Analog When viewing the HDMI 1 input, analog audio from the HDMI input will be output. Assigned channel labels will be displayed in the banner, Channel Add/Delete, Channels Block, and Channel Browser. Setting the HDMI™ audio mode To set to assign. Audio Setup PC Audio HDMI 1 Audio MTS Language Optical Output Format Dolby Digital Dynamic Range Control Reset No Auto Stereo English Dolby Digital Compressed Done Mode Description Auto When viewing the HDMI 1 input...
...," the HDMI 1 Audio setting changes to highlight Custom and press T. Delete the selected custom label? Analog When viewing the HDMI 1 input, analog audio from the HDMI input will be output. Assigned channel labels will be displayed in the banner, Channel Add/Delete, Channels Block, and Channel Browser. Setting the HDMI™ audio mode To set to assign. Audio Setup PC Audio HDMI 1 Audio MTS Language Optical Output Format Dolby Digital Dynamic Range Control Reset No Auto Stereo English Dolby Digital Compressed Done Mode Description Auto When viewing the HDMI 1 input...
Owner's Manual - English
Page 44
... Base CC Mode) for a particular channel. You can use the CC Selector to partially reduce (1/2 MUTE) or turn off (MUTE) the sound. See "Using the closed caption modes. Using the digital audio selector You can also use the digital audio selector: 1 Press Y and open the Audio menu. 2 Highlight Digital Audio Selector and press T. Mode Description Caption Size Auto, Small, Standard, Large Caption Text Type Auto, Default, Mono w. Each time you select "MUTE" mode, the closed caption mode is not available, the next best service will change...
... Base CC Mode) for a particular channel. You can use the CC Selector to partially reduce (1/2 MUTE) or turn off (MUTE) the sound. See "Using the closed caption modes. Using the digital audio selector You can also use the digital audio selector: 1 Press Y and open the Audio menu. 2 Highlight Digital Audio Selector and press T. Mode Description Caption Size Auto, Small, Standard, Large Caption Text Type Auto, Default, Mono w. Each time you select "MUTE" mode, the closed caption mode is not available, the next best service will change...
Owner's Manual - English
Page 59
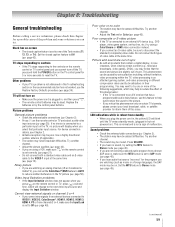
... view signals from external devices connected to VIDEO 1, VIDEO 2, ColorStream®, HDMI 1, HDMI 2, HDMI 3, HDMI 4, PC or from channels 3 or 4, make sure the Input Lock is set to SAP mode (- Try another channel. • Adjust the Tint and/or Color (- Try another channel. • Adjust the picture qualities (- page 42). This phenomenon can try the control panel buttons. Black box on • Make sure the power cord is plugged in this feature to help to the picture. - TV will blink until the TV enters standby mode, (plugged...
... view signals from external devices connected to VIDEO 1, VIDEO 2, ColorStream®, HDMI 1, HDMI 2, HDMI 3, HDMI 4, PC or from channels 3 or 4, make sure the Input Lock is set to SAP mode (- Try another channel. • Adjust the Tint and/or Color (- Try another channel. • Adjust the picture qualities (- page 42). This phenomenon can try the control panel buttons. Black box on • Make sure the power cord is plugged in this feature to help to the picture. - TV will blink until the TV enters standby mode, (plugged...
Owner's Manual - English
Page 64
... of antenna systems are your needs and help us to Obtain Warranty Service If, after following limited warranties to units that have been modified or had the serial number removed, altered, defaced, or rendered illegible. Consumer Product Safety Act. or Puerto Rico. (4) Labor service charges for set installation, setup, adjustment of customer controls, and installation or repair of shipment to you find that service is purchased and operated in...
... of antenna systems are your needs and help us to Obtain Warranty Service If, after following limited warranties to units that have been modified or had the serial number removed, altered, defaced, or rendered illegible. Consumer Product Safety Act. or Puerto Rico. (4) Labor service charges for set installation, setup, adjustment of customer controls, and installation or repair of shipment to you find that service is purchased and operated in...
Owner's Manual - English
Page 65
... repairs, modifications or replacements by persons other proof of purchase. (2) All warranty servicing of this Television must provide your home when warranty service is required. Limited One (1) Year Warranty on -site or the Television will come to your bill of sale or other than those authorized by failure to follow the specifications, User manuals or guides as set installation, setup, adjustment of customer controls, and installation or repair of antenna systems...
... repairs, modifications or replacements by persons other proof of purchase. (2) All warranty servicing of this Television must provide your home when warranty service is required. Limited One (1) Year Warranty on -site or the Television will come to your bill of sale or other than those authorized by failure to follow the specifications, User manuals or guides as set installation, setup, adjustment of customer controls, and installation or repair of antenna systems...
Owner's Manual - English
Page 66
... WARRANTY WILL NOT COVER ANY SERVICE THAT IS REQUIRED, IN PART OR IN WHOLE, AS A RESULT OF ANY FAILURE TO FOLLOW THE SET-UP AND USAGE INSTRUCTIONS. TO THE EXTENT NOT PRECLUDED BY LAW, STATUTORY OR OTHERWISE, THIS WRITTEN WARRANTY SUPERCEDES AND SPECIFICALLY DISCLAIMS ANY OTHER WARRANTY, CONDITION OR REPRESENTATION NOT STATED IN THIS WARRANTY, WHETHER MADE BY TCL, TOSHIBA...
... WARRANTY WILL NOT COVER ANY SERVICE THAT IS REQUIRED, IN PART OR IN WHOLE, AS A RESULT OF ANY FAILURE TO FOLLOW THE SET-UP AND USAGE INSTRUCTIONS. TO THE EXTENT NOT PRECLUDED BY LAW, STATUTORY OR OTHERWISE, THIS WRITTEN WARRANTY SUPERCEDES AND SPECIFICALLY DISCLAIMS ANY OTHER WARRANTY, CONDITION OR REPRESENTATION NOT STATED IN THIS WARRANTY, WHETHER MADE BY TCL, TOSHIBA...
Owner's Manual - English
Page 68
... Unlocking programs temporarily 48 Video inputs, locking 49 Locks menu 46 M MPEG noise reduction 56 MTS feature 45 MUTE button 44 O Optical audio output format 46 P PC Audio 50 PC connection 19 PC settings 50 Picture mode 42 Picture quality 42 Picture scroll 41 Picture size selection 39 POWER button 10, 21 Power-On Mode 34 R RECALL button 54 REGZA-LINK connection 17 REGZA-LINK feature 51 Remote control Battery installation 20 Device code table 25 Functional key chart 23 Programming 24 Reset Factory Defaults 34 S SAP sound...
... Unlocking programs temporarily 48 Video inputs, locking 49 Locks menu 46 M MPEG noise reduction 56 MTS feature 45 MUTE button 44 O Optical audio output format 46 P PC Audio 50 PC connection 19 PC settings 50 Picture mode 42 Picture quality 42 Picture scroll 41 Picture size selection 39 POWER button 10, 21 Power-On Mode 34 R RECALL button 54 REGZA-LINK connection 17 REGZA-LINK feature 51 Remote control Battery installation 20 Device code table 25 Functional key chart 23 Programming 24 Reset Factory Defaults 34 S SAP sound...


