
Owners Manual
Page 1
OWNER'S MANUAL Color Television TM 27A60 32A60 36A60 © TOSHIBA CORPORATION, 2000 Index Reference Reference Appendix Using the TV's Features Setting up your TV Using the Remote Control Connecting your TV Welcome to Toshiba
OWNER'S MANUAL Color Television TM 27A60 32A60 36A60 © TOSHIBA CORPORATION, 2000 Index Reference Reference Appendix Using the TV's Features Setting up your TV Using the Remote Control Connecting your TV Welcome to Toshiba
Owners Manual
Page 5
Welcome to Toshiba ...1 Exploring your new TV ...1 Selecting a location for the TV ...1 Connecting your TV ...2 Connecting a VCR ...2 Connecting a cable converter box ...3 Connecting a cable converter box and a VCR 3 Connecting a DVD/satellite receiver and a VCR 4 Connecting a DVD with ColorStream™ and a VCR 4 Connecting two VCRs ...5 Connecting a camcorder ...6 Connecting an audio amplifier ...6 Using the remote control...
Welcome to Toshiba ...1 Exploring your new TV ...1 Selecting a location for the TV ...1 Connecting your TV ...2 Connecting a VCR ...2 Connecting a cable converter box ...3 Connecting a cable converter box and a VCR 3 Connecting a DVD/satellite receiver and a VCR 4 Connecting a DVD with ColorStream™ and a VCR 4 Connecting two VCRs ...5 Connecting a camcorder ...6 Connecting an audio amplifier ...6 Using the remote control...
Owners Manual
Page 7
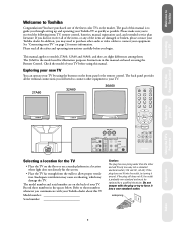
...the plug or try turning it into a non-standard outlet. This manual applies to models 27A60, 32A60 and 36A60, and there are damaged or broken, please contact your Toshiba dealer. The back panel provides all the terminal connections you begin. If the plug still does not fit, the... instructions carefully before using this manual are on the front panel or the remote control. The 36A60 is to guide you may damage the TV. In addition, you through setting up your TV Welcome to Toshiba Congratulations! Model number Serial number Caution: The plug has one of your ...
...the plug or try turning it into a non-standard outlet. This manual applies to models 27A60, 32A60 and 36A60, and there are damaged or broken, please contact your Toshiba dealer. The back panel provides all the terminal connections you begin. If the plug still does not fit, the... instructions carefully before using this manual are on the front panel or the remote control. The 36A60 is to guide you may damage the TV. In addition, you through setting up your TV Welcome to Toshiba Congratulations! Model number Serial number Caution: The plug has one of your ...
Owners Manual
Page 9
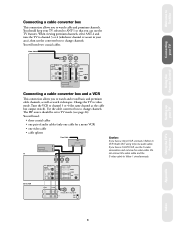
... box and a VCR This connection allows you can use the converter box to change channels. Use the cable convertor box to change channels. Welcome to Toshiba Connecting your TV Using the Remote Control Setting up your area), then use the TV features.
... box and a VCR This connection allows you can use the converter box to change channels. Use the cable convertor box to change channels. Welcome to Toshiba Connecting your TV Using the Remote Control Setting up your area), then use the TV features.
Owners Manual
Page 11
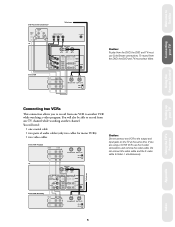
Welcome to Toshiba Connecting your TV Using the TV's Features Connecting two VCRs This connection allows you are using a S-VHS VCR, use ColorStream connections. Using the Remote Control Setting up your TV DVD Player with ColorStreamTM To Antenna VIDEO OUT AUDIO OUT L L R R COLORSTREAMTM Y Cb Cr S VIDEO TV Stereo VCR ANT (75Ω) ...
Welcome to Toshiba Connecting your TV Using the TV's Features Connecting two VCRs This connection allows you are using a S-VHS VCR, use ColorStream connections. Using the Remote Control Setting up your TV DVD Player with ColorStreamTM To Antenna VIDEO OUT AUDIO OUT L L R R COLORSTREAMTM Y Cb Cr S VIDEO TV Stereo VCR ANT (75Ω) ...
Owners Manual
Page 13
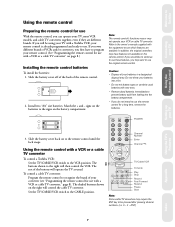
... the signs on the battery compartment. Welcome to Toshiba Connecting your TV Using the Remote Control Setting up your TV Using the remote control Preparing the remote control for use with a VCR or a cable TV converter" on page 8.) Installing the remote control batteries To install the batteries: 1. If ... the VCR. The buttons shown to be using your TV with a Toshiba VCR, your remote control is already programmed and ready to use. To control a cable TV converter: Program the remote control to the remote control until the lock snaps. The shaded buttons shown on to recognize ...
... the signs on the battery compartment. Welcome to Toshiba Connecting your TV Using the Remote Control Setting up your TV Using the remote control Preparing the remote control for use with a VCR or a cable TV converter" on page 8.) Installing the remote control batteries To install the batteries: 1. If ... the VCR. The buttons shown to be using your TV with a Toshiba VCR, your remote control is already programmed and ready to use. To control a cable TV converter: Program the remote control to the remote control until the lock snaps. The shaded buttons shown on to recognize ...
Owners Manual
Page 14
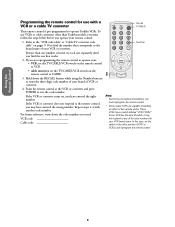
...is listed, try each one separately until you are reprogramming the remote control to operate your: • VCR, set the TV/CABLE/VCR switch on the remote control to VCR. • cable converter, set the switch to the other than Toshiba models, you must follow the steps below before you must ...reprogram the remote control. • Some newer VCRs are capable of working on either of...
...is listed, try each one separately until you are reprogramming the remote control to operate your: • VCR, set the TV/CABLE/VCR switch on the remote control to VCR. • cable converter, set the switch to the other than Toshiba models, you must follow the steps below before you must ...reprogram the remote control. • Some newer VCRs are capable of working on either of...
Owners Manual
Page 15
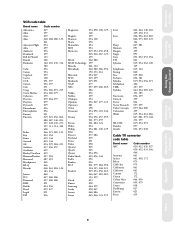
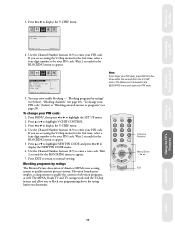
Welcome to Toshiba Connecting your TV Using the Remote Control Setting up your TV VCR code table Brand name Code number Adventura Aiko Aiwa Akai American High Asha Audiovox Beaumark Bell & Howell Brandt Broksonic ..., 067 Sansui 060, 086 Sanyo 065, 066, 123, 259 Scott Sears Sharp Shintom Shogun Singer Sony STS Sylvania Symphonic Tatung Teac Technics Teknika Telefunken TMK Toshiba Totevision Unitech Vector Vector Research Video Concepts Videosonic Wards XR-1000 Yamaha Zenith 062, 064, 140, 203, 229, 230, 231 054, 056, 061, 065, 066...
Welcome to Toshiba Connecting your TV Using the Remote Control Setting up your TV VCR code table Brand name Code number Adventura Aiko Aiwa Akai American High Asha Audiovox Beaumark Bell & Howell Brandt Broksonic ..., 067 Sansui 060, 086 Sanyo 065, 066, 123, 259 Scott Sears Sharp Shintom Shogun Singer Sony STS Sylvania Symphonic Tatung Teac Technics Teknika Telefunken TMK Toshiba Totevision Unitech Vector Vector Research Video Concepts Videosonic Wards XR-1000 Yamaha Zenith 062, 064, 140, 203, 229, 230, 231 054, 056, 061, 065, 066...

Owners Manual
Page 17
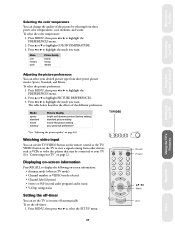
... [14] MENU TV / VIDEO VOLUME CHANNEL POWER 36A60 TV/VIDEO [12] VOLUME T/S CHANNEL s/t [14] MENU TV/VIDEO VOLUME CHANNEL T St s POWER T/S/t/s [14] POWER [8, 28] T/S/t/s [14] POWER [8, 28] MENU [12] Remote sensor POWER indicator MENU [12] Remote Control G This Remote Control is equipped with buttons (marked G) that are... TV/Video [12] PIP Functions [24-26] Using the TV's Features Appendix Index Reference 11 Welcome to Toshiba Connecting your TV Using the Remote Control Setting up your TV Location of Controls For details on the use of each control, refer to operate the...
... [14] MENU TV / VIDEO VOLUME CHANNEL POWER 36A60 TV/VIDEO [12] VOLUME T/S CHANNEL s/t [14] MENU TV/VIDEO VOLUME CHANNEL T St s POWER T/S/t/s [14] POWER [8, 28] T/S/t/s [14] POWER [8, 28] MENU [12] Remote sensor POWER indicator MENU [12] Remote Control G This Remote Control is equipped with buttons (marked G) that are... TV/Video [12] PIP Functions [24-26] Using the TV's Features Appendix Index Reference 11 Welcome to Toshiba Connecting your TV Using the Remote Control Setting up your TV Location of Controls For details on the use of each control, refer to operate the...
Owners Manual
Page 18
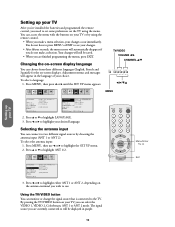
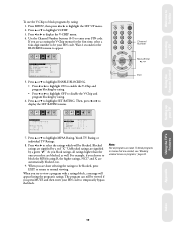
Setting up your TV Setting up your TV After you've installed the batteries and programmed the remote control, you can select the VIDEO 1, VIDEO 2, ColorStream, ANT 1 or ANT 2 mode. Your changes will appear in purple. 12 Press MENU, then press x or • ... select a language: 1. Press y or z to highlight LANGUAGE. 3. Using the TV/VIDEO button You can access the menu with the buttons on the TV using the remote control. • When you are currently connected to will automatically disappear if you wish to use x or • to highlight either ANT 1 or ANT 2, depending...
Setting up your TV Setting up your TV After you've installed the batteries and programmed the remote control, you can select the VIDEO 1, VIDEO 2, ColorStream, ANT 1 or ANT 2 mode. Your changes will appear in purple. 12 Press MENU, then press x or • ... select a language: 1. Press y or z to highlight LANGUAGE. 3. Using the TV/VIDEO button You can access the menu with the buttons on the TV using the remote control. • When you are currently connected to will automatically disappear if you wish to use x or • to highlight either ANT 1 or ANT 2, depending...
Owners Manual
Page 19
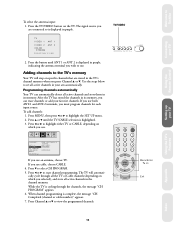
.... If you use both ANT-1 and ANT-2 terminals, you wish to use cable, choose CABLE. 4. While the TV is highlighted. 3. Welcome to Toshiba Connecting your TV Using the Remote Control Setting up your area automatically. Programming channels automatically Your TV can erase channels or add your favorite channels. Press MENU, then press...
.... If you use both ANT-1 and ANT-2 terminals, you wish to use cable, choose CABLE. 4. While the TV is highlighted. 3. Welcome to Toshiba Connecting your TV Using the Remote Control Setting up your area automatically. Programming channels automatically Your TV can erase channels or add your favorite channels. Press MENU, then press...
Owners Manual
Page 20
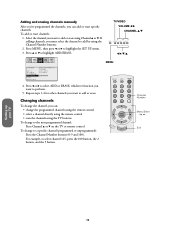
... channels. To add or erase channels: 1. To change the channel, you can : • change the programmed channels using the remote control • select a channel directly using the remote control • scan the channels using the TV buttons To change to the next programmed channel: Press Channel y or z on ...the TV or remote control. Changing channels To change to perform. 5. Press MENU, then press x or • to highlight ADD/ERASE. Press y or z to highlight the SET ...
... channels. To add or erase channels: 1. To change the channel, you can : • change the programmed channels using the remote control • select a channel directly using the remote control • scan the channels using the TV buttons To change to the next programmed channel: Press Channel y or z on ...the TV or remote control. Changing channels To change to perform. 5. Press MENU, then press x or • to highlight ADD/ERASE. Press y or z to highlight the SET ...
Owners Manual
Page 21
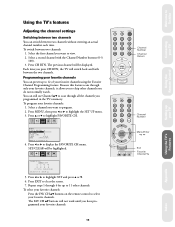
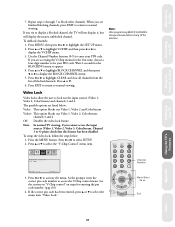
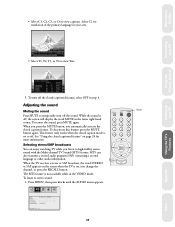
Welcome to Toshiba Connecting your TV Using the Remote Control Setting up your TV Using the TV's features Adjusting the channel settings Switching between two channels You can preset up to 11 other channels ...] MOVE[ ] START[ ] 4. SET/CLEAR will switch back and forth between two channels: 1. To select your favorite channels: Press the FAV CH yz buttons on the remote control to clear the screen. 7. Select a second channel with the Channel Number buttons (0-9, 100). 3. RECALL MUTE POWER 1 2 3 4 5 6 7 8 9 CH RTN 100 0 ENT CH VOL MENU/ VOL...
Welcome to Toshiba Connecting your TV Using the Remote Control Setting up your TV Using the TV's features Adjusting the channel settings Switching between two channels You can preset up to 11 other channels ...] MOVE[ ] START[ ] 4. SET/CLEAR will switch back and forth between two channels: 1. To select your favorite channels: Press the FAV CH yz buttons on the remote control to clear the screen. 7. Select a second channel with the Channel Number buttons (0-9, 100). 3. RECALL MUTE POWER 1 2 3 4 5 6 7 8 9 CH RTN 100 0 ENT CH VOL MENU/ VOL...
Owners Manual
Page 23
... 17 Television broadcasters employ a rating system to appear. If you to proceed to the BLOCKING menu and reset your PIN code: 1. Welcome to Toshiba Connecting your PIN code. PICTURE AUDIO SET UP PREFER C.CAPT BLOCKING IS ACTIVE PIN CODE - - - - Use the Channel Number buttons (0-9) to... MOVE[ ] SELECT[ ] Note: If you to qualify motion picture content. Use the Channel Number buttons (0-9) to enter your TV Using the Remote Control 3. The MPAA, Youth TV and TV ratings work with the V-Chip feature and allow you forget your PIN code. If you determine. ...
... 17 Television broadcasters employ a rating system to appear. If you to proceed to the BLOCKING menu and reset your PIN code: 1. Welcome to Toshiba Connecting your PIN code. PICTURE AUDIO SET UP PREFER C.CAPT BLOCKING IS ACTIVE PIN CODE - - - - Use the Channel Number buttons (0-9) to... MOVE[ ] SELECT[ ] Note: If you to qualify motion picture content. Use the Channel Number buttons (0-9) to enter your TV Using the Remote Control 3. The MPAA, Youth TV and TV ratings work with the V-Chip feature and allow you forget your PIN code. If you determine. ...
Owners Manual
Page 25
... LOCK [OFF] MOVE[ ] SELECT[ ] 5. As you try to view a program with a ratings block, a message will be your TV Using the Remote Control To use the V-Chip to block programs by a green "✔." Press x or • to select the ratings which will appear listing the program's...20. Unblocked ratings are accessing the V-Chip menus for the BLOCKING menu to appear. Press y or z to highlight the SET UP menu. 2. Welcome to Toshiba Connecting your PIN code. Press y or z to highlight MPAA Rating, Youth TV Rating or individual TV Ratings. 8. Press y or z to highlight SET...
... LOCK [OFF] MOVE[ ] SELECT[ ] 5. As you try to view a program with a ratings block, a message will be your TV Using the Remote Control To use the V-Chip to block programs by a green "✔." Press x or • to select the ratings which will appear listing the program's...20. Unblocked ratings are accessing the V-Chip menus for the BLOCKING menu to appear. Press y or z to highlight the SET UP menu. 2. Welcome to Toshiba Connecting your PIN code. Press y or z to highlight MPAA Rating, Youth TV Rating or individual TV Ratings. 8. Press y or z to highlight SET...
Owners Manual
Page 27
... all channels from the list of blocked channels. Press x or • to access the V-Chip control menu. The possible options are listed below : 1. Welcome to Toshiba Connecting your TV Using the Remote Control Setting up your PIN code. RECALL MUTE POWER PICTURE AUDIO SET UP PREFER C.CAPT BLOCKING IS ACTIVE PIN CODE - - - -
... all channels from the list of blocked channels. Press x or • to access the V-Chip control menu. The possible options are listed below : 1. Welcome to Toshiba Connecting your TV Using the Remote Control Setting up your PIN code. RECALL MUTE POWER PICTURE AUDIO SET UP PREFER C.CAPT BLOCKING IS ACTIVE PIN CODE - - - -

Owners Manual
Page 29
... for other video sources as desired. Press ENTER. 7. VCR DVD DTV[SAT]CBL VIDEO2 ColorStream SET UP MENU MOVE[ ] SELECT[ ] 4. Welcome to Toshiba Connecting your TV Using the Remote Control Setting up to 32 labels. SET/CLEAR will appear in that space. 9. Repeat steps 1 through 8 for your TV 7. Press the MENU button...
... for other video sources as desired. Press ENTER. 7. VCR DVD DTV[SAT]CBL VIDEO2 ColorStream SET UP MENU MOVE[ ] SELECT[ ] 4. Welcome to Toshiba Connecting your TV Using the Remote Control Setting up to 32 labels. SET/CLEAR will appear in that space. 9. Repeat steps 1 through 8 for your TV 7. Press the MENU button...
Owners Manual
Page 31
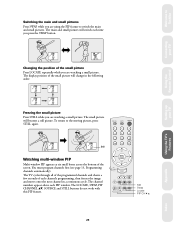
Connecting your TV Using the Remote Control Setting up your TV Using the TV's Features Changing the position of the small picture will change in a continuous cycle. The display position of ... first (see page 13, Programming channels automatically). The TV cycles through all of the programmed channels and shows a few seconds of the screen. Welcome to Toshiba Switching the main and small pictures Press SWAP while you press the SWAP button. RECALL MUTE POWER 1 2 3 4 5 6 7 8 9 CH RTN 100 0 ENT CH VOL MENU/ VOL...
Connecting your TV Using the Remote Control Setting up your TV Using the TV's Features Changing the position of the small picture will change in a continuous cycle. The display position of ... first (see page 13, Programming channels automatically). The TV cycles through all of the programmed channels and shows a few seconds of the screen. Welcome to Toshiba Switching the main and small pictures Press SWAP while you press the SWAP button. RECALL MUTE POWER 1 2 3 4 5 6 7 8 9 CH RTN 100 0 ENT CH VOL MENU/ VOL...
Owners Manual
Page 33
... • to highlight the PREFERENCES menu. 2. Welcome to highlight COLOR TEMPERATURE. 3. To select the color temperature: 1. Press y or z to Toshiba Connecting your TV Using the Remote Control Setting up your desired picture type from three preset color temperatures: cool, medium, and warm. To select the picture preferences: 1. Press MENU... the picture quality" on page 26) MENU TV/VIDEO VOLUME CHANNEL Watching video input You can use the TV/VIDEO button on the remote control or the TV/ VIDEO button on the TV to view a signal coming from other devices, such as VCRs or video disc ...
... • to highlight the PREFERENCES menu. 2. Welcome to highlight COLOR TEMPERATURE. 3. To select the color temperature: 1. Press y or z to Toshiba Connecting your TV Using the Remote Control Setting up your desired picture type from three preset color temperatures: cool, medium, and warm. To select the picture preferences: 1. Press MENU... the picture quality" on page 26) MENU TV/VIDEO VOLUME CHANNEL Watching video input You can use the TV/VIDEO button on the remote control or the TV/ VIDEO button on the TV to view a signal coming from other devices, such as VCRs or video disc ...
Owners Manual
Page 35
Connecting your TV Using the Remote Control Setting up your area. Adjusting the sound Muting the sound Press MUTE to temporarily turn off the sound. Selecting stereo/SAP broadcasts You can ... Cloudy Clear Cloudy Rain 5. The MTS feature is on page 28 for translation of the primary language in the lower right-hand corner. Welcome to Toshiba • Select C1, C2, C3, or C4 to stereo sound: 1. To restore the sound, press MUTE again. When you press the MUTE button, you listen...
Connecting your TV Using the Remote Control Setting up your area. Adjusting the sound Muting the sound Press MUTE to temporarily turn off the sound. Selecting stereo/SAP broadcasts You can ... Cloudy Clear Cloudy Rain 5. The MTS feature is on page 28 for translation of the primary language in the lower right-hand corner. Welcome to Toshiba • Select C1, C2, C3, or C4 to stereo sound: 1. To restore the sound, press MUTE again. When you press the MUTE button, you listen...


