

Owner's Manual - English
Page 7
Contents Important Safety Instructions 3 Installation, Care, and Service 3 Chapter 1: Introduction 8 Welcome to Toshiba 8 Features of your new TV 8 Overview of steps for installing, setting up, and using your new TV 9 TV front and side...19 Chapter 3: Using the remote control 20 Preparing the remote control for use 20 Installing the remote control batteries 20 Remote control effective range 20 Learning about the remote control 21 Using the remote control to control your other devices.........22 Remote Control functional key chart 23 Programming the remote control to control your other...
Contents Important Safety Instructions 3 Installation, Care, and Service 3 Chapter 1: Introduction 8 Welcome to Toshiba 8 Features of your new TV 8 Overview of steps for installing, setting up, and using your new TV 9 TV front and side...19 Chapter 3: Using the remote control 20 Preparing the remote control for use 20 Installing the remote control batteries 20 Remote control effective range 20 Learning about the remote control 21 Using the remote control to control your other devices.........22 Remote Control functional key chart 23 Programming the remote control to control your other...

Owner's Manual - English
Page 9
... location where light does not reflect on standby mode. The LED indication will damage the TV. THIS TYPE OF DAMAGE IS NOT COVERED UNDER THE TOSHIBA WARRANTY. 3� Do not plug in any power cords until AFTER you have connected all cables and devices to your TV. 4� BEFORE ... and controls ( pages 10-11). 5� Connect your other electronic device(s) to the TV ( pages 12-19). 6� Install the batteries in the remote control ( page 20). 7� See "Learning about your LCD TV" ( page 6). • Place the TV on using the TV's features, see ...
... location where light does not reflect on standby mode. The LED indication will damage the TV. THIS TYPE OF DAMAGE IS NOT COVERED UNDER THE TOSHIBA WARRANTY. 3� Do not plug in any power cords until AFTER you have connected all cables and devices to your TV. 4� BEFORE ... and controls ( pages 10-11). 5� Connect your other electronic device(s) to the TV ( pages 12-19). 6� Install the batteries in the remote control ( page 20). 7� See "Learning about your LCD TV" ( page 6). • Place the TV on using the TV's features, see ...

Owner's Manual - English
Page 10
Point the remote control toward this remote sensor ( "Remote control effective range" on -screen, these buttons function as the ENTER button. 6� CHANNEL pq - Press to change the channel (programmed channels only; page ...; MENU (ENTER) - These buttons adjust the volume level. 8� INPUT - When a menu is on-screen, the MENU button on page 47 for additional information. 2� Remote sensor - The side panel A/V connections are viewing (ANT, VIDEO 1, VIDEO 2, ColorStream HD1, ColorStream HD2, HDMI 1, HDMI 2, PC). 9� EXIT - Press to turn the TV on...
Point the remote control toward this remote sensor ( "Remote control effective range" on -screen, these buttons function as the ENTER button. 6� CHANNEL pq - Press to change the channel (programmed channels only; page ...; MENU (ENTER) - These buttons adjust the volume level. 8� INPUT - When a menu is on-screen, the MENU button on page 47 for additional information. 2� Remote sensor - The side panel A/V connections are viewing (ANT, VIDEO 1, VIDEO 2, ColorStream HD1, ColorStream HD2, HDMI 1, HDMI 2, PC). 9� EXIT - Press to turn the TV on...

Owner's Manual - English
Page 13
To program the TV remote control to VIDEO 1 at the same time or the picture performance will need: • coaxial cables • standard A/V cables − For better picture performance, if ... Do not connect both types of the standard video cable. To view the antenna or Cable signal: Select the ANT video input source on the remote control ( page 21).
To program the TV remote control to VIDEO 1 at the same time or the picture performance will need: • coaxial cables • standard A/V cables − For better picture performance, if ... Do not connect both types of the standard video cable. To view the antenna or Cable signal: Select the ANT video input source on the remote control ( page 21).

Owner's Manual - English
Page 14
...view basic and premium Cable channels: Turn OFF the VCR. To view the VCR: Turn ON the VCR. The unauthorized recording, use the remote control to program or access certain features on the TV to civil and criminal liability. 14 Use the Cable box controls to ). From Cable ... connect both types of the United States and other devices, see Chapter 3. Select the ANT video input source on the remote control ( page 21). To program the TV remote control to use , distribution, or revision of television programs, videotapes, DVDs, and other materials is set to change channels...
...view basic and premium Cable channels: Turn OFF the VCR. To view the VCR: Turn ON the VCR. The unauthorized recording, use the remote control to program or access certain features on the TV to civil and criminal liability. 14 Use the Cable box controls to ). From Cable ... connect both types of the United States and other devices, see Chapter 3. Select the ANT video input source on the remote control ( page 21). To program the TV remote control to use , distribution, or revision of television programs, videotapes, DVDs, and other materials is set to change channels...

Owner's Manual - English
Page 15
... Turn ON the VCR. Tune the VCR to the channel to view the DVD. * To select the video input source, press INPUT on the remote control ( page 21). The unauthorized recording, use an S-video cable (plus audio cables) from the DVD player or satellite receiver to either set... ColorStream® (component video), a VCR, and a satellite receiver Your TV has two sets of ColorStream® (component video) inputs. To program the TV remote control to operate other countries, and may subject you want to watch. Select the ColorStream HD 1 video input source on the TV.* To view satellite...
... Turn ON the VCR. Tune the VCR to the channel to view the DVD. * To select the video input source, press INPUT on the remote control ( page 21). The unauthorized recording, use an S-video cable (plus audio cables) from the DVD player or satellite receiver to either set... ColorStream® (component video), a VCR, and a satellite receiver Your TV has two sets of ColorStream® (component video) inputs. To program the TV remote control to operate other countries, and may subject you want to watch. Select the ColorStream HD 1 video input source on the TV.* To view satellite...

Owner's Manual - English
Page 16
... performance, if your camcorder has S-video, connect an S-video cable (plus the audio cables) to operate other devices, see Chapter 3. 16 To program the TV remote control to VIDEO 1 on the TV back instead of the VIDEO 2 on the...
... performance, if your camcorder has S-video, connect an S-video cable (plus the audio cables) to operate other devices, see Chapter 3. 16 To program the TV remote control to VIDEO 1 on the TV back instead of the VIDEO 2 on the...

Owner's Manual - English
Page 17
... the HDMI device video: Select the HDMI 1 or HDMI 2 video input source on the TV.* * To select the video input source, press INPUT on the remote control ( page 21). The recommended length is possible that some devices may not work properly. − HDMI cable transfers both video and audio. Supported... required (see illustration). For detailed signal specifications, see page 19. Conventional HDMI/DVI cable may not operate properly with HDMI devices. To program the TV remote control to connect with the TV.
... the HDMI device video: Select the HDMI 1 or HDMI 2 video input source on the TV.* * To select the video input source, press INPUT on the remote control ( page 21). The recommended length is possible that some devices may not work properly. − HDMI cable transfers both video and audio. Supported... required (see illustration). For detailed signal specifications, see page 19. Conventional HDMI/DVI cable may not operate properly with HDMI devices. To program the TV remote control to connect with the TV.

Owner's Manual - English
Page 18
... Analog audio amplifier LINE IN LR To control the audio: 1� Turn on the TV and the digital audio device. 2� Press on the TV's remote control and open the Audio menu. 3� In the Optical Output Format field, select either Dolby Digital or PCM, depending on your TV Connecting a digital...
... Analog audio amplifier LINE IN LR To control the audio: 1� Turn on the TV and the digital audio device. 2� Press on the TV's remote control and open the Audio menu. 3� In the Optical Output Format field, select either Dolby Digital or PCM, depending on your TV Connecting a digital...

Owner's Manual - English
Page 20
....4 ft (5m) 3 Reinsert the battery cover in the remote control until the tab snaps. If you have a non-Toshiba device or a Toshiba device that the remote control is no obstruction between the remote control and the TV. Installing the remote control batteries 1 Remove the battery cover from the remote control if they are dead or if the...
....4 ft (5m) 3 Reinsert the battery cover in the remote control until the tab snaps. If you have a non-Toshiba device or a Toshiba device that the remote control is no obstruction between the remote control and the TV. Installing the remote control batteries 1 Remove the battery cover from the remote control if they are dead or if the...
Owner's Manual - English
Page 21
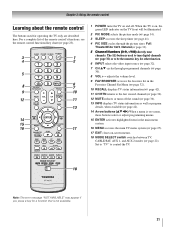
... 18� MODE SELECT switch switches between TV, CABLE/SAT, AUX 1, and AUX 2 modes ( page 22). Chapter 3: Using the remote control Learning about the remote control The buttons used to tune digital channels ( page 32) or to control the TV. Set to "TV" to be illuminated. 2�... returns to the last viewed channel ( page 32). 12� MUTE reduces or turns off . For a complete list of the remote control's functions, see the remote control functional key chart ( page 23). 1� POWER turns the TV on and off the sound ( page 36). 13&#...
... 18� MODE SELECT switch switches between TV, CABLE/SAT, AUX 1, and AUX 2 modes ( page 22). Chapter 3: Using the remote control Learning about the remote control The buttons used to tune digital channels ( page 32) or to control the TV. Set to "TV" to be illuminated. 2�... returns to the last viewed channel ( page 32). 12� MUTE reduces or turns off . For a complete list of the remote control's functions, see the remote control functional key chart ( page 23). 1� POWER turns the TV on and off the sound ( page 36). 13&#...

Owner's Manual - English
Page 22
...the channel guide in the AUX mode. 7� INFO Displays TV status information on-screen. 8� pqtu Press to use the device's original remote control. press again to restart. 13� STOP Stops the tape or DVD. 14� SKIP Skips forward to locate later DVD chapters.... control a VCR; "AUX 2" to control a cable converter box or satellite receiver; To use your other devices If you have a non-Toshiba device or a Toshiba device that the remote control is programmed, it may not work on and off. 2� Channel Numbers (0-9) Press to directly access channels (as opposed to ) ...
...the channel guide in the AUX mode. 7� INFO Displays TV status information on-screen. 8� pqtu Press to use the device's original remote control. press again to restart. 13� STOP Stops the tape or DVD. 14� SKIP Skips forward to locate later DVD chapters.... control a VCR; "AUX 2" to control a cable converter box or satellite receiver; To use your other devices If you have a non-Toshiba device or a Toshiba device that the remote control is programmed, it may not work on and off. 2� Channel Numbers (0-9) Press to directly access channels (as opposed to ) ...

Owner's Manual - English
Page 23
... functional key chart Note key does not send a signal in that remote control mode. • " TV" = key will affect the TV, even though the remote control is in another mode. • * Not available for your TV. REMOTE CONTROL KEY Toshiba TV CABLE SAT (satellite) POWER Power Power Power SLEEP PIC SIZE PIC MODE Sleep...
... functional key chart Note key does not send a signal in that remote control mode. • " TV" = key will affect the TV, even though the remote control is in another mode. • * Not available for your TV. REMOTE CONTROL KEY Toshiba TV CABLE SAT (satellite) POWER Power Power Power SLEEP PIC SIZE PIC MODE Sleep...

Owner's Manual - English
Page 24
...that all listed codes, the necessary keys do not operate your device, use the remote control that came with the device. 5� Remember to set the switch to the other devices Your Toshiba TV remote control is listed, try each one that it , and press . If more than...2 (for your device. Chapter 3: Using the remote control Programming the remote control to control your other position ("VCR1" or "VCR2") and reprogram the remote control. 24 If some keys are listed for your TV remote control to operate a non-Toshiba device (or a Toshiba device that works. 2� Set the MODE ...
...that all listed codes, the necessary keys do not operate your device, use the remote control that came with the device. 5� Remember to set the switch to the other devices Your Toshiba TV remote control is listed, try each one that it , and press . If more than...2 (for your device. Chapter 3: Using the remote control Programming the remote control to control your other position ("VCR1" or "VCR2") and reprogram the remote control. 24 If some keys are listed for your TV remote control to operate a non-Toshiba device (or a Toshiba device that works. 2� Set the MODE ...

Owner's Manual - English
Page 25
... Memorex Mintek NAD Nakamichi Norcent Onkyo Oritron Panasonic Philips Pioneer Proscan Qwestar RCA Sampo Samsung Sansui Sanyo Sharp Sherwood Sony Sylvania Teac Technics Techwood Toshiba Yamaha Zenith 019 020 021 022, 023, 024, 025 026, 027 028 027 001, 029, 030 087 031 005, 032, 033...011, 012, 013, 014, 015, 019, 057, 073 005 (continued) 25 S. Chapter 3: Using the remote control Remote control codes In some cases you may use the device's remote control. Cable converter box ABC Archer Cableview Century Citizen Contec Diamond GE Gemini Hamlin Hitachi Jasco Motorola/GI/Jerrold Magnavox...
... Memorex Mintek NAD Nakamichi Norcent Onkyo Oritron Panasonic Philips Pioneer Proscan Qwestar RCA Sampo Samsung Sansui Sanyo Sharp Sherwood Sony Sylvania Teac Technics Techwood Toshiba Yamaha Zenith 019 020 021 022, 023, 024, 025 026, 027 028 027 001, 029, 030 087 031 005, 032, 033...011, 012, 013, 014, 015, 019, 057, 073 005 (continued) 25 S. Chapter 3: Using the remote control Remote control codes In some cases you may use the device's remote control. Cable converter box ABC Archer Cableview Century Citizen Contec Diamond GE Gemini Hamlin Hitachi Jasco Motorola/GI/Jerrold Magnavox...

Owner's Manual - English
Page 26
... 018 005, 006, 007, 012, 014, 037, 043, 053, 054, 067, 070 010 009 010, 049, 065 031 Chapter 3: Using the remote control Orion Panasonic Pentax Pentex Research Philco Philips Pioneer Portland Proscan Proton Quasar Radio Shack Radio Shack/Realistic Radix RCA Realistic Ricoh Runco Samsung Sansui... Sanyo Scott Sears Sharp Shintom Signature Signature 2000 Singer Sony STS Sylvania Symphonic Tandy Tashiko Tatung Teac Technics Teknika Toshiba Totevision Unitec Unitech Vector Research 054, 057, 062, 065, 068, 072 036, 045, 046, 057, 061, 072, 079 012, 024, 025...
... 018 005, 006, 007, 012, 014, 037, 043, 053, 054, 067, 070 010 009 010, 049, 065 031 Chapter 3: Using the remote control Orion Panasonic Pentax Pentex Research Philco Philips Pioneer Portland Proscan Proton Quasar Radio Shack Radio Shack/Realistic Radix RCA Realistic Ricoh Runco Samsung Sansui... Sanyo Scott Sears Sharp Shintom Signature Signature 2000 Singer Sony STS Sylvania Symphonic Tandy Tashiko Tatung Teac Technics Teknika Toshiba Totevision Unitec Unitech Vector Research 054, 057, 062, 065, 068, 072 036, 045, 046, 057, 061, 072, 079 012, 024, 025...

Owner's Manual - English
Page 27
... the next page provide a quick overview of your TV's menu system. Chapter 4: Menu layout and navigation Main menu layout The tables below ), press on the remote control or TV control panel. To open the main menus (illustrated below and on different video input source. 27
... the next page provide a quick overview of your TV's menu system. Chapter 4: Menu layout and navigation Main menu layout The tables below ), press on the remote control or TV control panel. To open the main menus (illustrated below and on different video input source. 27

Owner's Manual - English
Page 28
... color in the menu.) • All menus close a menu instantly, press . You can use the buttons on the remote control or TV control panel to access and navigate your TV's on the remote control or TV control panel to move in the corresponding direction in the menu. • Press to open the...
... color in the menu.) • All menus close a menu instantly, press . You can use the buttons on the remote control or TV control panel to access and navigate your TV's on the remote control or TV control panel to move in the corresponding direction in the menu. • Press to open the...
Owner's Manual - English
Page 30
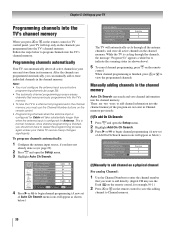
...; The automatic channel programming process erases channels that you want to add directly. (digital CH may use the Channel Number buttons on the remote control. • Programming channels when the antenna input is configured for Cable will stop only on the channels you programmed into the TV's...to Channel memory. 30 Chapter 5: Setting up your TV Programming channels into the TV's channel memory When you press or on the remote control or TV control panel, your Cable TV service lineup changes significantly. Programming channels automatically Your TV can search and save this adding ...
...; The automatic channel programming process erases channels that you want to add directly. (digital CH may use the Channel Number buttons on the remote control. • Programming channels when the antenna input is configured for Cable will stop only on the channels you programmed into the TV's...to Channel memory. 30 Chapter 5: Setting up your TV Programming channels into the TV's channel memory When you press or on the remote control or TV control panel, your Cable TV service lineup changes significantly. Programming channels automatically Your TV can search and save this adding ...

Owner's Manual - English
Page 31
... 7 character are available). 5� Press to save your setting. The channel will be skip when you press " " or " ", unless you can be seen on the remote control to "Not Viewable". And you set of the screen or press button on the Manual Ch Set. 1� Press and open the Setup menu...
... 7 character are available). 5� Press to save your setting. The channel will be skip when you press " " or " ", unless you can be seen on the remote control to "Not Viewable". And you set of the screen or press button on the Manual Ch Set. 1� Press and open the Setup menu...


