Printable Spec Sheet
Page 1
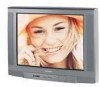
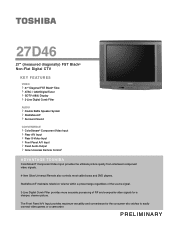
...FST Black® Non-Flat Digital CTV KEY FEATURES VIDEO 27" Diagonal FST Black® Tube ATSC / QAM Digital Tuner SDTV (480i) Display 3-Line Digital Comb Filter AUDIO Double Baffle Speaker System StableSound® Surround Sound CONVENIENCE ColorStream® Component Video Input Rear A/V Input Rear S-Video Input Front Panel A/V Input Fixed Audio Output Glow Universal Remote Control1 ADVANTAGE TOSHIBA ColorStream® Component Video Input provides the ultimate picture quality from interlaced component video signals. 4-Item Glow Universal Remote also controls most cable boxes and DVD players...
...FST Black® Non-Flat Digital CTV KEY FEATURES VIDEO 27" Diagonal FST Black® Tube ATSC / QAM Digital Tuner SDTV (480i) Display 3-Line Digital Comb Filter AUDIO Double Baffle Speaker System StableSound® Surround Sound CONVENIENCE ColorStream® Component Video Input Rear A/V Input Rear S-Video Input Front Panel A/V Input Fixed Audio Output Glow Universal Remote Control1 ADVANTAGE TOSHIBA ColorStream® Component Video Input provides the ultimate picture quality from interlaced component video signals. 4-Item Glow Universal Remote also controls most cable boxes and DVD players...
Printable Spec Sheet
Page 2
...Screen Display X Off / Sleep / GameTimerTM X On Timer X Closed Captioning X V-Chip X Advanced Channel Return X Channel Lock X Video Lock X Favorite Channel X Channel Labeling X JACK PACK: Inputs: RF Input X Rear A/V Input X Rear S-Video Input X ColorStream® Component Video Inputs (Y, Pb, Pr) X Front Panel A/V Input X Outputs: Fixed Audio Output X CABINET: W x H x D (in -the-clear signals and digital terrestrial broadcasts. 3 Line Digital Comb Filter - Digital Comb Filter 3-Line 16:9 Mode with Zoom X SOUND: MTS Stereo / SAP with many of Toshiba...
...Screen Display X Off / Sleep / GameTimerTM X On Timer X Closed Captioning X V-Chip X Advanced Channel Return X Channel Lock X Video Lock X Favorite Channel X Channel Labeling X JACK PACK: Inputs: RF Input X Rear A/V Input X Rear S-Video Input X ColorStream® Component Video Inputs (Y, Pb, Pr) X Front Panel A/V Input X Outputs: Fixed Audio Output X CABINET: W x H x D (in -the-clear signals and digital terrestrial broadcasts. 3 Line Digital Comb Filter - Digital Comb Filter 3-Line 16:9 Mode with Zoom X SOUND: MTS Stereo / SAP with many of Toshiba...
Owner's Manual - English
Page 2
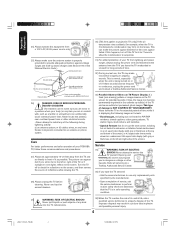
...television safety. Arlington, VA 22201 U.S.A. NOTE TO CATV INSTALLERS This is NOT COVERED BY YOUR WARRANTY. (See item 33 on top of your family and friends. NOTICE OF POSSIBLE ADVERSE EFFECTS ON TV PICTURE DISPLAY If a fixed (non-moving) pattern or image remains on or play with your TV (such as a VCR, remote control, or toy) that the cable.... REFER SERVICING TO QUALIFIED SERVICE PERSONNEL. For additional antenna grounding information, see items 25 and 26 on the proper TV stands. CAUTION TO PREVENT ELECTRIC SHOCK DO NOT USE THIS POLARIZED PLUG WITH AN EXTENSION CORD, RECEPTACLE ...
...television safety. Arlington, VA 22201 U.S.A. NOTE TO CATV INSTALLERS This is NOT COVERED BY YOUR WARRANTY. (See item 33 on top of your family and friends. NOTICE OF POSSIBLE ADVERSE EFFECTS ON TV PICTURE DISPLAY If a fixed (non-moving) pattern or image remains on or play with your TV (such as a VCR, remote control, or toy) that the cable.... REFER SERVICING TO QUALIFIED SERVICE PERSONNEL. For additional antenna grounding information, see items 25 and 26 on the proper TV stands. CAUTION TO PREVENT ELECTRIC SHOCK DO NOT USE THIS POLARIZED PLUG WITH AN EXTENSION CORD, RECEPTACLE ...
Owner's Manual - English
Page 4
... the power cord and disconnect the antenna from a 120 V AC, 60 Hz power source only. 25) Always make the picture appear distorted or the color appear faded. or b) cables, wires, or any home theater component connected to service the TV yourself. If this equipment from the TV if you leave the TV unattended or unused for long periods of the screen); Never leave the TV on...
... the power cord and disconnect the antenna from a 120 V AC, 60 Hz power source only. 25) Always make the picture appear distorted or the color appear faded. or b) cables, wires, or any home theater component connected to service the TV yourself. If this equipment from the TV if you leave the TV unattended or unused for long periods of the screen); Never leave the TV on...
Owner's Manual - English
Page 5
...Chip (parental control) feature 23 Locking channels ...24 Locking the video inputs ...25 Setting the GameTimerTM ...25 Using the front panel lock feature ...26 Labeling channels ...26 Selecting the video input source ...27 Setting the clock ...27 Setting the ON/OFF timer ...27 Viewing the wide-screen picture formats ...28 Adjusting the picture ...30 Adjusting the picture quality ...30 Resetting your picture adjustments ...30 Setting the sleep timer ...30 Using the closed caption feature ...31 Using the CC advanced feature ...31 Adjusting the sound ...32 Muting the sound ...32 Selecting stereo...
...Chip (parental control) feature 23 Locking channels ...24 Locking the video inputs ...25 Setting the GameTimerTM ...25 Using the front panel lock feature ...26 Labeling channels ...26 Selecting the video input source ...27 Setting the clock ...27 Setting the ON/OFF timer ...27 Viewing the wide-screen picture formats ...28 Adjusting the picture ...30 Adjusting the picture quality ...30 Resetting your picture adjustments ...30 Setting the sleep timer ...30 Using the closed caption feature ...31 Using the CC advanced feature ...31 Adjusting the sound ...32 Muting the sound ...32 Selecting stereo...
Owner's Manual - English
Page 7
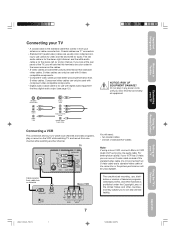
... not connect both an S-video cable and a standard video cable at the rear panel of the TV, you have finished connecting all equipment. The red audio cable is for the stereo right channel, and the white audio cable is for use with digital audio equipment that has digital audio output (see that comes in from your antenna or cable converter box. Component video cables can use "F" connectors. • Standard A/V (audio/video) cables are color coded in the same manner as the cables. • S-video cables provide better picture performance than S-video cables...
... not connect both an S-video cable and a standard video cable at the rear panel of the TV, you have finished connecting all equipment. The red audio cable is for the stereo right channel, and the white audio cable is for use with digital audio equipment that has digital audio output (see that comes in from your antenna or cable converter box. Component video cables can use "F" connectors. • Standard A/V (audio/video) cables are color coded in the same manner as the cables. • S-video cables provide better picture performance than S-video cables...

Owner's Manual - English
Page 13
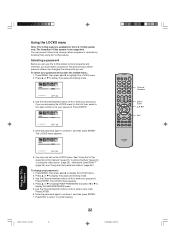
... PM Using the TV's Features Appendix Important Safeguards Connecting an audio system Back panel of TV You will need : • one coaxial digital cable • Six sets of standard audio cables Amplifier LINE IN LR Welcome to Toshiba Connecting your TV Using the Remote Control Setting up your TV Connecting an AV amplifier with built-in digital surround This connection allows you also must connect analog audio cables from the L/R ANALOG AUDIO jacks to the receiver's inputs. Consult the owner's manual...
... PM Using the TV's Features Appendix Important Safeguards Connecting an audio system Back panel of TV You will need : • one coaxial digital cable • Six sets of standard audio cables Amplifier LINE IN LR Welcome to Toshiba Connecting your TV Using the Remote Control Setting up your TV Connecting an AV amplifier with built-in digital surround This connection allows you also must connect analog audio cables from the L/R ANALOG AUDIO jacks to the receiver's inputs. Consult the owner's manual...
Owner's Manual - English
Page 15
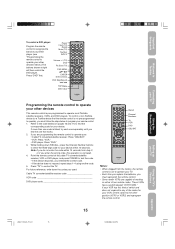
..., VCRs, and DVD players. Power Input (TV) Recall Mute (TV) Number buttons Volume +/- (TV) DVD Pic Size (TV) DVD MENU LM ENTER DVD controls M DVD Skip/Search / TOP Menu DVD Clear M Connecting your TV Using the Remote Control Setting up your TV Programming the remote control to operate your other devices This remote control is canceled. 4. To control a non-Toshiba device (or a Toshiba device that works. 2. Press "DVD" first. While holding down the codes you used: Cable TV converter/satellite receiver code VCR code DVD player code Recall Channel Numbers TV VCR DVD...
..., VCRs, and DVD players. Power Input (TV) Recall Mute (TV) Number buttons Volume +/- (TV) DVD Pic Size (TV) DVD MENU LM ENTER DVD controls M DVD Skip/Search / TOP Menu DVD Clear M Connecting your TV Using the Remote Control Setting up your TV Programming the remote control to operate your other devices This remote control is canceled. 4. To control a non-Toshiba device (or a Toshiba device that works. 2. Press "DVD" first. While holding down the codes you used: Cable TV converter/satellite receiver code VCR code DVD player code Recall Channel Numbers TV VCR DVD...
Owner's Manual - English
Page 18
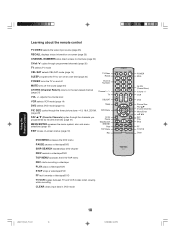
... the three picture sizes-4:3, 16:9, ZOOM. (page 28) DVD Menu FAV L / M (Favorite Channels) cycles through programmed channels (page 20) TV selects TV mode CBL/SAT selects CBL/SAT mode (page 14) SLEEP programs the TV to turn off the sound (page 24) Channel Numbers CH RTN (Channel Return) returns to channels (page 20) CH 3 / 4 cycles through the channels you programmed as favorite channels (page 21) MENU/ENTER accesses the menu system; Using the Remote Control Learning about the remote control TV/VIDEO selects the video input source...
... the three picture sizes-4:3, 16:9, ZOOM. (page 28) DVD Menu FAV L / M (Favorite Channels) cycles through programmed channels (page 20) TV selects TV mode CBL/SAT selects CBL/SAT mode (page 14) SLEEP programs the TV to turn off the sound (page 24) Channel Numbers CH RTN (Channel Return) returns to channels (page 20) CH 3 / 4 cycles through the channels you programmed as favorite channels (page 21) MENU/ENTER accesses the menu system; Using the Remote Control Learning about the remote control TV/VIDEO selects the video input source...
Owner's Manual - English
Page 19
.... 1. SETUP LANGUAGE CLOCK SET TV / CABLE CH PROGRAM ADD / ERASE :SELECT ENGLISH CABLE :ADJUST 2. See "Connecting your TV" on pages 7-13 for the on the remote control. • When you do not have installed the batteries and programmed the remote control, you are finished programming the menus, press EXIT. To select a language: 1. You do not make a menu selection, your changes occur immediately. Press POWER to turn on the TV, and helps you turn on the TV using the menu...
.... 1. SETUP LANGUAGE CLOCK SET TV / CABLE CH PROGRAM ADD / ERASE :SELECT ENGLISH CABLE :ADJUST 2. See "Connecting your TV" on pages 7-13 for the on the remote control. • When you do not have installed the batteries and programmed the remote control, you are finished programming the menus, press EXIT. To select a language: 1. You do not make a menu selection, your changes occur immediately. Press POWER to turn on the TV, and helps you turn on the TV using the menu...
Owner's Manual - English
Page 20
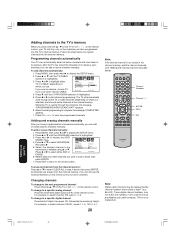
... a specific analog channel: Press the Channel Number buttons (0-9) on the remote control. Press L or M until the ADD/ERASE selection is complete, the message "COMPLETED" appears. 7. SETUP LANGUAGE CLOCK SET TV / CABLE CH PROGRAM ADD / ERASE ENGLISH TV / CABLE If you can still use cable, choose CABLE. :SELECT :ADJUST 4. If you selected), and store all channels from the channel memory. (You can add or erase channels manually. The TV will stop only on the remote control to tune a channel.) Changing channels To change to...
... a specific analog channel: Press the Channel Number buttons (0-9) on the remote control. Press L or M until the ADD/ERASE selection is complete, the message "COMPLETED" appears. 7. SETUP LANGUAGE CLOCK SET TV / CABLE CH PROGRAM ADD / ERASE ENGLISH TV / CABLE If you can still use cable, choose CABLE. :SELECT :ADJUST 4. If you selected), and store all channels from the channel memory. (You can add or erase channels manually. The TV will stop only on the remote control to tune a channel.) Changing channels To change to...

Owner's Manual - English
Page 21
... select your TV Using the Remote Control Using the TV's features Adjusting the channel settings Switching between two channels: 1. Press MENU, then press or to display the FAVORITE CH menu. SET/CLEAR will be highlighted. 5. FAVORITE CH:CH SET / CLEAR TV 0 0 0 0 OPTION MENU :SELECT ENTER:SET 2 CABLE 0 0 0 0 0 0 0 0 :ADJUST E X I T: E N D To select your favorite channels: Press the FAV L M buttons on the remote control to skip other FAVORITE CH:CH 2 SET / CLEAR TV CABLE 002 0 0 0 OPTION MENU :SELECT ENTER:CLEAR 0 0 0 0 0 0 0 0 :ADJUST E X I T: E N D channels...
... select your TV Using the Remote Control Using the TV's features Adjusting the channel settings Switching between two channels: 1. Press MENU, then press or to display the FAVORITE CH menu. SET/CLEAR will be highlighted. 5. FAVORITE CH:CH SET / CLEAR TV 0 0 0 0 OPTION MENU :SELECT ENTER:SET 2 CABLE 0 0 0 0 0 0 0 0 :ADJUST E X I T: E N D To select your favorite channels: Press the FAV L M buttons on the remote control to skip other FAVORITE CH:CH 2 SET / CLEAR TV CABLE 002 0 0 0 OPTION MENU :SELECT ENTER:CLEAR 0 0 0 0 0 0 0 0 :ADJUST E X I T: E N D channels...
Owner's Manual - English
Page 22
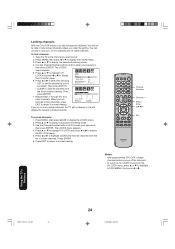
... supported. Press L or M to confirm it , and then press ENTER. 7. Enter the password again to display the password entering mode. LOCKS NEW PASSWORD ---- [0-9]:SELECT ENTER : SET EXIT : END 3. If you set up the LOCKS menu. Use the Channel Number buttons (0-9) to be your password. See "Using the V-Chip (parental control) feature" (page 23), "Locking channels" (page 24), "Locking the video inputs" (page 25), "Setting the GameTimerTM" (page 25), and "Using the front panel lock feature" (page 26.) To change your password...
... supported. Press L or M to confirm it , and then press ENTER. 7. Enter the password again to display the password entering mode. LOCKS NEW PASSWORD ---- [0-9]:SELECT ENTER : SET EXIT : END 3. If you set up the LOCKS menu. Use the Channel Number buttons (0-9) to be your password. See "Using the V-Chip (parental control) feature" (page 23), "Locking channels" (page 24), "Locking the video inputs" (page 25), "Setting the GameTimerTM" (page 25), and "Using the front panel lock feature" (page 26.) To change your password...
Owner's Manual - English
Page 24
... unlocked channel. Use the Channel Number buttons (0-9) to enter your password, then press ENTER. Press or to select the following: • SET: to set the channel as one to LOCKS LOCK CH LOCK VIDEO LOCK GAME TIMER FRONT PANEL LOCK NEW PASSWORD :SELECT OFF OFF OFF :ADJUST be able to tune locked channels unless you are finished locking channels, press CH LOCK :CH 2 SET / CLEAR TV CABLE 0 0 0 0 LOCKS MENU :SELECT ENTER:SET 0 0 0 0 0 0 0 0 :ADJUST E X I T: E N D EXIT to return to normal viewing. When you clear the setting. The LOCKS menu appears. 4. Tune...
... unlocked channel. Use the Channel Number buttons (0-9) to enter your password, then press ENTER. Press or to select the following: • SET: to set the channel as one to LOCKS LOCK CH LOCK VIDEO LOCK GAME TIMER FRONT PANEL LOCK NEW PASSWORD :SELECT OFF OFF OFF :ADJUST be able to tune locked channels unless you are finished locking channels, press CH LOCK :CH 2 SET / CLEAR TV CABLE 0 0 0 0 LOCKS MENU :SELECT ENTER:SET 0 0 0 0 0 0 0 0 :ADJUST E X I T: E N D EXIT to return to normal viewing. When you clear the setting. The LOCKS menu appears. 4. Tune...
Owner's Manual - English
Page 25
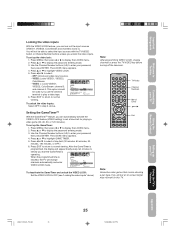
This option should be able to select the input sources with the TV/VIDEO button or Channel Number buttons unless you unlock the video inputs. Press MENU, then press or to display the password entering mode. 3. LOCK CH LOCK VIDEO LOCK OFF GAME TIMER OFF OFF / 30 / 60 / 90 / 120 FRONT PANEL LOCK OFF NEW PASSWORD :SELECT :ADJUST To deactivate the GameTimer and unlock the VIDEO LOCK: Set the VIDEO LOCK to OFF (see "Locking the video inputs" above . Using the Remote Control Setting up the GameTimer: 1. Press L or...
This option should be able to select the input sources with the TV/VIDEO button or Channel Number buttons unless you unlock the video inputs. Press MENU, then press or to display the password entering mode. 3. LOCK CH LOCK VIDEO LOCK OFF GAME TIMER OFF OFF / 30 / 60 / 90 / 120 FRONT PANEL LOCK OFF NEW PASSWORD :SELECT :ADJUST To deactivate the GameTimer and unlock the VIDEO LOCK: Set the VIDEO LOCK to OFF (see "Locking the video inputs" above . Using the Remote Control Setting up the GameTimer: 1. Press L or...
Owner's Manual - English
Page 27
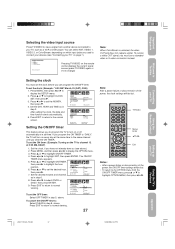
... :SELECT :ADJUST step 3. Set the clock, if you to program the TV to normal viewing. 27 Note: After a power failure or disconnection of the power, the ON/OFF timer settings will be lost . • To return to the OPTION menu from another device connected to display the SETUP menu. 2. Setting up your TV, such as a VCR or DVD player. Important Safeguards Welcome to Toshiba Connecting your TV Using the Remote Control Selecting the video input source Press TV/VIDEO to view a signal...
... :SELECT :ADJUST step 3. Set the clock, if you to program the TV to normal viewing. 27 Note: After a power failure or disconnection of the power, the ON/OFF timer settings will be lost . • To return to the OPTION menu from another device connected to display the SETUP menu. 2. Setting up your TV, such as a VCR or DVD player. Important Safeguards Welcome to Toshiba Connecting your TV Using the Remote Control Selecting the video input source Press TV/VIDEO to view a signal...
Owner's Manual - English
Page 30
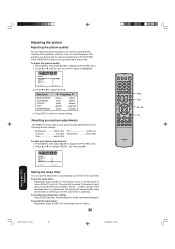
... to highlight RESET, and then press . To set the sleep timer: Repeatedly press SLEEP on the remote control to set time. The remaining time will be stored automatically in the PICTURE menu's MEMORY mode so you choose will be momentarily displayed. Press or to normal viewing. Press EXIT to return to adjust the level. To adjust the picture quality: 1. Selection BRIGHTNESS CONTRAST COLOR TINT...
... to highlight RESET, and then press . To set the sleep timer: Repeatedly press SLEEP on the remote control to set time. The remaining time will be stored automatically in the PICTURE menu's MEMORY mode so you choose will be momentarily displayed. Press or to normal viewing. Press EXIT to return to adjust the level. To adjust the picture quality: 1. Selection BRIGHTNESS CONTRAST COLOR TINT...
Owner's Manual - English
Page 34
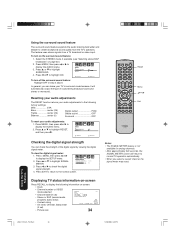
... display the AUDIO menu. 2. To turn off the surround sound feature: Highlight OFF in surround mode because it will return to highlight SIGNAL SIGNAL METER CHANNEL (DIGITAL) 1-001 METER. 80 3. Resetting your audio adjustments The RESET function returns your audio adjustments to the following information on page 32.) 2. Select the STEREO mode, if available (see "Selecting stereo/SAP broadcasts" on -screen: • Clock • Channel number or VIDEO mode selected STEREO SAP 4:3 • Channel label (if set) TV-PG L ON TIMER OFF TIMER V 12...
... display the AUDIO menu. 2. To turn off the surround sound feature: Highlight OFF in surround mode because it will return to highlight SIGNAL SIGNAL METER CHANNEL (DIGITAL) 1-001 METER. 80 3. Resetting your audio adjustments The RESET function returns your audio adjustments to the following information on page 32.) 2. Select the STEREO mode, if available (see "Selecting stereo/SAP broadcasts" on -screen: • Clock • Channel number or VIDEO mode selected STEREO SAP 4:3 • Channel label (if set) TV-PG L ON TIMER OFF TIMER V 12...
Owner's Manual - English
Page 35
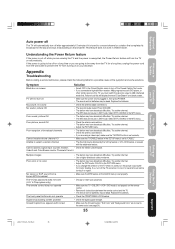
... MTS broadcast The V-Chip password does not work in the MTS menu. Symptom Solution Black box on screen • Select OFF in the Closed Caption menu to turn off the TV and allow it to the same color (see page 31). 35 Setting up your password. • Make sure the TV • CBL/SAT • VCR • DVD mode is turned on that channel. Poor picture, sound OK • Check the antenna connections. • The station...
... MTS broadcast The V-Chip password does not work in the MTS menu. Symptom Solution Black box on screen • Select OFF in the Closed Caption menu to turn off the TV and allow it to the same color (see page 31). 35 Setting up your password. • Make sure the TV • CBL/SAT • VCR • DVD mode is turned on that channel. Poor picture, sound OK • Check the antenna connections. • The station...
Owner's Manual - English
Page 37
... THE REPAIR OR REPLACEMENT OF ANY PARTS. Owner's Manual and Product Registration Card Read this owner's manual thoroughly before operating this television. THEREFORE, THE ABOVE PROVISIONS MAY NOT APPLY TO YOU UNDER SUCH CIRCUMSTANCES. 37 Setting up your home at no cost to you. Important Safeguards Welcome to Toshiba Connecting your TV Using the Remote Control Limited United States Warranty for Non-FST PURE® CRT-based TVs 27 Inch...
... THE REPAIR OR REPLACEMENT OF ANY PARTS. Owner's Manual and Product Registration Card Read this owner's manual thoroughly before operating this television. THEREFORE, THE ABOVE PROVISIONS MAY NOT APPLY TO YOU UNDER SUCH CIRCUMSTANCES. 37 Setting up your home at no cost to you. Important Safeguards Welcome to Toshiba Connecting your TV Using the Remote Control Limited United States Warranty for Non-FST PURE® CRT-based TVs 27 Inch...


