
User Manual
Page 1
... and serial number are on the back of steps for setting up your TV. Record these numbers whenever you communicate with your Toshiba dealer about this TV. Refer to these numbers in the spaces below. Owner's Manual Integrated High Definition LCD Television 19SL410U 24SL410U 32SL410U For an overview of your new TV, see...
... and serial number are on the back of steps for setting up your TV. Record these numbers whenever you communicate with your Toshiba dealer about this TV. Refer to these numbers in the spaces below. Owner's Manual Integrated High Definition LCD Television 19SL410U 24SL410U 32SL410U For an overview of your new TV, see...
User Manual
Page 2
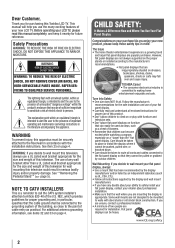
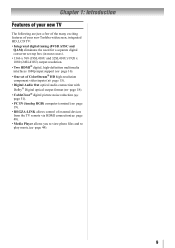
... However, flat panel displays are not always supported on the proper stands or installed according to making home entertainment enjoyable and safe. TOSHIBA Cares! • The consumer electronics industry is committed to the manufacturer's recommendations. • Flat panel displays that may fall over...of your purchase! WARNING To prevent injury, this product. • Don't allow children to climb on or play with furniture and television sets. • Don't place flat panel displays on dressers, bookcases, shelves, desks, speakers, chests or carts may be of sufficient magnitude ...
... However, flat panel displays are not always supported on the proper stands or installed according to making home entertainment enjoyable and safe. TOSHIBA Cares! • The consumer electronics industry is committed to the manufacturer's recommendations. • Flat panel displays that may fall over...of your purchase! WARNING To prevent injury, this product. • Don't allow children to climb on or play with furniture and television sets. • Don't place flat panel displays on dressers, bookcases, shelves, desks, speakers, chests or carts may be of sufficient magnitude ...
User Manual
Page 6
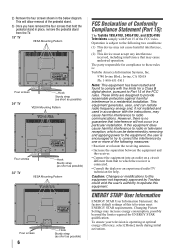
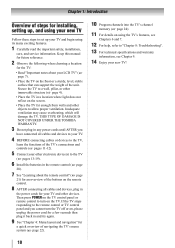
...the four screws that interference will not occur in a particular installation. This will allow removal of this equipment. Changing Picture Settings may not cause harmful interference, and (2) This device must accept any interference received, including interference that to operate this ... Four screws 6 Hook Sturdy strap (as short as possible) FCC Declaration of Conformity Compliance Statement (Part 15): The Toshiba 19SL410U, 24SL410U, and 32SL410U Televisions comply with the instructions, may cause undesired operation. Operation is subject to these rules is operating at...
...the four screws that interference will not occur in a particular installation. This will allow removal of this equipment. Changing Picture Settings may not cause harmful interference, and (2) This device must accept any interference received, including interference that to operate this ... Four screws 6 Hook Sturdy strap (as short as possible) FCC Declaration of Conformity Compliance Statement (Part 15): The Toshiba 19SL410U, 24SL410U, and 32SL410U Televisions comply with the instructions, may cause undesired operation. Operation is subject to these rules is operating at...
User Manual
Page 7
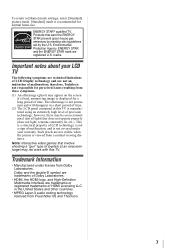
...the United States and other countries. • MPEG Layer-3 audio coding technology licensed from a normal viewing distance. To return to [Home] mode settings, select [Standard] picture mode. [Standard] mode is not responsible for perceived issues resulting from Dolby Laboratories. ENERGY STAR and the ENERGY STAR ... are technical limitations of light) that earn the ENERGY STAR prevent green house gas emissions by meeting strict guidelines set by the U.S. therefore, Toshiba is recommended for normal home use. ENERGY STAR® qualified TV. Environmental Protection Agency. marks.
...the United States and other countries. • MPEG Layer-3 audio coding technology licensed from a normal viewing distance. To return to [Home] mode settings, select [Standard] picture mode. [Standard] mode is not responsible for perceived issues resulting from Dolby Laboratories. ENERGY STAR and the ENERGY STAR ... are technical limitations of light) that earn the ENERGY STAR prevent green house gas emissions by meeting strict guidelines set by the U.S. therefore, Toshiba is recommended for normal home use. ENERGY STAR® qualified TV. Environmental Protection Agency. marks.
User Manual
Page 8
... feature 42 Using the Game Timer 43 Using the control panel lock feature 43 Using the PC settings feature 43 Setting the PC Audio 44 Using the Media Player 44 Using the Media Player with USB 44 To ... the last mode memory feature 50 Chapter 7: Using the TV's advanced features ......... 51 Using the advanced picture settings features 51 Using Dynamic Contrast 51 Using the static gamma feature 51 Selecting the color temperature 51 Using CableClear®...Limited United States Warranty for LCD Televisions .. 57 Limited Canadian Warranty for Toshiba Brand Flat Panel Televisions 58
... feature 42 Using the Game Timer 43 Using the control panel lock feature 43 Using the PC settings feature 43 Setting the PC Audio 44 Using the Media Player 44 Using the Media Player with USB 44 To ... the last mode memory feature 50 Chapter 7: Using the TV's advanced features ......... 51 Using the advanced picture settings features 51 Using Dynamic Contrast 51 Using the static gamma feature 51 Selecting the color temperature 51 Using CableClear®...Limited United States Warranty for LCD Televisions .. 57 Limited Canadian Warranty for Toshiba Brand Flat Panel Televisions 58
User Manual
Page 9
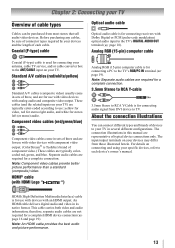
... exciting features of your new Toshiba widescreen, integrated HD, LCD TV: • Integrated digital tuning (8VSB ATSC and QAM) eliminates the need for a separate digital converter set-top box (in most cases). • 1366 x 768 (19SL410U and 32SL410U)/1920 x 1080 (24SL410U) output resolution. •... Two HDMI® digital, high-definition multimedia interfaces 1080p input support ( page 16). • One set of ColorStream® HD high-resolution component video inputs ( page 15). •...
... exciting features of your new Toshiba widescreen, integrated HD, LCD TV: • Integrated digital tuning (8VSB ATSC and QAM) eliminates the need for a separate digital converter set-top box (in most cases). • 1366 x 768 (19SL410U and 32SL410U)/1920 x 1080 (24SL410U) output resolution. •... Two HDMI® digital, high-definition multimedia interfaces 1080p input support ( page 16). • One set of ColorStream® HD high-resolution component video inputs ( page 15). •...
User Manual
Page 10
... structure ( page 4). • Place the TV in and try again. 9 See "Chapter 4: Menu layout and navigation" for your TV and other objects to set up , and using its many exciting features. 1 Carefully read the important safety, installation, care, and service information. Keep this manual for future reference. 2 Observe... a few seconds then plug it back in a location where light does not reflect on the TV. THIS TYPE OF DAMAGE IS NOT COVERED UNDER THE TOSHIBA WARRANTY. 3 Do not plug in the remote control ( page 20). 7 See "Learning about your LCD TV" ( page 7). • Place the TV on...
... structure ( page 4). • Place the TV in and try again. 9 See "Chapter 4: Menu layout and navigation" for your TV and other objects to set up , and using its many exciting features. 1 Carefully read the important safety, installation, care, and service information. Keep this manual for future reference. 2 Observe... a few seconds then plug it back in a location where light does not reflect on the TV. THIS TYPE OF DAMAGE IS NOT COVERED UNDER THE TOSHIBA WARRANTY. 3 Do not plug in the remote control ( page 20). 7 See "Learning about your LCD TV" ( page 7). • Place the TV on...
User Manual
Page 13
...audio input to the TV's DIGITAL AUDIO OUT terminal ( page 18). Analog RGB (15-pin) computer cable Coaxial (F-type) cable is Toshiba's brand of component video.) These cables are typically colorcoded red, green, and blue. Separate audio cables are required for use with devices with...in this manual are representative of typical device connections only. Standard A/V cables (red/white/yellow) Standard A/V cables (composite video) usually come in sets of three, and are for a complete connection. These cables (and the related inputs on your TV) are for a complete HDMI device connection ...
...audio input to the TV's DIGITAL AUDIO OUT terminal ( page 18). Analog RGB (15-pin) computer cable Coaxial (F-type) cable is Toshiba's brand of component video.) These cables are typically colorcoded red, green, and blue. Separate audio cables are required for use with devices with...in this manual are representative of typical device connections only. Standard A/V cables (red/white/yellow) Standard A/V cables (composite video) usually come in sets of three, and are for a complete connection. These cables (and the related inputs on your TV) are for a complete HDMI device connection ...
User Manual
Page 14
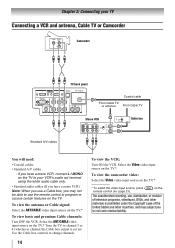
... control to program or access certain features on the The unauthorized recording, use, distribution, or revision of television programs, videotapes, DVDs, and other materials is set to). Use the Cable box controls to change channels. 14 To view the VCR: Turn ON the VCR. Select the ANT/CABLE video input source...
... control to program or access certain features on the The unauthorized recording, use, distribution, or revision of television programs, videotapes, DVDs, and other materials is set to). Use the Cable box controls to change channels. 14 To view the VCR: Turn ON the VCR. Select the ANT/CABLE video input source...
User Manual
Page 16
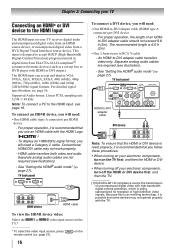
... then the TV. [1] EIA/CEA-861-D compliance covers the transmission of an HDMto-DVI adapter cable should not exceed 9.8 ft (3m). See "Setting the HDMI® audio mode" ( page 27). For proper operation, the length of uncompressed digital video with high-bandwidth digital content protection, which is... per HDMI device - For detailed signal specifications, see page 19. To display an 1080i/60Hz signal format, you will need a Category 2 cable. See "Setting the HDMI® audio mode" ( page 27). This input is recommended that the HDMI or DVI device is reset properly, it is 6.6 ft (2m)....
... then the TV. [1] EIA/CEA-861-D compliance covers the transmission of an HDMto-DVI adapter cable should not exceed 9.8 ft (3m). See "Setting the HDMI® audio mode" ( page 27). For proper operation, the length of uncompressed digital video with high-bandwidth digital content protection, which is... per HDMI device - For detailed signal specifications, see page 19. To display an 1080i/60Hz signal format, you will need a Category 2 cable. See "Setting the HDMI® audio mode" ( page 27). This input is recommended that the HDMI or DVI device is reset properly, it is 6.6 ft (2m)....
User Manual
Page 17
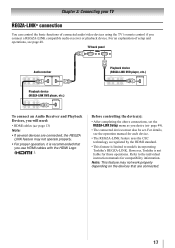
... page 13) Note: • If several devices are connected. 17 Before controlling the device(s): • After completing the above connections, set . Refer to models incorporating Toshiba's REGZA-LINK. TV back panel Audio receiver Playback device (REGZA-LINK DVD player, etc.) Playback device (REGZA-LINK DVD player, etc... the CEC technology as you use HDMI cables with the HDMI Logo ( ). However, Toshiba is recommended that you desire ( page 49). • The connected devices must also be set the REGZA-LINK Setup menu as regulated by the HDMI standard. • This feature is...
... page 13) Note: • If several devices are connected. 17 Before controlling the device(s): • After completing the above connections, set . Refer to models incorporating Toshiba's REGZA-LINK. TV back panel Audio receiver Playback device (REGZA-LINK DVD player, etc.) Playback device (REGZA-LINK DVD player, etc... the CEC technology as you use HDMI cables with the HDMI Logo ( ). However, Toshiba is recommended that you desire ( page 49). • The connected devices must also be set the REGZA-LINK Setup menu as regulated by the HDMI standard. • This feature is...
User Manual
Page 18
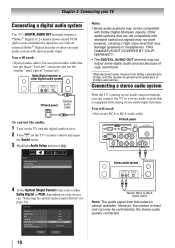
... RCA to a stereo audio system that is fixed and can connect the TV to RCA audio cable TV back panel Sound Digital Audio Selector Audio Settings Audio Setup Stereo audio system 4 In the Optical Output Format field, select either Dolby Digital or PCM, depending on your TV Connecting a digital audio system...
... RCA to a stereo audio system that is fixed and can connect the TV to RCA audio cable TV back panel Sound Digital Audio Selector Audio Settings Audio Setup Stereo audio system 4 In the Optical Output Format field, select either Dolby Digital or PCM, depending on your TV Connecting a digital audio system...
User Manual
Page 19
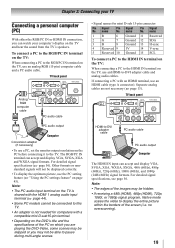
name Pin Signal No. If connecting a PC with an HDMI terminal, use the PC setting feature ( "Using the PC settings feature" on the TV, use an analog RGB (15-pin) computer cable and a PC audio cable. no overscanning). 19 For detailed signal specifications ( page 56). ... SCL To connect a PC to the HDMI IN terminal on the TV: When connecting a PC to the HDMI IN terminal on the TV, use a PC, set the monitor output resolution on the TV and hear the sound from the TV's speakers. Note: • The edges of the screen (i.e.
name Pin Signal No. If connecting a PC with an HDMI terminal, use the PC setting feature ( "Using the PC settings feature" on the TV, use an analog RGB (15-pin) computer cable and a PC audio cable. no overscanning). 19 For detailed signal specifications ( page 56). ... SCL To connect a PC to the HDMI IN terminal on the TV: When connecting a PC to the HDMI IN terminal on the TV, use a PC, set the monitor output resolution on the TV and hear the sound from the TV's speakers. Note: • The edges of the screen (i.e.
User Manual
Page 22
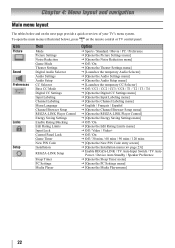
... Labeling menu] J English / Français / Español J [Opens the Channel Browser Setup menu] J [Opens the REGZA-LINK Player Control] J [Opens the Energy Saving Settings menu] J Off / On J [Opens the Edit Rating Limits menu] J Off / Video / Video+ J Off / On J Off / 30 mins / 60 mins / 90 ...REGZA-LINK / TV Auto Input Switch / TV Auto Power / Device Auto Standby / Speaker Preference J [Opens the Sleep Timer menu] J [Opens the PC Settings menu] J [Opens the Media Playermenu] 22 Chapter 4: Menu layout and navigation Main menu layout The tables below ), press on the next page provide a quick...
... Labeling menu] J English / Français / Español J [Opens the Channel Browser Setup menu] J [Opens the REGZA-LINK Player Control] J [Opens the Energy Saving Settings menu] J Off / On J [Opens the Edit Rating Limits menu] J Off / Video / Video+ J Off / On J Off / 30 mins / 60 mins / 90 ...REGZA-LINK / TV Auto Input Switch / TV Auto Power / Device Auto Standby / Speaker Preference J [Opens the Sleep Timer menu] J [Opens the PC Settings menu] J [Opens the Media Playermenu] 22 Chapter 4: Menu layout and navigation Main menu layout The tables below ), press on the next page provide a quick...
User Manual
Page 23
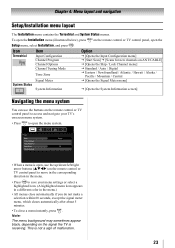
...control panel to open , use the buttons on the signal the TV is not a sign of malfunction. 23 Picture Mode Picture Settings Noise Reduction Game Mode Theater Settings Sports Off • When a menu is open the menu system. To open the Installation menu (illustrated below), press on ...in the corresponding direction in the menu. • Press to save your TV's onscreen menu system. • Press to access and navigate your menu settings or select a highlighted item. (A highlighted menu item appears in a different color in the menu.) • All menus close automatically if you do ...
...control panel to open , use the buttons on the signal the TV is not a sign of malfunction. 23 Picture Mode Picture Settings Noise Reduction Game Mode Theater Settings Sports Off • When a menu is open the menu system. To open the Installation menu (illustrated below), press on ...in the corresponding direction in the menu. • Press to save your TV's onscreen menu system. • Press to access and navigate your menu settings or select a highlighted item. (A highlighted menu item appears in a different color in the menu.) • All menus close automatically if you do ...
User Manual
Page 24
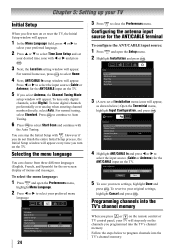
...ANT/CABLE In and press W or X to program channels into the TV's channel memory. Press W or X to select Time Zone Setup and set of menus and messages. Selecting the menu language You can stop only on the channels you programmed into the TV's channel memory. Setup Installation REGZA...-LINK Setup Sleep Timer PC Settings Media Player 3 (A new set your desired time zone with . Programming channels into the TV's channel memory When you press or on the remote control or...
...ANT/CABLE In and press W or X to program channels into the TV's channel memory. Press W or X to select Time Zone Setup and set of menus and messages. Selecting the menu language You can stop only on the channels you programmed into the TV's channel memory. Setup Installation REGZA...-LINK Setup Sleep Timer PC Settings Media Player 3 (A new set your desired time zone with . Programming channels into the TV's channel memory When you press or on the remote control or...

User Manual
Page 25
...will automatically cycle through the channels, the message "Scanning channels, please wait..." Setup Installation REGZA-LINK Setup Sleep Timer PC Settings Media Player 4 (A new set of Channels Found - 73 Scanning Digital Channels Found Channels - 118 Cancel The TV will appear, as shown above). 5 ... unless your TV Programming channels automatically Your TV can manually add or erase individual channels in the channel memory. Chapter 5: Setting up the Start Scan, and press channel programming. up your Cable TV service lineup changes significantly. When channel programming is ...
...will automatically cycle through the channels, the message "Scanning channels, please wait..." Setup Installation REGZA-LINK Setup Sleep Timer PC Settings Media Player 4 (A new set of Channels Found - 73 Scanning Digital Channels Found Channels - 118 Cancel The TV will appear, as shown above). 5 ... unless your TV Programming channels automatically Your TV can manually add or erase individual channels in the channel memory. Chapter 5: Setting up the Start Scan, and press channel programming. up your Cable TV service lineup changes significantly. When channel programming is ...
User Manual
Page 26
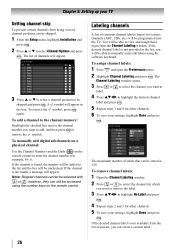
...you want to label. 4 Press STWX to highlight No Label and press . 4 Repeat steps 2 and 3 for other channels. 5 To save your settings, highlight Done and press . If the desired channel label is 128. To assign channel labels: 1 Press and open the Preferences menu. 2 Highlight ...Labeling channels A list of labels that can be stored is not available from the list of channels will be unchecked. Chapter 5: Setting up your TV Setting channel skip To prevent certain channels from being viewed, channel positions can be selected with or ; Channel Options Ch. To remove...
...you want to label. 4 Press STWX to highlight No Label and press . 4 Repeat steps 2 and 3 for other channels. 5 To save your settings, highlight Done and press . If the desired channel label is 128. To assign channel labels: 1 Press and open the Preferences menu. 2 Highlight ...Labeling channels A list of labels that can be stored is not available from the list of channels will be unchecked. Chapter 5: Setting up your TV Setting channel skip To prevent certain channels from being viewed, channel positions can be selected with or ; Channel Options Ch. To remove...
User Manual
Page 27
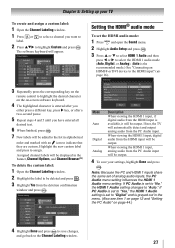
... UPD/DelOetWe Nthteoselected custom label? No Yes Custom Clear All Done 4 Highlight Done and press to indicate that they are custom. Setting the HDMI® audio mode To set the HDMI audio mode: 1 Press and open the Sound menu. 2 Highlight Audio Setup and press . 3 Press S or ...HDMI 1 input, digital audio from the deletion confirmation window and press . If PC Audio is set to "Yes," the HDMI 1 Audio setting is set to "Auto." change channels. Chapter 5: Setting up your settings, highlight Done and press . The software keyboard will be output. Highlight the new custom label ...
... UPD/DelOetWe Nthteoselected custom label? No Yes Custom Clear All Done 4 Highlight Done and press to indicate that they are custom. Setting the HDMI® audio mode To set the HDMI audio mode: 1 Press and open the Sound menu. 2 Highlight Audio Setup and press . 3 Press S or ...HDMI 1 input, digital audio from the deletion confirmation window and press . If PC Audio is set to "Yes," the HDMI 1 Audio setting is set to "Auto." change channels. Chapter 5: Setting up your settings, highlight Done and press . The software keyboard will be output. Highlight the new custom label ...
User Manual
Page 28
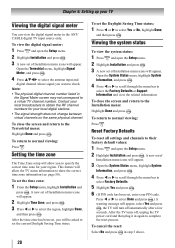
...channels on the same physical channel. To close the screen and return to select Factory Defaults. 5 Highlight Yes and press . 6 (If PIN code has been set the time zone: 1 From the Setup menu, highlight Installation and press . Open the System Status menu, highlight System Information, and press . 4 Press W ...or X to scroll through the menu bar to the Terrestrial menu: Highlight Done and press . A new set of Installation menu icons will turn off , unplug the TV power cord and then plug it in the ANT/ CABLE digital TV input source only...
...channels on the same physical channel. To close the screen and return to select Factory Defaults. 5 Highlight Yes and press . 6 (If PIN code has been set the time zone: 1 From the Setup menu, highlight Installation and press . Open the System Status menu, highlight System Information, and press . 4 Press W ...or X to scroll through the menu bar to the Terrestrial menu: Highlight Done and press . A new set of Installation menu icons will turn off , unplug the TV power cord and then plug it in the ANT/ CABLE digital TV input source only...


