
User Manual
Page 3
... servicing to rain or moisture, does not operate normally, or has been dropped. Install in fire. The LCD panel inside a wall or similar enclosed area. 22) Never modify this apparatus during lightning storms or when unused for replacement of children. 17) CAUTION: Do not let water or other open flames away...
... servicing to rain or moisture, does not operate normally, or has been dropped. Install in fire. The LCD panel inside a wall or similar enclosed area. 22) Never modify this apparatus during lightning storms or when unused for replacement of children. 17) CAUTION: Do not let water or other open flames away...

User Manual
Page 6
...: Always place the TV on the rear of the unit. To secure the TV, use a sturdy strap from the TV. 19" TV VESA Mounting Pattern 22" TV VESA Mounting Pattern Two screws CAUTION: Always place the TV on the floor or a sturdy, level, stable surface that can support the weight of... Pattern Two screws Four screws Hook Sturdy strap (as short as a quilt or blanket. 7) VESA Mounting Pattern TV Size Hole Pattern(HxV) 19" 100x100 mm 22" 100x100 mm 26" 200x100 mm 32" 200x200 mm Screw Size M4 M4 M4 M6 (unit in the right diagram.
...: Always place the TV on the rear of the unit. To secure the TV, use a sturdy strap from the TV. 19" TV VESA Mounting Pattern 22" TV VESA Mounting Pattern Two screws CAUTION: Always place the TV on the floor or a sturdy, level, stable surface that can support the weight of... Pattern Two screws Four screws Hook Sturdy strap (as short as a quilt or blanket. 7) VESA Mounting Pattern TV Size Hole Pattern(HxV) 19" 100x100 mm 22" 100x100 mm 26" 200x100 mm 32" 200x200 mm Screw Size M4 M4 M4 M6 (unit in the right diagram.
User Manual
Page 8
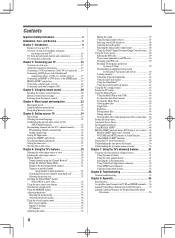
... control 20 Installing the remote control batteries 20 Remote control effective range 20 Learning about the remote control 21 Chapter 4: Menu layout and navigation 22 Main menu layout 22 Setup/Installation menu layout 23 Navigating the menu system 23 Chapter 5: Setting up your TV 24 Initial Setup 24 Selecting the menu language... 55 Specifications 55 Acceptable signal formats for PC IN and HDMI terminals......56 Limited United States Warranty for LCD Televisions 57 Limited Canadian Warranty for Toshiba Brand Flat Panel Televisions 58
... control 20 Installing the remote control batteries 20 Remote control effective range 20 Learning about the remote control 21 Chapter 4: Menu layout and navigation 22 Main menu layout 22 Setup/Installation menu layout 23 Navigating the menu system 23 Chapter 5: Setting up your TV 24 Initial Setup 24 Selecting the menu language... 55 Specifications 55 Acceptable signal formats for PC IN and HDMI terminals......56 Limited United States Warranty for LCD Televisions 57 Limited Canadian Warranty for Toshiba Brand Flat Panel Televisions 58
User Manual
Page 10
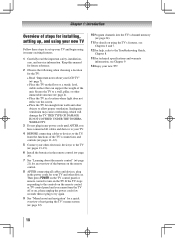
THIS TYPE OF DAMAGE IS NOT COVERED UNDER THE TOSHIBA WARRANTY. 3 Do not plug in the power cords for your new TV! 10 If the TV stops responding to the controls on the remote control ... for the TV: • Read "Important notes about the remote control" ( page 21) for a quick overview of navigating the TV's menu system ( page 22). 10 Program channels into the TV's channel memory ( page 24). 11 For details on the remote control. 8 AFTER connecting all cables and devices to...
THIS TYPE OF DAMAGE IS NOT COVERED UNDER THE TOSHIBA WARRANTY. 3 Do not plug in the power cords for your new TV! 10 If the TV stops responding to the controls on the remote control ... for the TV: • Read "Important notes about the remote control" ( page 21) for a quick overview of navigating the TV's menu system ( page 22). 10 Program channels into the TV's channel memory ( page 24). 11 For details on the remote control. 8 AFTER connecting all cables and devices to...

User Manual
Page 11
... turn the TV on and off the TV, please unplug the power cord few seconds then re-plug to access the menu system ( pages 22-23). These buttons adjust the volume level. 10無 INPUT - Press to instantly close an on-screen menu. 8無 CHANNEL pq - Repeatedly press to change...
... turn the TV on and off the TV, please unplug the power cord few seconds then re-plug to access the menu system ( pages 22-23). These buttons adjust the volume level. 10無 INPUT - Press to instantly close an on-screen menu. 8無 CHANNEL pq - Repeatedly press to change...
User Manual
Page 21
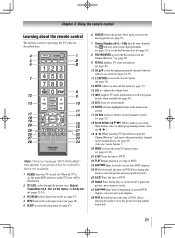
... channel history ( page 29). (Also see "Arrow buttons.") 20無 MENU accesses the main TV menu system ( pages 22-23). 21無 STOP Stops the tape or DVD. 22無 PLAY Begins playback of current DVD chapter, or locates previous chapters. 28無 REW Rewinds/reverses the tape or DVD...
... channel history ( page 29). (Also see "Arrow buttons.") 20無 MENU accesses the main TV menu system ( pages 22-23). 21無 STOP Stops the tape or DVD. 22無 PLAY Begins playback of current DVD chapter, or locates previous chapters. 28無 REW Rewinds/reverses the tape or DVD...

User Manual
Page 22
... Auto Power / Device Auto Standby / Speaker Preference [Opens the Sleep Timer menu] [Opens the PC Settings menu] [Opens the Media Player menu] 22
... Auto Power / Device Auto Standby / Speaker Preference [Opens the Sleep Timer menu] [Opens the PC Settings menu] [Opens the Media Player menu] 22

User Manual
Page 44
... folder Maximum photo resolution: 4096 x 4096 pixels Best photo resolution: 1366 x 768 pixels Music Player specifications: File format: MP3 Sampling frequency: 16 kHz, 22.05 kHz, 24 kHz, 32 kHz, 44.1 kHz, 48 kHz Bit rate: from the USB storage device. 44 To select the Auto Start function 1&#...Audio menu setting. Photo Viewer specifications: Data type: JPEG Exif ver2.1 File format: JPEG Maximum photo size: 6 MB Maximum number of the TV. Toshiba cannot and does not grant such permission. ••Depending on -screen when loading files from 8 to 320 kbps Maximum number of methods to open...
... folder Maximum photo resolution: 4096 x 4096 pixels Best photo resolution: 1366 x 768 pixels Music Player specifications: File format: MP3 Sampling frequency: 16 kHz, 22.05 kHz, 24 kHz, 32 kHz, 44.1 kHz, 48 kHz Bit rate: from the USB storage device. 44 To select the Auto Start function 1&#...Audio menu setting. Photo Viewer specifications: Data type: JPEG Exif ver2.1 File format: JPEG Maximum photo size: 6 MB Maximum number of the TV. Toshiba cannot and does not grant such permission. ••Depending on -screen when loading files from 8 to 320 kbps Maximum number of methods to open...

User Manual
Page 55
...) 32SL400U: Width: 2'6-1/2 inches (775.4mm) Height: 1'8-1/8 inches (512.5mm) Depth: 7-7/8 inches (200mm) Mass (Weight) 19SL400U: 7.7 lbs (3.5 kg) 22SL400U: 8.8 lbs (4.0 kg) 26SL400U: 13.2 lbs (6.0 kg) 32SL400U: 18.7 lbs (8.5 kg) Operating conditions Temperature: 32ºF - 95ºF (0ºC ...Power: 19SL400U: 3 W + 3 W 22SL400U: 3 W + 3 W 26SL400U: 5 W + 5 W 32SL400U: 10 W + 10 W Speaker Type: 19SL400U/22SL400U: Two 7/8 × 3-1/2 inches (22 × 90 mm) 26SL400U: Two 7/8 × 5-5/8 inches (22 × 142 mm) 32SL400U: Two 7/8 × 5-3/4 inches (22 × 146 mm) Video/Audio Terminals ...
...) 32SL400U: Width: 2'6-1/2 inches (775.4mm) Height: 1'8-1/8 inches (512.5mm) Depth: 7-7/8 inches (200mm) Mass (Weight) 19SL400U: 7.7 lbs (3.5 kg) 22SL400U: 8.8 lbs (4.0 kg) 26SL400U: 13.2 lbs (6.0 kg) 32SL400U: 18.7 lbs (8.5 kg) Operating conditions Temperature: 32ºF - 95ºF (0ºC ...Power: 19SL400U: 3 W + 3 W 22SL400U: 3 W + 3 W 26SL400U: 5 W + 5 W 32SL400U: 10 W + 10 W Speaker Type: 19SL400U/22SL400U: Two 7/8 × 3-1/2 inches (22 × 90 mm) 26SL400U: Two 7/8 × 5-5/8 inches (22 × 142 mm) 32SL400U: Two 7/8 × 5-3/4 inches (22 × 146 mm) Video/Audio Terminals ...
