User Guide
Page 2
... Satellite®/Satellite Pro® L700 Series Recordable and/or ReWritable Drive(s) and Associated Software Warranty The computer system you purchased may lose data or suffer other damage. IF YOUR DATA IS ALTERED OR LOST DUE TO ANY TROUBLE, FAILURE OR MALFUNCTION OF THE HARD DISK DRIVE...to do so, this product will expose you may include Recordable and/or ReWritable optical disc drive(s) and associated software, among the most advanced data storage technologies available. YOU AGREE THAT TOSHIBA, ITS AFFILIATES AND SUPPLIERS SHALL HAVE NO RESPONSIBILITY FOR DAMAGE TO OR LOSS OF ANY ...
... Satellite®/Satellite Pro® L700 Series Recordable and/or ReWritable Drive(s) and Associated Software Warranty The computer system you purchased may lose data or suffer other damage. IF YOUR DATA IS ALTERED OR LOST DUE TO ANY TROUBLE, FAILURE OR MALFUNCTION OF THE HARD DISK DRIVE...to do so, this product will expose you may include Recordable and/or ReWritable optical disc drive(s) and associated software, among the most advanced data storage technologies available. YOU AGREE THAT TOSHIBA, ITS AFFILIATES AND SUPPLIERS SHALL HAVE NO RESPONSIBILITY FOR DAMAGE TO OR LOSS OF ANY ...
User Guide
Page 27
... cannot be exposed to disassemble, adjust or repair an optical disc drive. Under the copyright laws, this model properly, read the User's Guide carefully and keep it for your future reference. You would also be reproduced in serious injury. Always contact an authorized Toshiba service provider, if any form without the prior written...
... cannot be exposed to disassemble, adjust or repair an optical disc drive. Under the copyright laws, this model properly, read the User's Guide carefully and keep it for your future reference. You would also be reproduced in serious injury. Always contact an authorized Toshiba service provider, if any form without the prior written...
User Guide
Page 32
... programs and files field 109 Saving your work 109 Printing your work 111 Backing up your work 112 Restoring your work 112 Using the optical disc drive 113 Viewing Blu-ray Disc™ movies 113
... programs and files field 109 Saving your work 109 Printing your work 111 Backing up your work 112 Restoring your work 112 Using the optical disc drive 113 Viewing Blu-ray Disc™ movies 113
User Guide
Page 33
Contents 33 Optical disc drive components 115 Inserting an optical disc 115 Playing an audio CD 117 Playing optical media 117 Recording optical media 117 Removing a disc with the computer on...........118 Removing a disc with the computer off ..........118 Caring for optical discs 119 Toshiba's online resources 119 Chapter 3: Mobile Computing 120 Toshiba's energy-saver design 120 Running the...
Contents 33 Optical disc drive components 115 Inserting an optical disc 115 Playing an audio CD 117 Playing optical media 117 Recording optical media 117 Removing a disc with the computer on...........118 Removing a disc with the computer off ..........118 Caring for optical discs 119 Toshiba's online resources 119 Chapter 3: Mobile Computing 120 Toshiba's energy-saver design 120 Running the...
User Guide
Page 35
... batteries 177 Keyboard problems 179 Display problems 179 Disk or storage drive problems 181 Error-checking 181 Optical disc drive problems 182 Sound system problems 185 Printer problems 185 Wireless networking problems 186 DVD ...and Blu-ray Disc™ operating problems.........188 Develop good computing habits 189 Data and system configuration backup in the Windows® operating system 190 If you need further assistance 194 Before you contact Toshiba 194 Contacting Toshiba...
... batteries 177 Keyboard problems 179 Display problems 179 Disk or storage drive problems 181 Error-checking 181 Optical disc drive problems 182 Sound system problems 185 Printer problems 185 Wireless networking problems 186 DVD ...and Blu-ray Disc™ operating problems.........188 Develop good computing habits 189 Data and system configuration backup in the Windows® operating system 190 If you need further assistance 194 Before you contact Toshiba 194 Contacting Toshiba...

User Guide
Page 76
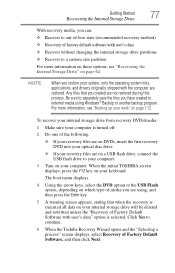
... 5 Click the Create button in the TOSHIBA Recovery Media Creator utility dialog box. 6 Follow the on the internal storage drive. For example, if your original internal storage drive fails, you can restore your system to a new internal storage drive from such media, if necessary. Restoring ... copying files to DVD, insert a blank DVD into the optical disc drive. ❖ If you are copying files to a USB flash drive, connect a USB flash drive of the required minimum capacity (as specified in the TOSHIBA Recovery Media Creator utility) to your computer. For information on using...
... 5 Click the Create button in the TOSHIBA Recovery Media Creator utility dialog box. 6 Follow the on the internal storage drive. For example, if your original internal storage drive fails, you can restore your system to a new internal storage drive from such media, if necessary. Restoring ... copying files to DVD, insert a blank DVD into the optical disc drive. ❖ If you are copying files to a USB flash drive, connect a USB flash drive of the required minimum capacity (as specified in the TOSHIBA Recovery Media Creator utility) to your computer. For information on using...
User Guide
Page 77
...computer. Click Yes to continue. 6 When the Toshiba Recovery Wizard opens and the "Selecting a process" screen displays, select Recovery of the following: ❖ If your recovery files are on DVDs, insert the first recovery DVD into your optical disc drive. ❖ If your recovery files are not ...restored during this process. When the initial TOSHIBA screen displays, press the F12 key on your system, only the operating system files, applications...
...computer. Click Yes to continue. 6 When the Toshiba Recovery Wizard opens and the "Selecting a process" screen displays, select Recovery of the following: ❖ If your recovery files are on DVDs, insert the first recovery DVD into your optical disc drive. ❖ If your recovery files are not ...restored during this process. When the initial TOSHIBA screen displays, press the F12 key on your system, only the operating system files, applications...
User Guide
Page 79
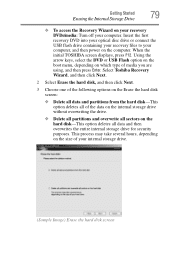
...drive for security purposes. Select Toshiba Recovery Wizard, and then click Next. 2 Select Erase the hard disk, and then click Next. 3 Choose one of the following options on your recovery DVDs/media: Turn off your internal storage drive. (Sample Image) Erase the hard disk screen Insert the first recovery DVD into your optical disc drive... or connect the USB flash drive containing your recovery files to your computer, and ...
...drive for security purposes. Select Toshiba Recovery Wizard, and then click Next. 2 Select Erase the hard disk, and then click Next. 3 Choose one of the following options on your recovery DVDs/media: Turn off your internal storage drive. (Sample Image) Erase the hard disk screen Insert the first recovery DVD into your optical disc drive... or connect the USB flash drive containing your recovery files to your computer, and ...
User Guide
Page 101
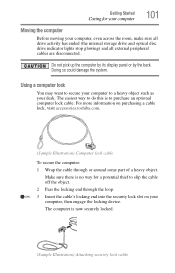
For more information on purchasing a cable lock, visit accessories.toshiba.com. (Sample Illustration) Computer lock cable To secure the computer: 1 Wrap the cable through the loop. 3 Insert the cable's locking end into the security lock .... The easiest way to do this is to a heavy object such as your computer, even across the room, make sure all drive activity has ended (the internal storage drive and optical disc drive indicator lights stop glowing) and all external peripheral cables are disconnected. The computer is no way for your computer 101 Moving...
For more information on purchasing a cable lock, visit accessories.toshiba.com. (Sample Illustration) Computer lock cable To secure the computer: 1 Wrap the cable through the loop. 3 Insert the cable's locking end into the security lock .... The easiest way to do this is to a heavy object such as your computer, even across the room, make sure all drive activity has ended (the internal storage drive and optical disc drive indicator lights stop glowing) and all external peripheral cables are disconnected. The computer is no way for your computer 101 Moving...
User Guide
Page 113
...will automatically change regions four times. That is recommended that came with a Blu-ray Disc™ drive. The external monitor or television must support HDMI™. Learning the Basics Using the optical disc drive 113 TECHNICAL NOTE: When restoring files, the backup program prompts you if you play...region 2 and back to overwrite a file that were not available on an external monitor or television. TECHNICAL NOTE: Your optical disc drive is the one you to change to view High Definition content via your computer. Due to differences between High Definition and previous ...
...will automatically change regions four times. That is recommended that came with a Blu-ray Disc™ drive. The external monitor or television must support HDMI™. Learning the Basics Using the optical disc drive 113 TECHNICAL NOTE: When restoring files, the backup program prompts you if you play...region 2 and back to overwrite a file that were not available on an external monitor or television. TECHNICAL NOTE: Your optical disc drive is the one you to change to view High Definition content via your computer. Due to differences between High Definition and previous ...
User Guide
Page 114
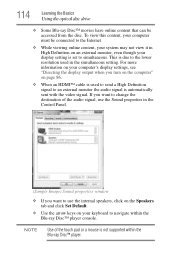
... the touch pad or a mouse is not supported within the Blu-ray Disc™ player console. To view this content, your computer must be accessed from the disc. 114 Learning the Basics Using the optical disc drive ❖ Some Blu-ray Disc™ movies have online content that can be connected to the Internet. ❖...
... the touch pad or a mouse is not supported within the Blu-ray Disc™ player console. To view this content, your computer must be accessed from the disc. 114 Learning the Basics Using the optical disc drive ❖ Some Blu-ray Disc™ movies have online content that can be connected to the Internet. ❖...

User Guide
Page 115
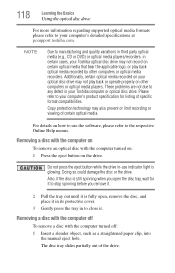
... object to touch the lens or the area around it . Learning the Basics Using the optical disc drive 115 Optical disc drive components The optical disc drive is in use. When the disc tray is open if the computer's power is off . Never use indicator light-Indicates when the... the manual eject button. Your optical disc drive may look like this: Drive in-use indicator light Eject button Manual eject hole (Sample Illustration) Optical disc drive Drive in -use indicator light is glowing. Inserting an optical disc To insert an optical disc into the drive: 1 Make sure the computer is ...
... object to touch the lens or the area around it . Learning the Basics Using the optical disc drive 115 Optical disc drive components The optical disc drive is in use. When the disc tray is open if the computer's power is off . Never use indicator light-Indicates when the... the manual eject button. Your optical disc drive may look like this: Drive in-use indicator light Eject button Manual eject hole (Sample Illustration) Optical disc drive Drive in -use indicator light is glowing. Inserting an optical disc To insert an optical disc into the drive: 1 Make sure the computer is ...

User Guide
Page 116
... edge. Do not touch the surface of dust. If the disc is dusty, clean it as described in the drive 7 Gently press the disc onto the center spindle until it is free of the disc. 116 Learning the Basics Using the optical disc drive 4 Grasp the tray and pull it fully open. (Sample ...Illustration) Drive tray fully extended 5 Hold the disc by its edges and check that ...
... edge. Do not touch the surface of dust. If the disc is dusty, clean it as described in the drive 7 Gently press the disc onto the center spindle until it is free of the disc. 116 Learning the Basics Using the optical disc drive 4 Grasp the tray and pull it fully open. (Sample ...Illustration) Drive tray fully extended 5 Hold the disc by its edges and check that ...

User Guide
Page 117
... launching the optical disc manually. If this happens, contact Toshiba support for assistance. 9 Push the disc tray in by pressing gently on the disc. Before putting on the configuration, your disc does not run the optical disc. The drive will run using this , follow these steps: 1 Click Start, and then Computer. 2 Double-click the optical disc drive icon. For...
... launching the optical disc manually. If this happens, contact Toshiba support for assistance. 9 Push the disc tray in by pressing gently on the disc. Before putting on the configuration, your disc does not run the optical disc. The drive will run using this , follow these steps: 1 Click Start, and then Computer. 2 Double-click the optical disc drive icon. For...
User Guide
Page 118
... record on how to use indicator light is fully open, remove the disc, and place it in its protective cover. 3 Gently press the tray in to your Toshiba computer or optical disc drive. The disc tray slides partially out of specific format compatibilities. Please refer to any ... object, such as a straightened paper clip, into the manual eject hole. Doing so could damage the disc or the drive. These problems are not due to your Toshiba optical disc drive may also prevent or limit recording or viewing of certain optical media. For details on certain optical media that...
... record on how to use indicator light is fully open, remove the disc, and place it in its protective cover. 3 Gently press the tray in to your Toshiba computer or optical disc drive. The disc tray slides partially out of specific format compatibilities. Please refer to any ... object, such as a straightened paper clip, into the manual eject hole. Doing so could damage the disc or the drive. These problems are not due to your Toshiba optical disc drive may also prevent or limit recording or viewing of certain optical media. For details on certain optical media that...
User Guide
Page 119
Toshiba's online resources Toshiba maintains a number of online sites to which you up to direct sunlight or extreme heat or cold. ❖ To clean a disc that is fully open, remove the disc, and place it in its outside edge. Fingerprints on the surface can prevent the optical disc drive from reading the data properly. ❖ Do not...
Toshiba's online resources Toshiba maintains a number of online sites to which you up to direct sunlight or extreme heat or cold. ❖ To clean a disc that is fully open, remove the disc, and place it in its outside edge. Fingerprints on the surface can prevent the optical disc drive from reading the data properly. ❖ Do not...
User Guide
Page 127
... again ❖ Use the Windows® power-saving option plans These power-saving options control the way in which you can use the internal storage drive, optical disc drive, or other optional devices ❖ Where you are working, since operating time decreases at low temperatures There are using them, you can increase the...
... again ❖ Use the Windows® power-saving option plans These power-saving options control the way in which you can use the internal storage drive, optical disc drive, or other optional devices ❖ Where you are working, since operating time decreases at low temperatures There are using them, you can increase the...
User Guide
Page 181
Make sure the external monitor is not available for optical disc drives. Devices that may not be missing. Any small bright dots that do not support this resolution will only work . Disk or storage drive problems Problems with the storage drive or with external media usually show up menu, click ... high-precision technology. When the computer is operated on battery power, the screen will deteriorate. If Something Goes Wrong Disk or storage drive problems 181 The display mode is set to Simultaneous and the external display device does not work in them. Small bright dots appear...
Make sure the external monitor is not available for optical disc drives. Devices that may not be missing. Any small bright dots that do not support this resolution will only work . Disk or storage drive problems Problems with the storage drive or with external media usually show up menu, click ... high-precision technology. When the computer is operated on battery power, the screen will deteriorate. If Something Goes Wrong Disk or storage drive problems 181 The display mode is set to Simultaneous and the external display device does not work in them. Small bright dots appear...
User Guide
Page 182
...Accessories, System Tools, and then Disk Defragmenter. Optical disc drive problems You cannot access a disc in the tray. If the optical disc drive is closed properly. Open the tray and remove the disc. Make sure that holds the optical disc is an external drive, make sure the two USB cables or the AC... adaptor cable are damaged or corrupted. You may have become fragmented. 182 If Something Goes Wrong Optical disc drive problems 4 Click the Tools tab. 5 Click the Check now... The Check Disk box appears. 6 You can interfere with a clean cloth...
...Accessories, System Tools, and then Disk Defragmenter. Optical disc drive problems You cannot access a disc in the tray. If the optical disc drive is closed properly. Open the tray and remove the disc. Make sure that holds the optical disc is an external drive, make sure the two USB cables or the AC... adaptor cable are damaged or corrupted. You may have become fragmented. 182 If Something Goes Wrong Optical disc drive problems 4 Click the Tools tab. 5 Click the Check now... The Check Disk box appears. 6 You can interfere with a clean cloth...
User Guide
Page 183
If Something Goes Wrong Optical disc drive problems 183 You press the disc eject button, but the drive tray does not slide out." If the problem is connected to a power source and turned on. Make sure the computer is with your computer at pcsupport.toshiba.com. Never use a narrow object,...complete detail specifications for example, if the battery is not displaying properly. The optical disc drive eject mechanism requires power to the optical disc drive eject button on the face of the drive when you need to press the manual eject button. If you click the eject ...
If Something Goes Wrong Optical disc drive problems 183 You press the disc eject button, but the drive tray does not slide out." If the problem is connected to a power source and turned on. Make sure the computer is with your computer at pcsupport.toshiba.com. Never use a narrow object,...complete detail specifications for example, if the battery is not displaying properly. The optical disc drive eject mechanism requires power to the optical disc drive eject button on the face of the drive when you need to press the manual eject button. If you click the eject ...

