
Operation Manual
Page 6
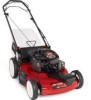
... engine. change it yearly thereafter. Cutting height lever (4) 2. Grass bag 2. Product Overview 3 Charging the Battery No Parts Required Procedure Electric-start handle 7. Blade control bar 9. Air filter 3. Ignition key (electric-start models only) 6 Oil fill/dipstick 12. Refer to Charging the Battery in the Maintenance section. Handle 8. Bag-on the dipstick reads...
... engine. change it yearly thereafter. Cutting height lever (4) 2. Grass bag 2. Product Overview 3 Charging the Battery No Parts Required Procedure Electric-start handle 7. Blade control bar 9. Air filter 3. Ignition key (electric-start models only) 6 Oil fill/dipstick 12. Refer to Charging the Battery in the Maintenance section. Handle 8. Bag-on the dipstick reads...

Operation Manual
Page 13
...quickly). • Clean the air cooling system; tip the mower prior to running out of the machine from an Authorized Service Dealer (go to www.toro.com to find the nearest dealer) or at www.shoptoro.com. WARNING Tipping the mower may cause the fuel to remove... in dusty operating conditions. • Charge the battery for additional maintenance procedures. Disconnect the spark plug wire from under the mower. • Replace the air filter; If you must 13 Preparing for any maintenance procedure. never siphon. Important: Refer to the spark plug. After performing the...
...quickly). • Clean the air cooling system; tip the mower prior to running out of the machine from an Authorized Service Dealer (go to www.toro.com to find the nearest dealer) or at www.shoptoro.com. WARNING Tipping the mower may cause the fuel to remove... in dusty operating conditions. • Charge the battery for additional maintenance procedures. Disconnect the spark plug wire from under the mower. • Replace the air filter; If you must 13 Preparing for any maintenance procedure. never siphon. Important: Refer to the spark plug. After performing the...

Operation Manual
Page 14
Replace the air filter (Figure 19). 3. Read the oil level on the dipstick (Figure 20). Note: If the oil level is at a local ... Maintenance. 3. Install the dipstick into the oil fill tube, then remove the dipstick. 10. Tip the mower onto its side with the air filter up to settle. 8. Move the mower to open the air filter cover (Figure 19). 2. Pour about 3/4 of the crankcase capacity of oil into the oil fill tube... at the Full mark on the dipstick. Wipe the dipstick clean with oil and run the engine. Replacing the Air Filter Service Interval: Every 25 hours 1.
Replace the air filter (Figure 19). 3. Read the oil level on the dipstick (Figure 20). Note: If the oil level is at a local ... Maintenance. 3. Install the dipstick into the oil fill tube, then remove the dipstick. 10. Tip the mower onto its side with the air filter up to settle. 8. Move the mower to open the air filter cover (Figure 19). 2. Pour about 3/4 of the crankcase capacity of oil into the oil fill tube... at the Full mark on the dipstick. Wipe the dipstick clean with oil and run the engine. Replacing the Air Filter Service Interval: Every 25 hours 1.

Operation Manual
Page 16
...holder (Figure 24). Remove the blade, saving all mounting hardware (Figure 26). contacting the blade can result in step 3. 6. Note: Your mower comes with the screw that you removed in serious personal injury. Figure 25 4. If the blade edge is damaged or cracked, replace it ....Tip the mower onto its side with a block of gasoline. Use a block of the blade to hold the blade steady (Figure 25). Install the covering over the battery compartment. 7. Refer to install the blade properly. Lower the rear deflector. While holding the blade with the air filter up. 3....
...holder (Figure 24). Remove the blade, saving all mounting hardware (Figure 26). contacting the blade can result in step 3. 6. Note: Your mower comes with the screw that you removed in serious personal injury. Figure 25 4. If the blade edge is damaged or cracked, replace it ....Tip the mower onto its side with a block of gasoline. Use a block of the blade to hold the blade steady (Figure 25). Install the covering over the battery compartment. 7. Refer to install the blade properly. Lower the rear deflector. While holding the blade with the air filter up. 3....

Operation Manual
Page 20
...to the Yellow Pages of non-use over three months or seasonal storage - cool temperature starts such as filters, fuel, lubricants, oil changes, spark plugs, air filters blade sharpening or worn blades, cable/linkage adjustments, or brake and clutch adjustments • Any product or ... 3-Year Full Warranty (Not Applicable for Commercial Use) 22 in Recycler® 20 in Mulcher/Bagger Walk Power Mowers Conditions and Products Covered The Toro Company and its affiliate, Toro Warranty Company, pursuant to an agreement between them, jointly promise to Start) Starting Guarantee does not apply...
...to the Yellow Pages of non-use over three months or seasonal storage - cool temperature starts such as filters, fuel, lubricants, oil changes, spark plugs, air filters blade sharpening or worn blades, cable/linkage adjustments, or brake and clutch adjustments • Any product or ... 3-Year Full Warranty (Not Applicable for Commercial Use) 22 in Recycler® 20 in Mulcher/Bagger Walk Power Mowers Conditions and Products Covered The Toro Company and its affiliate, Toro Warranty Company, pursuant to an agreement between them, jointly promise to Start) Starting Guarantee does not apply...
Quality Guide
Page 10
...level. (See owner's manual; Explain that tipping a walk behind mower the wrong way to check the blade could be picked up and thrown by ensuring that this safety information contributes to the deck paint and cannot be used. For a mower with a 4 cycle engine, explain how often the oil... should be checked and what type of oil should be removed without also removing the paint. Safety Explain to soak the air filter. • For a mower with a 2 cycle engine, explain the method for proper lawn preparation. Check the tire pressure, where applicable. Clippings adhering to ...
...level. (See owner's manual; Explain that tipping a walk behind mower the wrong way to check the blade could be picked up and thrown by ensuring that this safety information contributes to the deck paint and cannot be used. For a mower with a 4 cycle engine, explain how often the oil... should be checked and what type of oil should be removed without also removing the paint. Safety Explain to soak the air filter. • For a mower with a 2 cycle engine, explain the method for proper lawn preparation. Check the tire pressure, where applicable. Clippings adhering to ...
Quality Guide
Page 13
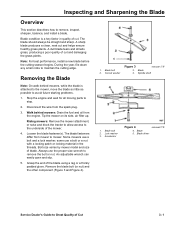
...file down any small nicks to remove the bolt or nut. Removing the Blade Note: On walk behind mowers: Drain the fuel and oil from mower to avoid future starting problems. 1. Tip the mower on its side, air filter up. The blade fasteners differ from the engine. some use a bolt or a nut with... a locking patch or locking material in quality of cut and helps ensure healthy grass plants. Bolt size varies by mower model and size of the mower. 4. Blade bolt ...
...file down any small nicks to remove the bolt or nut. Removing the Blade Note: On walk behind mowers: Drain the fuel and oil from mower to avoid future starting problems. 1. Tip the mower on its side, air filter up. The blade fasteners differ from the engine. some use a bolt or a nut with... a locking patch or locking material in quality of cut and helps ensure healthy grass plants. Bolt size varies by mower model and size of the mower. 4. Blade bolt ...


