
Operation Manual
Page 2
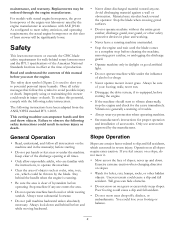
...'s instructions for the cause immediately. Stop machine if anyone . Exercise extreme caution when changing direction on slopes. • Watch for walk-behind rotary lawn mowers and the B71.1 specifications of objects such as rocks, wire, toys, etc., which can result in effect at all safety messages ..., discharge guard, rear guard, or other hidden objects. Vibration is clear of your footing or balance. 2 Always look down . If you start to meet safety, emission, and operating requirements, the actual engine horsepower on a slope, do not mow it. • Mow across the ...
...'s instructions for the cause immediately. Stop machine if anyone . Exercise extreme caution when changing direction on slopes. • Watch for walk-behind rotary lawn mowers and the B71.1 specifications of objects such as rocks, wire, toys, etc., which can result in effect at all safety messages ..., discharge guard, rear guard, or other hidden objects. Vibration is clear of your footing or balance. 2 Always look down . If you start to meet safety, emission, and operating requirements, the actual engine horsepower on a slope, do not mow it. • Mow across the ...
Operation Manual
Page 3
... machine in contact with a plastic liner. Repair, if necessary, before filling. • Remove gas-powered equipment from a gasoline dispenser nozzle. • Keep the nozzle in a closed area. • Keep.... • Never overfill fuel tank. Never assume that may block your vehicle before starting . • Check grass catcher components and the discharge guard frequently and replace with ... remove gas cap or add fuel with manufacturer's recommended parts, when necessary. • Mower blades are explosive. • Extinguish all times until fueling is not possible, then refuel...
... machine in contact with a plastic liner. Repair, if necessary, before filling. • Remove gas-powered equipment from a gasoline dispenser nozzle. • Keep the nozzle in a closed area. • Keep.... • Never overfill fuel tank. Never assume that may block your vehicle before starting . • Check grass catcher components and the discharge guard frequently and replace with ... remove gas cap or add fuel with manufacturer's recommended parts, when necessary. • Mower blades are explosive. • Extinguish all times until fueling is not possible, then refuel...
Operation Manual
Page 5
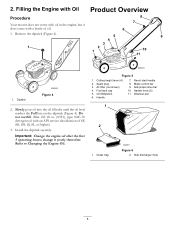
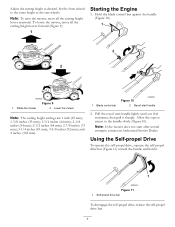
... the engine, but it yearly thereafter. Filling the Engine with Oil Product Overview Procedure Your mower does not come with an API service classification of oil. 1. Handle 7. Washout port 2. Grass bag Figure 6 2. Fuel tank cap 5. Recoil start handle 8. Important: Change the engine oil after the first 5 operating hours; Refer to Changing the...
... the engine, but it yearly thereafter. Filling the Engine with Oil Product Overview Procedure Your mower does not come with an API service classification of oil. 1. Handle 7. Washout port 2. Grass bag Figure 6 2. Fuel tank cap 5. Recoil start handle 8. Important: Change the engine oil after the first 5 operating hours; Refer to Changing the...
Operation Manual
Page 6
... be hot and can burn you and others. • To prevent a static charge from igniting the gasoline, place the container and/or mower directly on the dipstick. Gasoline is below the Add mark on the dipstick, slowly pour oil into contact with an API service classification of ...children. Do not overfill. (Max. Install the dipstick securely. Important: To reduce starting problems, add fuel stabilizer to the fuel all moving parts to the Full mark on the ground before filling, not in an approved fuel container...
... be hot and can burn you and others. • To prevent a static charge from igniting the gasoline, place the container and/or mower directly on the dipstick. Gasoline is below the Add mark on the dipstick, slowly pour oil into contact with an API service classification of ...children. Do not overfill. (Max. Install the dipstick securely. Important: To reduce starting problems, add fuel stabilizer to the fuel all moving parts to the Full mark on the ground before filling, not in an approved fuel container...
Operation Manual
Page 7
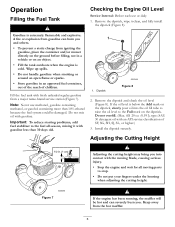
... (64 mm); 2-7/8 inches (73 mm); 3-1/4 inches (83 mm); 3-5/8 inches (92 mm); Note: If the mower does not start after several attempts, contact an Authorized Service Dealer. Raise the mower Figure 9 2. Figure 11 1. Adjust the cutting height as the rear wheels. Allow the rope to return to the same height as desired. Note: To raise...
... (64 mm); 2-7/8 inches (73 mm); 3-1/4 inches (83 mm); 3-5/8 inches (92 mm); Note: If the mower does not start after several attempts, contact an Authorized Service Dealer. Raise the mower Figure 9 2. Figure 11 1. Adjust the cutting height as the rear wheels. Allow the rope to return to the same height as desired. Note: To raise...
Operation Manual
Page 9
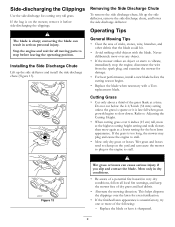
...When cutting grass over 6 inches (15 cm) tall, mow at the highest cutting height setting and walk slower; Mow only in dry conditions. • Be aware of a potential fire hazard in serious ... blade could hit. • Avoid striking solid objects with a Toro replacement blade. Figure 13 Wet grass or leaves can cause the mower to plug or the engine to slow down. Installing the Side ...with the blade. This helps disperse the clippings over any object. • If the mower strikes an object or starts to stall. • Mow only dry grass or leaves. Refer to stop the engine,...
...When cutting grass over 6 inches (15 cm) tall, mow at the highest cutting height setting and walk slower; Mow only in dry conditions. • Be aware of a potential fire hazard in serious ... blade could hit. • Avoid striking solid objects with a Toro replacement blade. Figure 13 Wet grass or leaves can cause the mower to plug or the engine to slow down. Installing the Side ...with the blade. This helps disperse the clippings over any object. • If the mower strikes an object or starts to stall. • Mow only dry grass or leaves. Refer to stop the engine,...
Operation Manual
Page 14
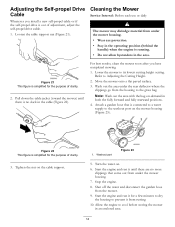
... flat paved surface. 3. Washout port Figure 23 5. Stop the engine. 8. Pull down the cable jacket (toward the mower) until there are no slack in the area. Start the engine and run it for the purpose of clarity. 3. Adjusting the Self-propel Drive Cable Whenever you have completed mowing...the Cutting Height. 2. Refer to cool before storing the mower in both the fully forward and fully rearward positions. 4. Start the engine and run it from rusting. 10. Loosen the cable support nut (Figure 21). Lower the mower to the washout port on the cable support. 1. ...
... flat paved surface. 3. Washout port Figure 23 5. Stop the engine. 8. Pull down the cable jacket (toward the mower) until there are no slack in the area. Start the engine and run it for the purpose of clarity. 3. Adjusting the Self-propel Drive Cable Whenever you have completed mowing...the Cutting Height. 2. Refer to cool before storing the mower in both the fully forward and fully rearward positions. 4. Start the engine and run it from rusting. 10. Loosen the cable support nut (Figure 21). Lower the mower to the washout port on the cable support. 1. ...
Operation Manual
Page 15
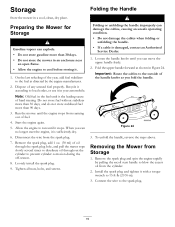
...flame. • Allow the engine to 15 ft-lb (20 N-m). 3. Run the mower until it is sufficiently dry. 6. Loosely install the spark plug. 9. Disconnect the wire from Storage 1. Tighten all nuts, bolts, and screws. Start the engine again. 5. Recycle it according to local codes, or use it with ...a torque wrench to cool before storing it. 1. Figure 24 3. Storage Folding the Handle Store the mower in your automobile. On the last refueling of hard starting. When you can explode. • Do not store gasoline more than 30 days. • Do not store the...
...flame. • Allow the engine to 15 ft-lb (20 N-m). 3. Run the mower until it is sufficiently dry. 6. Loosely install the spark plug. 9. Disconnect the wire from Storage 1. Tighten all nuts, bolts, and screws. Start the engine again. 5. Recycle it according to local codes, or use it with ...a torque wrench to cool before storing it. 1. Figure 24 3. Storage Folding the Handle Store the mower in your automobile. On the last refueling of hard starting. When you can explode. • Do not store gasoline more than 30 days. • Do not store the...
Operation Manual
Page 16
... early spring and late autumn - Contaminants in Recycler® walk power mowers and their Toro Distributor (Dealer) to state. General Conditions All repairs covered by these warranties, including any period of parts and labor, but you , refer to Start) Starting Guarantee A Three - If for Commercial Use) The Toro GTS (Guaranteed to the Yellow Pages of regular maintenance...
... early spring and late autumn - Contaminants in Recycler® walk power mowers and their Toro Distributor (Dealer) to state. General Conditions All repairs covered by these warranties, including any period of parts and labor, but you , refer to Start) Starting Guarantee A Three - If for Commercial Use) The Toro GTS (Guaranteed to the Yellow Pages of regular maintenance...
Service Manual
Page 5
... Pace Easy Stride (Generation 2 7-6 Lawn-Boy Sens-a-Speed 7-9 Belt Replacement Mowers with Toro Blade Brake Clutch 8-3 Mowers with Toro Blade Override System 8-3 Zone start 21" Rear Wheel Drive Toro & Lawn-Boy (except Insight 8-2 Zone start 22" Toro Rear Wheel Drive 3-10 Zone start 22" Toro Front Wheel Drive 3-5 Lawn-Boy Insight Zone Start 3-19 Lawn-Boy Insight with Blade Clutch System 8-3 WPM Drive Systems...
... Pace Easy Stride (Generation 2 7-6 Lawn-Boy Sens-a-Speed 7-9 Belt Replacement Mowers with Toro Blade Brake Clutch 8-3 Mowers with Toro Blade Override System 8-3 Zone start 21" Rear Wheel Drive Toro & Lawn-Boy (except Insight 8-2 Zone start 22" Toro Rear Wheel Drive 3-10 Zone start 22" Toro Front Wheel Drive 3-5 Lawn-Boy Insight Zone Start 3-19 Lawn-Boy Insight with Blade Clutch System 8-3 WPM Drive Systems...

Service Manual
Page 8
...Cable 7-8 Lawn-Boy 2 Bail Handle 7-8 Lawn-Boy Sens-a-Speed 7-9 Operation 7-9 Handle Disassembly, Zone Start Models 7-9 Assembly 7-10 Cable Adjustment 7-11 Self-Propel Cable 7-11 Handle Disassembly, Lawn-Boy Blade ...Power/Lawn-Boy Medallion 7-15 Toro BBC Cable Adjustment (Recycler/Rear Bagger 7-16 Toro BOS Control 7-17 Toro BOS Control Cable Adjustment 7-18 Lawn-Boy BCS Control 7-18 Lawn-Boy BCS Control Cable Adjustment 7-18 SELF-PROPEL BELT REPLACEMENT Toro 21" Front Wheel Drive 8-2 22" Front Wheel Drive 8-2 22" Rear Wheel Drive 8-2 21" Steel & Cast Deck Toro & Lawn-Boy Mowers...
...Cable 7-8 Lawn-Boy 2 Bail Handle 7-8 Lawn-Boy Sens-a-Speed 7-9 Operation 7-9 Handle Disassembly, Zone Start Models 7-9 Assembly 7-10 Cable Adjustment 7-11 Self-Propel Cable 7-11 Handle Disassembly, Lawn-Boy Blade ...Power/Lawn-Boy Medallion 7-15 Toro BBC Cable Adjustment (Recycler/Rear Bagger 7-16 Toro BOS Control 7-17 Toro BOS Control Cable Adjustment 7-18 Lawn-Boy BCS Control 7-18 Lawn-Boy BCS Control Cable Adjustment 7-18 SELF-PROPEL BELT REPLACEMENT Toro 21" Front Wheel Drive 8-2 22" Front Wheel Drive 8-2 22" Rear Wheel Drive 8-2 21" Steel & Cast Deck Toro & Lawn-Boy Mowers...
Service Manual
Page 21
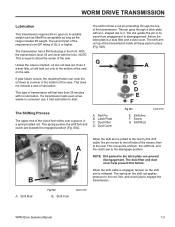
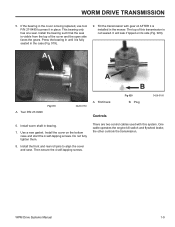
..., fork, and clutch jaw to a smear in consumer use, it . Roll Pin B. This moves the shift pin, the shift fork, and the clutch jaw to start. Dust Filter D. Shift Arm F. If a transmission lasts even a few weeks in the bottom of the case. NOTE: Dirt packed in the front. Shift Rod When... the shift arm is pulled to the rear by the shift cable, the pin moves to the left side of the mower, then A to about the center of the seal on the shift arm is equal to the rear. WORM DRIVE TRANSMISSION Lubrication This transmission requires 90...
..., fork, and clutch jaw to a smear in consumer use, it . Roll Pin B. This moves the shift pin, the shift fork, and the clutch jaw to start. Dust Filter D. Shift Arm F. If a transmission lasts even a few weeks in the bottom of the case. NOTE: Dirt packed in the front. Shift Rod When... the shift arm is pulled to the rear by the shift cable, the pin moves to the left side of the mower, then A to about the center of the seal on the shift arm is equal to the rear. WORM DRIVE TRANSMISSION Lubrication This transmission requires 90...
Service Manual
Page 27
... cover and case. One cable operates the engine kill switch and flywheel brake; Install the bearing such that the seal is installed in the mower. The top of the cover and the open side faces the gears. It will leak if tipped on the bottom case and... start the 4 self-tapping screws. Tool P/N 27-0490 Fig 019 3428-0159 A. Use a new gasket. Install the cover on its side (Fig. 020). Then secure the 4 ...
... cover and case. One cable operates the engine kill switch and flywheel brake; Install the bearing such that the seal is installed in the mower. The top of the cover and the open side faces the gears. It will leak if tipped on the bottom case and... start the 4 self-tapping screws. Tool P/N 27-0490 Fig 019 3428-0159 A. Use a new gasket. Install the cover on its side (Fig. 020). Then secure the 4 ...
Service Manual
Page 58
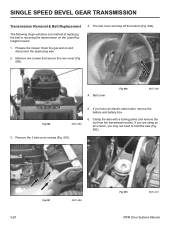
...transmission pulley. Remove the 3 belt cover screws (Fig. 091). 3-20 Fig 091 MVC-286 Fig 093 MVC-291 WPM Drive Systems Manual Prepare the mower. SINGLE SPEED BEVEL GEAR TRANSMISSION Transmission Removal & Belt Replacement The following steps will drop off the bottom (Fig. 092). If you are using an... air wrench, you have an electric start model, remove the battery and battery box. 6. If you may not need to hold the axle (Fig. 093). 3. Drain the gas and oil...
...transmission pulley. Remove the 3 belt cover screws (Fig. 091). 3-20 Fig 091 MVC-286 Fig 093 MVC-291 WPM Drive Systems Manual Prepare the mower. SINGLE SPEED BEVEL GEAR TRANSMISSION Transmission Removal & Belt Replacement The following steps will drop off the bottom (Fig. 092). If you are using an... air wrench, you have an electric start model, remove the battery and battery box. 6. If you may not need to hold the axle (Fig. 093). 3. Drain the gas and oil...
Service Manual
Page 69
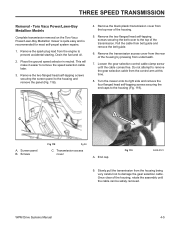
...panel to the housing (Fig. 119). Remove the transmission access cover from underneath. 7. Toro Vacu Power/Lawn-Boy Medallion Models Complete transmission removal on the Toro Vacu Power/Lawn-Boy Medallion mower is quite easy and is recommended for most self-propel system repairs. 1. Drain the ... from the housing being very careful not to prevent accidental starting. Transmission access cover A. A C A. Screen panel B. Slowly pull the transmission from the engine to damage the gear selection cable. Turn the mower onto its right side and remove the four flanged...
...panel to the housing (Fig. 119). Remove the transmission access cover from underneath. 7. Toro Vacu Power/Lawn-Boy Medallion Models Complete transmission removal on the Toro Vacu Power/Lawn-Boy Medallion mower is quite easy and is recommended for most self-propel system repairs. 1. Drain the ... from the housing being very careful not to prevent accidental starting. Transmission access cover A. A C A. Screen panel B. Slowly pull the transmission from the engine to damage the gear selection cable. Turn the mower onto its right side and remove the four flanged...
Service Manual
Page 80
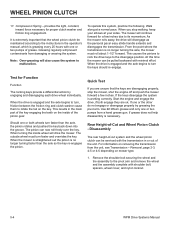
...is no longer turning faster than the axle, the pinion rotates and pushes the key back down into the groove. Start the engine and engage the drive, if both wheels turn , friction between the friction ring and clutch washer cause them to its momentum. Rear Height-of the key...: Over-greasing will drive the mower. Walk along at your elbows at a normal pace. At this system, practice the following. If the keys disengage the system is necessary. If grease does not help disassembly is working correctly. Remove the shoulder bolt securing the wheel and tire assembly to the disengage...
...is no longer turning faster than the axle, the pinion rotates and pushes the key back down into the groove. Start the engine and engage the drive, if both wheels turn , friction between the friction ring and clutch washer cause them to its momentum. Rear Height-of the key...: Over-greasing will drive the mower. Walk along at your elbows at a normal pace. At this system, practice the following. If the keys disengage the system is necessary. If grease does not help disassembly is working correctly. Remove the shoulder bolt securing the wheel and tire assembly to the disengage...
Service Manual
Page 101
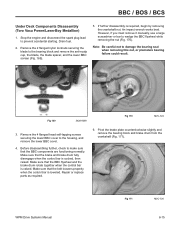
...(Fig. 171). An impact wrench works best. Remove the 4 flanged head self-tapping screws securing the lower BBC cover to prevent accidental starting. Stop the engine and disconnect the spark plug lead to the housing, and remove the lower BBC cover. 4. If further disassembly is cocked, ...scalp cup, the blade, the blade spacer, and the lower BBC screen (Fig. 169). 5. BBC / BOS / BCS Under Deck Components Disassembly (Toro Vacu Power/Lawn-Boy Medallion) 1. Remove the 2 flanged nylon locknuts securing the blade to make sure that the belt loosens properly when the control bar ...
...(Fig. 171). An impact wrench works best. Remove the 4 flanged head self-tapping screws securing the lower BBC cover to prevent accidental starting. Stop the engine and disconnect the spark plug lead to the housing, and remove the lower BBC cover. 4. If further disassembly is cocked, ...scalp cup, the blade, the blade spacer, and the lower BBC screen (Fig. 169). 5. BBC / BOS / BCS Under Deck Components Disassembly (Toro Vacu Power/Lawn-Boy Medallion) 1. Remove the 2 flanged nylon locknuts securing the blade to make sure that the belt loosens properly when the control bar ...
Service Manual
Page 111
Start by installing the key and self-propel pulley. The flywheel must be concerned. Push the flywheel firmly on the taper of the ...
Start by installing the key and self-propel pulley. The flywheel must be concerned. Push the flywheel firmly on the taper of the ...
Service Manual
Page 112
... at side on the pulley MUST engage the flywheel. CAUTION! Fig 196 3428-0189 4. But the seals in the bearing need to be intact. Start the nut on the crankshaft. 7. Fig 197 3428-0187 6. Inspect the hub assembly if the old one is harmless. If the seals are damaged or...
... at side on the pulley MUST engage the flywheel. CAUTION! Fig 196 3428-0189 4. But the seals in the bearing need to be intact. Start the nut on the crankshaft. 7. Fig 197 3428-0187 6. Inspect the hub assembly if the old one is harmless. If the seals are damaged or...
Service Manual
Page 113
... cable clamp and pull cable out from under the screw (Fig. 201). Pull it towards you and hook the end as shown (Fig. 198). 10. Start the shaft into the housing. Screwdriver Fig 200 C. Hold the idler/brake arm in the housing. Spring B. Fig 199 3428-0192 WPM Drive Systems Manual...
... cable clamp and pull cable out from under the screw (Fig. 201). Pull it towards you and hook the end as shown (Fig. 198). 10. Start the shaft into the housing. Screwdriver Fig 200 C. Hold the idler/brake arm in the housing. Spring B. Fig 199 3428-0192 WPM Drive Systems Manual...


