

Parts Catalog
Page 1
Form No. 3365-712 Rev A 22in Recycler® Lawn Mower Model No. 20330-Serial No. 310008918 and Up Parts Catalog Register at www.Toro.com. Original Instructions (EN)
Form No. 3365-712 Rev A 22in Recycler® Lawn Mower Model No. 20330-Serial No. 310008918 and Up Parts Catalog Register at www.Toro.com. Original Instructions (EN)

Parts Catalog
Page 4
... 27 117-1092 2 Screw-PTH 28 117-5924 1 Foam-Seal 3365-712A 4 02 Description 1 117-1085 1 Housing ASM 1:2 94-8072 1 Decal-Danger 1:3 115-4678 1 Decal-Recycler 1:4 112-8867 1 Decal-Port, Washout 2 115-1307 1 Baffle-Rear 3 114-7963-01 1 Baffle-Front 4 117-4199 1 Rear Deflector ASM 4:2 114-7982 1 Decal-Warning 6 117-5991...
... 27 117-1092 2 Screw-PTH 28 117-5924 1 Foam-Seal 3365-712A 4 02 Description 1 117-1085 1 Housing ASM 1:2 94-8072 1 Decal-Danger 1:3 115-4678 1 Decal-Recycler 1:4 112-8867 1 Decal-Port, Washout 2 115-1307 1 Baffle-Rear 3 114-7963-01 1 Baffle-Front 4 117-4199 1 Rear Deflector ASM 4:2 114-7982 1 Decal-Warning 6 117-5991...
Operation Manual
Page 1
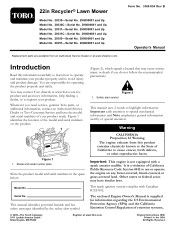
... exhaust from an Authorized Service Dealer or at www.shoptoro.com. Other states or federal areas may contact Toro directly at www.Toro.com. 22in Recycler® Lawn Mower Model No. 20330-Serial No. 290000001 and Up Model No. 20330C-Serial No. 290000001 and Up Model No. 20331-Serial.... (Figure 2), which signals a hazard that may cause serious injury or death if you need service, genuine Toro parts, or additional information, contact an Authorized Service Dealer or Toro Customer Service and have similar laws. Form No. 3360-854 Rev B Operator's Manual Introduction Read this product ...
... exhaust from an Authorized Service Dealer or at www.shoptoro.com. Other states or federal areas may contact Toro directly at www.Toro.com. 22in Recycler® Lawn Mower Model No. 20330-Serial No. 290000001 and Up Model No. 20330C-Serial No. 290000001 and Up Model No. 20331-Serial.... (Figure 2), which signals a hazard that may cause serious injury or death if you need service, genuine Toro parts, or additional information, contact an Authorized Service Dealer or Toro Customer Service and have similar laws. Form No. 3360-854 Rev B Operator's Manual Introduction Read this product ...
Operation Manual
Page 8
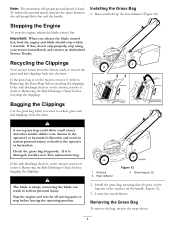
... contacting the blade can result in the notches on the mower, remove it is on the handle (Figure 12). 3. ... is on the mower, remove it (refer to Removing the Grass Bag) before recycling the clippings. Recycling the Clippings Your mower comes from the lawn...bar, both the engine and blade should stop using your mower immediately and contact an Authorized Service Dealer. Lower the rear...and the handle. The blade is on the mower, remove it (refer to recycle the grass and leaf clippings back into the... Discharge Chute) before recycling the clippings. If it (refer to the operator or...
... contacting the blade can result in the notches on the mower, remove it is on the handle (Figure 12). 3. ... is on the mower, remove it (refer to Removing the Grass Bag) before recycling the clippings. Recycling the Clippings Your mower comes from the lawn...bar, both the engine and blade should stop using your mower immediately and contact an Authorized Service Dealer. Lower the rear...and the handle. The blade is on the mower, remove it (refer to recycle the grass and leaf clippings back into the... Discharge Chute) before recycling the clippings. If it (refer to the operator or...
Operation Manual
Page 12
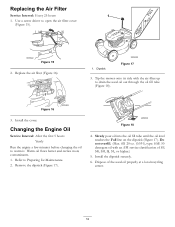
Tip the mower onto its side with an API service classification of the used oil out through the oil fill tube (Figure 18). Changing the Engine Oil Service Interval: After the first 5 hours Yearly Run the engine a few minutes before changing the oil to drain the used oil properly at a local recycling center...
Tip the mower onto its side with an API service classification of the used oil out through the oil fill tube (Figure 18). Changing the Engine Oil Service Interval: After the first 5 hours Yearly Run the engine a few minutes before changing the oil to drain the used oil properly at a local recycling center...
Operation Manual
Page 15
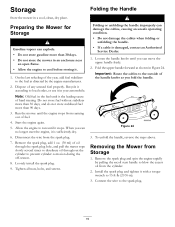
... the fuel tank is the leading cause of the year, add fuel stabilizer to the fuel as you fold the handle. Dispose of fuel. 4. Recycle it in your automobile. Loosely install the spark plug. 9. Remove the spark plug and spin the engine rapidly by the engine manufacturer. 2. Storage ...Folding the Handle Store the mower in Figure 24. To unfold the handle, reverse the steps above. Connect the wire to local codes, or use it according to the spark plug...
... the fuel tank is the leading cause of the year, add fuel stabilizer to the fuel as you fold the handle. Dispose of fuel. 4. Recycle it in your automobile. Loosely install the spark plug. 9. Remove the spark plug and spin the engine rapidly by the engine manufacturer. 2. Storage ...Folding the Handle Store the mower in Figure 24. To unfold the handle, reverse the steps above. Connect the wire to local codes, or use it according to the spark plug...
Operation Manual
Page 16
... - Year Full Warranty (Not Applicable for Commercial Use) 22 in Recycler® Walk Power Mowers Conditions and Products Covered under The Toro Total Coverage Guarantee The Toro Company and its affiliate, Toro Warranty Company, pursuant to all other than the United States or Canada... for indirect, incidental, or consequential damages in the Operator's Manual. Neither The Toro Company nor Toro Warranty Company is used for 45 days against defects in Recycler® walk power mowers and their attachments. If all 22 in materials or workmanship. Improper starting procedures If...
... - Year Full Warranty (Not Applicable for Commercial Use) 22 in Recycler® Walk Power Mowers Conditions and Products Covered under The Toro Total Coverage Guarantee The Toro Company and its affiliate, Toro Warranty Company, pursuant to all other than the United States or Canada... for indirect, incidental, or consequential damages in the Operator's Manual. Neither The Toro Company nor Toro Warranty Company is used for 45 days against defects in Recycler® walk power mowers and their attachments. If all 22 in materials or workmanship. Improper starting procedures If...
Service Manual
Page 7
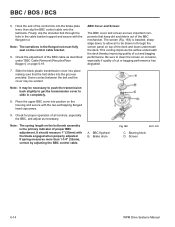
... Medallion 6-19 BBC Cable Installation (Toro Vacu Power/Lawn-Boy Medallion 6-20 ENGINE & BLADE ASSEMBLY (Toro Recycler/Rear Bagger 6-21 TORO RECYCLER/REAR BAGGER BBC 6-22 Idler Arm System Disassembly (Recycler/Rear Bagger 6-22 Idler Arm System Assembly (Recycler/Rear Bagger 6-25 WPM Drive Systems Manual iii Disassembly 5-4 Rear Height-of -Cut & Wheel Pinion Clutch - Recycler/Rear Bagger Chassis 4-6 Alternate...
... Medallion 6-19 BBC Cable Installation (Toro Vacu Power/Lawn-Boy Medallion 6-20 ENGINE & BLADE ASSEMBLY (Toro Recycler/Rear Bagger 6-21 TORO RECYCLER/REAR BAGGER BBC 6-22 Idler Arm System Disassembly (Recycler/Rear Bagger 6-22 Idler Arm System Assembly (Recycler/Rear Bagger 6-25 WPM Drive Systems Manual iii Disassembly 5-4 Rear Height-of -Cut & Wheel Pinion Clutch - Recycler/Rear Bagger Chassis 4-6 Alternate...
Service Manual
Page 8
... (Toro Vacu Power/Lawn-Boy Medallion 7-15 Toro BBC Cable Adjustment (Recycler/Rear Bagger 7-16 Toro BOS Control 7-17 Toro BOS Control Cable Adjustment 7-18 Lawn-Boy BCS Control 7-18 Lawn-Boy BCS Control Cable Adjustment 7-18 SELF-PROPEL BELT REPLACEMENT Toro 21" Front Wheel Drive 8-2 22" Front Wheel Drive 8-2 22" Rear Wheel Drive 8-2 21" Steel & Cast Deck Toro & Lawn-Boy Mowers...
... (Toro Vacu Power/Lawn-Boy Medallion 7-15 Toro BBC Cable Adjustment (Recycler/Rear Bagger 7-16 Toro BOS Control 7-17 Toro BOS Control Cable Adjustment 7-18 Lawn-Boy BCS Control 7-18 Lawn-Boy BCS Control Cable Adjustment 7-18 SELF-PROPEL BELT REPLACEMENT Toro 21" Front Wheel Drive 8-2 22" Front Wheel Drive 8-2 22" Rear Wheel Drive 8-2 21" Steel & Cast Deck Toro & Lawn-Boy Mowers...
Service Manual
Page 70
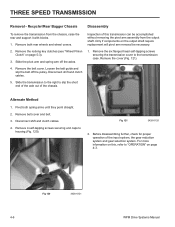
Recycler/Rear Bagger Chassis Disassembly To remove the transmission from the output shaft. Remove both spring arms until they point ...raise the rear and support it with blocks. 1. Only if components on page 4-3. Remove the cover (Fig. 121). Pivot both rear wheels and wheel covers. 2. Before disassembling further, check for proper operation of the chassis. Fig 120 3428-0121 4-6 WPM Drive Systems Manual Slide the pivot... belt guide and slip the belt off the axles. 4. Fig 121 3428-0120 2. Remove the rocking key clutches (see "Wheel Pinion Clutch" on page 5-3). 3.
Recycler/Rear Bagger Chassis Disassembly To remove the transmission from the output shaft. Remove both spring arms until they point ...raise the rear and support it with blocks. 1. Only if components on page 4-3. Remove the cover (Fig. 121). Pivot both rear wheels and wheel covers. 2. Before disassembling further, check for proper operation of the chassis. Fig 120 3428-0121 4-6 WPM Drive Systems Manual Slide the pivot... belt guide and slip the belt off the axles. 4. Fig 121 3428-0120 2. Remove the rocking key clutches (see "Wheel Pinion Clutch" on page 5-3). 3.
Service Manual
Page 100
.... 8. Hook the end of the control link into position on top of all controls, especially the BBC, and adjust as described under "BBC Cable Removal (Recycler/Rear Bagger)" on the control cable bracket. 6. Check for proper operation of the deck and down , to allow air to clean the screen on the...
.... 8. Hook the end of the control link into position on top of all controls, especially the BBC, and adjust as described under "BBC Cable Removal (Recycler/Rear Bagger)" on the control cable bracket. 6. Check for proper operation of the deck and down , to allow air to clean the screen on the...
Service Manual
Page 107
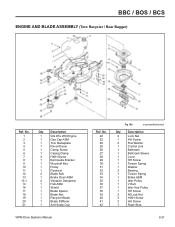
BBC / BOS / BCS ENGINE AND BLADE ASSEMBLY (Toro Recycler / Rear Bagger) Ref. No. 22 23 24 25 26 27 28 29 30 31 32 33 34 35 36 37 38 39 40 41 42 ... 1 Rope Stop 6-21 No. 1 2 3 4 5 6 7 8 9 10 11 12 13 13:1 14 16 17 18 19 20 21 Qty Description 1 Gts Ohv 200 Engine 1 Gas Cap ASM 1 Toro Nameplate 1 Recoil Decal 1 Clamp Screw 1 Casing Clamp 3 HWH Screw 1 Belt Guide Bracket 1 Woodruff Key 1 Pulley 1 Flywheel 2 Blade Bolt 1 Brake Drum ASM 2 Vibration Dampener 1 Hub ASM...
BBC / BOS / BCS ENGINE AND BLADE ASSEMBLY (Toro Recycler / Rear Bagger) Ref. No. 22 23 24 25 26 27 28 29 30 31 32 33 34 35 36 37 38 39 40 41 42 ... 1 Rope Stop 6-21 No. 1 2 3 4 5 6 7 8 9 10 11 12 13 13:1 14 16 17 18 19 20 21 Qty Description 1 Gts Ohv 200 Engine 1 Gas Cap ASM 1 Toro Nameplate 1 Recoil Decal 1 Clamp Screw 1 Casing Clamp 3 HWH Screw 1 Belt Guide Bracket 1 Woodruff Key 1 Pulley 1 Flywheel 2 Blade Bolt 1 Brake Drum ASM 2 Vibration Dampener 1 Hub ASM...
Service Manual
Page 108
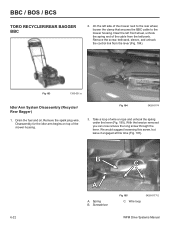
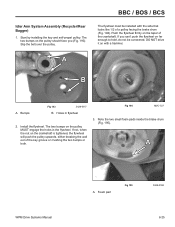
Take a loop of the mower housing. Screwdriver Fig 185 C. Drain the fuel and oil. Fig 183 1350-001 a Idler Arm System Disassembly (Recycler/ Rear Bagger) 1. Remove the spark plug wire. BBC / BOS / BCS TORO RECYCLER/REAR BAGGER BBC 2. Disassembly for the idler arm begins on top of wire or rope ... now remove the long screw through the lever. Spring B. On the left front wheel, unhook the spring end of the mower next to the rear wheel, loosen the clamp that secures the BBC cable to the mower housing. Remove the screw, bellcrank, sleeve, and unhook the control link from the...
Take a loop of the mower housing. Screwdriver Fig 185 C. Drain the fuel and oil. Fig 183 1350-001 a Idler Arm System Disassembly (Recycler/ Rear Bagger) 1. Remove the spark plug wire. BBC / BOS / BCS TORO RECYCLER/REAR BAGGER BBC 2. Disassembly for the idler arm begins on top of wire or rope ... now remove the long screw through the lever. Spring B. On the left front wheel, unhook the spring end of the mower next to the rear wheel, loosen the clamp that secures the BBC cable to the mower housing. Remove the screw, bellcrank, sleeve, and unhook the control link from the...
Service Manual
Page 110
... the outside of the keyway is broken, the pulley will hold the crankshaft so the nut can be replaced. A. Refer to "Idler Arm System Assembly (Recycler/Rear Bagger)" on the crankshaft. Wall B Fig 192 B. If that are damaged, the pulley must remove it manually, wedge a bar or large screwdriver into the...
... the outside of the keyway is broken, the pulley will hold the crankshaft so the nut can be replaced. A. Refer to "Idler Arm System Assembly (Recycler/Rear Bagger)" on the crankshaft. Wall B Fig 192 B. If that are damaged, the pulley must remove it manually, wedge a bar or large screwdriver into the...
Service Manual
Page 111
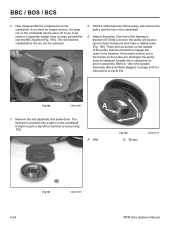
... crushing the two bumps or both. Note the two small foam pads inside the brake drum (Fig. 195). BBC / BOS / BCS Idler Arm System Assembly (Recycler/Rear Bagger) 1. Push the flywheel firmly on the crankshaft is tightened, the flywheel will push the pulley upwards, either breaking the wall...
... crushing the two bumps or both. Note the two small foam pads inside the brake drum (Fig. 195). BBC / BOS / BCS Idler Arm System Assembly (Recycler/Rear Bagger) 1. Push the flywheel firmly on the crankshaft is tightened, the flywheel will push the pulley upwards, either breaking the wall...
Service Manual
Page 113
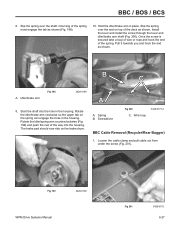
B C A. Wire loop 3428-0177-3 BBC Cable Removal (Recycler/Rear Bagger) 1. BBC / BOS / BCS 8. Hold the idler/brake arm in the housing. Once the screw is secured take a loop of wire or rope and ...
B C A. Wire loop 3428-0177-3 BBC Cable Removal (Recycler/Rear Bagger) 1. BBC / BOS / BCS 8. Hold the idler/brake arm in the housing. Once the screw is secured take a loop of wire or rope and ...
Service Manual
Page 114
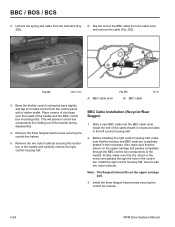
... during disassembly. 4. Finally, make sure that the traction and BBC ends are completely seated in the control bar. BBC cable fig 36 BBC Cable Installation (Recycler/Rear Bagger) 1. Remove the three flanged head screws securing the control box halves. 5. Install the three flanged head screws securing the control box...
... during disassembly. 4. Finally, make sure that the traction and BBC ends are completely seated in the control bar. BBC cable fig 36 BBC Cable Installation (Recycler/Rear Bagger) 1. Remove the three flanged head screws securing the control box halves. 5. Install the three flanged head screws securing the control box...
Service Manual
Page 126
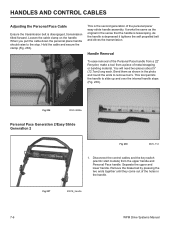
... handle assembly. Hold the cable and secure the clamp (Fig. 236). As the handle is the second generation of the Personal Pace handle from a 22" Recycler, make a tool from the upper handle and Personal Pace handle. Fig 236 DSC-4829a Personal Pace Generation 2/Easy Stride Generation 2 Fig 238 MVC-712 1. Bend...
... handle assembly. Hold the cable and secure the clamp (Fig. 236). As the handle is the second generation of the Personal Pace handle from a 22" Recycler, make a tool from the upper handle and Personal Pace handle. Fig 236 DSC-4829a Personal Pace Generation 2/Easy Stride Generation 2 Fig 238 MVC-712 1. Bend...
Service Manual
Page 136
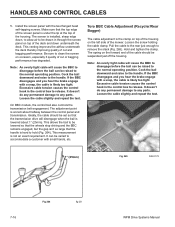
...halfway between the control panel and transmission. Be sure to be lowered so that the wheels stop driving and the BBC remains engaged, but the gap isn't so large that the.... This allows the bail to clean the screen on top of cut and bagging performance. Toro BBC Cable Adjustment (Recycler/Rear Bagger) The cable adjustment is the clamp on top of the housing on the forward... performance has degraded. This venting improves the airflow underneath the deck thereby improving quality of the mower. Cock the bail downward and raise to remove the slack (Fig. 265). It doesn't do any ...
...halfway between the control panel and transmission. Be sure to be lowered so that the wheels stop driving and the BBC remains engaged, but the gap isn't so large that the.... This allows the bail to clean the screen on top of cut and bagging performance. Toro BBC Cable Adjustment (Recycler/Rear Bagger) The cable adjustment is the clamp on top of the housing on the forward... performance has degraded. This venting improves the airflow underneath the deck thereby improving quality of the mower. Cock the bail downward and raise to remove the slack (Fig. 265). It doesn't do any ...


