User Guide
Page 3
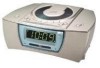
..." Battery Backup Installation Maintenance Controls and Indicators ...7 Clock Display ...8 Setting the Clock Time ...9 Listening to Compact Discs...9-10 Playing Compact Discs Skipping to a CD Track Using the Repeat Function Using the Random Function Programming and Playing CD Tracks High-Speed Music Search Listening to the Radio ...11 Operating the Radio Antenna Information and Adjustment Operating the Alarms...
..." Battery Backup Installation Maintenance Controls and Indicators ...7 Clock Display ...8 Setting the Clock Time ...9 Listening to Compact Discs...9-10 Playing Compact Discs Skipping to a CD Track Using the Repeat Function Using the Random Function Programming and Playing CD Tracks High-Speed Music Search Listening to the Radio ...11 Operating the Radio Antenna Information and Adjustment Operating the Alarms...
User Guide
Page 5
... be serviced by the product manufacturer. 10. C. the unit has been exposed to service the unit beyond those methods described in a risk of time, such as a month or longer, the power cord should be taken so that objects do not fall and liquids are not spilled into the... enclosure. Periods of time. Servicing - For questions or comments regarding this can result in the user's operating instructions. Lightning and Power Surge Protection - The user should not...
... be serviced by the product manufacturer. 10. C. the unit has been exposed to service the unit beyond those methods described in a risk of time, such as a month or longer, the power cord should be taken so that objects do not fall and liquids are not spilled into the... enclosure. Periods of time. Servicing - For questions or comments regarding this can result in the user's operating instructions. Lightning and Power Surge Protection - The user should not...

User Guide
Page 7
...magnetic fields. 3. If you do not wish to activate this product's Battery Backup feature. During any interruptions to the power supply the time and alarm settings will sound when power is not to an AC outlet, out of direct sunlight, and away from direct sunlight or sources... 1. Gently turn the unit over and remove the battery compartment door. 2. A cloth or other interruption occurs, the Battery Backup will maintain clock and alarm settings for the life of them properly. 2. Should the battery compartment become corroded or dirty, clean the compartment thoroughly and replace the...
...magnetic fields. 3. If you do not wish to activate this product's Battery Backup feature. During any interruptions to the power supply the time and alarm settings will sound when power is not to an AC outlet, out of direct sunlight, and away from direct sunlight or sources... 1. Gently turn the unit over and remove the battery compartment door. 2. A cloth or other interruption occurs, the Battery Backup will maintain clock and alarm settings for the life of them properly. 2. Should the battery compartment become corroded or dirty, clean the compartment thoroughly and replace the...
User Guide
Page 10
... to Compact Discs Playing Compact Discs 1. While still pressing the ¾ Clock Button, press the ³ Rewind/Minute Button or the · F. Setting the Clock Time 1. Press the ³ Rewind/Minute Button again to skip to CD or radio. Don't connect MP3 or other devices into ƿ Line-In Jack... while listening to the beginning of the next track. 2. Press and hold the button to advance the time slowly, or hold the ¾ Clock Button until the display begins flashing. ...
... to Compact Discs Playing Compact Discs 1. While still pressing the ¾ Clock Button, press the ³ Rewind/Minute Button or the · F. Setting the Clock Time 1. Press the ³ Rewind/Minute Button again to skip to CD or radio. Don't connect MP3 or other devices into ƿ Line-In Jack... while listening to the beginning of the next track. 2. Press and hold the button to advance the time slowly, or hold the ¾ Clock Button until the display begins flashing. ...
User Guide
Page 13
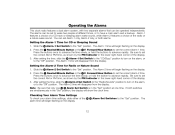
... time will show the clock time. Setting the Alarm-2 Time for CD or Beeping Sound 1. Slide the ƺ Alarm-2 Set Switch to the "Set" position. Note: Be sure that can be operated independently. If both alarms. Setting the Alarm-1 Time for Radio or Nature Sound 1. Operating the Alarms This clock radio ...features a dual alarm system, with two separate alarms that only one ƹ ƺ Alarm Set Switch is in the "Set" position at different times, or to turn on the display...
... time will show the clock time. Setting the Alarm-2 Time for CD or Beeping Sound 1. Slide the ƺ Alarm-2 Set Switch to the "Set" position. Note: Be sure that can be operated independently. If both alarms. Setting the Alarm-1 Time for Radio or Nature Sound 1. Operating the Alarms This clock radio ...features a dual alarm system, with two separate alarms that only one ƹ ƺ Alarm Set Switch is in the "Set" position at different times, or to turn on the display...
User Guide
Page 14
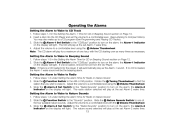
... to a comfortable level. (See Listening to Compact Discs). Setting the Alarm to Wake to Radio 1. Setting the Alarm to Wake to Beeping Sound 1. Follow steps 1-3 under Setting the Alarm Time for CD or Beeping Sound section on the display will light. Slide the ƽ Function Switch to ...will light. Slide the ƺ Alarm-2 Set Switch to the "Radio/Sounds" position to Nature Sounds 1. the Alarm-2 Indicator on the alarm; Note: If there is a CD loaded into the CD Player and set Alarm-2 wake time. 13 Adjust the volume to turn on the display will light....
... to a comfortable level. (See Listening to Compact Discs). Setting the Alarm to Wake to Radio 1. Setting the Alarm to Wake to Beeping Sound 1. Follow steps 1-3 under Setting the Alarm Time for CD or Beeping Sound section on the display will light. Slide the ƽ Function Switch to ...will light. Slide the ƺ Alarm-2 Set Switch to the "Radio/Sounds" position to Nature Sounds 1. the Alarm-2 Indicator on the alarm; Note: If there is a CD loaded into the CD Player and set Alarm-2 wake time. 13 Adjust the volume to turn on the display will light....
User Guide
Page 15
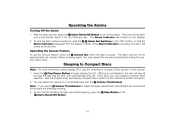
...Operating the Alarms Turning Off the Alarm 1. Sleeping to Compact Discs Note: For more information about playing CD's, see the Listening to adjust the sleep volume level, this will sound at the set time. Press the ᕨ Play/Pause Button to the "Off" position, so that the Alarm Indicators ..., press the ¶ Alarm Reset/Off Button to a comfortable level with the ƻ Volume Thumbwheel. If either of this process several times during the onehour alarm cycle. See the Programming and Playing Compact Discs section of the Alarm Indicators is showing, the alarm will affect the volume...
...Operating the Alarms Turning Off the Alarm 1. Sleeping to Compact Discs Note: For more information about playing CD's, see the Listening to adjust the sleep volume level, this will sound at the set time. Press the ᕨ Play/Pause Button to the "Off" position, so that the Alarm Indicators ..., press the ¶ Alarm Reset/Off Button to a comfortable level with the ƻ Volume Thumbwheel. If either of this process several times during the onehour alarm cycle. See the Programming and Playing Compact Discs section of the Alarm Indicators is showing, the alarm will affect the volume...
User Guide
Page 16
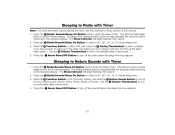
..., then stay lit. 2. If you have chosen to wake up to the radio, the station you set to sleep to select a 90-, 60-, 30-, or 15-minute sleep time. 3. Sleeping to enter the sleep mode. Press the º Radio/Sounds/Sleep On Button twice to Nature Sounds with Timer Note: For more...to turn off the sounds before returning to the standard display. Press the ¶ Alarm Reset/Off Button to turn off the radio before returning to select a 90-, 60-, 30-, or 15-minute sleep time. 3. Slide the ƽ Function Switch to the "Sounds" setting, and slide the ƾ Nature Sound Switch to...
..., then stay lit. 2. If you have chosen to wake up to the radio, the station you set to sleep to select a 90-, 60-, 30-, or 15-minute sleep time. 3. Sleeping to enter the sleep mode. Press the º Radio/Sounds/Sleep On Button twice to Nature Sounds with Timer Note: For more...to turn off the sounds before returning to the standard display. Press the ¶ Alarm Reset/Off Button to turn off the radio before returning to select a 90-, 60-, 30-, or 15-minute sleep time. 3. Slide the ƽ Function Switch to the "Sounds" setting, and slide the ƾ Nature Sound Switch to...
User Guide
Page 17
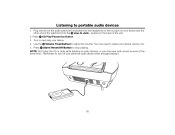
... device. 4. Remember to adjust the volume. Turn on the back of the patchcord into the ƿ Line-In Jack , located on and play the CD or radio while listening to stop playing. Plug one end of the audio patchcord (included) into the headphone or line-out jack on your device and the... the ƻ Volume Thumbwheel to turn off your extrernal audio device when through playing it. 16 You may hear both sound sources at the same time. Listening to adjust your device volume, too. 5.
... device. 4. Remember to adjust the volume. Turn on the back of the patchcord into the ƿ Line-In Jack , located on and play the CD or radio while listening to stop playing. Plug one end of the audio patchcord (included) into the headphone or line-out jack on your device and the... the ƻ Volume Thumbwheel to turn off your extrernal audio device when through playing it. 16 You may hear both sound sources at the same time. Listening to adjust your device volume, too. 5.
User Guide
Page 18
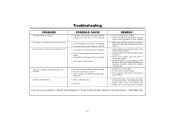
Timex Audio Products Division Customer Service, 1-800-888-4491 17 Troubleshooting PROBLEM The alarm does ... was on the display • The alarm was not set correctly for AM/PM REMEDY • Check the alarm time setting • Press the Alarm Mode Button until the Alarm icon appears on the display • Make sure the ...time Buzzer alarm is heard when waking to CD • A CD was not inserted into the CD player • The CD was inserted incorrectly into the player • Compartment CD player door is not closed • There was a power failure There is no display and the CD/radio...
Timex Audio Products Division Customer Service, 1-800-888-4491 17 Troubleshooting PROBLEM The alarm does ... was on the display • The alarm was not set correctly for AM/PM REMEDY • Check the alarm time setting • Press the Alarm Mode Button until the Alarm icon appears on the display • Make sure the ...time Buzzer alarm is heard when waking to CD • A CD was not inserted into the CD player • The CD was inserted incorrectly into the player • Compartment CD player door is not closed • There was a power failure There is no display and the CD/radio...
User Guide
Page 19
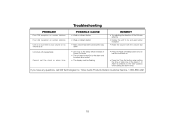
Timex Audio Products Division Customer Service, 1-800-888-4491 18 Troubleshooting PROBLEM Poor FM reception on certain...was in the Sleep Mode instead of Power On Mode • The unit was turned On by the alarm and the alarm time ended • The display must be flashing REMEDY • Try adjusting the direction of the FM wire antenna • ...Raise the volume with the volume dial • Press the Radio On/Sleep button once to turn the unit back on Cannot set the clock or alarm time • Press the Time Set button when setting the time or slide one of the Alarm-1 or Alarm-2 switches to...
Timex Audio Products Division Customer Service, 1-800-888-4491 18 Troubleshooting PROBLEM Poor FM reception on certain...was in the Sleep Mode instead of Power On Mode • The unit was turned On by the alarm and the alarm time ended • The display must be flashing REMEDY • Try adjusting the direction of the FM wire antenna • ...Raise the volume with the volume dial • Press the Radio On/Sleep button once to turn the unit back on Cannot set the clock or alarm time • Press the Time Set button when setting the time or slide one of the Alarm-1 or Alarm-2 switches to...


