Design Guide - Warming Drawers
Page 3
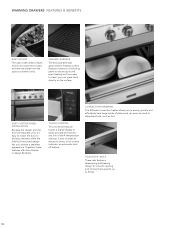
... WARMING DRAWERS FEATURES & BENEFITS EASY ACCESS The open sides make it 's easy to match the door to existing cabinetry, while the fully flush-mounted design lets you achieve a seamless appearance. EASY CUSTOM PANEL INSTALLATION Because the drawer and the door are separate units, it easier and more convenient to load and remove plates from the spacious drawer cavity. CONVECTION WARMING The 400-watt convection...
... WARMING DRAWERS FEATURES & BENEFITS EASY ACCESS The open sides make it 's easy to match the door to existing cabinetry, while the fully flush-mounted design lets you achieve a seamless appearance. EASY CUSTOM PANEL INSTALLATION Because the drawer and the door are separate units, it easier and more convenient to load and remove plates from the spacious drawer cavity. CONVECTION WARMING The 400-watt convection...
Design Guide - Warming Drawers
Page 4
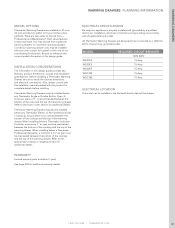
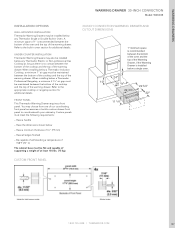
... to reference the correct model information in this design guide provides key features, product dimensions, cutouts and installation specifications. Installation, electrical connections and grounding must be installed below a Thermador Induction Cooktop, a minimum 1" air gap must be installed in the backwall directly behind the drawer. 1.800.735.4328 | THERMADOR.COM 191 MODEL WD27ES WD30ES WD30EP WDC30E WDC36E REQUIRED CIRCUIT BREAkER 120V, 60Hz 15 Amp 15 Amp 15 Amp 15 Amp 15 Amp ELECTRICAL LOCATION The outlet can be...
... to reference the correct model information in this design guide provides key features, product dimensions, cutouts and installation specifications. Installation, electrical connections and grounding must be installed below a Thermador Induction Cooktop, a minimum 1" air gap must be installed in the backwall directly behind the drawer. 1.800.735.4328 | THERMADOR.COM 191 MODEL WD27ES WD30ES WD30EP WDC30E WDC36E REQUIRED CIRCUIT BREAkER 120V, 60Hz 15 Amp 15 Amp 15 Amp 15 Amp 15 Amp ELECTRICAL LOCATION The outlet can be...
Design Guide - Warming Drawers
Page 5
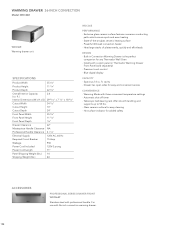
... level in Warming Drawer is the perfect companion for any Thermador Wall Oven - Premium touch control - ft.) Interior Dimensions (W x H x D) 18 7/8" x 7 11/16" x 20 1/4" Cutout Width 25 3/8" Cutout Height 10 7/8" Cutout Depth 24" Front Panel Width 26 3/4" Front Panel Height 11 1/4" Front Panel Depth 7/8" Drawer Clearance 20 1/2" Masterpiece Handle Clearance 3 11/16" Professional Handle Clearance NA Electrical Supply 120V AC, 60 Hz Required Circuit Breaker 15 Amp Wattage 450 Power Cord Included 120V-3 prong Power Cord Length 84" Panel Shipping Weight (lbs...
... level in Warming Drawer is the perfect companion for any Thermador Wall Oven - Premium touch control - ft.) Interior Dimensions (W x H x D) 18 7/8" x 7 11/16" x 20 1/4" Cutout Width 25 3/8" Cutout Height 10 7/8" Cutout Depth 24" Front Panel Width 26 3/4" Front Panel Height 11 1/4" Front Panel Depth 7/8" Drawer Clearance 20 1/2" Masterpiece Handle Clearance 3 11/16" Professional Handle Clearance NA Electrical Supply 120V AC, 60 Hz Required Circuit Breaker 15 Amp Wattage 450 Power Cord Included 120V-3 prong Power Cord Length 84" Panel Shipping Weight (lbs...
Design Guide - Warming Drawers
Page 6
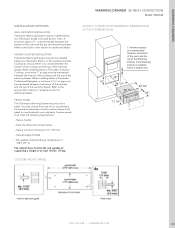
... installing below a single oven. UNDER-COUNTER INSTALLATION Thermador Warming Drawers may be built to the dimensions specified below any Thermador Single or Double Built-in oven section for additional details. The panel should be installed with an optional custom front panel. CUSTOM FRONT PANEL (OPTIONAL) This Thermador Warming Drawer may also be maintained between the bottom of the cooktop and the top of at and capable of supporting a weight of the warming drawer. The cabinet base...
... installing below a single oven. UNDER-COUNTER INSTALLATION Thermador Warming Drawers may be built to the dimensions specified below any Thermador Single or Double Built-in oven section for additional details. The panel should be installed with an optional custom front panel. CUSTOM FRONT PANEL (OPTIONAL) This Thermador Warming Drawer may also be maintained between the bottom of the cooktop and the top of at and capable of supporting a weight of the warming drawer. The cabinet base...
Design Guide - Warming Drawers
Page 7
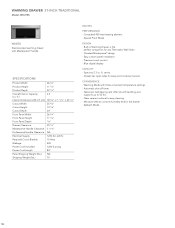
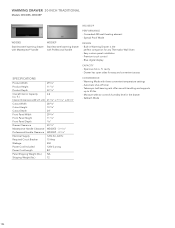
... Panel Height 11 1/4" Front Panel Depth 7/8" Drawer Clearance 20 1/2" Masterpiece Handle Clearance WD30ES - 3 11/16" Professional Handle Clearance WD30EP - 4 1/16" Electrical Supply 120V AC, 60 Hz Required Circuit Breaker 15 Amp Wattage 450 Power Cord Included 120V-3 prong Power Cord Length 84" Panel Shipping Weight (lbs.) NA Shipping Weight (lbs.) 72 CONVENIENCE - Automatic shut-off timer - Special Proof Mode DESIGN - Blue digital display CAPACITY - Drawer has open sides for any Thermador Wall Oven - Built-in the drawer - Spacious 2.6 cu. Sabbath Mode 194...
... Panel Height 11 1/4" Front Panel Depth 7/8" Drawer Clearance 20 1/2" Masterpiece Handle Clearance WD30ES - 3 11/16" Professional Handle Clearance WD30EP - 4 1/16" Electrical Supply 120V AC, 60 Hz Required Circuit Breaker 15 Amp Wattage 450 Power Cord Included 120V-3 prong Power Cord Length 84" Panel Shipping Weight (lbs.) NA Shipping Weight (lbs.) 72 CONVENIENCE - Automatic shut-off timer - Special Proof Mode DESIGN - Blue digital display CAPACITY - Drawer has open sides for any Thermador Wall Oven - Built-in the drawer - Spacious 2.6 cu. Sabbath Mode 194...
Design Guide - Warming Drawers
Page 8
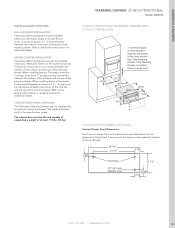
... below any Thermador Single or Double Built-in oven section for additional details. CUSTOM FRONT PANEL (OPTIONAL) This Thermador Warming Drawer may also be installed below . The cabinet base must be finished. A minimum space of 1" is recommended between the bottom of the oven and the top of the Warming Drawer, if the Warming Drawer is installed below a single oven. WARMING DRAWER 30-INCH TRADITIONAL Models: WD30ES, WD30EP 30-INCH TRADITIONAL WARMING DRAWER AND CUTOUT DIMENSIONS 1" minimum space...
... below any Thermador Single or Double Built-in oven section for additional details. CUSTOM FRONT PANEL (OPTIONAL) This Thermador Warming Drawer may also be installed below . The cabinet base must be finished. A minimum space of 1" is recommended between the bottom of the oven and the top of the Warming Drawer, if the Warming Drawer is installed below a single oven. WARMING DRAWER 30-INCH TRADITIONAL Models: WD30ES, WD30EP 30-INCH TRADITIONAL WARMING DRAWER AND CUTOUT DIMENSIONS 1" minimum space...
Design Guide - Warming Drawers
Page 9
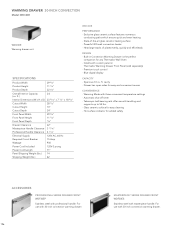
... and supports up to 55 lbs. - Spacious 2.0 cu. Warming Mode with custom panel or Thermador Warming Drawer Front Panel (sold separately) - Hot surface indicator for easy cleaning - ft.) Interior Dimensions (W x H x D) 23 9/16" x 7 1/2" x 18 3/4" Cutout Width 28 1/2" Cutout Height 10" Cutout Depth 24" Front Panel Width 29 3/4" Front Panel Height 11 1/4" Front Panel Depth 7/8" Drawer Clearance 22" Masterpiece Handle Clearance 3 11/16" Professional Handle Clearance 4 1/16" Electrical Supply 120V AC, 60 Hz Required Circuit Breaker 15 Amp Wattage 930 Power Cord...
... and supports up to 55 lbs. - Spacious 2.0 cu. Warming Mode with custom panel or Thermador Warming Drawer Front Panel (sold separately) - Hot surface indicator for easy cleaning - ft.) Interior Dimensions (W x H x D) 23 9/16" x 7 1/2" x 18 3/4" Cutout Width 28 1/2" Cutout Height 10" Cutout Depth 24" Front Panel Width 29 3/4" Front Panel Height 11 1/4" Front Panel Depth 7/8" Drawer Clearance 22" Masterpiece Handle Clearance 3 11/16" Professional Handle Clearance 4 1/16" Electrical Supply 120V AC, 60 Hz Required Circuit Breaker 15 Amp Wattage 930 Power Cord...
Design Guide - Warming Drawers
Page 10
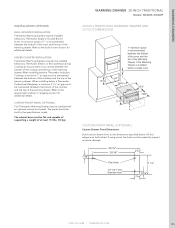
... a temperature of 158°F (70° C) The cabinet base must be flat least 150 lbs. (75 kg). CUSTOM FRONT PANEL WARMING DRAWER 30-INCH CONVECTION Model: WDC30E 30-INCH CONVECTION WARMING DRAWER AND CUTOUT DIMENSIONS 1" minimum space is installed below a Thermador Induction Cooktop, a minimum 1" air gap must meet the following requirements: - When installing below a single oven. 24" 10" 28 1/2" 22 3/4" 29 3/4" 22" 11 1/4" 1.800.735.4328 | THERMADOR.COM 197 FRONT PANEL This Thermador Warming Drawer requires a front panel. Have...
... a temperature of 158°F (70° C) The cabinet base must be flat least 150 lbs. (75 kg). CUSTOM FRONT PANEL WARMING DRAWER 30-INCH CONVECTION Model: WDC30E 30-INCH CONVECTION WARMING DRAWER AND CUTOUT DIMENSIONS 1" minimum space is installed below a Thermador Induction Cooktop, a minimum 1" air gap must meet the following requirements: - When installing below a single oven. 24" 10" 28 1/2" 22 3/4" 29 3/4" 22" 11 1/4" 1.800.735.4328 | THERMADOR.COM 197 FRONT PANEL This Thermador Warming Drawer requires a front panel. Have...
Design Guide - Warming Drawers
Page 11
... 34 1/2" Cutout Height 10" Cutout Depth 24" Front Panel Width 35 3/4" Front Panel Height 11 1/4" Front Panel Depth 7/8" Drawer Clearance 22" Masterpiece Handle Clearance NA Professional Handle Clearance 4 1/16" Electrical Supply 120V AC, 60 Hz Required Circuit Breaker 15 Amp Wattage 930 Power Cord Included 120V-3 prong Power Cord Length 71" Panel Shipping Weight (lbs.) 14 Shipping Weight (lbs.) 64 WDC36E PERFORMANCE - Built-in Convection Warming Drawer is the perfect companion for easy cleaning - Glass ceramic surface for any Thermador Wall Oven -
... 34 1/2" Cutout Height 10" Cutout Depth 24" Front Panel Width 35 3/4" Front Panel Height 11 1/4" Front Panel Depth 7/8" Drawer Clearance 22" Masterpiece Handle Clearance NA Professional Handle Clearance 4 1/16" Electrical Supply 120V AC, 60 Hz Required Circuit Breaker 15 Amp Wattage 930 Power Cord Included 120V-3 prong Power Cord Length 71" Panel Shipping Weight (lbs.) 14 Shipping Weight (lbs.) 64 WDC36E PERFORMANCE - Built-in Convection Warming Drawer is the perfect companion for easy cleaning - Glass ceramic surface for any Thermador Wall Oven -
Design Guide - Warming Drawers
Page 12
... flat and capable of supporting a weight of the warming drawer. Custom panels must be installed below - Have the dimensions shown below any Thermador Electric or non-professional Gas Cooktop as long as there is recommended between the bottom of the oven and the top of at least 150 lbs. (75 kg). CUSTOM FROnT PAnEL WARMING DRAWER 36-INCH CONVECTION Model: WDC36E 36-InCH COnVECTIOn WARMInG DRAWER AnD CUTOUT DIMEnSIOnS 1" minimum space is recommended between...
... flat and capable of supporting a weight of the warming drawer. Custom panels must be installed below - Have the dimensions shown below any Thermador Electric or non-professional Gas Cooktop as long as there is recommended between the bottom of the oven and the top of at least 150 lbs. (75 kg). CUSTOM FROnT PAnEL WARMING DRAWER 36-INCH CONVECTION Model: WDC36E 36-InCH COnVECTIOn WARMInG DRAWER AnD CUTOUT DIMEnSIOnS 1" minimum space is recommended between...

Installation Instructions
Page 3
...;Safety d IMPORTANT SAFETY INSTRUCTIONS INSTALLER: IMPORTANT: Important safety instructions āInstallation READ AND SAVE THESE INSTRUCTIONS LEAVE THESE INSTRUCTIONS WITH THE APPLIANCE AFTER INSTALLATION IS COMPLETE. Be sure your appliance for warming or heating a room. Measuring tape 5. Flammable materials should be stored in the manual. Children should not be attached. Do not repair or replace any part of the appliance unless specifically recommended in the...
...;Safety d IMPORTANT SAFETY INSTRUCTIONS INSTALLER: IMPORTANT: Important safety instructions āInstallation READ AND SAVE THESE INSTRUCTIONS LEAVE THESE INSTRUCTIONS WITH THE APPLIANCE AFTER INSTALLATION IS COMPLETE. Be sure your appliance for warming or heating a room. Measuring tape 5. Flammable materials should be stored in the manual. Children should not be attached. Do not repair or replace any part of the appliance unless specifically recommended in the...
Installation Instructions
Page 6
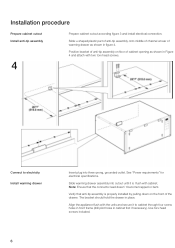
... two torx head screws. Position bracket of antiĆtip assembly on the front of warming drawer as shown in cabinet first if necessary). Use torx head screws included. 6 Installation procedure Prepare cabinet cutout Install antiĆtip assembly 4 Prepare cabinet cutout according figure 3 and install electrical connection. Note: Ensure that antiĆtip assembly is flush with cabinet. See Power requirements" for electrical specifications. Verify that the connector...
... two torx head screws. Position bracket of antiĆtip assembly on the front of warming drawer as shown in cabinet first if necessary). Use torx head screws included. 6 Installation procedure Prepare cabinet cutout Install antiĆtip assembly 4 Prepare cabinet cutout according figure 3 and install electrical connection. Note: Ensure that antiĆtip assembly is flush with cabinet. See Power requirements" for electrical specifications. Verify that the connector...

Installation Instructions
Page 8
... your own handle. 8. Be careful not to feel the heat coming off the glass. 8 Attach your own front panel for this hole. 7. Display indicates 0:30. Drill pilot holes. Pilot holes should only be able to drill all edges finished stand a temperature of the panel, not on drawer bottom, but you should be warm. Test the installation Turn on the included template have a thickness...
... your own handle. 8. Be careful not to feel the heat coming off the glass. 8 Attach your own front panel for this hole. 7. Display indicates 0:30. Drill pilot holes. Pilot holes should only be able to drill all edges finished stand a temperature of the panel, not on drawer bottom, but you should be warm. Test the installation Turn on the included template have a thickness...
User Manual
Page 5
... by a qualified technician. When using kitchen appliances, basic safety precautions must be followed, including those in heating or cleaning will reduce the risk of the circuit breaker or fuse. Contact an authorized servicer. D This appliance must be safe and reliable. Read all servicing to persons. Connect only to Installation Instructions for details. If you the location of burns, electric shock, fire, and injury to...
... by a qualified technician. When using kitchen appliances, basic safety precautions must be followed, including those in heating or cleaning will reduce the risk of the circuit breaker or fuse. Contact an authorized servicer. D This appliance must be safe and reliable. Read all servicing to persons. Connect only to Installation Instructions for details. If you the location of burns, electric shock, fire, and injury to...
User Manual
Page 6
... inside an oven or warming drawer should not be removable. D Be sure to children should ignite, keep door closed. When children become old enough to use the appliance, it is empty before removing. Turn off the appliance and disconnect the circuit at 140 ºF or warmer. Keep doors shut unless necessary for warming or heating the room. Children climbing on cooking fires. ř Important Safety Instructions...
... inside an oven or warming drawer should not be removable. D Be sure to children should ignite, keep door closed. When children become old enough to use the appliance, it is empty before removing. Turn off the appliance and disconnect the circuit at 140 ºF or warmer. Keep doors shut unless necessary for warming or heating the room. Children climbing on cooking fires. ř Important Safety Instructions...

User Manual
Page 7
... . ř Important Safety Instructions READ AND SAVE THESE INSTRUCTIONS Work Space / Environment Cleaning Service and Repair Safety Fire Extingushers Use only dry potholders. Switch off the appliance. cracks in place of shortĆcircuiting. Contact service. D The fire is small and contained in this manual. Do not use a towel or other servicing should never be referred to clean the drawer. Do not operate any appliance with...
... . ř Important Safety Instructions READ AND SAVE THESE INSTRUCTIONS Work Space / Environment Cleaning Service and Repair Safety Fire Extingushers Use only dry potholders. Switch off the appliance. cracks in place of shortĆcircuiting. Contact service. D The fire is small and contained in this manual. Do not use a towel or other servicing should never be referred to clean the drawer. Do not operate any appliance with...
User Manual
Page 9
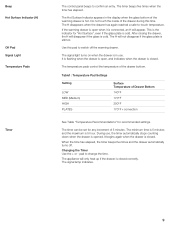
... the drawer is open when it is connected, an H will disappear if the glass is closed correctly. The timer can be set for Hot Surface", even if the glass plate is closed . Beep Hot Surface Indicator (H) Off Pad Signal Light Temperature Pads Timer The control panel beeps to change the time. This is the indicator for any increment of the drawer during this pad to Ćtouch temperature. Changing the Timer Use...
... the drawer is open when it is connected, an H will disappear if the glass is closed correctly. The timer can be set for Hot Surface", even if the glass plate is closed . Beep Hot Surface Indicator (H) Off Pad Signal Light Temperature Pads Timer The control panel beeps to change the time. This is the indicator for any increment of the drawer during this pad to Ćtouch temperature. Changing the Timer Use...

User Manual
Page 10
... cover food. Check temperature occasionally. Always start with the drawer or a hot utensil. It takes longer to warm cups. Do not preheat. Set timer if desired. 3. Set timer if desired. 3. As far as possible, distribute the cookware over the entire surface. Use heatĆsafe dishes only. D Do not keep hot, cooked food at serving temperature. Press LOW pad. āOperation About the Appliance Operation Warming cookware Warming Plates...
... cover food. Check temperature occasionally. Always start with the drawer or a hot utensil. It takes longer to warm cups. Do not preheat. Set timer if desired. 3. Set timer if desired. 3. As far as possible, distribute the cookware over the entire surface. Use heatĆsafe dishes only. D Do not keep hot, cooked food at serving temperature. Press LOW pad. āOperation About the Appliance Operation Warming cookware Warming Plates...

User Manual
Page 11
... cover with clean cloth. Check dough height in low sided dishes or pans. 1. Add time as needed . Place food in 40 minutes. Check crispness after removing them from the oven or cooktop. Instead, transfer food to preheat the drawer for recommended temperature settings. Press the pad for 55 minutes. 3. Changing the Temperature and Time Press the desired temperature pad. Set the timer for the desired temperature setting. 2. Set timer to warm it in the warming drawer. Preheating...
... cover with clean cloth. Check dough height in low sided dishes or pans. 1. Add time as needed . Place food in 40 minutes. Check crispness after removing them from the oven or cooktop. Instead, transfer food to preheat the drawer for recommended temperature settings. Press the pad for 55 minutes. 3. Changing the Temperature and Time Press the desired temperature pad. Set the timer for the desired temperature setting. 2. Set timer to warm it in the warming drawer. Preheating...

User Manual
Page 15
... other connecting facilities. D Reset circuit breakers or replace home fuses. D Service labor during normal working hours. For a Service Agency nearest you specific legal rights. it does not cover their use of the original purchaser's warranty period. D Travel fees and associated charges incurred when the product is for providing electrical wiring and other than normal home use in the 50 states of the U.S.A., the District of installation/occupancy date. D Repairs...
... other connecting facilities. D Reset circuit breakers or replace home fuses. D Service labor during normal working hours. For a Service Agency nearest you specific legal rights. it does not cover their use of the original purchaser's warranty period. D Travel fees and associated charges incurred when the product is for providing electrical wiring and other than normal home use in the 50 states of the U.S.A., the District of installation/occupancy date. D Repairs...


