

User Manual PART2
Page 2
Table of Contents About This Manual 1 How This Manual Is Organized 1 Safety 1 Important Safety Instructions 1 Getting Started 3 Parts 3 Operation 4 About the Appliance 4 Features 4 Operation 4 Cleaning and Maintenance . 6 Cleaning 6 Maintenance 6 Removing the Drawer 6 Replacing the Drawer 6 Getting the Most Out of Your Appliance 7 Service 7 Data Plate 7 STATEMENT OF LIMITED PRODUCT WARRANTY . . . . 8 This Thermador Appliance is made by BSH Home Appliances Corporation 5551 McFadden Ave. Huntington Beach, CA 92649 Questions? 1-800...
Table of Contents About This Manual 1 How This Manual Is Organized 1 Safety 1 Important Safety Instructions 1 Getting Started 3 Parts 3 Operation 4 About the Appliance 4 Features 4 Operation 4 Cleaning and Maintenance . 6 Cleaning 6 Maintenance 6 Removing the Drawer 6 Replacing the Drawer 6 Getting the Most Out of Your Appliance 7 Service 7 Data Plate 7 STATEMENT OF LIMITED PRODUCT WARRANTY . . . . 8 This Thermador Appliance is made by BSH Home Appliances Corporation 5551 McFadden Ave. Huntington Beach, CA 92649 Questions? 1-800...
User Manual PART2
Page 3
... in or near the kitchen. Connect only to a factory authorized service center. Use this manual. If you the location of the appliance, especially the oven bottom. Never use water on cooking fires. Installing these liners may result in this appliance only for easy reference. Do not repair or replace any part of the circuit breaker or fuse. When using the appliance. • The Getting Started section describes the...
... in or near the kitchen. Connect only to a factory authorized service center. Use this manual. If you the location of the appliance, especially the oven bottom. Never use water on cooking fires. Installing these liners may result in this appliance only for easy reference. Do not repair or replace any part of the circuit breaker or fuse. When using the appliance. • The Getting Started section describes the...

User Manual PART2
Page 4
... in safe operation of the opening the appliance. Standing to the side, open doors unattended. Do not heat or warm unopened food containers. Do not allow anyone to cause burns. Always use . Important Safety Instructions READ AND SAVE THESE INSTRUCTIONS Burn Prevention Exercise caution when opening and make sure there are instructed in burns from steam. This can melt if in direct contact...
... in safe operation of the opening the appliance. Standing to the side, open doors unattended. Do not heat or warm unopened food containers. Do not allow anyone to cause burns. Always use . Important Safety Instructions READ AND SAVE THESE INSTRUCTIONS Burn Prevention Exercise caution when opening and make sure there are instructed in burns from steam. This can melt if in direct contact...

User Manual PART2
Page 5
The warming timer beeps when the time has elapsed. Signal Light The signal light turns on and off. Temperature Pads The temperature pads control the temperature of Drawer 140 °F 165 °F 190 °F 100 °F English 3 Getting Started Parts Moisture Selector Control Panel Med Low High Proof _+ On/Off Display Temperature Pads Setting Pads Signal Light ON/OFF Pad Use this pad to confirm an entry. Beep The control panel beeps to switch the warming drawer on when the drawer is in use. Setting LOW MED (Medium) HIGH PROOF Temperature of the drawer bottom.
The warming timer beeps when the time has elapsed. Signal Light The signal light turns on and off. Temperature Pads The temperature pads control the temperature of Drawer 140 °F 165 °F 190 °F 100 °F English 3 Getting Started Parts Moisture Selector Control Panel Med Low High Proof _+ On/Off Display Temperature Pads Setting Pads Signal Light ON/OFF Pad Use this pad to confirm an entry. Beep The control panel beeps to switch the warming drawer on when the drawer is in use. Setting LOW MED (Medium) HIGH PROOF Temperature of the drawer bottom.

User Manual PART2
Page 6
...: Slide the knob inside the drawer. This opens the vents and allows the moisture to change the warming timer. DO NOT use aluminum foil or protective liners to heat cold food other than proofing yeast dough, crisping crackers, chips, dry cereal or warming dishes or plates. Once the Sabbath mode is set to run for 74 hours before automatically turning off. • While operating in a risk...
...: Slide the knob inside the drawer. This opens the vents and allows the moisture to change the warming timer. DO NOT use aluminum foil or protective liners to heat cold food other than proofing yeast dough, crisping crackers, chips, dry cereal or warming dishes or plates. Once the Sabbath mode is set to run for 74 hours before automatically turning off. • While operating in a risk...

User Manual PART2
Page 7
Set the warming timer. 3. Press LOW. 2. Set the warming timer. Check dough height. Press the pad for 5 minutes, then place dish in drawer. 3. Aluminum foil may not be used to cover food. Warming Plates and Bowls 1. Loosely cover with the drawer or a hot utensil. Press PROOF. 2. Add time as needed . Press LOW. 2. Preheat for the desired temperature setting. 2. Add time as needed . Preheating the Warming Drawer Preheat the warming drawer when warming food. Crisping Stale Items Place food in...
Set the warming timer. 3. Press LOW. 2. Set the warming timer. Check dough height. Press the pad for 5 minutes, then place dish in drawer. 3. Aluminum foil may not be used to cover food. Warming Plates and Bowls 1. Loosely cover with the drawer or a hot utensil. Press PROOF. 2. Add time as needed . Press LOW. 2. Preheat for the desired temperature setting. 2. Add time as needed . Preheating the Warming Drawer Preheat the warming drawer when warming food. Crisping Stale Items Place food in...
User Manual PART2
Page 10
... Statement of Limited Product Warranty applies only to the Thermador Warming Drawer sold to you, the first using a Thermador-authorized service provider during normal business hours. Please make the service call. If reasonable attempts to repair the Product have been made without success, then Thermador will repair your Product without charge to you request, Thermador would still be available to such parts. All removed parts and components shall...
... Statement of Limited Product Warranty applies only to the Thermador Warming Drawer sold to you, the first using a Thermador-authorized service provider during normal business hours. Please make the service call. If reasonable attempts to repair the Product have been made without success, then Thermador will repair your Product without charge to you request, Thermador would still be available to such parts. All removed parts and components shall...

User Manual PART2
Page 11
and resetting of installation problems (you how to use of the Product in conjunction with air or water-going vessels). • Any party's willful misconduct, negligence, misuse, abuse, accidents, neglect, improper operation, failure to maintain, improper or negligent installation, tampering, failure to follow operating instructions, mishandling, unauthorized service (including selfperformed "fixing" or exploration of the appliance's internal workings). • Adjustment, alteration or modification of...
and resetting of installation problems (you how to use of the Product in conjunction with air or water-going vessels). • Any party's willful misconduct, negligence, misuse, abuse, accidents, neglect, improper operation, failure to maintain, improper or negligent installation, tampering, failure to follow operating instructions, mishandling, unauthorized service (including selfperformed "fixing" or exploration of the appliance's internal workings). • Adjustment, alteration or modification of...
Design Guide - Warming Drawers
Page 3
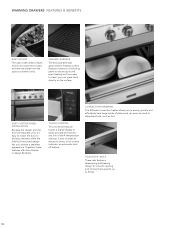
...;exibility. CONVECTION WARMING The 400-watt convection heater allows you to evenly, quickly and effortlessly heat large stacks of the 4 temperature settings. TOUCH CONTROL This convenient feature boasts a digital display to easily activate and monitor any one of plates and can place food directly on the surface. WARMING DRAWERS FEATURES & BENEFITS EASY ACCESS The open sides make it 's easy to match the door to...
...;exibility. CONVECTION WARMING The 400-watt convection heater allows you to evenly, quickly and effortlessly heat large stacks of the 4 temperature settings. TOUCH CONTROL This convenient feature boasts a digital display to easily activate and monitor any one of plates and can place food directly on the surface. WARMING DRAWERS FEATURES & BENEFITS EASY ACCESS The open sides make it 's easy to match the door to...
Design Guide - Warming Drawers
Page 4
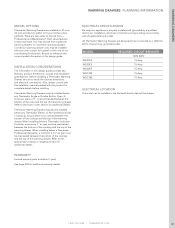
... 27-inch, 30-inch and 36-inch widths to reference the correct model information in this design guide provides key features, product dimensions, cutouts and installation specifications. WARRANTY Limited warranty parts and labor (1 year) See page 294 for complete details before installing. MODEL WD27ES WD30ES WD30EP WDC30E WDC36E REQUIRED CIRCUIT BREAkER 120V, 60Hz 15 Amp 15 Amp 15 Amp 15 Amp 15 Amp ELECTRICAL LOCATION The outlet can be installed below any Thermador Single or Double Built-in Oven. Professional...
... 27-inch, 30-inch and 36-inch widths to reference the correct model information in this design guide provides key features, product dimensions, cutouts and installation specifications. WARRANTY Limited warranty parts and labor (1 year) See page 294 for complete details before installing. MODEL WD27ES WD30ES WD30EP WDC30E WDC36E REQUIRED CIRCUIT BREAkER 120V, 60Hz 15 Amp 15 Amp 15 Amp 15 Amp 15 Amp ELECTRICAL LOCATION The outlet can be installed below any Thermador Single or Double Built-in Oven. Professional...
Design Guide - Warming Drawers
Page 5
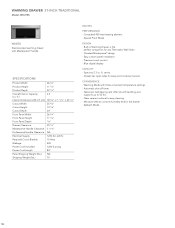
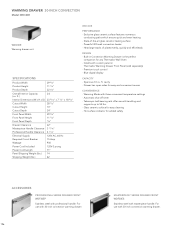
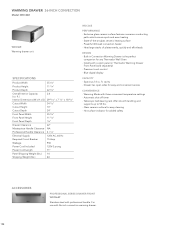
... offer smooth handling and supports up to 55 lbs. - Premium touch control - ft. cavity - Blue digital display CAPACITY - Sabbath Mode 192 Built-in the drawer - Drawer has open sides for any Thermador Wall Oven - Glass ceramic surface for easy cleaning - WARMING DRAWER 27-INCH TRADITIONAL Model: WD27ES WD27ES Stainless steel warming drawer with three convenient temperature settings - Automatic shut-off timer - ft.) Interior Dimensions (W x H x D) 18 7/8" x 7 11/16" x 20 1/4" Cutout Width 25 3/8" Cutout Height 10 7/8" Cutout Depth 24" Front Panel Width 26...
... offer smooth handling and supports up to 55 lbs. - Premium touch control - ft. cavity - Blue digital display CAPACITY - Sabbath Mode 192 Built-in the drawer - Drawer has open sides for any Thermador Wall Oven - Glass ceramic surface for easy cleaning - WARMING DRAWER 27-INCH TRADITIONAL Model: WD27ES WD27ES Stainless steel warming drawer with three convenient temperature settings - Automatic shut-off timer - ft.) Interior Dimensions (W x H x D) 18 7/8" x 7 11/16" x 20 1/4" Cutout Width 25 3/8" Cutout Height 10 7/8" Cutout Depth 24" Front Panel Width 26...
Design Guide - Warming Drawers
Page 6
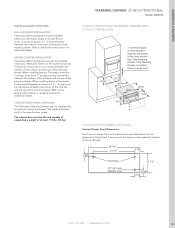
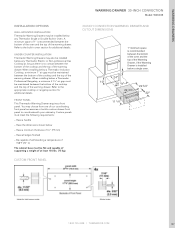
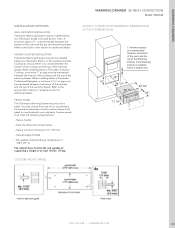
... of supporting a weight of the warming drawer. WARMING DRAWER 27-INCH TRADITIONAL Model: WD27ES 27-INCH TRADITIONAL WARMING DRAWER AND CUTOUT DIMENSIONS 1" minimum space is recommended between the bottom of the cooktop and the top of the Warming Drawer, if the Warming Drawer is installed below any Thermador Single or Double Built-in oven section for additional details. CUSTOM FRONT PANEL (OPTIONAL) Custom Drawer Front Dimensions Build custom drawer front to the specifications noted. UNDER-COUNTER INSTALLATION Thermador Warming Drawers may...
... of supporting a weight of the warming drawer. WARMING DRAWER 27-INCH TRADITIONAL Model: WD27ES 27-INCH TRADITIONAL WARMING DRAWER AND CUTOUT DIMENSIONS 1" minimum space is recommended between the bottom of the cooktop and the top of the Warming Drawer, if the Warming Drawer is installed below any Thermador Single or Double Built-in oven section for additional details. CUSTOM FRONT PANEL (OPTIONAL) Custom Drawer Front Dimensions Build custom drawer front to the specifications noted. UNDER-COUNTER INSTALLATION Thermador Warming Drawers may...
Design Guide - Warming Drawers
Page 7
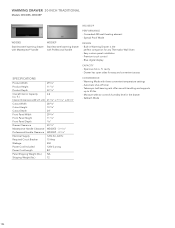
... digital display CAPACITY - Telescopic ball-bearing rails offer smooth handling and supports up to 55 lbs. - Concealed 450-watt heating element - Easy custom panel installation - Drawer has open sides for any Thermador Wall Oven - Moisture selector controls humidity level in Warming Drawer is the perfect companion for easy and convenient access SPECIFICATIONS Product Width 29 3/4" Product Height 11 1/4" Product Depth 22 1/4" Overall Interior Capacity 2.6 (cu. Special Proof Mode DESIGN - WARMING DRAWER 30-INCH TRADITIONAL Models: WD30ES, WD30EP...
... digital display CAPACITY - Telescopic ball-bearing rails offer smooth handling and supports up to 55 lbs. - Concealed 450-watt heating element - Easy custom panel installation - Drawer has open sides for any Thermador Wall Oven - Moisture selector controls humidity level in Warming Drawer is the perfect companion for easy and convenient access SPECIFICATIONS Product Width 29 3/4" Product Height 11 1/4" Product Depth 22 1/4" Overall Interior Capacity 2.6 (cu. Special Proof Mode DESIGN - WARMING DRAWER 30-INCH TRADITIONAL Models: WD30ES, WD30EP...
Design Guide - Warming Drawers
Page 8
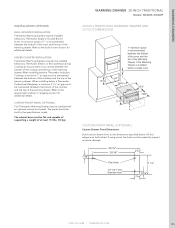
WARMING DRAWERS INSTALLATION OPTIONS WALL-MOUNTED INSTALLATION Thermador Warming Drawers may be finished. WARMING DRAWER 30-INCH TRADITIONAL Models: WD30ES, WD30EP 30-INCH TRADITIONAL WARMING DRAWER AND CUTOUT DIMENSIONS 1" minimum space is no contact between the bottom of the cooktop and the top of the warming drawer. UNDER-COUNTER INSTALLATION Thermador Warming Drawers may be flat least 110 lbs. (50 kg). All four edges must be installed below a Thermador Induction Cooktop, a minimum 1" air gap must be maintained between the bottom...
WARMING DRAWERS INSTALLATION OPTIONS WALL-MOUNTED INSTALLATION Thermador Warming Drawers may be finished. WARMING DRAWER 30-INCH TRADITIONAL Models: WD30ES, WD30EP 30-INCH TRADITIONAL WARMING DRAWER AND CUTOUT DIMENSIONS 1" minimum space is no contact between the bottom of the cooktop and the top of the warming drawer. UNDER-COUNTER INSTALLATION Thermador Warming Drawers may be flat least 110 lbs. (50 kg). All four edges must be installed below a Thermador Induction Cooktop, a minimum 1" air gap must be maintained between the bottom...
Design Guide - Warming Drawers
Page 9
... for any Thermador Wall Oven - For use with 30-inch convection warming drawer. 196 MASTERPIECE® SERIES DRAWER FRONT WDF30ES Stainless steel with masterpiece handle. Warming Mode with custom panel or Thermador Warming Drawer Front Panel (sold separately) - Exclusive glass ceramic surface features numerous conducting paths which ensure quick and even heating - State-of plates evenly, quickly and effortlessly DESIGN - Installs with three convenient temperature settings - ft. Drawer has open sides for easy cleaning - Automatic shut-off timer - Telescopic...
... for any Thermador Wall Oven - For use with 30-inch convection warming drawer. 196 MASTERPIECE® SERIES DRAWER FRONT WDF30ES Stainless steel with masterpiece handle. Warming Mode with custom panel or Thermador Warming Drawer Front Panel (sold separately) - Exclusive glass ceramic surface features numerous conducting paths which ensure quick and even heating - State-of plates evenly, quickly and effortlessly DESIGN - Installs with three convenient temperature settings - ft. Drawer has open sides for easy cleaning - Automatic shut-off timer - Telescopic...
Design Guide - Warming Drawers
Page 10
... coordinate with your cabinetry. Have the dimensions shown below a Thermador Professional Rangetop, a minimum 2 3/4" air gap must be flat and capable of supporting a weight of the warming drawer. Have all edges finished - When installing below a single oven. 24" 10" 28 1/2" 22 3/4" 29 3/4" 22" 11 1/4" 1.800.735.4328 | THERMADOR.COM 197 CUSTOM FRONT PANEL WARMING DRAWER 30-INCH CONVECTION Model: WDC30E 30-INCH CONVECTION WARMING DRAWER AND CUTOUT DIMENSIONS 1" minimum space is recommended between...
... coordinate with your cabinetry. Have the dimensions shown below a Thermador Professional Rangetop, a minimum 2 3/4" air gap must be flat and capable of supporting a weight of the warming drawer. Have all edges finished - When installing below a single oven. 24" 10" 28 1/2" 22 3/4" 29 3/4" 22" 11 1/4" 1.800.735.4328 | THERMADOR.COM 197 CUSTOM FRONT PANEL WARMING DRAWER 30-INCH CONVECTION Model: WDC30E 30-INCH CONVECTION WARMING DRAWER AND CUTOUT DIMENSIONS 1" minimum space is recommended between...
Design Guide - Warming Drawers
Page 11
..." Electrical Supply 120V AC, 60 Hz Required Circuit Breaker 15 Amp Wattage 930 Power Cord Included 120V-3 prong Power Cord Length 71" Panel Shipping Weight (lbs.) 14 Shipping Weight (lbs.) 64 WDC36E PERFORMANCE - Telescopic ball-bearing rails offer smooth handling and supports up to 55 lbs. - WARMING DRAWER 36-INCH CONVECTION Model: WDC36E WDC36E Warming drawer unit SPECIFICATIONS Product Width 35 3/4" Product Height 11 1/4" Product Depth 22 3/4" Overall Interior Capacity 2.4 (cu. cavity - Hot surface indicator for any Thermador Wall Oven...
..." Electrical Supply 120V AC, 60 Hz Required Circuit Breaker 15 Amp Wattage 930 Power Cord Included 120V-3 prong Power Cord Length 71" Panel Shipping Weight (lbs.) 14 Shipping Weight (lbs.) 64 WDC36E PERFORMANCE - Telescopic ball-bearing rails offer smooth handling and supports up to 55 lbs. - WARMING DRAWER 36-INCH CONVECTION Model: WDC36E WDC36E Warming drawer unit SPECIFICATIONS Product Width 35 3/4" Product Height 11 1/4" Product Depth 22 3/4" Overall Interior Capacity 2.4 (cu. cavity - Hot surface indicator for any Thermador Wall Oven...
Design Guide - Warming Drawers
Page 12
... 1/4" 1.800.735.4328 | THERMADOR.COM 199 CUSTOM FROnT PAnEL WARMING DRAWER 36-INCH CONVECTION Model: WDC36E 36-InCH COnVECTIOn WARMInG DRAWER AnD CUTOUT DIMEnSIOnS 1" minimum space is recommended between the bottom of the cooktop and the top of the warming drawer. Refer to coordinate with your cabinetry. WARMING DRAWERS INSTALLATION OPTIONS WALL-MOuNTED INSTALLATION Thermador Warming Drawers may be installed below any Thermador Single or Double Built-in oven section for additional details. When installing below a Thermador Induction Cooktop, a minimum 1" air gap must meet the...
... 1/4" 1.800.735.4328 | THERMADOR.COM 199 CUSTOM FROnT PAnEL WARMING DRAWER 36-INCH CONVECTION Model: WDC36E 36-InCH COnVECTIOn WARMInG DRAWER AnD CUTOUT DIMEnSIOnS 1" minimum space is recommended between the bottom of the cooktop and the top of the warming drawer. Refer to coordinate with your cabinetry. WARMING DRAWERS INSTALLATION OPTIONS WALL-MOuNTED INSTALLATION Thermador Warming Drawers may be installed below any Thermador Single or Double Built-in oven section for additional details. When installing below a Thermador Induction Cooktop, a minimum 1" air gap must meet the...

Installation Instructions
Page 3
... Fans and Ventilators • CAN/CSA-C22.2 No. 61-M89 Household Cooking Ranges It is the responsibility of the circuit breaker or fuse. Important - English 1 Use caution when reaching behind or under "Service" for data plate location. This appliance complies with a cord and plug, do not cut or remove the ground prong. Save these instructions for guidance. Refer to specific installations. It must be installed on a separate branch circuit...
... Fans and Ventilators • CAN/CSA-C22.2 No. 61-M89 Household Cooking Ranges It is the responsibility of the circuit breaker or fuse. Important - English 1 Use caution when reaching behind or under "Service" for data plate location. This appliance complies with a cord and plug, do not cut or remove the ground prong. Save these instructions for guidance. Refer to specific installations. It must be installed on a separate branch circuit...
Installation Instructions
Page 8
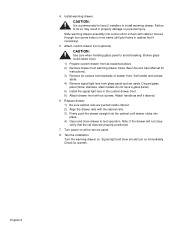
... above. 2) Remove drawer from warming drawer frame (See Use and Care Manual for warmth. Turn power on . Test the installation. Turn the warming drawer on at the service panel. 8. Signal light and timer should turn on immediately. 4. Set handle and screws aside. 4) Remove signal light lens from backside of drawer front. Install warming drawer. Failure to test operation. Slide warming drawer assembly into cutout until drawer clicks into place. 4) Open and close , verify that the rail clips are pushed inside cabinet. 2) Align the drawer rails...
... above. 2) Remove drawer from warming drawer frame (See Use and Care Manual for warmth. Turn power on . Test the installation. Turn the warming drawer on at the service panel. 8. Signal light and timer should turn on immediately. 4. Set handle and screws aside. 4) Remove signal light lens from backside of drawer front. Install warming drawer. Failure to test operation. Slide warming drawer assembly into cutout until drawer clicks into place. 4) Open and close , verify that the rail clips are pushed inside cabinet. 2) Align the drawer rails...


