Installation Instructions
Page 2
... 10 Choosing the Correct Blower 10 Installation Instructions 11 Blower Motor Installation 11 Remote Installation (optional 15 VCIN Model Installation 18 VCIB Model Installation 26 Installing Filters, Filter Spacers, & Grease Trays 28 Service 29 Before Calling Service 29 Product Data Rating Plate 29 Installer Checklist 29 To Clean & Protect Exterior Surfaces 30 THERMADOR® Service, Parts & Accessories back page...
... 10 Choosing the Correct Blower 10 Installation Instructions 11 Blower Motor Installation 11 Remote Installation (optional 15 VCIN Model Installation 18 VCIB Model Installation 26 Installing Filters, Filter Spacers, & Grease Trays 28 Service 29 Before Calling Service 29 Product Data Rating Plate 29 Installer Checklist 29 To Clean & Protect Exterior Surfaces 30 THERMADOR® Service, Parts & Accessories back page...
Installation Instructions
Page 3
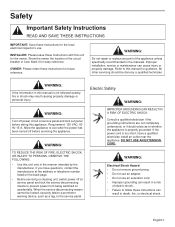
...causing property damage or personal injury. English 1 If you have a qualified electrician install an outlet near the appliance. Safety Important Safety Instructions READ AND SAVE THESE INSTRUCTIONS IMPORTANT: Save these Instructions with this unit for the owner. WARNING: Do not repair or replace any... Hazard • Do not remove ground prong. • Do not use an adapter. • Do not use . INSTALLER: Please leave these Instructions for future reference. WARNING: Turn off at service panel and lock the service disconnecting means to the service panel. DO NOT...
...causing property damage or personal injury. English 1 If you have a qualified electrician install an outlet near the appliance. Safety Important Safety Instructions READ AND SAVE THESE INSTRUCTIONS IMPORTANT: Save these Instructions with this unit for the owner. WARNING: Do not repair or replace any... Hazard • Do not remove ground prong. • Do not use an adapter. • Do not use . INSTALLER: Please leave these Instructions for future reference. WARNING: Turn off at service panel and lock the service disconnecting means to the service panel. DO NOT...
Installation Instructions
Page 4
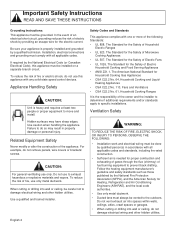
... the risk of the appliance. Important Safety Instructions READ AND SAVE THESE INSTRUCTIONS Grounding Instructions: This appliance must be careful not to damage electrical wiring and other hidden utilities. Be sure your appliance is heavy and requires at least two people or proper equipment to move and install. When cutting or drilling into wall...
... the risk of the appliance. Important Safety Instructions READ AND SAVE THESE INSTRUCTIONS Grounding Instructions: This appliance must be careful not to damage electrical wiring and other hidden utilities. Be sure your appliance is heavy and requires at least two people or proper equipment to move and install. When cutting or drilling into wall...
Installation Instructions
Page 6
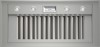
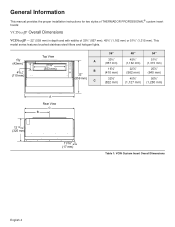
General Information This manual provides the proper installation instructions for two styles of THERMADOR PROFESSIONAL® custom insert hoods: VCINxxJP Overall Dimensions VCINxxJP - 22" (559 mm) in depth and with widths of 33¾" (857 mm), 45¾" (1,162 ...
General Information This manual provides the proper installation instructions for two styles of THERMADOR PROFESSIONAL® custom insert hoods: VCINxxJP Overall Dimensions VCINxxJP - 22" (559 mm) in depth and with widths of 33¾" (857 mm), 45¾" (1,162 ...
Installation Instructions
Page 8
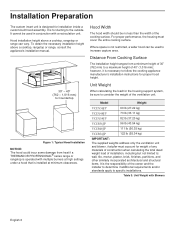
...THERMADOR PROFESSIONAL® series range or rangetop is operated with multiple burners at minimum clearances. Model Weight VCIN36JP 60 lb (27.22 kg) VCIN48JP 73 lb (33.11 kg) VCIN54JP 82 lb (37.20 kg) VCIB36JP 96 lb (43.54 kg) VCIB48JP... width should be used to specific installations. however, it is necessary to follow the cooking appliance manufacturer's installation instructions for installation inside a custom-built hood assembly. Hood installation height above a cooktop, rangetop or range, consult the appliance's installation manual. For proper performance, the housing...
...THERMADOR PROFESSIONAL® series range or rangetop is operated with multiple burners at minimum clearances. Model Weight VCIN36JP 60 lb (27.22 kg) VCIN48JP 73 lb (33.11 kg) VCIN54JP 82 lb (37.20 kg) VCIB36JP 96 lb (43.54 kg) VCIB48JP... width should be used to specific installations. however, it is necessary to follow the cooking appliance manufacturer's installation instructions for installation inside a custom-built hood assembly. Hood installation height above a cooktop, rangetop or range, consult the appliance's installation manual. For proper performance, the housing...
Installation Instructions
Page 13
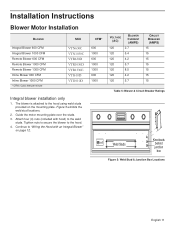
... nuts to secure the blower to the weld studs. Continue to "Wiring the Hood with hood) to the hood. 4. Installation Instructions Blower Motor Installation BLOWER Integral Blower 600 CFM Integral Blower 1000 CFM Remote Blower 600 CFM Remote Blower 1000 CFM Remote Blower 1300 CFM Inline ...Blower 600 CFM Inline Blower 1000 CFM * CFM= Cubic feet per minute SKU VTN630C VTN1030C VTR630D VTR1030D VTR1330E VTI610D VTI1010D Integral blower installation only 1. Figure 5 exhibits the weld stud locations. 2. Guide the motor mounting plate over the studs. 3. CFM* 600 1000 600 1000...
... nuts to secure the blower to the weld studs. Continue to "Wiring the Hood with hood) to the hood. 4. Installation Instructions Blower Motor Installation BLOWER Integral Blower 600 CFM Integral Blower 1000 CFM Remote Blower 600 CFM Remote Blower 1000 CFM Remote Blower 1300 CFM Inline ...Blower 600 CFM Inline Blower 1000 CFM * CFM= Cubic feet per minute SKU VTN630C VTN1030C VTR630D VTR1030D VTR1330E VTI610D VTI1010D Integral blower installation only 1. Figure 5 exhibits the weld stud locations. 2. Guide the motor mounting plate over the studs. 3. CFM* 600 1000 600 1000...
Installation Instructions
Page 14
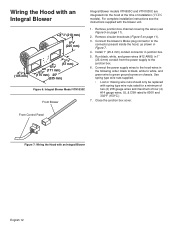
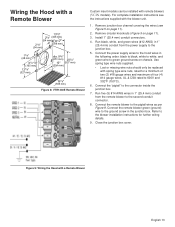
...at the time of four (4) #14 gauge wires, UL & CSA rated to 600V and 302°F (150°C.) 7. For complete installation instructions see Figure 5 on page 11). 2. Install 1" (25.4 mm) conduit connector in the following order: black to black, white to white, and green wire to green ground screw ... 1" (25.4 mm) conduit from the power supply to the hood wires in junction box. 5. Remove junction box channel covering the wires (see the instructions supplied with the blower unit. 1. From Control Panel Figure 7: Wiring the Hood with spring type wire nuts rated for a minimum of two (2) #18...
...at the time of four (4) #14 gauge wires, UL & CSA rated to 600V and 302°F (150°C.) 7. For complete installation instructions see Figure 5 on page 11). 2. Install 1" (25.4 mm) conduit connector in the following order: black to black, white to white, and green wire to green ground screw ... 1" (25.4 mm) conduit from the power supply to the hood wires in junction box. 5. Remove junction box channel covering the wires (see the instructions supplied with the blower unit. 1. From Control Panel Figure 7: Wiring the Hood with spring type wire nuts rated for a minimum of two (2) #18...
Installation Instructions
Page 15
...chassis. Connect the power supply wires to the second conduit connector. 8. For complete installation instructions see Figure 5 on page 11). 3. Close the junction box cover. Remove circular knockouts (Figure 5 on page 11). 2. Install 1" (25.4 mm) conduit connectors. 4. Run five (5) #14 AWG wires... Lost or missing wire nuts should only be installed with remote blowers (VCIN models). Remove junction box channel covering the wires (see the instructions supplied with a Remote Blower English 13 Refer to the blower installation instructions for a minimum of two (2) #18 gauge ...
...chassis. Connect the power supply wires to the second conduit connector. 8. For complete installation instructions see Figure 5 on page 11). 3. Close the junction box cover. Remove circular knockouts (Figure 5 on page 11). 2. Install 1" (25.4 mm) conduit connectors. 4. Run five (5) #14 AWG wires... Lost or missing wire nuts should only be installed with remote blowers (VCIN models). Remove junction box channel covering the wires (see the instructions supplied with a Remote Blower English 13 Refer to the blower installation instructions for a minimum of two (2) #18 gauge ...
Installation Instructions
Page 16
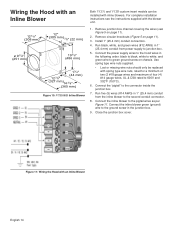
...two (2 #18 gauge wires and maximum of four (4) #14 gauge wires, UL & CSA rated to 600V and 302°F (150°C). 6. Install 1" (25.4 mm) conduit connectors. 4. Connect the power supply wires to green ground screw on chassis. Figure 11: Wiring the Hood with the blower... Figure 10: VTI1010D Inline Blower 1. Use spring type wire nuts supplied. • Lost or missing wire nuts should only be installed with inline blowers. For complete installation instructions see Figure 5 on page 11). 3. Connect the inline blower to the connector inside the junction box. 7. Connect the inline ...
...two (2 #18 gauge wires and maximum of four (4) #14 gauge wires, UL & CSA rated to 600V and 302°F (150°C). 6. Install 1" (25.4 mm) conduit connectors. 4. Connect the power supply wires to green ground screw on chassis. Figure 11: Wiring the Hood with the blower... Figure 10: VTI1010D Inline Blower 1. Use spring type wire nuts supplied. • Lost or missing wire nuts should only be installed with inline blowers. For complete installation instructions see Figure 5 on page 11). 3. Connect the inline blower to the connector inside the junction box. 7. Connect the inline ...
Installation Instructions
Page 24
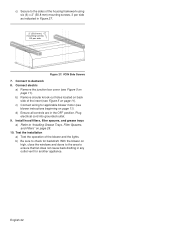
Plug electrical cord into grounded outlet. 9. b) Be sure to check for applicable blower motor (see blower instructions beginning on page 11). Connect to "Installing Grease Trays, Filter Spacers, and Filters" on back side of the housing framework using six (6) x 2" (50.8 mm) mounting screws, 3 ...11). c) Connect wiring for backdraft. b) Remove circular knock-out holes located on page 28. 10. With the blower on page 11). Test the installation a) Test the operation of the blower and the lights. English 22 Connect electric a) Remove the junction box cover (see Figure 5 on high, ...
Plug electrical cord into grounded outlet. 9. b) Be sure to check for applicable blower motor (see blower instructions beginning on page 11). Connect to "Installing Grease Trays, Filter Spacers, and Filters" on back side of the housing framework using six (6) x 2" (50.8 mm) mounting screws, 3 ...11). c) Connect wiring for backdraft. b) Remove circular knock-out holes located on page 28. 10. With the blower on page 11). Test the installation a) Test the operation of the blower and the lights. English 22 Connect electric a) Remove the junction box cover (see Figure 5 on high, ...
Installation Instructions
Page 29
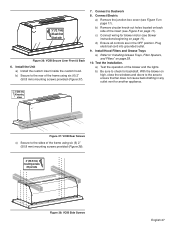
... all controls are in any outlet vent for blower motor (see Figure 5 on page 28. 10. Test the installation. Connect Electric a) Remove the junction box cover (see blower instructions beginning on back side of the blower and the lights. b) Remove circular knock-out holes located on page 11)....page 11). a) Test the operation of the insert (see Figure 5 on high, close the windows and doors to the area to Ductwork 8. Install the Unit a) Install the custom insert inside the custom hood. c) Connect wiring for another appliance. 2" (50.8 mm) X6 mounting screws Figure 37: VCIB Rear...
... all controls are in any outlet vent for blower motor (see Figure 5 on page 28. 10. Test the installation. Connect Electric a) Remove the junction box cover (see blower instructions beginning on back side of the blower and the lights. b) Remove circular knock-out holes located on page 11)....page 11). a) Test the operation of the insert (see Figure 5 on high, close the windows and doors to the area to Ductwork 8. Install the Unit a) Install the custom insert inside the custom hood. c) Connect wiring for another appliance. 2" (50.8 mm) X6 mounting screws Figure 37: VCIB Rear...
Installation Instructions
Page 32
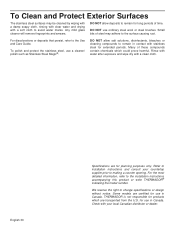
... marks. DO NOT use a cleaner/ polish such as Stainless Steel Magic®. For discolorations or deposits that persist, refer to the installation instructions accompanying this product or write THERMADOR® indicating the model number. Many of time. For the most detailed information, refer to the Use and Care Guide. English 30...with stainless steel for long periods of these compounds contain chemicals which are certified for use in contact with your countertop supplier prior to installation instructions and consult your local Canadian distributor or dealer.
... marks. DO NOT use a cleaner/ polish such as Stainless Steel Magic®. For discolorations or deposits that persist, refer to the installation instructions accompanying this product or write THERMADOR® indicating the model number. Many of time. For the most detailed information, refer to the Use and Care Guide. English 30...with stainless steel for long periods of these compounds contain chemicals which are certified for use in contact with your countertop supplier prior to installation instructions and consult your local Canadian distributor or dealer.
User Manual
Page 6
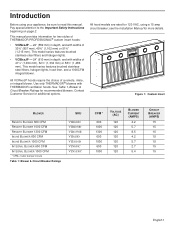
...are rated for 120 VAC, using your appliance, be sure to the Important Safety Instructions beginning on page 2. Figure 1: Custom Insert BLOWER REMOTE BLOWER 600 CFM REMOTE ... blower. See Table 1, Blower & Circuit Breaker Ratings for more details. see the Installation Manual for recommended blowers. Pay special attention to read this manual. Introduction Before using ...Customer Service for two styles of THERMADOR PROFESSIONAL® custom insert hoods: • VCINxxJP - 22" (559 mm) in depth, and with THERMADOR ventilation hoods. Use only THERMADOR® blowers with widths of...
...are rated for 120 VAC, using your appliance, be sure to the Important Safety Instructions beginning on page 2. Figure 1: Custom Insert BLOWER REMOTE BLOWER 600 CFM REMOTE ... blower. See Table 1, Blower & Circuit Breaker Ratings for more details. see the Installation Manual for recommended blowers. Pay special attention to read this manual. Introduction Before using ...Customer Service for two styles of THERMADOR PROFESSIONAL® custom insert hoods: • VCINxxJP - 22" (559 mm) in depth, and with THERMADOR ventilation hoods. Use only THERMADOR® blowers with widths of...

User Manual
Page 7
... sheet, or other metal tray, then turn hood ON when cooking at high settings. Safety Important Safety Instructions READ AND SAVE THESE INSTRUCTIONS Before you have questions, contact the manufacturer (800-735-4328). If you Begin INSTALLER: Please leave this unit only in the event of injury to an exit. b) Before servicing or...
... sheet, or other metal tray, then turn hood ON when cooking at high settings. Safety Important Safety Instructions READ AND SAVE THESE INSTRUCTIONS Before you have questions, contact the manufacturer (800-735-4328). If you Begin INSTALLER: Please leave this unit only in the event of injury to an exit. b) Before servicing or...
User Manual
Page 8
...in an appliance, in use when heating or cooking food. English 3 Clean ventilating fans frequently. They should not be properly installed and grounded by qualified persons. Mark it off. If you the location of this appliance. Contact an authorized servicer. Children ... cabinets above an appliance, or on any questions, contact the manufacturer. CAUTION: Items of an appliance. Important Safety Instructions READ AND SAVE THESE INSTRUCTIONS Whenever possible, do not reach through fire to turn it for easy reference. CAUTION: Grease left alone or unattended ...
...in an appliance, in use when heating or cooking food. English 3 Clean ventilating fans frequently. They should not be properly installed and grounded by qualified persons. Mark it off. If you the location of this appliance. Contact an authorized servicer. Children ... cabinets above an appliance, or on any questions, contact the manufacturer. CAUTION: Items of an appliance. Important Safety Instructions READ AND SAVE THESE INSTRUCTIONS Whenever possible, do not reach through fire to turn it for easy reference. CAUTION: Grease left alone or unattended ...
User Manual
Page 9
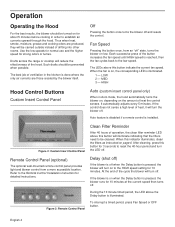
...for 10 minutes. Figure 2: Custom Insert Control Panel Clean Filter Reminder After 40 hours of ventilation in order to the Remote Control Installation Instruction for strong odors or fumes. Refer to establish air currents upward through the hood. If the blower is on when the Delay button... When this button will turn on low. During the 10 minute timed period, the LED above this indicator illuminates, clean the filters as instructed on , the corresponding LED is illuminated. Such drafts should be prevented when possible. The best job of operation, the clean filter reminder...
...for 10 minutes. Figure 2: Custom Insert Control Panel Clean Filter Reminder After 40 hours of ventilation in order to the Remote Control Installation Instruction for strong odors or fumes. Refer to establish air currents upward through the hood. If the blower is on when the Delay button... When this button will turn on low. During the 10 minute timed period, the LED above this indicator illuminates, clean the filters as instructed on , the corresponding LED is illuminated. Such drafts should be prevented when possible. The best job of operation, the clean filter reminder...
User Manual
Page 11
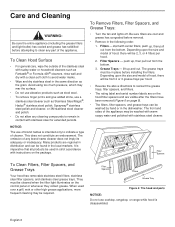
... of cleaner. NOTICE: The use a stainless steel cleaner such as Fantastik® or Formula 409® cleaners, rinse well and dry with instructions on the package. Be sure filters are regional in distribution and can be found in contact with stainless steel cleaner. 2 2 Filters 1 1...- Care and Cleaning WARNING: Be sure the entire appliance (including the grease filters and light bulbs) has cooled and grease has solidified before installing the filters. The omission of hood, there will be cleaned when the filter light illuminates on page 8). • The filters, filter spacers...
... of cleaner. NOTICE: The use a stainless steel cleaner such as Fantastik® or Formula 409® cleaners, rinse well and dry with instructions on the package. Be sure filters are regional in distribution and can be found in contact with stainless steel cleaner. 2 2 Filters 1 1...- Care and Cleaning WARNING: Be sure the entire appliance (including the grease filters and light bulbs) has cooled and grease has solidified before installing the filters. The omission of hood, there will be cleaned when the filter light illuminates on page 8). • The filters, filter spacers...
User Manual
Page 15
... LIABILITY, OR NEGLIGENCE) OR OTHERWISE. Products on external surfaces and exposed parts; Call us at THERMADOR customer service at thermador.com 3. Mail in , or around the Product. English 10 Product Registration Register your product online... willful misconduct, negligence, misuse, abuse, accidents, neglect, improper operation, failure to maintain, improper or negligent installation, tampering, failure to follow operating instructions, mishandling, unauthorized service (including selfperformed "fixing" or exploration of the appliance's internal workings). • Adjustment...
... LIABILITY, OR NEGLIGENCE) OR OTHERWISE. Products on external surfaces and exposed parts; Call us at THERMADOR customer service at thermador.com 3. Mail in , or around the Product. English 10 Product Registration Register your product online... willful misconduct, negligence, misuse, abuse, accidents, neglect, improper operation, failure to maintain, improper or negligent installation, tampering, failure to follow operating instructions, mishandling, unauthorized service (including selfperformed "fixing" or exploration of the appliance's internal workings). • Adjustment...