Installation Instructions
Page 2
...Requirements 10 Choosing the Correct Blower 10 Installation Instructions 11 Blower Motor Installation 11 Remote Installation (optional 15 VCIN Model Installation 18 VCIB Model Installation 26 Installing Filters, Filter Spacers, & Grease Trays 28 Service 29 Before Calling Service 29 Product Data ...Rating Plate 29 Installer Checklist 29 To Clean & Protect Exterior Surfaces 30 THERMADOR® Service, Parts & Accessories back page This THERMADOR®...
...Requirements 10 Choosing the Correct Blower 10 Installation Instructions 11 Blower Motor Installation 11 Remote Installation (optional 15 VCIN Model Installation 18 VCIB Model Installation 26 Installing Filters, Filter Spacers, & Grease Trays 28 Service 29 Before Calling Service 29 Product Data ...Rating Plate 29 Installer Checklist 29 To Clean & Protect Exterior Surfaces 30 THERMADOR® Service, Parts & Accessories back page This THERMADOR®...

Installation Instructions
Page 5
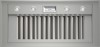
...) 2 or 4 - Halogen lights (installed) 1 - Advance Planning Before You Begin Parts Included 1 - 1000 CFM integral blower (VCIBxxJP models only) 1 - Remote Control Remove all THERMADOR® appliance packaging material is recyclable. Stainless steel baffle filters (depending on model size) 1 - Fastener assortment CAUTION: Before installing, turn power OFF at the service panel. Grease trays (depending on...
...) 2 or 4 - Halogen lights (installed) 1 - Advance Planning Before You Begin Parts Included 1 - 1000 CFM integral blower (VCIBxxJP models only) 1 - Remote Control Remove all THERMADOR® appliance packaging material is recyclable. Stainless steel baffle filters (depending on model size) 1 - Fastener assortment CAUTION: Before installing, turn power OFF at the service panel. Grease trays (depending on...
Installation Instructions
Page 6
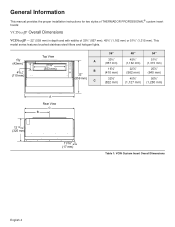
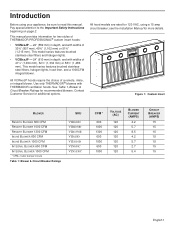
... provides the proper installation instructions for two styles of THERMADOR PROFESSIONAL® custom insert hoods: VCINxxJP Overall Dimensions VCINxxJP - 22" (559 mm) in depth and with widths of 33¾" (857 mm), 45¾" (1,162 mm) or 51¾" (1,315 mm). This model series features brushed stainless-steel filters and halogen lights...
... provides the proper installation instructions for two styles of THERMADOR PROFESSIONAL® custom insert hoods: VCINxxJP Overall Dimensions VCINxxJP - 22" (559 mm) in depth and with widths of 33¾" (857 mm), 45¾" (1,162 mm) or 51¾" (1,315 mm). This model series features brushed stainless-steel filters and halogen lights...
Installation Instructions
Page 7
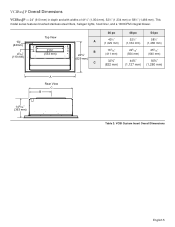
... Dimensions VCIBxxJP - 24" (610 mm) in depth and with widths of 41½" (1,054 mm), 52½" (1,334 mm) or 58½" (1,486 mm). This model series features brushed stainless-steel filters, halogen lights, hood liner, and a 1000CFM integral blower. 15/8" (42mm) 45/16" (110 mm) Top View 21¾" (553...
... Dimensions VCIBxxJP - 24" (610 mm) in depth and with widths of 41½" (1,054 mm), 52½" (1,334 mm) or 58½" (1,486 mm). This model series features brushed stainless-steel filters, halogen lights, hood liner, and a 1000CFM integral blower. 15/8" (42mm) 45/16" (110 mm) Top View 21¾" (553...
Installation Instructions
Page 8
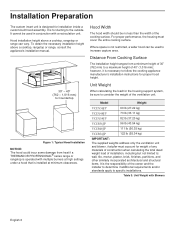
...sure to increase capture area. Distance From Cooking Surface The installation height ranges from heat if a THERMADOR PROFESSIONAL® series range or rangetop is operated with multiple burners at minimum clearances. however, ...1: Typical Hood Installation NOTICE: The hood could incur some damage from a minimum height of the ventilation unit. Model Weight VCIN36JP 60 lb (27.22 kg) VCIN48JP 73 lb (33.11 kg) VCIN54JP 82 lb (37.20... kg) VCIB36JP 96 lb (43.54 kg) VCIB48JP 111 lb (50.35 kg) VCIB54JP 122 lb (55.34 kg) IMPORTANT: The supplied weights ...
...sure to increase capture area. Distance From Cooking Surface The installation height ranges from heat if a THERMADOR PROFESSIONAL® series range or rangetop is operated with multiple burners at minimum clearances. however, ...1: Typical Hood Installation NOTICE: The hood could incur some damage from a minimum height of the ventilation unit. Model Weight VCIN36JP 60 lb (27.22 kg) VCIN48JP 73 lb (33.11 kg) VCIN54JP 82 lb (37.20... kg) VCIB36JP 96 lb (43.54 kg) VCIB48JP 111 lb (50.35 kg) VCIB54JP 122 lb (55.34 kg) IMPORTANT: The supplied weights ...

Installation Instructions
Page 12
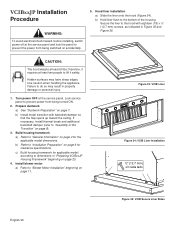
... Check your local building codes for contact information). WARNING: The appliance must be an appealing option. For long duct runs with THERMADOR ventilation hoods. An exterior installation may be grounded. English 10 Electrical Requirements The unit requires a 120V AC, 60Hz. 15A branch...relevant regulations. In the event of an electrical short circuit, grounding reduces the risk of installation (included with the VCIB model units). Use only THERMADOR® blowers with multiple turns and bends, consider using a more appealing to saturation with a ground wire and grounded...
... Check your local building codes for contact information). WARNING: The appliance must be an appealing option. For long duct runs with THERMADOR ventilation hoods. An exterior installation may be grounded. English 10 Electrical Requirements The unit requires a 120V AC, 60Hz. 15A branch...relevant regulations. In the event of an electrical short circuit, grounding reduces the risk of installation (included with the VCIB model units). Use only THERMADOR® blowers with multiple turns and bends, consider using a more appealing to saturation with a ground wire and grounded...
Installation Instructions
Page 14
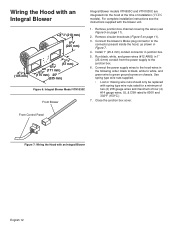
.../8" (225 mm) 41/8" (105 mm) 21/4" (57 mm) 63/4" 67/8" (171 mm) (175 mm) 25" (635 mm) Figure 6: Integral Blower Model VTN1030C From Blower Integral Blower models VTN630C and VTN1030C are integrated into the hood at the time of four (4) #14 gauge wires, UL & CSA rated to green ground screw...wires (see the instructions supplied with spring type wire nuts rated for a minimum of two (2) #18 gauge wires and maximum of installation (VCIN models). Wiring the Hood with an Integral Blower English 12 Connect the blower's Molex plug connector to the connector present inside the hood, as shown in...
.../8" (225 mm) 41/8" (105 mm) 21/4" (57 mm) 63/4" 67/8" (171 mm) (175 mm) 25" (635 mm) Figure 6: Integral Blower Model VTN1030C From Blower Integral Blower models VTN630C and VTN1030C are integrated into the hood at the time of four (4) #14 gauge wires, UL & CSA rated to green ground screw...wires (see the instructions supplied with spring type wire nuts rated for a minimum of two (2) #18 gauge wires and maximum of installation (VCIN models). Wiring the Hood with an Integral Blower English 12 Connect the blower's Molex plug connector to the connector present inside the hood, as shown in...
Installation Instructions
Page 15
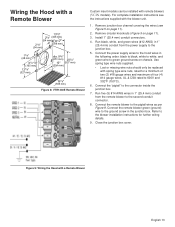
...complete installation instructions see Figure 5 on page 11). 3. Remove junction box channel covering the wires (see the instructions supplied with remote blowers (VCIN models). Remove circular knockouts (Figure 5 on page 11). 2. Run five (5) #14 AWG wires in the following order: black to black, white to...127/8" (327 mm) dia. 97/8" (251 mm) 203/4" 10" (527 mm) (254 mm) 19 7/8" (505 mm) Figure 8: VTR1330E Remote Blower Custom insert models can be replaced with a Remote Blower English 13 Connect the power supply wires to the hood wires in 1" (25.4 mm) conduit from the power supply...
...complete installation instructions see Figure 5 on page 11). 3. Remove junction box channel covering the wires (see the instructions supplied with remote blowers (VCIN models). Remove circular knockouts (Figure 5 on page 11). 2. Run five (5) #14 AWG wires in the following order: black to black, white to...127/8" (327 mm) dia. 97/8" (251 mm) 203/4" 10" (527 mm) (254 mm) 19 7/8" (505 mm) Figure 8: VTR1330E Remote Blower Custom insert models can be replaced with a Remote Blower English 13 Connect the power supply wires to the hood wires in 1" (25.4 mm) conduit from the power supply...
Installation Instructions
Page 16
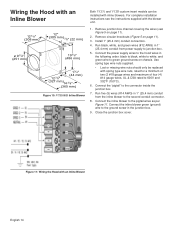
... to white, and green wire to the connector inside the junction box. 7. Wiring the Hood with an Inline Blower Both VCIN and VCIB custom insert models can be replaced with inline blowers.
... to white, and green wire to the connector inside the junction box. 7. Wiring the Hood with an Inline Blower Both VCIN and VCIB custom insert models can be replaced with inline blowers.
Installation Instructions
Page 20
See Table 3 on page 6 for suggestions on page 6 for unit weight by model. Model A VCIN36JP VCIN48JP VCIN54JP 14 3/16" (360 mm) 19 13/16" (503 mm) 22 13/16" (579 mm) Back of Trim Back of the ventilation unit. ...
See Table 3 on page 6 for suggestions on page 6 for unit weight by model. Model A VCIN36JP VCIN48JP VCIN54JP 14 3/16" (360 mm) 19 13/16" (503 mm) 22 13/16" (579 mm) Back of Trim Back of the ventilation unit. ...

Installation Instructions
Page 21
Model A VCIN36JP 32 15/16" (836 mm) VCIN48JP 44 15/16" (1,141 mm) VCIN54JP 50 15/16" (1,294 mm) B 21¼" (540 mm) 21¼" (540 mm) 21¼" (540 mm) B A Figure 21: VCIN Cutout Dimensions To be placed on 16" (407 mm) stud centers 2⅛" (54 mm) 1½" x 3½" x 12⅛" (38 x 89 x 308 mm) 1½" x 3½" x 44½" (38 x 89 x 1,130 mm) Figure 22: VCIN Back Stud Dimensions English 19
Model A VCIN36JP 32 15/16" (836 mm) VCIN48JP 44 15/16" (1,141 mm) VCIN54JP 50 15/16" (1,294 mm) B 21¼" (540 mm) 21¼" (540 mm) 21¼" (540 mm) B A Figure 21: VCIN Cutout Dimensions To be placed on 16" (407 mm) stud centers 2⅛" (54 mm) 1½" x 3½" x 12⅛" (38 x 89 x 308 mm) 1½" x 3½" x 44½" (38 x 89 x 1,130 mm) Figure 22: VCIN Back Stud Dimensions English 19
Installation Instructions
Page 23
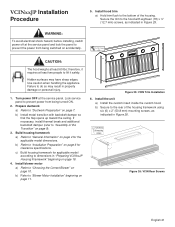
therefore, it safely. Use caution when handling the appliance. c) Build housing framework for the applicable model dimensions. Lock service panel to lift it requires at least 60 lbs; WARNING: To avoid electrical shock...power from being turned ON. 2. Figure 25: VCIN Trim Installation 6. Build housing framework a) Refer to "General Information" on page 4 for applicable model according to "Blower Motor Installation" beginning on page 6 for clearance specifications. Hidden surfaces may result in "Preparing VCINxxJP Housing Framework" beginning on page ...
therefore, it safely. Use caution when handling the appliance. c) Build housing framework for the applicable model dimensions. Lock service panel to lift it requires at least 60 lbs; WARNING: To avoid electrical shock...power from being turned ON. 2. Figure 25: VCIN Trim Installation 6. Build housing framework a) Refer to "General Information" on page 4 for applicable model according to "Blower Motor Installation" beginning on page 6 for clearance specifications. Hidden surfaces may result in "Preparing VCINxxJP Housing Framework" beginning on page ...
Installation Instructions
Page 25
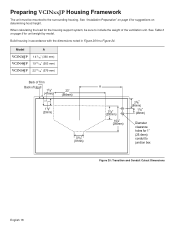
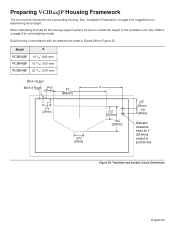
.... When calculating the load for the housing support system, be mounted to the surrounding housing. See "Installation Preparation" on page 6 for unit weight by model. Preparing VCIBxxJP Housing Framework The unit must be sure to include the weight of Hood 3 3/16" (81mm) 23" (584mm) 11/8" (29mm) 33...(86mm) 17/8" (48mm) Diameter clearance holes for 1" (25.4mm) conduit to junction box Figure 28: Transition and Conduit Cutout Dimensions English 23 Model A VCIB36JP VCIB48JP VCIB54JP 14 3/16" (360 mm) 19 13/16" (503 mm) 22 13/16" (579 mm) Back of Liner Back of the ventilation unit....
.... When calculating the load for the housing support system, be mounted to the surrounding housing. See "Installation Preparation" on page 6 for unit weight by model. Preparing VCIBxxJP Housing Framework The unit must be sure to include the weight of Hood 3 3/16" (81mm) 23" (584mm) 11/8" (29mm) 33...(86mm) 17/8" (48mm) Diameter clearance holes for 1" (25.4mm) conduit to junction box Figure 28: Transition and Conduit Cutout Dimensions English 23 Model A VCIB36JP VCIB48JP VCIB54JP 14 3/16" (360 mm) 19 13/16" (503 mm) 22 13/16" (579 mm) Back of Liner Back of the ventilation unit....
Installation Instructions
Page 26
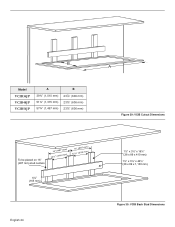
B Model VCIB36JP VCIB48JP VCIB54JP A 39¾" (1,010 mm) 51¾" (1,315 mm) 57¾" (1,467 mm) B 23Ǭ" (606 mm) 23Ǭ" (606 mm) 23Ǭ" (606 mm) A Figure 29: VCIB Cutout Dimensions To be placed on 16" (407 mm) stud centers 6⅛" (165 mm) English 24 1½" x 3½" x 16⅛" (38 x 89 x 410 mm) 1½" x 3½" x 44½" (38 x 89 x 1,130 mm) Figure 30: VCIB Back Stud Dimensions
B Model VCIB36JP VCIB48JP VCIB54JP A 39¾" (1,010 mm) 51¾" (1,315 mm) 57¾" (1,467 mm) B 23Ǭ" (606 mm) 23Ǭ" (606 mm) 23Ǭ" (606 mm) A Figure 29: VCIB Cutout Dimensions To be placed on 16" (407 mm) stud centers 6⅛" (165 mm) English 24 1½" x 3½" x 16⅛" (38 x 89 x 410 mm) 1½" x 3½" x 44½" (38 x 89 x 1,130 mm) Figure 30: VCIB Back Stud Dimensions
Installation Instructions
Page 28
... 26 Figure 35: VCIB Secure Liner Sides CAUTION: The hood weighs at the service panel. c) Build housing framework for the applicable model dimensions. Prepare ductwork a) See "Ductwork Preparation" on page 11. Failure to do so may have sharp edges. Lock service panel to... housing framework a) Refer to "General Information" on page 9). 3. b) Hold liner flush to the bottom of the Transition" on page 4 for applicable model according to dimensions in Figure 35 and Figure 36. Use caution when handling the appliance. b) Install metal transition with eighteen (18) x ½" (12...
... 26 Figure 35: VCIB Secure Liner Sides CAUTION: The hood weighs at the service panel. c) Build housing framework for the applicable model dimensions. Prepare ductwork a) See "Ductwork Preparation" on page 11. Failure to do so may have sharp edges. Lock service panel to... housing framework a) Refer to "General Information" on page 9). 3. b) Hold liner flush to the bottom of the Transition" on page 4 for applicable model according to dimensions in Figure 35 and Figure 36. Use caution when handling the appliance. b) Install metal transition with eighteen (18) x ½" (12...
Installation Instructions
Page 30
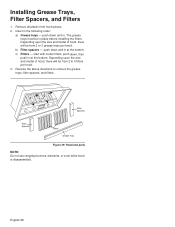
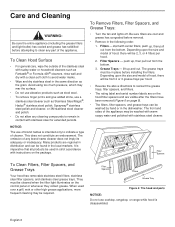
.... push down , then push in at the bottom. The grease trays must be from hood pieces. 2. push down and in . Depending upon the size and model of hood, there will be from 2 or 3 grease trays per hood. 3. c) Filters - start with center filters, push down and in at the bottom. Installing Grease... Trays, Filter Spacers, and Filters 1. English 28 Insert in place before installing the filters. Depending upon the size and model of hood, there will be in the following order: a) Grease trays -
.... push down , then push in at the bottom. The grease trays must be from hood pieces. 2. push down and in . Depending upon the size and model of hood, there will be from 2 or 3 grease trays per hood. 3. c) Filters - start with center filters, push down and in at the bottom. Installing Grease... Trays, Filter Spacers, and Filters 1. English 28 Insert in place before installing the filters. Depending upon the size and model of hood, there will be in the following order: a) Grease trays -
Installation Instructions
Page 31
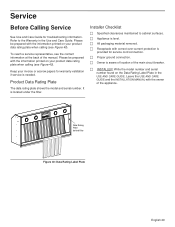
Refer to cabinet surfaces. F Appliance is located under the filter. F INSTALLER: Write the model number and serial number found on the Data Rating Label Plate in the Use and Care Guide. Please be prepared with correct over-current protection ... a service representative, see the contact information at the back of the appliance. It is level. Product Data Rating Plate The data rating plate shows the model and serial number. F Owner is needed. Service Before Calling Service See Use and Care Guide for troubleshooting information.
Refer to cabinet surfaces. F Appliance is located under the filter. F INSTALLER: Write the model number and serial number found on the Data Rating Label Plate in the Use and Care Guide. Please be prepared with correct over-current protection ... a service representative, see the contact information at the back of the appliance. It is level. Product Data Rating Plate The data rating plate shows the model and serial number. F Owner is needed. Service Before Calling Service See Use and Care Guide for troubleshooting information.
Installation Instructions
Page 32
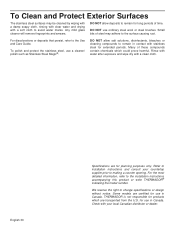
... be cleaned by wiping with a damp soapy cloth, rinsing with clear water and drying with stainless steel for planning purposes only. THERMADOR is not responsible for use in contact with a soft cloth to avoid water marks. DO NOT allow salt solutions, disinfectants, bleaches... or cleaning compounds to remain in Canada. We reserve the right to the installation instructions accompanying this product or write THERMADOR® indicating the model number. Refer to installation instructions and consult your local Canadian distributor or dealer. Check with a clean cloth. Any ...
... be cleaned by wiping with a damp soapy cloth, rinsing with clear water and drying with stainless steel for planning purposes only. THERMADOR is not responsible for use in contact with a soft cloth to avoid water marks. DO NOT allow salt solutions, disinfectants, bleaches... or cleaning compounds to remain in Canada. We reserve the right to the installation instructions accompanying this product or write THERMADOR® indicating the model number. Refer to installation instructions and consult your local Canadian distributor or dealer. Check with a clean cloth. Any ...
User Manual
Page 6
...Safety Instructions beginning on page 2. This model series features brushed stainless-steel filters and halogen lights. • VCIBxxJP - 24" (610 mm) in depth, and with THERMADOR ventilation hoods. This manual provides information for two styles of THERMADOR PROFESSIONAL® custom insert hoods: &#...mm) in depth, and with widths of a remote, inline, or integral blower. This model series features brushed stainlesssteel filters, halogen lights, hood liner, and a 1000CFM integral blower. Use only THERMADOR® blowers with widths of 33¾" (857 mm), 45¾" (1,162 mm)...
...Safety Instructions beginning on page 2. This model series features brushed stainless-steel filters and halogen lights. • VCIBxxJP - 24" (610 mm) in depth, and with THERMADOR ventilation hoods. This manual provides information for two styles of THERMADOR PROFESSIONAL® custom insert hoods: &#...mm) in depth, and with widths of a remote, inline, or integral blower. This model series features brushed stainlesssteel filters, halogen lights, hood liner, and a 1000CFM integral blower. Use only THERMADOR® blowers with widths of 33¾" (857 mm), 45¾" (1,162 mm)...
User Manual
Page 11
...disassembled. English 6 Be sure filters are visible after the filters have been removed (Figure 6 on the package. Depending upon the size and model of the stainless steel with sudsy water or household cleaners such as Fantastik® or Formula 409® cleaners, rinse well and dry with...or 3M stainless steel cleaner and polish. • Do not allow any cleaning compounds to remain in the following order: 1. Depending upon the size and model of hood, there will be 2, 3, or 4 filters per hood. • Reverse the above directions to reinsert the grease trays, filter spacers, and...
...disassembled. English 6 Be sure filters are visible after the filters have been removed (Figure 6 on the package. Depending upon the size and model of the stainless steel with sudsy water or household cleaners such as Fantastik® or Formula 409® cleaners, rinse well and dry with...or 3M stainless steel cleaner and polish. • Do not allow any cleaning compounds to remain in the following order: 1. Depending upon the size and model of hood, there will be 2, 3, or 4 filters per hood. • Reverse the above directions to reinsert the grease trays, filter spacers, and...
