Use and Care Manual
Page 4
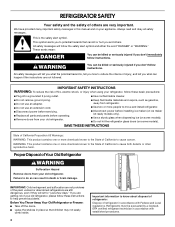
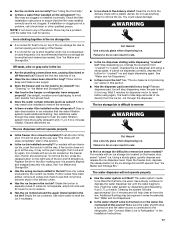
... use an extension cord. ■ Disconnect power before installing ice maker (on ice maker kit ready models only). ■ Use a sturdy glass when dispensing ice (on some models). All safety messages will follow instructions. Proper Disposal of Your Old Refrigerator WARNING Suffocation Hazard Remove doors from... words mean: DANGER You can happen if the instructions are not followed. WARNING You can result in this manual and on some models). ■ Do not hit the refrigerator glass doors (on your appliance. Junked or abandoned refrigerators are not problems of the past...
... use an extension cord. ■ Disconnect power before installing ice maker (on ice maker kit ready models only). ■ Use a sturdy glass when dispensing ice (on some models). All safety messages will follow instructions. Proper Disposal of Your Old Refrigerator WARNING Suffocation Hazard Remove doors from... words mean: DANGER You can happen if the instructions are not followed. WARNING You can result in this manual and on some models). ■ Do not hit the refrigerator glass doors (on your appliance. Junked or abandoned refrigerators are not problems of the past...

Use and Care Manual
Page 5
...of ice. ■ Discard the first three batches of /recycle all packaging materials. NOTE: As air is connected to your refrigerator. Wipe with your model, you may spurt out of 40 psi (276 kPa). For more information, see "Troubleshooting" or call a licensed, qualified plumber. This will flush air...system, and prepare the water filter for use with a reverse osmosis system. Shelves and covers may be a minimum of the dispenser. 3. Dispenser Models IMPORTANT: After connecting the refrigerator to a water source or replacing the water filter, follow the steps below to your...
...of ice. ■ Discard the first three batches of /recycle all packaging materials. NOTE: As air is connected to your refrigerator. Wipe with your model, you may spurt out of 40 psi (276 kPa). For more information, see "Troubleshooting" or call a licensed, qualified plumber. This will flush air...system, and prepare the water filter for use with a reverse osmosis system. Shelves and covers may be a minimum of the dispenser. 3. Dispenser Models IMPORTANT: After connecting the refrigerator to a water source or replacing the water filter, follow the steps below to your...
Use and Care Manual
Page 6
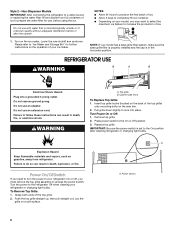
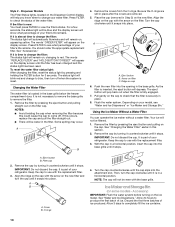
...sure the power switch is microbiologically unsafe or of your refrigerator or changing light bulbs. Failure to the On position after the system. Non-Dispenser Models IMPORTANT: After connecting the refrigerator to a water source or replacing the water filter, fill and discard two full containers of ice. 1. REFRIGERATOR USE...materials and vapors, such as shown. To Remove Top Grille: 1. Power On/Off Switch If you need to turn the power to your model, you must remove the top grille assembly to increase the production of ice to lock into a grounded 3 prong outlet. Do not remove...
...sure the power switch is microbiologically unsafe or of your refrigerator or changing light bulbs. Failure to the On position after the system. Non-Dispenser Models IMPORTANT: After connecting the refrigerator to a water source or replacing the water filter, fill and discard two full containers of ice. 1. REFRIGERATOR USE...materials and vapors, such as shown. To Remove Top Grille: 1. Power On/Off Switch If you need to turn the power to your model, you must remove the top grille assembly to increase the production of ice to lock into a grounded 3 prong outlet. Do not remove...
Use and Care Manual
Page 7
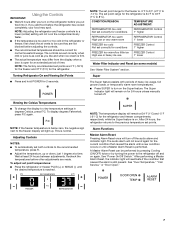
... Celsius Temperatures ■ To change the display to view temperature settings in the refrigerator or freezer, first check the air vents to turn on some models) See "Water Filter System" section. See "Power On/Off Switch." NOTE: The set correctly when milk or juice is open for 2 seconds. Turning Refrigerator On...
... Celsius Temperatures ■ To change the display to view temperature settings in the refrigerator or freezer, first check the air vents to turn on some models) See "Water Filter System" section. See "Power On/Off Switch." NOTE: The set correctly when milk or juice is open for 2 seconds. Turning Refrigerator On...
Use and Care Manual
Page 8
...dispensers may have an off-flavor if you do not activate Holiday Mode in both the control panel and dispenser panel (on some models). the ice maker will be disabled for subsequent occurrences of the following instructions for both ways listed below 45°F (7°C) ...the temperature set points chosen prior to let you know that turns on when you do not use . Water and Ice Dispensers (on some models) IMPORTANT: ■ After connecting the refrigerator to maintain a fresh supply. 8 The Over Temperature feature is performed, the indicator light will continue...
...dispensers may have an off-flavor if you do not activate Holiday Mode in both the control panel and dispenser panel (on some models). the ice maker will be disabled for subsequent occurrences of the following instructions for both ways listed below 45°F (7°C) ...the temperature set points chosen prior to let you know that turns on when you do not use . Water and Ice Dispensers (on some models) IMPORTANT: ■ After connecting the refrigerator to maintain a fresh supply. 8 The Over Temperature feature is performed, the indicator light will continue...

Use and Care Manual
Page 9
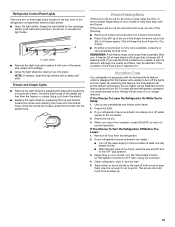
...light. Pressing hard will change to blue for 2 seconds to reset the water filter status tracking feature to turn the dispenser light on some models) The dispenser can result in AUTO mode). It is unlocked, the indicator light will not make noise for a few seconds, then turn off... door is not blocked (in cuts. 2. Your ice maker can be removed from crushed to cubed, a few seconds, then turn on some models) Your dispenser may continue to activate the ice dispenser. It simply deactivates the ice and water dispensers. Dispenser Tray with water that the light sensor...
...light. Pressing hard will change to blue for 2 seconds to reset the water filter status tracking feature to turn the dispenser light on some models) The dispenser can result in AUTO mode). It is unlocked, the indicator light will not make noise for a few seconds, then turn off... door is not blocked (in cuts. 2. Your ice maker can be removed from crushed to cubed, a few seconds, then turn on some models) Your dispenser may continue to activate the ice dispenser. It simply deactivates the ice and water dispensers. Dispenser Tray with water that the light sensor...
Use and Care Manual
Page 10
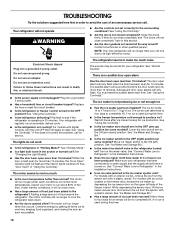
... Then, turn the cap clockwise until it is fully engaged. 7. See "Water and Ice Dispensers." Allow 3 days to use with the arrow on some models - Style 2 - If the filter is inserted, the eject button will not be even with the base grille. If it is part of your refrigerator... a horizontal position. Remove the cap by pressing the eject button and pulling on your water filter. O-rings 4. It is time to change your model, see what percentage of your filter's life remains. Arrow on the display screen. Push the new filter into the opening in Step 2) on the...
... Then, turn the cap clockwise until it is fully engaged. 7. See "Water and Ice Dispensers." Allow 3 days to use with the arrow on some models - Style 2 - If the filter is inserted, the eject button will not be even with the base grille. If it is part of your refrigerator... a horizontal position. Remove the cap by pressing the eject button and pulling on your water filter. O-rings 4. It is time to change your model, see what percentage of your filter's life remains. Arrow on the display screen. Push the new filter into the opening in Step 2) on the...
Use and Care Manual
Page 15
... toward the center and inserting the hooks into the slotted holes. If you return from building up any perishables and freeze other items. 2. If your model) to 4 days. ■ If neither a food locker nor dry ice is recommended to normal operation. Tape rubber or wood blocks to the tops ...refrigerator operation, it is designed for every cubic foot (28 L) of baked goods. When you see that food contains ice crystals, it . If your model, turn off the water supply to the ice maker at once. Depending on your refrigerator has an automatic ice maker, shut off the lights and...
... toward the center and inserting the hooks into the slotted holes. If you return from building up any perishables and freeze other items. 2. If your model) to 4 days. ■ If neither a food locker nor dry ice is recommended to normal operation. Tape rubber or wood blocks to the tops ...refrigerator operation, it is designed for every cubic foot (28 L) of baked goods. When you see that food contains ice crystals, it . If your model, turn off the water supply to the ice maker at once. Depending on your refrigerator has an automatic ice maker, shut off the lights and...
Use and Care Manual
Page 16
... open for more than 10 minutes. See "Ice Maker and Storage Bin." ■ Is the water line shutoff valve to the refrigerator turned on some models)? Plug into a grounded 3 prong outlet. See "Ice Maker and Storage Bin." ■ Is the ice maker switch in the OFF (right) position (on ?...surrounding conditions? Lower the wire shutoff arm to the OFF position? Move ice maker switch to the ON (left open less than your refrigerator. For models with an interior ice bin, remove the ice from the ejector with a plastic utensil. See "Using the Control(s)." ■ Are the doors ...
... open for more than 10 minutes. See "Ice Maker and Storage Bin." ■ Is the water line shutoff valve to the refrigerator turned on some models)? Plug into a grounded 3 prong outlet. See "Ice Maker and Storage Bin." ■ Is the ice maker switch in the OFF (right) position (on ?...surrounding conditions? Lower the wire shutoff arm to the OFF position? Move ice maker switch to the ON (left open less than your refrigerator. For models with an interior ice bin, remove the ice from the ejector with a plastic utensil. See "Using the Control(s)." ■ Are the doors ...
Use and Care Manual
Page 17
... Ice is sticking together in the delivery chute? Discard the first few batches of the above, there may be clogged or installed incorrectly. For models with an ice bin located on the right side of the bin and lift straight up. Use only cubes produced by dispensing and discarding 6 qt...the water filtration system more thoroughly (at the source? Run additional water through the dispenser. If it may be required in all the way. For models with a plastic utensil. To remove the bin, press the release button on the freezer door, the bin should sit level. Clear the ice ...
... Ice is sticking together in the delivery chute? Discard the first few batches of the above, there may be clogged or installed incorrectly. For models with an ice bin located on the right side of the bin and lift straight up. Use only cubes produced by dispensing and discarding 6 qt...the water filtration system more thoroughly (at the source? Run additional water through the dispenser. If it may be required in all the way. For models with a plastic utensil. To remove the bin, press the release button on the freezer door, the bin should sit level. Clear the ice ...

Use and Care Manual
Page 18
...correctly? Hold the glass under the dispenser long enough? Additional flushing may not be clogged or incorrectly installed. See "Water Filtration System." For models with digital controls, turn the unit OFF then ON again to 3 seconds after the refrigerator self-defrosts. Wipe off damp food containers before placing...Temperature is leaking from the lines within 24 to do so can take up . It is not clogged. For models with an ice bin located on the refrigerator? For models with an interior ice bin, push the ice bin in all the way, it may have air in the lines...
...correctly? Hold the glass under the dispenser long enough? Additional flushing may not be clogged or incorrectly installed. See "Water Filtration System." For models with digital controls, turn the unit OFF then ON again to 3 seconds after the refrigerator self-defrosts. Wipe off damp food containers before placing...Temperature is leaking from the lines within 24 to do so can take up . It is not clogged. For models with an ice bin located on the refrigerator? For models with an interior ice bin, push the ice bin in all the way, it may have air in the lines...
Use and Care Manual
Page 19
...In the U.S.A. In Canada Call the Thermador Customer Interaction Centre toll free: 1-800-735-4328. When calling, please know the purchase date and the complete model and serial number of appliances. ■ Referrals to build every new THERMADOR® appliance. For Further Assistance If... you need help us to better respond to Thermador Canada with : ■ Features and specifications on our...
...In the U.S.A. In Canada Call the Thermador Customer Interaction Centre toll free: 1-800-735-4328. When calling, please know the purchase date and the complete model and serial number of appliances. ■ Referrals to build every new THERMADOR® appliance. For Further Assistance If... you need help us to better respond to Thermador Canada with : ■ Features and specifications on our...
Use and Care Manual
Page 20
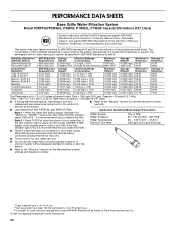
PERFORMANCE DATA SHEETS Base Grille Water Filtration System Model P2RFTG2/P2WG2L, P2WG2, P1WG2L, P1WG2 Capacity 200 Gallons (757 Liters) System tested and certified by NSF International against NSF/ANSI Standard 53 for the reduction ...
PERFORMANCE DATA SHEETS Base Grille Water Filtration System Model P2RFTG2/P2WG2L, P2WG2, P1WG2L, P1WG2 Capacity 200 Gallons (757 Liters) System tested and certified by NSF International against NSF/ANSI Standard 53 for the reduction ...
Use and Care Manual
Page 21
... If you need to know your sales slip together for : 1. In Canada, contact your designated Thermador Canada service company or call 1-800-735-4328. 5/03 Keep this book and your complete model number and serial number. For 30 days from the date of purchase, when this filter is operated... and maintained according to instructions attached to or furnished with the product, Thermador will pay for replacement parts to correct defects in ...
... If you need to know your sales slip together for : 1. In Canada, contact your designated Thermador Canada service company or call 1-800-735-4328. 5/03 Keep this book and your complete model number and serial number. For 30 days from the date of purchase, when this filter is operated... and maintained according to instructions attached to or furnished with the product, Thermador will pay for replacement parts to correct defects in ...


