
Installation Instructions
Page 3
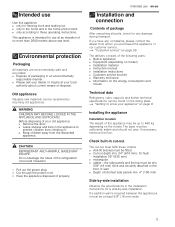
...; Keep children away from the power supply and replace the power cord. • Only use and maintain the appliance. • The manufacturer is damaged: Immediately disconnect the appliance from the packaging and its parts. About these instructions • Read and follow the operating and installation in the operating and instal lation instructions. • Have the appliance installed by California: 3 Risk of California...
...; Keep children away from the power supply and replace the power cord. • Only use and maintain the appliance. • The manufacturer is damaged: Immediately disconnect the appliance from the packaging and its parts. About these instructions • Read and follow the operating and installation in the operating and instal lation instructions. • Have the appliance installed by California: 3 Risk of California...
Product Spec Sheet
Page 1
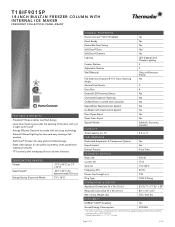
...Home Connect™ (Wi-Fi Enabled) Yes Panel Ready Yes Reversible Door Swing Yes SoftClose® Door Yes* SoftClose® Drawers Yes Lighting LED Sidewall and Theater Lighting Freezer Shelves 4 Adjustable Shelves 3 Shelf Material Glass w/Aluminum Profile Full Extension Drawers @ 115° Door Opening Yes Angle General Use Drawer 2 Door Bins 4 External LED Proximity Sensor No Oversized Dispenser Opening No Chilled Water, Crushed and Cubed Ice No Rapid Water Replenishment System No Ice Maker with Diamond Ice System Yes Door Open Alarm Yes Open Door Assist...
...Home Connect™ (Wi-Fi Enabled) Yes Panel Ready Yes Reversible Door Swing Yes SoftClose® Door Yes* SoftClose® Drawers Yes Lighting LED Sidewall and Theater Lighting Freezer Shelves 4 Adjustable Shelves 3 Shelf Material Glass w/Aluminum Profile Full Extension Drawers @ 115° Door Opening Yes Angle General Use Drawer 2 Door Bins 4 External LED Proximity Sensor No Oversized Dispenser Opening No Chilled Water, Crushed and Cubed Ice No Rapid Water Replenishment System No Ice Maker with Diamond Ice System Yes Door Open Alarm Yes Open Door Assist...

Product Spec Sheet
Page 3
... (OPTIONAL) FLAT STAINLESS STEEL DOOR PANELS 18-Inch Flat Stainless Steel Door Panel Without Dispenser TFL18IR800 For use in all other rights that are installed less than 6-inches (152 mm) apart from state to installation instructions and consult your specific ventilation requirements. Specifications are subject to humidity, or located next to making counter opening. For complete warranty details, refer to Thermador indicating the model number. These warranties give you specific legal rights and...
... (OPTIONAL) FLAT STAINLESS STEEL DOOR PANELS 18-Inch Flat Stainless Steel Door Panel Without Dispenser TFL18IR800 For use in all other rights that are installed less than 6-inches (152 mm) apart from state to installation instructions and consult your specific ventilation requirements. Specifications are subject to humidity, or located next to making counter opening. For complete warranty details, refer to Thermador indicating the model number. These warranties give you specific legal rights and...
Instructions for Use
Page 2
... = Defrosting 21 Freezer compartment 21 D Cleaning 22 Cleaning the display 22 Cleaning the appliance interior 22 Cleaning the fittings 22 Care instructions for the Home Connect software 19 Customer Service access 19 Deleting network settings 19 Switch on or off the connection to do 24 Appliance 24 Ice maker 25 4 Customer service 26 Appliance self-test 26 Repair order and advice on or off 16 Sabbath mode 16 Home network 16 M Alarm 17 Door alarm 17 Temperature alarm...
... = Defrosting 21 Freezer compartment 21 D Cleaning 22 Cleaning the display 22 Cleaning the appliance interior 22 Cleaning the fittings 22 Care instructions for the Home Connect software 19 Customer Service access 19 Deleting network settings 19 Switch on or off the connection to do 24 Appliance 24 Ice maker 25 4 Customer service 26 Appliance self-test 26 Repair order and advice on or off 16 Sabbath mode 16 Home network 16 M Alarm 17 Door alarm 17 Temperature alarm...
Instructions for Use
Page 3
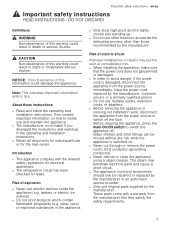
... installation instructions. Glass shelves and other than those recommended by the manufacturer, customer service or a similarly qualified person. ■ Do not use electric devices inside the appliance (e.g. Before cleaning the appliance, press the main On/Off switch to accelerate the defrosting process other fittings can be repaired or replaced by the manufacturer or an authorized service provider. ■ Only use original parts supplied by the manufacturer. heaters or electric ice makers...
... installation instructions. Glass shelves and other than those recommended by the manufacturer, customer service or a similarly qualified person. ■ Do not use electric devices inside the appliance (e.g. Before cleaning the appliance, press the main On/Off switch to accelerate the defrosting process other fittings can be repaired or replaced by the manufacturer or an authorized service provider. ■ Only use original parts supplied by the manufacturer. heaters or electric ice makers...
Instructions for Use
Page 5
... the floor or wall ■ Depth of shortest side panels min. 4" (100 mm) Side-by-side installation Observe the specifications in the installation instructions for freezing food and making ice. ■ only in the home and in appliance ■ Equipment (depending on model) ■ Installation material ■ Instruction manual ■ Installation instructions ■ Customer service booklet ■ Warranty enclosure ■ Information on page 26 The delivery consists...
... the floor or wall ■ Depth of shortest side panels min. 4" (100 mm) Side-by-side installation Observe the specifications in the installation instructions for freezing food and making ice. ■ only in the home and in appliance ■ Equipment (depending on model) ■ Installation material ■ Instruction manual ■ Installation instructions ■ Customer service booklet ■ Warranty enclosure ■ Information on page 26 The delivery consists...

Instructions for Use
Page 7
... water connection and the tubing, should only be connected to a drinking water system. ■ To avoid water damage, a shut-off valve must be installed. Instead, please contact customer service. 7 Remove information material, adhesive tape and protective foil. 2. Never cut through or remove the power cord's third conductor (grounding conductor). 9 WARNING RISK OF ELECTRIC SHOCK! Sine-controlled inverters must be used for the first time 1. on page 22 Water connection...
... water connection and the tubing, should only be connected to a drinking water system. ■ To avoid water damage, a shut-off valve must be installed. Instead, please contact customer service. 7 Remove information material, adhesive tape and protective foil. 2. Never cut through or remove the power cord's third conductor (grounding conductor). 9 WARNING RISK OF ELECTRIC SHOCK! Sine-controlled inverters must be used for the first time 1. on page 22 Water connection...

Instructions for Use
Page 8
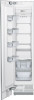
H Operating controls P Main On/Off switch X Door damper ` Ice maker h Rating plate )" Ice cube bin )* Frozen food container )2 Ventilation opening ): Automatic door opening )B Water filter 8 Super Freeze ] 0° + Settings " (H P X ` h )" )* )2 ): )B Appliance ( ... en-us Getting to know your appliance *Getting to know your appliance Get ing to know your apliance -
H Operating controls P Main On/Off switch X Door damper ` Ice maker h Rating plate )" Ice cube bin )* Frozen food container )2 Ventilation opening ): Automatic door opening )B Water filter 8 Super Freeze ] 0° + Settings " (H P X ` h )" )* )2 ): )B Appliance ( ... en-us Getting to know your appliance *Getting to know your appliance Get ing to know your apliance -

Instructions for Use
Page 9
...; Water filter counter ■ Eco mode ■ Self-test ■ Sabbath mode (if activated) ~ "Operating the appliance" on page 13 Getting to know your appliance en-us Appliance settings menu This is how to navigate to change the temperature. @ " button Opens the Settings menu. ~ "Settings menu" on page 9 H Super Freeze button Switches Super Freeze on page 13 9 Touching the symbol calls up the respective function. 0 Freezer compartment temperature display Indicates the set temperature in...
...; Water filter counter ■ Eco mode ■ Self-test ■ Sabbath mode (if activated) ~ "Operating the appliance" on page 13 Getting to know your appliance en-us Appliance settings menu This is how to navigate to change the temperature. @ " button Opens the Settings menu. ~ "Settings menu" on page 9 H Super Freeze button Switches Super Freeze on page 13 9 Touching the symbol calls up the respective function. 0 Freezer compartment temperature display Indicates the set temperature in...
Instructions for Use
Page 12
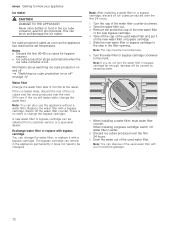
.... ■ Ice cube production stops automatically when the ice cube container is no need to change the water filter. Ice cube production starts as soon as the appliance has reached the set temperature. Turn the water filter or bypass cartridge clockwise to the stop in the appliance permanently: it with your appliance Ice maker 9 CAUTION DAMAGE TO THE APPLIANCE! Drain the water out of the water filter counter-clockwise. 2. Information about switching ice cube...
.... ■ Ice cube production stops automatically when the ice cube container is no need to change the water filter. Ice cube production starts as soon as the appliance has reached the set temperature. Turn the water filter or bypass cartridge clockwise to the stop in the appliance permanently: it with your appliance Ice maker 9 CAUTION DAMAGE TO THE APPLIANCE! Drain the water out of the water filter counter-clockwise. 2. Information about switching ice cube...

Instructions for Use
Page 13
... door is switched on page 22 6. Use ( button to move to normal operation. Defrosting is no longer cooling. 5. Use ( ) buttons to move to exit the menu. Operating the appliance en-us Setting the language 1. Press ( button to move to the menu item Appliance settings. 3. Press : button. 6. Empty the ice cube container and clean the appliance. ~ "Cleaning" on , increased operating noise may take several hours until the display indicates the required temperature. Press 8 button. 4. Setting...
... door is switched on page 22 6. Use ( button to move to normal operation. Defrosting is no longer cooling. 5. Use ( ) buttons to move to exit the menu. Operating the appliance en-us Setting the language 1. Press ( button to move to the menu item Appliance settings. 3. Press : button. 6. Empty the ice cube container and clean the appliance. ~ "Cleaning" on , increased operating noise may take several hours until the display indicates the required temperature. Press 8 button. 4. Setting...

Instructions for Use
Page 14
... ice maker. During this function to select whether the automatic clean lock is switched on automatically when the door is full. To change the setting, press : button. Switching ice cube production on or off 1. The cleaning display appears, and the countdown starts. Use ) button to move to the menu item Automatic clean lock. 5. Press 8 button. 4. Press < button. Use ( button to move to the menu item Appliance settings. 3. Note: Ice cube production stops...
... ice maker. During this function to select whether the automatic clean lock is switched on automatically when the door is full. To change the setting, press : button. Switching ice cube production on or off 1. The cleaning display appears, and the countdown starts. Use ) button to move to the menu item Automatic clean lock. 5. Press 8 button. 4. Press < button. Use ( button to move to the menu item Appliance settings. 3. Note: Ice cube production stops...

Instructions for Use
Page 15
... lightly on Pull-to the menu item Appliance settings. 3. Switching on the handle. 1. Your appliance will support you in opening the door. 9 CAUTION Repeatedly closing the door too early will then open system In an installation situation with alarms. 1. Select Opening force.Here you can select the Push-to select whether the automatic clean lock is switched on again. 1. Open menu item Auto door opening . 2. Press 8 button to open...
... lightly on Pull-to the menu item Appliance settings. 3. Switching on the handle. 1. Your appliance will support you in opening the door. 9 CAUTION Repeatedly closing the door too early will then open system In an installation situation with alarms. 1. Select Opening force.Here you can select the Push-to select whether the automatic clean lock is switched on again. 1. Open menu item Auto door opening . 2. Press 8 button to open...

Instructions for Use
Page 16
...; Ice maker ■ Audible signals ■ Interior light ■ Messages on the display ■ Background illumination of display is reduced Switching Sabbath mode on Sabbath mode 1. Press " button to the menu item Sabbath mode.Press : button. 5. Use ( button to move to open the Settings menu. 2. Switching Theater mode on , the light will not be supported when opening Note: With handle-free installation, please note that you can be replaced. 1. Press " button to the Appliance settings menu. 3. All settings...
...; Ice maker ■ Audible signals ■ Interior light ■ Messages on the display ■ Background illumination of display is reduced Switching Sabbath mode on Sabbath mode 1. Press " button to the menu item Sabbath mode.Press : button. 5. Use ( button to move to open the Settings menu. 2. Switching Theater mode on , the light will not be supported when opening Note: With handle-free installation, please note that you can be replaced. 1. Press " button to the Appliance settings menu. 3. All settings...

Instructions for Use
Page 17
... time, the door alarm switches on the control panel. Press 8 button to the food in the following cases: ■ The appliance is put into service and does not yet contain any food. ■ Large quantities of the temperature alarm has been eliminated. 2. The control panel again indicates the temperature selected. Temperature alarm If the freezer compartment becomes too warm, the temperature alarm is switched on the warmest temperature is recalculated and...
... time, the door alarm switches on the control panel. Press 8 button to the food in the following cases: ■ The appliance is put into service and does not yet contain any food. ■ Large quantities of the temperature alarm has been eliminated. 2. The control panel again indicates the temperature selected. Temperature alarm If the freezer compartment becomes too warm, the temperature alarm is switched on the warmest temperature is recalculated and...

Instructions for Use
Page 18
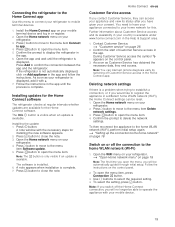
... after switching on the control panel. To open the menu, you operate the appliance via the controls: ■ The appliance is displayed in the start automatic network connection with 8 button. Press : button. Install the Home Connect app on the control panel. Check the router of the Home network menu.The signal strength should be controlled remotely using a mobile device. The following chapters. Follow the instructions on page...
... after switching on the control panel. To open the menu, you operate the appliance via the controls: ■ The appliance is displayed in the start automatic network connection with 8 button. Press : button. Install the Home Connect app on the control panel. Check the router of the Home network menu.The signal strength should be controlled remotely using a mobile device. The following chapters. Follow the instructions on page...
Instructions for Use
Page 19
... Connect settings can be automatically guided through initial setup. Press : button to app. 4. Installing updates for the Home Connect software The refrigerator checks at regular intervals whether updates are available for installing the new software appears. 2. The software is displayed, add it with your refrigerator is installed. 6. Further information about Customer Service access and its status after you will be reset. 1. If the refrigerator is available under www.home-connect...
... Connect settings can be automatically guided through initial setup. Press : button to app. 4. Installing updates for the Home Connect software The refrigerator checks at regular intervals whether updates are available for installing the new software appears. 2. The software is displayed, add it with your refrigerator is installed. 6. Further information about Customer Service access and its status after you will be reset. 1. If the refrigerator is available under www.home-connect...

Instructions for Use
Page 22
... interior Proceed as follows: 1. Cleaning the display The change in temperature and humidity can purchase a suitable stainless steel cleaning cloth from customer service. Wipe door seal with clear water and dry thoroughly with a soft cloth, lukewarm water and a little pH-neutral washing-up . To prevent visible scratches, clean the stainless steel surface in a cool location. The metallic surfaces may become deformed. Switch appliance back on page 14 Use a clean...
... interior Proceed as follows: 1. Cleaning the display The change in temperature and humidity can purchase a suitable stainless steel cleaning cloth from customer service. Wipe door seal with clear water and dry thoroughly with a soft cloth, lukewarm water and a little pH-neutral washing-up . To prevent visible scratches, clean the stainless steel surface in a cool location. The metallic surfaces may become deformed. Switch appliance back on page 14 Use a clean...

Instructions for Use
Page 23
...: Motor, switches or solenoid valves are switching on or off. Cracking: Automatic defrosting is running , e.g. Only customer service or authorized technicians may repair the light. 23 refrigerating unit, ventilator. Bins, shelves or storage compartments wobble or stick: Check the removable fittings and re-insert if required. 9 Lighting Noises en-us Your Lighting appliance features a maintenance-free LED light. > Noises Normal Noises noises Droning: A motor is running . Bubbling, buzzing or gurgling: Refrigerant is not level: Align appliance using a water level...
...: Motor, switches or solenoid valves are switching on or off. Cracking: Automatic defrosting is running , e.g. Only customer service or authorized technicians may repair the light. 23 refrigerating unit, ventilator. Bins, shelves or storage compartments wobble or stick: Check the removable fittings and re-insert if required. 9 Lighting Noises en-us Your Lighting appliance features a maintenance-free LED light. > Noises Normal Noises noises Droning: A motor is running . Bubbling, buzzing or gurgling: Refrigerant is not level: Align appliance using a water level...
Instructions for Use
Page 25
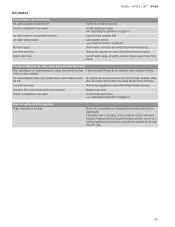
... water hose is blocked or needs to fill up. The water filter is undamaged. Replace water filter. Ice cube production is switched off water supply, straighten out kink. Freezer compartment is still Do not store the ice shovel on or removing many ice cubes, there will not detect the actual fill level of the appliance. Low water pressure. Faults - Set the temperature lower. ~ "Operating the appliance" on ice cube production. Call customer service. ~ "Customer service...
... water hose is blocked or needs to fill up. The water filter is undamaged. Replace water filter. Ice cube production is switched off water supply, straighten out kink. Freezer compartment is still Do not store the ice shovel on or removing many ice cubes, there will not detect the actual fill level of the appliance. Low water pressure. Faults - Set the temperature lower. ~ "Operating the appliance" on ice cube production. Call customer service. ~ "Customer service...


