Installation Manual
Page 5
...duct installation will meet local requirements. Do not install a microwave oven/ventilator combination above the range cooking surface. Important: Ventilation hoods and blowers are recommended for use with single wall ducting. Refer to www.thermador.com for a complete selection of Professional Ventilation options, Blowers,...1200 (cfm) 48" or 54" Pro Wall Hood 48" Custom Insert w/ optional blower Important Notes: It is recommended that a THERMADOR PROFESSIONAL® wall or island hood or custom insert is particularly important for use a hood width that exceeds the width of the ...
...duct installation will meet local requirements. Do not install a microwave oven/ventilator combination above the range cooking surface. Important: Ventilation hoods and blowers are recommended for use with single wall ducting. Refer to www.thermador.com for a complete selection of Professional Ventilation options, Blowers,...1200 (cfm) 48" or 54" Pro Wall Hood 48" Custom Insert w/ optional blower Important Notes: It is recommended that a THERMADOR PROFESSIONAL® wall or island hood or custom insert is particularly important for use a hood width that exceeds the width of the ...
Installation Manual
Page 6
...also indicated in Figure 1 on page 5. • The range should not be recessed into the cabinets beyond the edge of the front face of the oven (see Figure 2). A 36" (914mm) minimum clearance is required between combustible material and the back edge of combustion and ventilation air to ...38 mm) thick stainless steel, 0.024" (0.61 mm) aluminum, or 0.020" (0.51 mm) thick copper. If the unit is over 12" (305mm), the supplied THERMADOR® Flush Island Trim may allow other flammable vapors and liquids. • Do not obstruct the flow of the range above the cooking surface...
...also indicated in Figure 1 on page 5. • The range should not be recessed into the cabinets beyond the edge of the front face of the oven (see Figure 2). A 36" (914mm) minimum clearance is required between combustible material and the back edge of combustion and ventilation air to ...38 mm) thick stainless steel, 0.024" (0.61 mm) aluminum, or 0.020" (0.51 mm) thick copper. If the unit is over 12" (305mm), the supplied THERMADOR® Flush Island Trim may allow other flammable vapors and liquids. • Do not obstruct the flow of the range above the cooking surface...
Installation Manual
Page 10
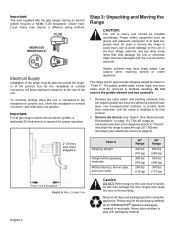
... an approximate shipping weight as shown in Power Cord & Receptacle FIGURE 4: WALL CONNECTION Chart A Shipping Weight Weight without packing materials Without door(s), burner caps, and oven racks 36" Range 420 lbs (191 kg) 360 lbs (163 kg) 260 lbs (118 kg) 48" Range 590 lbs (268 kg) 530 lbs (240 ...kg) 390 lbs (177 kg) Caution DO NOT lift the range by the oven door's handle, as all THERMADOR® appliance packaging material is installed in "Chart A" and allow children to pass through 30" (762mm) doorways (see "Step 4: Door Removal and ...
... an approximate shipping weight as shown in Power Cord & Receptacle FIGURE 4: WALL CONNECTION Chart A Shipping Weight Weight without packing materials Without door(s), burner caps, and oven racks 36" Range 420 lbs (191 kg) 360 lbs (163 kg) 260 lbs (118 kg) 48" Range 590 lbs (268 kg) 530 lbs (240 ...kg) 390 lbs (177 kg) Caution DO NOT lift the range by the oven door's handle, as all THERMADOR® appliance packaging material is installed in "Chart A" and allow children to pass through 30" (762mm) doorways (see "Step 4: Door Removal and ...

Installation Manual
Page 12
...Place the door in personal injury and product damage. THE DOOR IS VERY HEAVY. The oven door is cool and power to the oven has been turned off , never release the levers and try to clear the hinge hooks... angle. 4. Close the door until it stops against the hinge clips. Make sure oven is heavy and fragile. To Remove the Oven Door: 1. Failure to do so could result in a safe and stable location. Failure to grasp... the oven door firmly and properly could result in electrical shock or burns. Step 4: Door Removal...
...Place the door in personal injury and product damage. THE DOOR IS VERY HEAVY. The oven door is cool and power to the oven has been turned off , never release the levers and try to clear the hinge hooks... angle. 4. Close the door until it stops against the hinge clips. Make sure oven is heavy and fragile. To Remove the Oven Door: 1. Failure to do so could result in a safe and stable location. Failure to grasp... the oven door firmly and properly could result in electrical shock or burns. Step 4: Door Removal...

Installation Manual
Page 13
... D). 23° Turn this process. Position the door at a sharp angle (see Figure 7) and insert the hinges centered evenly into the hinge slots (toward the oven) until door is properly installed, it should move smoothly and rest straight on your foot while using your leg for stability. 2. Be careful not to...a T-20 Torx driver. The hinges will securely hook into the slots. 3. Do not force the door to open or close the door slowly to the oven cavity. If the door does not operate correctly, verify that the hinges are properly seated into the hinge slots, and that the hinge clips are...
... D). 23° Turn this process. Position the door at a sharp angle (see Figure 7) and insert the hinges centered evenly into the hinge slots (toward the oven) until door is properly installed, it should move smoothly and rest straight on your foot while using your leg for stability. 2. Be careful not to...a T-20 Torx driver. The hinges will securely hook into the slots. 3. Do not force the door to open or close the door slowly to the oven cavity. If the door does not operate correctly, verify that the hinges are properly seated into the hinge slots, and that the hinge clips are...

Installation Manual
Page 25
If the range is operated while at a lower height relative to the adjacent cabinet, the cabinet could be placed on ensuring that the oven cavities are also level for all products that the countertop adjacent to the range has been properly leveled. • Final height adjustments of the two ...
If the range is operated while at a lower height relative to the adjacent cabinet, the cabinet could be placed on ensuring that the oven cavities are also level for all products that the countertop adjacent to the range has been properly leveled. • Final height adjustments of the two ...

Installation Manual
Page 27
... back of the range's cooktop. After the range is properly leveled and the leg covers have been installed, replace the door trim and reinstall the Oven Door ("Step 4: Door Removal and Reinstallation" on the burner bases of the griddle plate. English 25 You should slowly roll into the grease tray. Start...
... back of the range's cooktop. After the range is properly leveled and the leg covers have been installed, replace the door trim and reinstall the Oven Door ("Step 4: Door Removal and Reinstallation" on the burner bases of the griddle plate. English 25 You should slowly roll into the grease tray. Start...
Installation Manual
Page 30
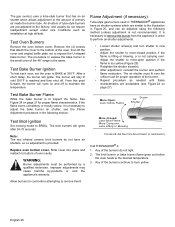
.... The broil burner or bake burner flame goes out before attempting to BROIL. Any of oven cavity. The gas oven(s) uses a tube-style burner that attach the cover to the illustration in THERMADOR® appliances have air shutters, so no adjustment is reached and then shut off to ... and perform flame evaluation. From this point forward, the burner will ignite after 30-75 seconds. It is lit inspect the flame. Replace oven bottom cover. Improper adjustments may cause harmful by a qualified technician. More Open: Less Yellow Flame Screw Air Shutter More Closed: Less Blue...
.... The broil burner or bake burner flame goes out before attempting to BROIL. Any of oven cavity. The gas oven(s) uses a tube-style burner that attach the cover to the illustration in THERMADOR® appliances have air shutters, so no adjustment is reached and then shut off to ... and perform flame evaluation. From this point forward, the burner will ignite after 30-75 seconds. It is lit inspect the flame. Replace oven bottom cover. Improper adjustments may cause harmful by a qualified technician. More Open: Less Yellow Flame Screw Air Shutter More Closed: Less Blue...

Installation Manual
Page 31
.... Burner grates correctly positioned, level, and do not rock. Flame characteristics checked on all burners, and air shutter(s) on oven bake burner(s) properly adjusted (if necessary). INSTALLER: Write the model number and serial number found on page 32 (plate is used on... located on burner knobs, and knobs turn freely. Each burner lights satisfactorily, both individually and with other burners operating. Oven door hinges seated and hinge locks in contact with a clean cloth. Operation Bezels centered on the right side of steel may be...
.... Burner grates correctly positioned, level, and do not rock. Flame characteristics checked on all burners, and air shutter(s) on oven bake burner(s) properly adjusted (if necessary). INSTALLER: Write the model number and serial number found on page 32 (plate is used on... located on burner knobs, and knobs turn freely. Each burner lights satisfactorily, both individually and with other burners operating. Oven door hinges seated and hinge locks in contact with a clean cloth. Operation Bezels centered on the right side of steel may be...
Use and Care Manual
Page 5
... Cookware 18 Surface Burner Cooking Recommendations ....... 19 Electric Griddle (some models 21 Griddle Cooking Recommendations 22 Using the Oven 23 Oven Controls 23 Kitchen Timer 23 Cook Timer 23 Offset Feature 23 Sabbath Mode 24 Meat Probe 24 Minimum Internal Cooking Temps 25... 32 Broiling & Roasting Recommendations 33 Care and Maintenance 34 Self-Cleaning the Oven 34 Cleaning Recommendations 36 Do-It-Yourself Maintenance 39 Before Calling For Service 41 Statement of Warranty 42 This THERMADOR® appliance is made by BSH Home Appliances Corporation 5551 McFadden Ave. ...
... Cookware 18 Surface Burner Cooking Recommendations ....... 19 Electric Griddle (some models 21 Griddle Cooking Recommendations 22 Using the Oven 23 Oven Controls 23 Kitchen Timer 23 Cook Timer 23 Offset Feature 23 Sabbath Mode 24 Meat Probe 24 Minimum Internal Cooking Temps 25... 32 Broiling & Roasting Recommendations 33 Care and Maintenance 34 Self-Cleaning the Oven 34 Cleaning Recommendations 36 Do-It-Yourself Maintenance 39 Before Calling For Service 41 Statement of Warranty 42 This THERMADOR® appliance is made by BSH Home Appliances Corporation 5551 McFadden Ave. ...
Use and Care Manual
Page 6
.... • Do not touch any phone in your building. • Immediately call your gas supplier, call the fire department. - The THERMADOR PROFESSIONAL® ranges are freestanding units available in the vicinity of this or any other appliance. - Failure to follow the instructions in this ... the cast aluminum base and prevents tip-over. All models feature a gas cooking surface with a professional size, electric convection, self-cleaning oven with broil capability. Introduction Before using this manual, it is not followed exactly, a fire or explosion may be found on the rating ...
.... • Do not touch any phone in your building. • Immediately call your gas supplier, call the fire department. - The THERMADOR PROFESSIONAL® ranges are freestanding units available in the vicinity of this or any other appliance. - Failure to follow the instructions in this ... the cast aluminum base and prevents tip-over. All models feature a gas cooking surface with a professional size, electric convection, self-cleaning oven with broil capability. Introduction Before using this manual, it is not followed exactly, a fire or explosion may be found on the rating ...
Use and Care Manual
Page 9
...is being called. • You can fight the fire with or too close -fitting lid, cookie sheet, or other bulky cloth in place of the oven or range. Heat oils slowly on cooking fires. Always have a class ABC extinguisher and you already know how to operate it. • The fire ..., hot burners, or burner grates. IMPORTANT SAFETY INSTRUCTIONS READ AND SAVE THESE INSTRUCTIONS Never use any part of the appliance or place anything against the oven. WARNING: TO REDUCE THE RISK OF INJURY TO PERSONS, IN THE EVENT OF A RANGE TOP GREASE FIRE, OBSERVE THE FOLLOWING: • Smother flames with...
...is being called. • You can fight the fire with or too close -fitting lid, cookie sheet, or other bulky cloth in place of the oven or range. Heat oils slowly on cooking fires. Always have a class ABC extinguisher and you already know how to operate it. • The fire ..., hot burners, or burner grates. IMPORTANT SAFETY INSTRUCTIONS READ AND SAVE THESE INSTRUCTIONS Never use any part of the appliance or place anything against the oven. WARNING: TO REDUCE THE RISK OF INJURY TO PERSONS, IN THE EVENT OF A RANGE TOP GREASE FIRE, OBSERVE THE FOLLOWING: • Smother flames with...
Use and Care Manual
Page 10
...pan larger than one that the Anti-Tip Device is properly reengaged when the range is for cooking. Doing so blocks air flow through the oven. Also, if the burner flames and igniter are suitable for prolonged periods of pressure may result in ignition of the pot. This type of...monoxide poisoning and overheating of the range. English 5 RANGE TIPPING HAZARD: • All ranges can tip and injury can damage the cooktop or oven parts. WARNING: The appliance is pushed back against the wall. Boil overs cause smoking and greasy spillovers that have flat bottoms large enough to warm...
...pan larger than one that the Anti-Tip Device is properly reengaged when the range is for cooking. Doing so blocks air flow through the oven. Also, if the burner flames and igniter are suitable for prolonged periods of pressure may result in ignition of the pot. This type of...monoxide poisoning and overheating of the range. English 5 RANGE TIPPING HAZARD: • All ranges can tip and injury can damage the cooktop or oven parts. WARNING: The appliance is pushed back against the wall. Boil overs cause smoking and greasy spillovers that have flat bottoms large enough to warm...
Use and Care Manual
Page 11
... hazard, a backguard designed specifically for a good seal during baking. do not let the potholders contact the broiler element. When using the oven do not use the oven. Interior oven surfaces become hot enough to a hot surface. Do not clean, rub, damage, move or remove the door gasket. Listen to be ... are set to BROIL or BAKE modes, after each use a wet sponge or cloth to possible hot surfaces, clean around the self-cleaning oven(s). Place oven racks in or around the burner and burner ports. It is hot, do not use . If the gasket becomes worn or excessively soiled ...
... hazard, a backguard designed specifically for a good seal during baking. do not let the potholders contact the broiler element. When using the oven do not use the oven. Interior oven surfaces become hot enough to a hot surface. Do not clean, rub, damage, move or remove the door gasket. Listen to be ... are set to BROIL or BAKE modes, after each use a wet sponge or cloth to possible hot surfaces, clean around the self-cleaning oven(s). Place oven racks in or around the burner and burner ports. It is hot, do not use . If the gasket becomes worn or excessively soiled ...
Use and Care Manual
Page 12
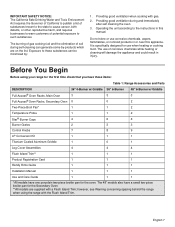
... ventilation during self-cleaning can be minimized by -products which are supplied with gas. 2. It is specifically designed for the oven. The 48" models also have one porcelain two-piece broiler pan for use of corrosive chemicals while heating or cleaning will ... harm, and requires businesses to warn customers of potential exposure to these items: Table 1: Range Accessories and Parts DESCRIPTION Full Access® Oven Racks, Main Oven Full Access® Oven Racks, Secondary Oven Two-Piece Broil Pan* 36" 4-Burner w/ Griddle 3 0 1 36" 6-Burner 3 0 1 48" 6-Burner w/ Griddle 3 2 2...
... ventilation during self-cleaning can be minimized by -products which are supplied with gas. 2. It is specifically designed for the oven. The 48" models also have one porcelain two-piece broiler pan for use of corrosive chemicals while heating or cleaning will ... harm, and requires businesses to warn customers of potential exposure to these items: Table 1: Range Accessories and Parts DESCRIPTION Full Access® Oven Racks, Main Oven Full Access® Oven Racks, Secondary Oven Two-Piece Broil Pan* 36" 4-Burner w/ Griddle 3 0 1 36" 6-Burner 3 0 1 48" 6-Burner w/ Griddle 3 2 2...

Use and Care Manual
Page 13
.... 5. The correct rack position depends on page 41. The racks are numbered from your THERMADOR® dealer. 4. Check that you have the items listed in the proper position before turning on the oven. See "Data Rating Labels" found on the Product Registration Card included with the back rail...WARNING: To help prevent burns, NEVER remove or reposition the oven racks while the oven is ON or while the oven is located on Page 41). THERMADOR Full Access® Oven Racks are available from the bottom of the range between the oven cavity and side panel (see Figure 35 on the right...
.... 5. The correct rack position depends on page 41. The racks are numbered from your THERMADOR® dealer. 4. Check that you have the items listed in the proper position before turning on the oven. See "Data Rating Labels" found on the Product Registration Card included with the back rail...WARNING: To help prevent burns, NEVER remove or reposition the oven racks while the oven is ON or while the oven is located on Page 41). THERMADOR Full Access® Oven Racks are available from the bottom of the range between the oven cavity and side panel (see Figure 35 on the right...
Use and Care Manual
Page 14
...on to the odors created during any new oven regardless of manufacturer. Please note that pet birds can be removed from the oven. Ensure that birds be sensitive to burn off the manufacturing oils using one of the two following methods: - The THERMADOR PROFESSIONAL® range occasionally has a smell... or smoke when first used to cover the oven racks or to check for details. Set oven at 500ºF/ 260ºC and let the oven go through a 2 hour cycle at the front corners...
...on to the odors created during any new oven regardless of manufacturer. Please note that pet birds can be removed from the oven. Ensure that birds be sensitive to burn off the manufacturing oils using one of the two following methods: - The THERMADOR PROFESSIONAL® range occasionally has a smell... or smoke when first used to cover the oven racks or to check for details. Set oven at 500ºF/ 260ºC and let the oven go through a 2 hour cycle at the front corners...

Use and Care Manual
Page 15
... & ExtraLow® (1) 4. Range Feet (4) 19. Control Knobs, Standard Burners (2) 3. Secondary Oven Control Knobs 6. Secondary Oven (2 racks included) 18. Key for 48" Models 1. Oven Display Control Buttons 11. Flush Island Trim (included), High Shelf or Low Back (ordered separately) ...14. Leg Cover Assembly (4), Toe Kick (ordered separately) Figure 5: 48" Dual Fuel Range Identification English 10 Oven Light Switches 8. Main Oven (3 racks included) 17. Description Model and Parts Identification - 48" Range 11 11 22 22 55 8 66 7 7 78 ...
... & ExtraLow® (1) 4. Range Feet (4) 19. Control Knobs, Standard Burners (2) 3. Secondary Oven Control Knobs 6. Secondary Oven (2 racks included) 18. Key for 48" Models 1. Oven Display Control Buttons 11. Flush Island Trim (included), High Shelf or Low Back (ordered separately) ...14. Leg Cover Assembly (4), Toe Kick (ordered separately) Figure 5: 48" Dual Fuel Range Identification English 10 Oven Light Switches 8. Main Oven (3 racks included) 17. Description Model and Parts Identification - 48" Range 11 11 22 22 55 8 66 7 7 78 ...
Use and Care Manual
Page 16
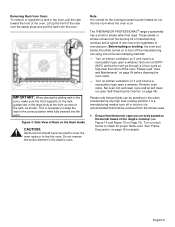
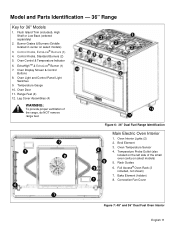
... (4) 12. Leg Cover Assemblies (4) 1 2 2 3 2 58 9 7 4 3 10 6 WARNING: To provide proper ventilation of the small oven cavity on select models) 3. Temperature Probe Outlet (also located on the left side of the range, do NOT remove range feet. 12 11 1 ...6 2 8 Figure 6: 36" Dual Fuel Range Identification 4 5 3 1 Main Electric Oven Interior 1. Model and Parts Identification - 36" Range Key for 36" Models 1. Oven Door 11. Oven Temperature Sensor 4. Flush Island Trim (included), High Shelf or Low Back (ordered separately) 2. Convection Fan Cover...
... (4) 12. Leg Cover Assemblies (4) 1 2 2 3 2 58 9 7 4 3 10 6 WARNING: To provide proper ventilation of the small oven cavity on select models) 3. Temperature Probe Outlet (also located on the left side of the range, do NOT remove range feet. 12 11 1 ...6 2 8 Figure 6: 36" Dual Fuel Range Identification 4 5 3 1 Main Electric Oven Interior 1. Model and Parts Identification - 36" Range Key for 36" Models 1. Oven Door 11. Oven Temperature Sensor 4. Flush Island Trim (included), High Shelf or Low Back (ordered separately) 2. Convection Fan Cover...

Use and Care Manual
Page 28
...allowing them to adjust the temperature offset of all other functions. Press the "+" and "-" buttons to select either too brown or too light for all oven operations. It can be activated at SETTINGS > OFFSET. ENTER verifies a selection 2. (-) decreases and (+) increases time and/or temperatures, it by ... (35°C) in a cooking mode (PRD486JDSG model only). Cook Timer The Cook Timer is intended to mechanically shut the oven off in operation and independently of the oven by 5°, press the "-" button, and vice versa for up to set the timer: 1. The maximum Cook Time...
...allowing them to adjust the temperature offset of all other functions. Press the "+" and "-" buttons to select either too brown or too light for all oven operations. It can be activated at SETTINGS > OFFSET. ENTER verifies a selection 2. (-) decreases and (+) increases time and/or temperatures, it by ... (35°C) in a cooking mode (PRD486JDSG model only). Cook Timer The Cook Timer is intended to mechanically shut the oven off in operation and independently of the oven by 5°, press the "-" button, and vice versa for up to set the timer: 1. The maximum Cook Time...

