
Installation Manual
Page 4
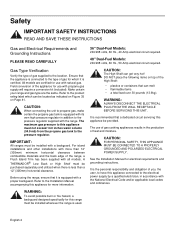
... the back edge of gas for this range must not exceed 14.0" water column (34.9 mb) from the propane gas tank to "Backguard Kit Model Numbers" on page 14 before proceeding with the CAN 1-B149.1 and .2 - CAUTION: To eliminate risk of appliance installation. Important Installation Information Gas ... type of this unit, particular attention should be paid to the hood and duct work installation to assure it meets local building codes. A THERMADOR® Low Back or High Shelf must be installed properly, using the minimum clearances to the location. Due to the high heat capability of...
... the back edge of gas for this range must not exceed 14.0" water column (34.9 mb) from the propane gas tank to "Backguard Kit Model Numbers" on page 14 before proceeding with the CAN 1-B149.1 and .2 - CAUTION: To eliminate risk of appliance installation. Important Installation Information Gas ... type of this unit, particular attention should be paid to the hood and duct work installation to assure it meets local building codes. A THERMADOR® Low Back or High Shelf must be installed properly, using the minimum clearances to the location. Due to the high heat capability of...
Installation Manual
Page 5
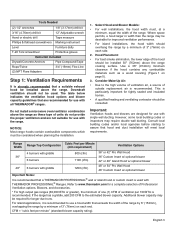
... blower capacity may require double wall ducting. Select Hood and Blower Models: • For wall installations, the hood width must be used with the range. CFM = "cubic feet per 100 BTU is recommended to www.thermador.com for use with single wall ducting. NOTICE: Most range hoods... contain combustible components which must , at a minimum, equal the width of the hood should be required for use with all THERMADOR® ranges. Use a 36" (914mm) minimum clearance if the hood contains any combustible materials such as these type of units do not ...
... blower capacity may require double wall ducting. Select Hood and Blower Models: • For wall installations, the hood width must be used with the range. CFM = "cubic feet per 100 BTU is recommended to www.thermador.com for use with single wall ducting. NOTICE: Most range hoods... contain combustible components which must , at a minimum, equal the width of the hood should be required for use with all THERMADOR® ranges. Use a 36" (914mm) minimum clearance if the hood contains any combustible materials such as these type of units do not ...
Installation Manual
Page 7
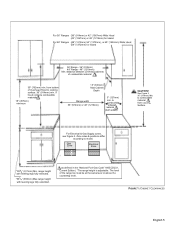
... width 36" (914mm) or 48" (1219mm) 5" (127mm) min. Zone sizes & positions differ according to combustible material from bottom of combustible material 30" (762mm) min. to model. to cooking surface. 36" (914mm) min. For 36" Ranges {36" (914mm) or 42" (1067mm) Wide Hood {42" (1067mm) or 48" (1219mm) for Island For 48...
... width 36" (914mm) or 48" (1219mm) 5" (127mm) min. Zone sizes & positions differ according to combustible material from bottom of combustible material 30" (762mm) min. to model. to cooking surface. 36" (914mm) min. For 36" Ranges {36" (914mm) or 42" (1067mm) Wide Hood {42" (1067mm) or 48" (1219mm) for Island For 48...

Installation Manual
Page 9
Gas and Electric Supply Zones: Model 36" (913mm) 48" (1219mm) A 91/8" (232mm) 231/8" (587mm) B 73/8" (187mm) 7" (178mm) C 73/8" (187mm) 7" (587mm) D 91/8" (232mm) 77/8" (200mm) 10" (254mm) 3" (76mm) A B C 36" (913mm) 48" (1219mm) 2" (...
Gas and Electric Supply Zones: Model 36" (913mm) 48" (1219mm) A 91/8" (232mm) 231/8" (587mm) B 73/8" (187mm) 7" (178mm) C 73/8" (187mm) 7" (587mm) D 91/8" (232mm) 77/8" (200mm) 10" (254mm) 3" (76mm) A B C 36" (913mm) 48" (1219mm) 2" (...
Installation Manual
Page 10
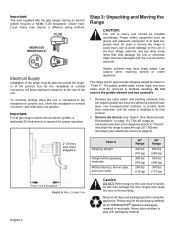
Important: For all gas range models with packaging material. Hidden surfaces may require a different wiring method. This will allow maximum clearance to the receptacle or junction box, orient the receptacle or ... fit incorrectly. Do not remove the griddle element and tray assembly. 1. The grates, griddle plate, burner caps, and oven racks must be removed. Remove all THERMADOR® appliance packaging material is installed in Power Cord & Receptacle FIGURE 4: WALL CONNECTION Chart A Shipping Weight Weight without packing materials Without door(s), burner caps, and...
Important: For all gas range models with packaging material. Hidden surfaces may require a different wiring method. This will allow maximum clearance to the receptacle or junction box, orient the receptacle or ... fit incorrectly. Do not remove the griddle element and tray assembly. 1. The grates, griddle plate, burner caps, and oven racks must be removed. Remove all THERMADOR® appliance packaging material is installed in Power Cord & Receptacle FIGURE 4: WALL CONNECTION Chart A Shipping Weight Weight without packing materials Without door(s), burner caps, and...

Installation Manual
Page 18
... installing, turn power OFF at the service panel. Important: For all applicable local codes and ordinances by a qualified electrician. Installer - Step 7: Electrical Requirements, Connection & Grounding MODEL TYPE 36" 36" with Griddle 48" with a cord and plug, do not cut or remove the ground prong. English 16 This must be in the...
... installing, turn power OFF at the service panel. Important: For all applicable local codes and ordinances by a qualified electrician. Installer - Step 7: Electrical Requirements, Connection & Grounding MODEL TYPE 36" 36" with Griddle 48" with a cord and plug, do not cut or remove the ground prong. English 16 This must be in the...

Installation Manual
Page 23
... gloves to avoid potential laceration to a backguard, install the backsplash first and the backguard second before use. Backguard Installation PRG366JG PRL366JG PRG364JDG PRL364JDG PRG486JDG PRL486JDG AVAILABLE FOR THESE MODELS: Pro Grand® 36" Gas Range 6 Burner Pro Grand® 36" Gas Range 6 Burner - LP Pro Grand® 36" Gas Range 4 Burner Griddle...
... gloves to avoid potential laceration to a backguard, install the backsplash first and the backguard second before use. Backguard Installation PRG366JG PRL366JG PRG364JDG PRL364JDG PRG486JDG PRL486JDG AVAILABLE FOR THESE MODELS: Pro Grand® 36" Gas Range 6 Burner Pro Grand® 36" Gas Range 6 Burner - LP Pro Grand® 36" Gas Range 4 Burner Griddle...

Installation Manual
Page 24
...outside the flange on the front side of the range. Mounts inside side panel flange Mounts inside side panel flange Backguard Kit Model Numbers Model Low Back High Shelf Flush Island Trim 36" PA36JLBG PA36JHSG Included on Range 48" PA48JLBG PA48JHSG Included on Range Backguard Installation ... (5) stainless screws along the back Figure 17: Backguard Rear View 1. When there is over 12" (305mm) or for island installations, the supplied THERMADOR® Flush Island Trim may be attached before sliding the range into the back of the range. 4. Slide the shelf onto the backguard channel. ...
...outside the flange on the front side of the range. Mounts inside side panel flange Mounts inside side panel flange Backguard Kit Model Numbers Model Low Back High Shelf Flush Island Trim 36" PA36JLBG PA36JHSG Included on Range 48" PA48JLBG PA48JHSG Included on Range Backguard Installation ... (5) stainless screws along the back Figure 17: Backguard Rear View 1. When there is over 12" (305mm) or for island installations, the supplied THERMADOR® Flush Island Trim may be attached before sliding the range into the back of the range. 4. Slide the shelf onto the backguard channel. ...

Installation Manual
Page 27
... the leg covers have been installed, replace the door trim and reinstall the Oven Door ("Step 4: Door Removal and Reinstallation" on page 10 for all models) Check the griddle adjustment by one half turn until water slowly flows into the grease tray. Beneath the range, wrap the mated pieces around the...
... the leg covers have been installed, replace the door trim and reinstall the Oven Door ("Step 4: Door Removal and Reinstallation" on page 10 for all models) Check the griddle adjustment by one half turn until water slowly flows into the grease tray. Beneath the range, wrap the mated pieces around the...

Installation Manual
Page 31
.... Flame characteristics checked on all burners, and air shutter(s) on oven bake burner(s) properly adjusted (if necessary). INSTALLER: Write the model number and serial number found on the Rating Label Plate in the USE AND CARE MANUAL on page 32 (plate is level and centered. DO... long periods of time. DO NOT allow salt solutions, disinfectants, bleaches or cleaning compounds to remain in contact with stainless steel for gas range models with electric griddle with a soft cloth to avoid water marks. Small bits of steel may be cleaned by wiping with a damp soapy cloth,...
.... Flame characteristics checked on all burners, and air shutter(s) on oven bake burner(s) properly adjusted (if necessary). INSTALLER: Write the model number and serial number found on the Rating Label Plate in the USE AND CARE MANUAL on page 32 (plate is level and centered. DO... long periods of time. DO NOT allow salt solutions, disinfectants, bleaches or cleaning compounds to remain in contact with stainless steel for gas range models with electric griddle with a soft cloth to avoid water marks. Small bits of steel may be cleaned by wiping with a damp soapy cloth,...
Installation Manual
Page 96
...installation instructions accompanying product or write Thermador indicating model number. Check with a heating and ventilating engineer for your local Canadian distributor or dealer Les spécifications ne sont fournies qu'à titre prévisionnel. Thermador n'est pas responsable des produits ... you have any questions or in your appliance so that your countertop supplier prior to installation instructions and consult your Thermador appliance needs service. Specifications are for products which are transported from the U.S. For the most detailed information, refer ...
...installation instructions accompanying product or write Thermador indicating model number. Check with a heating and ventilating engineer for your local Canadian distributor or dealer Les spécifications ne sont fournies qu'à titre prévisionnel. Thermador n'est pas responsable des produits ... you have any questions or in your appliance so that your countertop supplier prior to installation instructions and consult your Thermador appliance needs service. Specifications are for products which are transported from the U.S. For the most detailed information, refer ...
Use and Care Manual
Page 5
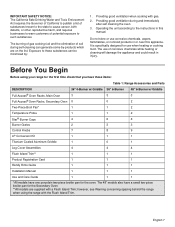
... Range 10 Parts Identification - 36" Range 11 Using The Cooktop 12 Cookware Recommendations 17 Specialty Cookware 18 Surface Burner Cooking Recommendations ....... 19 Electric Griddle (some models 21 Griddle Cooking Recommendations 22 Using the Oven 23 Oven Controls 23 Kitchen Timer 23 Cook Timer 23 Offset Feature 23 Sabbath Mode 24 Meat... 34 Self-Cleaning the Oven 34 Cleaning Recommendations 36 Do-It-Yourself Maintenance 39 Before Calling For Service 41 Statement of Warranty 42 This THERMADOR® appliance is made by BSH Home Appliances Corporation 5551 McFadden Ave.
... Range 10 Parts Identification - 36" Range 11 Using The Cooktop 12 Cookware Recommendations 17 Specialty Cookware 18 Surface Burner Cooking Recommendations ....... 19 Electric Griddle (some models 21 Griddle Cooking Recommendations 22 Using the Oven 23 Oven Controls 23 Kitchen Timer 23 Cook Timer 23 Offset Feature 23 Sabbath Mode 24 Meat... 34 Self-Cleaning the Oven 34 Cleaning Recommendations 36 Do-It-Yourself Maintenance 39 Before Calling For Service 41 Statement of Warranty 42 This THERMADOR® appliance is made by BSH Home Appliances Corporation 5551 McFadden Ave.
Use and Care Manual
Page 6
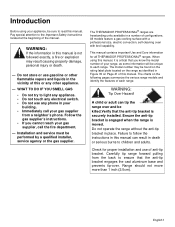
WARNING: Tip Over Hazard! Range should not move more than 1 inch (2.5cm). The THERMADOR PROFESSIONAL® ranges are freestanding units available in a number of the manual. All models feature a gas cooking surface with a professional size, electric convection, self-cleaning oven with broil capability. The ...Do not use of this manual can tip the range over and be sure to children and adults. English 1 Check for all THERMADOR PROFESSIONAL® ranges. WARNING: If the information in place. When using your appliance, be killed.Verify that the anti-tip bracket ...
WARNING: Tip Over Hazard! Range should not move more than 1 inch (2.5cm). The THERMADOR PROFESSIONAL® ranges are freestanding units available in a number of the manual. All models feature a gas cooking surface with a professional size, electric convection, self-cleaning oven with broil capability. The ...Do not use of this manual can tip the range over and be sure to children and adults. English 1 Check for all THERMADOR PROFESSIONAL® ranges. WARNING: If the information in place. When using your appliance, be killed.Verify that the anti-tip bracket ...
Use and Care Manual
Page 7
...gas tank to the type of you, the user, to the electrical power supply by a qualified electrician, in accordance with all models. A THERMADOR® Low Back or High Shelf must be provided. For island installations and other installations with the range. Before using the range,...the range is connected to the pressure regulator. It is equipped with propane gas supply will require a conversion kit (included). All models are the same. The use with a backguard. English 2 Safety IMPORTANT SAFETY INSTRUCTIONS READ AND SAVE THESE INSTRUCTIONS Gas and Electrical ...
...gas tank to the type of you, the user, to the electrical power supply by a qualified electrician, in accordance with all models. A THERMADOR® Low Back or High Shelf must be provided. For island installations and other installations with the range. Before using the range,...the range is connected to the pressure regulator. It is equipped with propane gas supply will require a conversion kit (included). All models are the same. The use with a backguard. English 2 Safety IMPORTANT SAFETY INSTRUCTIONS READ AND SAVE THESE INSTRUCTIONS Gas and Electrical ...

Use and Care Manual
Page 8
... Electrical Code Part 1. Have the range installed and electrically grounded by qualified persons. ALL MODELS: IN CASE OF AN ELECTRICAL FAILURE If for Household Cooking Ranges • CAN/CGA 1.1-M81 Domestic Gas Ranges Check your new THERMADOR PROFESSIONAL® range has been designed to dissipate before using the range. Insure proper installation...
... Electrical Code Part 1. Have the range installed and electrically grounded by qualified persons. ALL MODELS: IN CASE OF AN ELECTRICAL FAILURE If for Household Cooking Ranges • CAN/CGA 1.1-M81 Domestic Gas Ranges Check your new THERMADOR PROFESSIONAL® range has been designed to dissipate before using the range. Insure proper installation...
Use and Care Manual
Page 12
...Griddle 1 0 1 Leg Cover Assemblies 4 4 4 Flush Island Trim** 1 1 1 Product Registration Card 1 1 1 Handy Hints Guide 1 1 1 Installation Manual 1 1 1 Use and Care Guide 1 1 1 *All models have one porcelain two-piece broiler pan for the oven. Providing good ventilation when cooking with the Flush Island Trim. IMPORTANT SAFETY NOTICE: The California... Operating the unit according to such substances. It is specifically designed for the Secondary Oven. **All models are on the list. Before You Begin Before using the range with gas. 2. however, see...
...Griddle 1 0 1 Leg Cover Assemblies 4 4 4 Flush Island Trim** 1 1 1 Product Registration Card 1 1 1 Handy Hints Guide 1 1 1 Installation Manual 1 1 1 Use and Care Guide 1 1 1 *All models have one porcelain two-piece broiler pan for the oven. Providing good ventilation when cooking with the Flush Island Trim. IMPORTANT SAFETY NOTICE: The California... Operating the unit according to such substances. It is specifically designed for the Secondary Oven. **All models are on the list. Before You Begin Before using the range with gas. 2. however, see...

Use and Care Manual
Page 13
The correct rack position depends on all models. The rack positions are available from your THERMADOR® dealer. 4. Rack position 3 is the most frequently used for... Self-Clean, lubricants in the proper position before turning on page 41. Push the rack into position. THERMADOR Full Access® Oven Racks are designed to lock and not tilt while in the oven, hold the... Figure 35 on the Rating Label Plate. Check that you have the items listed in the oven. Record the Model and Serial number on the oven. Enter this information on a rack, pull the rack out to the indicated...
The correct rack position depends on all models. The rack positions are available from your THERMADOR® dealer. 4. Rack position 3 is the most frequently used for... Self-Clean, lubricants in the proper position before turning on page 41. Push the rack into position. THERMADOR Full Access® Oven Racks are designed to lock and not tilt while in the oven, hold the... Figure 35 on the Rating Label Plate. Check that you have the items listed in the oven. Record the Model and Serial number on the oven. Enter this information on a rack, pull the rack out to the indicated...

Use and Care Manual
Page 15
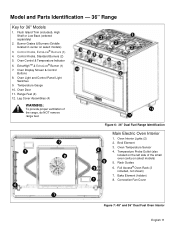
Description Model and Parts Identification - 48" Range 11 11 22 22 55 8 66 7 7 78 7 9 9 1100 9 9 1100 1111 12 12 44 33 11 Figure 4: 48" Dual Fuel Control ... 5: 48" Dual Fuel Range Identification English 10 Control Knobs, ExtraHighTM & ExtraLow® (1) 4. Range Feet (4) 19. Temperature Gauge 9. Control Knobs, ExtraLow® Burners (3) 2. Key for 48" Models 1. Secondary Oven (2 racks included) 18.
Description Model and Parts Identification - 48" Range 11 11 22 22 55 8 66 7 7 78 7 9 9 1100 9 9 1100 1111 12 12 44 33 11 Figure 4: 48" Dual Fuel Control ... 5: 48" Dual Fuel Range Identification English 10 Control Knobs, ExtraHighTM & ExtraLow® (1) 4. Range Feet (4) 19. Temperature Gauge 9. Control Knobs, ExtraLow® Burners (3) 2. Key for 48" Models 1. Secondary Oven (2 racks included) 18.
Use and Care Manual
Page 16
... 1 2 2 3 2 58 9 7 4 3 10 6 WARNING: To provide proper ventilation of the small oven cavity on select models) 3. Rack Guides 6. Control Knobs, ExtraLow® Burners (3) 4. Range Feet (4) 12. Temperature Probe Outlet (also located on the left... Oven Interior 1. Oven Light and Control Panel Light Switches 9. Oven Control & Temperature Indicator 6. Model and Parts Identification - 36" Range Key for 36" Models 1. Burner Grates & Burners (Griddle located in center on select models) 5. Control Knobs, Standard Burners (2) 5. Oven Door 11. Broil Element 3.
... 1 2 2 3 2 58 9 7 4 3 10 6 WARNING: To provide proper ventilation of the small oven cavity on select models) 3. Rack Guides 6. Control Knobs, ExtraLow® Burners (3) 4. Range Feet (4) 12. Temperature Probe Outlet (also located on the left... Oven Interior 1. Oven Light and Control Panel Light Switches 9. Oven Control & Temperature Indicator 6. Model and Parts Identification - 36" Range Key for 36" Models 1. Burner Grates & Burners (Griddle located in center on select models) 5. Control Knobs, Standard Burners (2) 5. Oven Door 11. Broil Element 3.
Use and Care Manual
Page 17
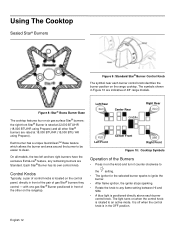
... has its own control knob. Figure 8: Star® Brass Burner Base The cooktop features four or six gas surface Star® burners; On all models, the two left and two right burners have the exclusive ExtraLow® feature, any flame setting between HI and SIM. • A blue light is...Front Center Front XLO XHI Right Front Figure 10: Cooktop Symbols Operation of the Burners • Press in front of the pair of 48" range models. Using The Cooktop Sealed Star® Burners Figure 9: Standard Star® Burner Control Knob The symbol near each burner control knob. The symbols ...
... has its own control knob. Figure 8: Star® Brass Burner Base The cooktop features four or six gas surface Star® burners; On all models, the two left and two right burners have the exclusive ExtraLow® feature, any flame setting between HI and SIM. • A blue light is...Front Center Front XLO XHI Right Front Figure 10: Cooktop Symbols Operation of the Burners • Press in front of the pair of 48" range models. Using The Cooktop Sealed Star® Burners Figure 9: Standard Star® Burner Control Knob The symbol near each burner control knob. The symbols ...


