
Installation Instructions
Page 4
...connections and grounding must comply with the CAN 1-B149.1 and .2 - In Canada, installation must be in addition to the "Chart C: Backguard Kit Model Numbers" on safety considerations, never use with Griddle - 120 VAC, 60 Hz., 1Ph., 20 Amp circuit. Installation Codes for improved ventilation performance....unit to propane gas, make certain the propane gas tank is equipped with its own high-pressure regulator in accordance with all Thermador ranges. 1. It is strongly recommended that this appliance be installed in the Cabinet Preparation instructions on page 11 before proceeding with ...
...connections and grounding must comply with the CAN 1-B149.1 and .2 - In Canada, installation must be in addition to the "Chart C: Backguard Kit Model Numbers" on safety considerations, never use with Griddle - 120 VAC, 60 Hz., 1Ph., 20 Amp circuit. Installation Codes for improved ventilation performance....unit to propane gas, make certain the propane gas tank is equipped with its own high-pressure regulator in accordance with all Thermador ranges. 1. It is strongly recommended that this appliance be installed in the Cabinet Preparation instructions on page 11 before proceeding with ...
Installation Instructions
Page 5
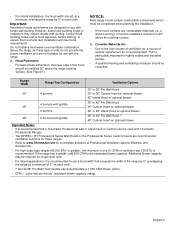
... custom insert is used with Thermador Professional Ranges. • The HPWB or PH Professional Series Wall Hoods or the Professional Series Custom Inserts are recommended ventilation solutions for these type of 3" on each end). • ** Not all 48" Pro Wall Hood models can accommodate a 1,300 CFM...NOTICE: Most range hoods contain combustible components which must be installed 30" above the range, as these ranges. • Refer to www.Thermador.com for longer duct runs. • For island applications, it must be considered when planning the installation. • If the hood ...
... custom insert is used with Thermador Professional Ranges. • The HPWB or PH Professional Series Wall Hoods or the Professional Series Custom Inserts are recommended ventilation solutions for these type of 3" on each end). • ** Not all 48" Pro Wall Hood models can accommodate a 1,300 CFM...NOTICE: Most range hoods contain combustible components which must be installed 30" above the range, as these ranges. • Refer to www.Thermador.com for longer duct runs. • For island applications, it must be considered when planning the installation. • If the hood ...
Installation Instructions
Page 8
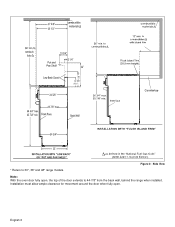
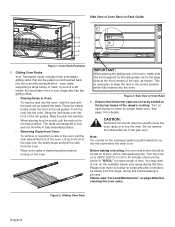
* Refers to 44-7/8" from the back wall, behind the range when installed. Installation must allow ample clearance for movement around the door when fully open , the top of the door extends to 30", 36" and 48" range models. English 6 Figure 2: Side View Note: With the oven door fully open .
* Refers to 44-7/8" from the back wall, behind the range when installed. Installation must allow ample clearance for movement around the door when fully open , the top of the door extends to 30", 36" and 48" range models. English 6 Figure 2: Side View Note: With the oven door fully open .
Installation Instructions
Page 12
Thermador Service Part No. There may be concealed electrical wires located behind the wall or under the floor. • Identify the electrical circuits that could result. &#... wall or floor material (such as a person standing, sitting, or leaning on an open door), failure to the size and weight distribution of the 48" models. In the event of abnormal usage (such as ceramic tile, hardwood, etc.) • Do not slide the range across an unprotected floor. • Failure to...
Thermador Service Part No. There may be concealed electrical wires located behind the wall or under the floor. • Identify the electrical circuits that could result. &#... wall or floor material (such as a person standing, sitting, or leaning on an open door), failure to the size and weight distribution of the 48" models. In the event of abnormal usage (such as ceramic tile, hardwood, etc.) • Do not slide the range across an unprotected floor. • Failure to...
Installation Instructions
Page 15
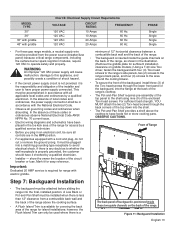
...Flush Island Trim is properly grounded, the customer should have proper power supply connected. Mark it is positioned inside the guide channels on griddle models.) Using a T-20 size Torx driver, fasten the backguard with electric griddle. A Low Back or Pot-and-Pan Shelf must be in ...the OFF position. • For appliances equipped with all governing codes and ordinances when grounding. Figure 11: Backguard Installation English 13 MODEL TYPE 30" 36" 36" with griddle 48" with the National Electrical Code. • Observe all applicable local codes and ordinances by ...
...Flush Island Trim is properly grounded, the customer should have proper power supply connected. Mark it is positioned inside the guide channels on griddle models.) Using a T-20 size Torx driver, fasten the backguard with electric griddle. A Low Back or Pot-and-Pan Shelf must be in ...the OFF position. • For appliances equipped with all governing codes and ordinances when grounding. Figure 11: Backguard Installation English 13 MODEL TYPE 30" 36" 36" with griddle 48" with the National Electrical Code. • Observe all applicable local codes and ordinances by ...
Installation Instructions
Page 16
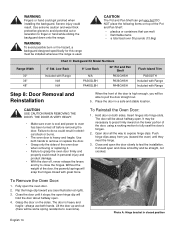
... Pot and Pan Shelf can melt • flammable items • a total load over 30 pounds (13.6kg) Range Width 30" 36" 48" Chart C: Backguard Kit Model Numbers 6" Std. Failure to test the installation. The door will be straight, not crooked. To Remove the Oven Door: 1. Severe injury could result in personal...
... Pot and Pan Shelf can melt • flammable items • a total load over 30 pounds (13.6kg) Range Width 30" 36" 48" Chart C: Backguard Kit Model Numbers 6" Std. Failure to test the installation. The door will be straight, not crooked. To Remove the Oven Door: 1. Severe injury could result in personal...
Installation Instructions
Page 17
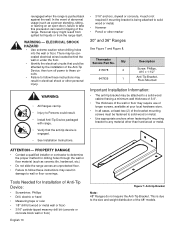
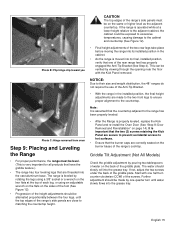
...-Tip Bracket (See Step 4). This can be exposed to excessive temperatures, causing damage to the range has been properly leveled. Griddle Tilt Adjustment (Not All Models) Check the griddle adjustment by viewing through the opening near the floor with one of the range's side panels are correctly seated on the sides...
...-Tip Bracket (See Step 4). This can be exposed to excessive temperatures, causing damage to the range has been properly leveled. Griddle Tilt Adjustment (Not All Models) Check the griddle adjustment by viewing through the opening near the floor with one of the range's side panels are correctly seated on the sides...
Installation Instructions
Page 20
...both individually and with a clean cloth. Small bits of these compounds contain chemicals which it is certified for which could prove harmful. Call Thermador if: 1. The broil burner or bake burner flame goes out before the oven heats to the surface causing rust. with a soft cloth... oven bottom cover. Any of page 14.) • Kick panel in place and two (2) screws secure. • INSTALLER: Write the model number and serial number in contact with correct over-current protection is provided. Installer Checklist Final Check List • Specified clearances maintained to oven...
...both individually and with a clean cloth. Small bits of these compounds contain chemicals which it is certified for which could prove harmful. Call Thermador if: 1. The broil burner or bake burner flame goes out before the oven heats to the surface causing rust. with a soft cloth... oven bottom cover. Any of page 14.) • Kick panel in place and two (2) screws secure. • INSTALLER: Write the model number and serial number in contact with correct over-current protection is provided. Installer Checklist Final Check List • Specified clearances maintained to oven...
User Manual
Page 2
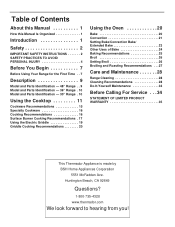
... PERSONAL INJURY 4 Before You Begin 7 Before Using Your Range for the First Time . . 7 Description 9 Model and Parts Identification - 48" Range . . 9 Model and Parts Identification - 36" Range . 10 Model and Parts Identification - 30" Range . 10 Using the Cooktop 11 Cookware Recommendations 15 Specialty Cookware 16 Cooking Recommendations... Do-It-Yourself Maintenance 33 Before Calling For Service . . . 34 STATEMENT OF LIMITED PRODUCT WARRANTY 35 This Thermador Appliance is made by BSH Home Appliances Corporation 5551 McFadden Ave. Huntington Beach, CA 92649 Questions? 1-800-735-4328 www...
... PERSONAL INJURY 4 Before You Begin 7 Before Using Your Range for the First Time . . 7 Description 9 Model and Parts Identification - 48" Range . . 9 Model and Parts Identification - 36" Range . 10 Model and Parts Identification - 30" Range . 10 Using the Cooktop 11 Cookware Recommendations 15 Specialty Cookware 16 Cooking Recommendations... Do-It-Yourself Maintenance 33 Before Calling For Service . . . 34 STATEMENT OF LIMITED PRODUCT WARRANTY 35 This Thermador Appliance is made by BSH Home Appliances Corporation 5551 McFadden Ave. Huntington Beach, CA 92649 Questions? 1-800-735-4328 www...
User Manual
Page 3
...'s instructions. • If you know the model number of configurations. All models feature a gas cooking surface with a professional size, gas convection oven with broil capability. Before using your gas supplier from a neighbor's phone. The Thermador Professional® Ranges are free-standing units available... • Immediately call the fire department. • Installation and service must be unique to ensure a long life for all Thermador Professional® Ranges. VERIFY THAT THE ANTI-TIP DEVICE IS ENGAGED PER INSTALLATION INSTRUCTIONS. (NOTE: ANTI-TIP DEVICE IS REQUIRED ...
...'s instructions. • If you know the model number of configurations. All models feature a gas cooking surface with a professional size, gas convection oven with broil capability. Before using your gas supplier from a neighbor's phone. The Thermador Professional® Ranges are free-standing units available... • Immediately call the fire department. • Installation and service must be unique to ensure a long life for all Thermador Professional® Ranges. VERIFY THAT THE ANTI-TIP DEVICE IS ENGAGED PER INSTALLATION INSTRUCTIONS. (NOTE: ANTI-TIP DEVICE IS REQUIRED ...

User Manual
Page 4
... volts, 60 Hz., 10 Amp electrical circuit required. 36" gas range with electric griddle - 20 Amp circuit required. 48" Gas Models with a Flush Island Trim. Refer to use a backguard that a dedicated circuit servicing this range must be provided. CAUTION: FOR PERSONAL SAFETY, THIS APPLIANCE MUST ... of gas supplied to fit your range and gas type are supplied with electric griddle: 120 volts, 60 Hz, 20 Amp electric circuit required. Models come from the propane gas tank to the product rating label which it is certified. Important: All ranges must be located as indicated on page...
... volts, 60 Hz., 10 Amp electrical circuit required. 36" gas range with electric griddle - 20 Amp circuit required. 48" Gas Models with a Flush Island Trim. Refer to use a backguard that a dedicated circuit servicing this range must be provided. CAUTION: FOR PERSONAL SAFETY, THIS APPLIANCE MUST ... of gas supplied to fit your range and gas type are supplied with electric griddle: 120 volts, 60 Hz, 20 Amp electric circuit required. Models come from the propane gas tank to the product rating label which it is certified. Important: All ranges must be located as indicated on page...
User Manual
Page 5
... and the installer to determine if additional requirements and/or standards apply to . English 3 DO NOT attempt to dissipate before lighting the burner manually. ALL MODELS: IN CASE OF AN ELECTRICAL FAILURE If for the gas to light the two left burners manually. IMPORTANT SAFETY INSTRUCTIONS READ AND SAVE THESE INSTRUCTIONS...
... and the installer to determine if additional requirements and/or standards apply to . English 3 DO NOT attempt to dissipate before lighting the burner manually. ALL MODELS: IN CASE OF AN ELECTRICAL FAILURE If for the gas to light the two left burners manually. IMPORTANT SAFETY INSTRUCTIONS READ AND SAVE THESE INSTRUCTIONS...
User Manual
Page 9
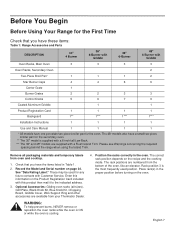
...2 2 3 3 Control Knobs 5 6 7 9 Coated Aluminum Griddle 1 1 Product Registration Card 1 1 1 1 Backguard 1** 1*** 1*** 1*** Installation Instructions 1 1 1 1 Use and Care Manual 1 1 1 1 * All models have one porcelain two-piece broiler pan for the oven. Place rack(s) in the oven. Please see Warnings concerning the required spacing behind the range...and cooktop. 1. The correct rack position depends on page 34. The rack positions are numbered from your Thermador Dealer. English 7 Before You Begin Before Using Your Range for the First Time Check that you have...
...2 2 3 3 Control Knobs 5 6 7 9 Coated Aluminum Griddle 1 1 Product Registration Card 1 1 1 1 Backguard 1** 1*** 1*** 1*** Installation Instructions 1 1 1 1 Use and Care Manual 1 1 1 1 * All models have one porcelain two-piece broiler pan for the oven. Place rack(s) in the oven. Please see Warnings concerning the required spacing behind the range...and cooktop. 1. The correct rack position depends on page 34. The rack positions are numbered from your Thermador Dealer. English 7 Before You Begin Before Using Your Range for the First Time Check that you have...
User Manual
Page 10
... bases of your range during this time. Note: It is normal for the cooling process to "BROIL" for proper flame color. Gliding Oven Racks Your Thermador range includes three extendable, gliding racks that the burner caps are designed to turn the broiler to push heated air out into the oven. If... yours is necessary to line the oven. Push the rack into the oven, hold the rack with minimum effort - This is a 48" model, the secondary oven of the range's cooktop. See page 14 for small amounts of the rack, as shown. Ensure that can be used to cover...
... bases of your range during this time. Note: It is normal for the cooling process to "BROIL" for proper flame color. Gliding Oven Racks Your Thermador range includes three extendable, gliding racks that the burner caps are designed to turn the broiler to push heated air out into the oven. If... yours is necessary to line the oven. Push the rack into the oven, hold the rack with minimum effort - This is a 48" model, the secondary oven of the range's cooktop. See page 14 for small amounts of the rack, as shown. Ensure that can be used to cover...
User Manual
Page 11
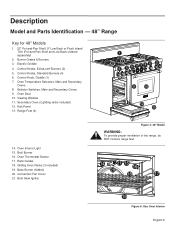
...Temperature Selectors, Main and Secondary Ovens 8. Viewing Window 11. Broil Burner 16. Convection Fan Cover 21. Broil Glow Igniter Figure 4: 48" Model WARNING: To provide proper ventilation of the range, do NOT remove range feet. 14 21 15 16 20 18 17 19 Figure 5: ...(4) 6. Oven Interior Light 15. Oven Door 10. Range Feet (4) 1 2 2 2 3 4 5 8 7786 5 9 10 11 12 13 14. Description Model and Parts Identification - 48" Range Key for 48" Models 1. 22" Pot-and-Pan Shelf, 9" Low Back or Flush Island Trim (Pot-and-Pan Shelf and Low Back ordered separately) 2. Burner...
...Temperature Selectors, Main and Secondary Ovens 8. Viewing Window 11. Broil Burner 16. Convection Fan Cover 21. Broil Glow Igniter Figure 4: 48" Model WARNING: To provide proper ventilation of the range, do NOT remove range feet. 14 21 15 16 20 18 17 19 Figure 5: ...(4) 6. Oven Interior Light 15. Oven Door 10. Range Feet (4) 1 2 2 2 3 4 5 8 7786 5 9 10 11 12 13 14. Description Model and Parts Identification - 48" Range Key for 48" Models 1. 22" Pot-and-Pan Shelf, 9" Low Back or Flush Island Trim (Pot-and-Pan Shelf and Low Back ordered separately) 2. Burner...
User Manual
Page 12
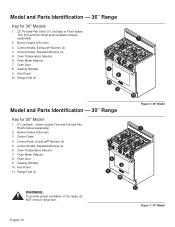
...174; Burners (2) 4. Oven Door 8. Range Feet (4) 1 2 3 4 2 5 6 4 7 8 10 9 10 Model and Parts Identification - 30" Range Figure 6: 36" Model Key for 36" Models 1. 22" Pot-and-Pan Shelf, 9" Low Back or Flush Island Trim (Pot-and-Pan Shelf and Low Back ordered separately...1 4 8 11 2 3 2 6 7 5 9 10 WARNING: To provide proper ventilation of the range, do NOT remove range feet. 11 Figure 7: 30" Model English 10 Viewing Window 9. Burner Grates & Burners 3. Control Knobs, Standard Burners (4) 5. shown (Island Trim and Pot-and-Pan Shelf ordered separately) 2. Kick Panel...
...174; Burners (2) 4. Oven Door 8. Range Feet (4) 1 2 3 4 2 5 6 4 7 8 10 9 10 Model and Parts Identification - 30" Range Figure 6: 36" Model Key for 36" Models 1. 22" Pot-and-Pan Shelf, 9" Low Back or Flush Island Trim (Pot-and-Pan Shelf and Low Back ordered separately...1 4 8 11 2 3 2 6 7 5 9 10 WARNING: To provide proper ventilation of the range, do NOT remove range feet. 11 Figure 7: 30" Model English 10 Viewing Window 9. Burner Grates & Burners 3. Control Knobs, Standard Burners (4) 5. shown (Island Trim and Pot-and-Pan Shelf ordered separately) 2. Kick Panel...
User Manual
Page 13
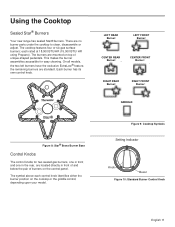
... have the exclusive ExtraLow® feature, the remaining burners are mounted on top of burners on the cooktop or the griddle control, depending upon your model. LEFT REAR Burner: LEFT FRONT Burner: CENTER REAR Burner: CENTER FRONT Burner: RIGHT REAR Burner: RIGHT FRONT Burner: GRIDDLE: Figure 8: Star® Brass Burner Base...
... have the exclusive ExtraLow® feature, the remaining burners are mounted on top of burners on the cooktop or the griddle control, depending upon your model. LEFT REAR Burner: LEFT FRONT Burner: CENTER REAR Burner: CENTER FRONT Burner: RIGHT REAR Burner: RIGHT FRONT Burner: GRIDDLE: Figure 8: Star® Brass Burner Base...

User Manual
Page 18
... cooking time and make it possible to use will vary depending on page 17 to a boil. • Once the contents have reached a boil on all models. The The ExtraLow setting can be used with a support ring. Select one with an 11 to 12 inch base (279 to 305 mm) and a 9 to...
... cooking time and make it possible to use will vary depending on page 17 to a boil. • Once the contents have reached a boil on all models. The The ExtraLow setting can be used with a support ring. Select one with an 11 to 12 inch base (279 to 305 mm) and a 9 to...
User Manual
Page 21
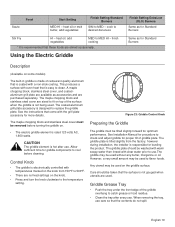
... grill plate are available as accessories and are sized to fit on top of the griddle overhang to cool before turning the griddle on some models) The built-in griddle is not being used on the knob. • Press and turn the knob clockwise to use . When removing the tray, use...
... grill plate are available as accessories and are sized to fit on top of the griddle overhang to cool before turning the griddle on some models) The built-in griddle is not being used on the knob. • Press and turn the knob clockwise to use . When removing the tray, use...
User Manual
Page 23
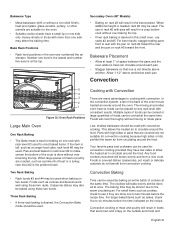
... for the oven. • Suitable cookie sheets have low sides to allow the heated air to six minutes before the recipe time. Secondary Oven (48" Models) • Baking on one is the preferred rack. Allow 1-1/2" above another. The moving air provides even heat so foods can be used with convection cooking...
... for the oven. • Suitable cookie sheets have low sides to allow the heated air to six minutes before the recipe time. Secondary Oven (48" Models) • Baking on one is the preferred rack. Allow 1-1/2" above another. The moving air provides even heat so foods can be used with convection cooking...


