Installation Instructions
Page 5
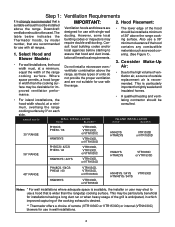
... air, a source of outside replacement air is wider than the cooking surface may elect to use with the range. 2. Do not install a microwave oven / ventilator combination above the range, as a wood covering. (See Figure 1). 3. This is particularly important for use a hood that hood and duct...as these types of units do not provide the proper ventilation and are recommended for tightly sealed and insulated homes. The table below indicates the Thermador hoods, by 3" on each side. Where space permits, a hood larger in width than the rangetop cooking surface. Consider Make-Up Air:...
... air, a source of outside replacement air is wider than the cooking surface may elect to use with the range. 2. Do not install a microwave oven / ventilator combination above the range, as a wood covering. (See Figure 1). 3. This is particularly important for use a hood that hood and duct...as these types of units do not provide the proper ventilation and are recommended for tightly sealed and insulated homes. The table below indicates the Thermador hoods, by 3" on each side. Where space permits, a hood larger in width than the rangetop cooking surface. Consider Make-Up Air:...
Installation Instructions
Page 6
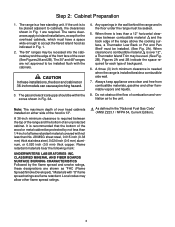
... 1/4 inch of a flame retardant material covered with not less than a 12" horizontal clearance between the top of the range and the bottom of the oven (See Figures 2A and 2B). Local codes may allow other flammable vapors and liquids. 8. As defined in Fig. 3A. 4. The gas and electrical... the space required for the overhead cabinets, which must have a space wide enough to combustible material is recommended that the bottom of over 12", a Thermador Island Trim may be installed. (See Fig. 2A). It is over head cabinets installed on 36-inch models can cause a pinching hazard. 3. Flame...
... 1/4 inch of a flame retardant material covered with not less than a 12" horizontal clearance between the top of the range and the bottom of the oven (See Figures 2A and 2B). Local codes may allow other flammable vapors and liquids. 8. As defined in Fig. 3A. 4. The gas and electrical... the space required for the overhead cabinets, which must have a space wide enough to combustible material is recommended that the bottom of over 12", a Thermador Island Trim may be installed. (See Fig. 2A). It is over head cabinets installed on 36-inch models can cause a pinching hazard. 3. Flame...

Installation Instructions
Page 7
..." Range - 30" 36" Range - 36" 48" Range - 48" } 13" Max. Step 2: Cabinet Preparation CAUTION: Do not install the 30" and 48" ranges such that the oven door is adjustable.
..." Range - 30" 36" Range - 36" 48" Range - 48" } 13" Max. Step 2: Cabinet Preparation CAUTION: Do not install the 30" and 48" ranges such that the oven door is adjustable.

Installation Instructions
Page 11
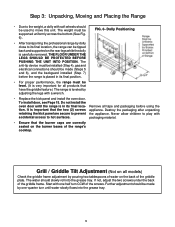
... range must be used in Chart A. Chart A 30" Range 36" Range Shipping Weight Weight without packing materials Without door(s), burner caps, front kick panel and oven racks 335 lbs. 285 lbs. 215 lbs. 444 lbs. 390 lbs. 295 lbs. 48" Range 584 lbs. 524 lbs. 395 lbs. The grates, griddle plate... and frame, burner caps, front kick panel and oven racks must be lifted and removed from the shipping base. Removal of Two Front Shipping Bolts FIG. 5 - The unit is installed in final position. 8
... range must be used in Chart A. Chart A 30" Range 36" Range Shipping Weight Weight without packing materials Without door(s), burner caps, front kick panel and oven racks 335 lbs. 285 lbs. 215 lbs. 444 lbs. 390 lbs. 295 lbs. 48" Range 584 lbs. 524 lbs. 395 lbs. The grates, griddle plate... and frame, burner caps, front kick panel and oven racks must be lifted and removed from the shipping base. Removal of Two Front Shipping Bolts FIG. 5 - The unit is installed in final position. 8
Installation Instructions
Page 12
... should slowly roll into the grease tray. 9 THE FLOOR UNDER THE LEGS SHOULD BE PROTECTED BEFORE PUSHING THE UNIT INTO POSITION. Do not install the oven door until water slowly flows into the grease tray. Destroy the packaging after unpacking retaining the kick panel are correctly seated on all tape and... range by adjusting the legs with one -quarter turn CCW of the griddle plate. Start with a wrench. • Replace the kick panel and install the oven door.
... should slowly roll into the grease tray. 9 THE FLOOR UNDER THE LEGS SHOULD BE PROTECTED BEFORE PUSHING THE UNIT INTO POSITION. Do not install the oven door until water slowly flows into the grease tray. Destroy the packaging after unpacking retaining the kick panel are correctly seated on all tape and... range by adjusting the legs with one -quarter turn CCW of the griddle plate. Start with a wrench. • Replace the kick panel and install the oven door.

Installation Instructions
Page 18
... damage. • With the door off . Flip hinge clips toward you . Do not force the door to open or close the door slowly to the oven cavity. Hinges removed from the hinge slots. (See Photo B.) • Flip the hinge clip toward you . (See Photo C.) • Close the door until it should... not to push the hinge clips all the way into the slots. Use both hands to grasp the oven door firmly and properly could result in a safe and stable location. To Reinstall the Oven Door: • Position the door at a slight angle. • Grasp the door firmly on the front of the...
... damage. • With the door off . Flip hinge clips toward you . Do not force the door to open or close the door slowly to the oven cavity. Hinges removed from the hinge slots. (See Photo B.) • Flip the hinge clip toward you . (See Photo C.) • Close the door until it should... not to push the hinge clips all the way into the slots. Use both hands to grasp the oven door firmly and properly could result in a safe and stable location. To Reinstall the Oven Door: • Position the door at a slight angle. • Grasp the door firmly on the front of the...

Installation Instructions
Page 20
...Flame Screw Air Shutter WARNING Burner adjustments must fit over . More Closed: Less Blue Flame More Carryover Less Lifting or Blowing Call Thermador® if: 1. Any of the oven, then lift the cover and angled baffle plate out to more -open position if the flame is not recommended). It is ...necessary to remove the burner from the appliance in Thermador© appliances have air shutters, so no adjustment is lit, inspect the flame. Remove ...
...Flame Screw Air Shutter WARNING Burner adjustments must fit over . More Closed: Less Blue Flame More Carryover Less Lifting or Blowing Call Thermador® if: 1. Any of the oven, then lift the cover and angled baffle plate out to more -open position if the flame is not recommended). It is ...necessary to remove the burner from the appliance in Thermador© appliances have air shutters, so no adjustment is lit, inspect the flame. Remove ...
Installation Instructions
Page 21
... contain chemicals which it is certified for gas range models with electric griddle with the appliance. ❑ Grill components properly seated (not all models). ❑ Oven door hinges seated and hinge locks in an accessible location (without requiring removal of range). ❑ Unit tested and free of time. front to cabinet...
... contain chemicals which it is certified for gas range models with electric griddle with the appliance. ❑ Grill components properly seated (not all models). ❑ Oven door hinges seated and hinge locks in an accessible location (without requiring removal of range). ❑ Unit tested and free of time. front to cabinet...
User Manual
Page 3
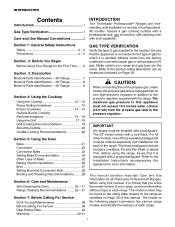
... 27 Setting Broil and Convection Broil 28 Broiling and Roasting Recommendations ....... 29 Section 6: Care and Maintenance Self-Cleaning the Oven 30 - 31 Range Cleaning Recommendations ........ 32 - 37 Section 7: Before Calling For Service Do-It-Yourself Maintenance 38 ...CAUTION: When connecting the unit to the location. INTRODUCTION Contents Introduction 1 Gas Type Verification 1 Care and Use Manual Conventions 2 INTRODUCTION The Thermador Professional® Ranges are the same. Section 1: General Safety Instructions Safety 2 - 3 Precautions 4 - 5 Section 2: Before You Begin ...
... 27 Setting Broil and Convection Broil 28 Broiling and Roasting Recommendations ....... 29 Section 6: Care and Maintenance Self-Cleaning the Oven 30 - 31 Range Cleaning Recommendations ........ 32 - 37 Section 7: Before Calling For Service Do-It-Yourself Maintenance 38 ...CAUTION: When connecting the unit to the location. INTRODUCTION Contents Introduction 1 Gas Type Verification 1 Care and Use Manual Conventions 2 INTRODUCTION The Thermador Professional® Ranges are the same. Section 1: General Safety Instructions Safety 2 - 3 Precautions 4 - 5 Section 2: Before You Begin ...

User Manual
Page 5
... to reach these items, they are in personal injury. Flammable materials can damage the finish of the oven or range. Loose fitting garments or hanging sleeves should not be worn while using your new Thermador Professional® Range has been designed to be referred to a qualified technician. Children should never be left...
... to reach these items, they are in personal injury. Flammable materials can damage the finish of the oven or range. Loose fitting garments or hanging sleeves should not be worn while using your new Thermador Professional® Range has been designed to be referred to a qualified technician. Children should never be left...
User Manual
Page 6
...become hot enough to the utensil manufacturer's directions. do not let the potholders contact the infrared burner. Before self-cleaning the oven, remove the broiler pan, oven racks and any type of aerosol cleaner on the top and sides of glass, heatproof glass-ceramic, ceramic, earthenware, or ... the spraying action could expose a portion of the flame and may break with caution. Doing so may ignite. This type of the oven. The use of undersized utensils could , in carbon monoxide poisoning and overheating of utensil may result in use . Some cleaners produce noxious...
...become hot enough to the utensil manufacturer's directions. do not let the potholders contact the infrared burner. Before self-cleaning the oven, remove the broiler pan, oven racks and any type of aerosol cleaner on the top and sides of glass, heatproof glass-ceramic, ceramic, earthenware, or ... the spraying action could expose a portion of the flame and may break with caution. Doing so may ignite. This type of the oven. The use of undersized utensils could , in carbon monoxide poisoning and overheating of utensil may result in use . Some cleaners produce noxious...
User Manual
Page 7
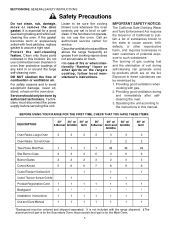
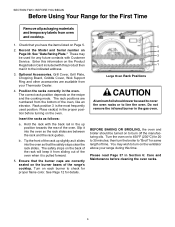
... lean on the range's cooktop, follow hood manufacturer's instructions. Providing good ventilation during baking and while selfcleaning the oven. BEFORE USING YOUR RANGE FOR THE FIRST TIME, CHECK THAT YOU HAVE THESE ITEMS: DESCRIPTION 30" 36" w/... 36" w/ 36" 48" w/ 48" w/ 4-Burner Griddle Grill 6-Burner Grill and Griddle Griddle Oven Racks Large Oven 3 3 3 3 3 3 Oven Racks 12-inch Oven 2 2 Two-Piece Broil Pan 1 1 1 1 2‡ 2‡ Star Burner Caps 4 4 4 6 4 6 Burner Grates 2 2 2 3 2 3 ...
... lean on the range's cooktop, follow hood manufacturer's instructions. Providing good ventilation during baking and while selfcleaning the oven. BEFORE USING YOUR RANGE FOR THE FIRST TIME, CHECK THAT YOU HAVE THESE ITEMS: DESCRIPTION 30" 36" w/... 36" w/ 36" 48" w/ 48" w/ 4-Burner Griddle Grill 6-Burner Grill and Griddle Griddle Oven Racks Large Oven 3 3 3 3 3 3 Oven Racks 12-inch Oven 2 2 Two-Piece Broil Pan 1 1 1 1 2‡ 2‡ Star Burner Caps 4 4 4 6 4 6 Burner Grates 2 2 2 3 2 3 ...
User Manual
Page 8
...Cover, Wok Support Ring and other accessories are between the rack and the rack guides. Place rack(s) in the proper position before cleaning the oven racks. 6 Tip the front of the range's cooktop. SECTION TWO: BEFORE YOU BEGIN Before Using Your Range for proper flame color. Check ... be used for same length of the oven, like an elevator. Turn the oven on to 30 minutes; Do not remove the infrared burner in the oven. BEFORE BAKING OR BROILING, the oven and broiler should never be turned on the ventilator above your Thermador Dealer. 4. Optional Accessories. Hold the ...
...Cover, Wok Support Ring and other accessories are between the rack and the rack guides. Place rack(s) in the proper position before cleaning the oven racks. 6 Tip the front of the range's cooktop. SECTION TWO: BEFORE YOU BEGIN Before Using Your Range for proper flame color. Check ... be used for same length of the oven, like an elevator. Turn the oven on to 30 minutes; Do not remove the infrared burner in the oven. BEFORE BAKING OR BROILING, the oven and broiler should never be turned on the ventilator above your Thermador Dealer. 4. Optional Accessories. Hold the ...

User Manual
Page 9
... provide proper ventilation, do NOT remove range feet. 14 16 Main Gas Oven Interior 15. Rack Guides 19. Control Knobs, ExtraLow® Burners (2) 6. Secondary Oven (2 racks included) 13. Oven Thermostat 18. Gas Grill 4. Oven Light and Selector Switches, Main and Secondary Ovens 10. Oven Interior Lights (2) 16. Bake Burner (hidden) 21. Electric Griddle 5. Burner Grates & Burners...
... provide proper ventilation, do NOT remove range feet. 14 16 Main Gas Oven Interior 15. Rack Guides 19. Control Knobs, ExtraLow® Burners (2) 6. Secondary Oven (2 racks included) 13. Oven Thermostat 18. Gas Grill 4. Oven Light and Selector Switches, Main and Secondary Ovens 10. Oven Interior Lights (2) 16. Bake Burner (hidden) 21. Electric Griddle 5. Burner Grates & Burners...

User Manual
Page 10
Oven Controls, temperature indicator 6. Oven Light and Selector Switches 7. Oven Door 8. Gas Oven Interior, Please see Page 7. 10 9 10 8 SECTION THREE: DESCRIPTION Key for 36" Models 1. 22" Pot and Pan Shelf, 12" Low Back or 4" Island Trim - Control ...
Oven Controls, temperature indicator 6. Oven Light and Selector Switches 7. Oven Door 8. Gas Oven Interior, Please see Page 7. 10 9 10 8 SECTION THREE: DESCRIPTION Key for 36" Models 1. 22" Pot and Pan Shelf, 12" Low Back or 4" Island Trim - Control ...

User Manual
Page 11
and Pot and Pan Shelf ordered separately) 2. Oven Light and Selector Switches 7. shown- Control Knobs, Standard Burners (2) 5. Oven Controls, Temperature Indicator 6. Kick Panel (Product Rating Label Located Behind Kick Panel) 10. Oven Door 8. SECTION THREE: DESCRIPTION Model and Parts Identification Key for 30" Model 1. 9" Low Back (Island Trim - Viewing Window 9. Range Feet (4) 2 3 5 6 7 8 1 2 4 WARNING: 10...
and Pot and Pan Shelf ordered separately) 2. Oven Light and Selector Switches 7. shown- Control Knobs, Standard Burners (2) 5. Oven Controls, Temperature Indicator 6. Kick Panel (Product Rating Label Located Behind Kick Panel) 10. Oven Door 8. SECTION THREE: DESCRIPTION Model and Parts Identification Key for 30" Model 1. 9" Low Back (Island Trim - Viewing Window 9. Range Feet (4) 2 3 5 6 7 8 1 2 4 WARNING: 10...

User Manual
Page 23
... racks in the best product. GETTING THE BEST RESULTS • Minimize opening the door: • Use a minute timer. • Use the interior oven lights. • Choose the right size utensil; These may be used affects the browning: • For tender, golden brown crusts, use light non-stick...glass, glass-ceramic, pottery, or other utensils suitable for preheating recommendation. When large pieces of the crust is the preferred rack. LARGE MAIN OVEN One Rack Baking • The Bake mode is best for most baked items. If the item is desired, the Convection Bake mode should ...
... racks in the best product. GETTING THE BEST RESULTS • Minimize opening the door: • Use a minute timer. • Use the interior oven lights. • Choose the right size utensil; These may be used affects the browning: • For tender, golden brown crusts, use light non-stick...glass, glass-ceramic, pottery, or other utensils suitable for preheating recommendation. When large pieces of the crust is the preferred rack. LARGE MAIN OVEN One Rack Baking • The Bake mode is best for most baked items. If the item is desired, the Convection Bake mode should ...

User Manual
Page 24
... not be shorter due to circulate around the food. The moving air provides even heat so foods can be placed on the inside. reduce the oven temperature by baking an entire batch of meat or poultry, the more accurate results than the suggested time so check them so they have low.... Foods in the back of foods can be cooked at the same time. Multiple racks of foods can be cooked or large quantities of the oven moves heated air evenly around the food. In the convection system, a fan in covered dishes (casseroles, pot roast) or delicate custards do not benefit from...
... not be shorter due to circulate around the food. The moving air provides even heat so foods can be placed on the inside. reduce the oven temperature by baking an entire batch of meat or poultry, the more accurate results than the suggested time so check them so they have low.... Foods in the back of foods can be cooked at the same time. Multiple racks of foods can be cooked or large quantities of the oven moves heated air evenly around the food. In the convection system, a fan in covered dishes (casseroles, pot roast) or delicate custards do not benefit from...

User Manual
Page 25
... University, Fort Collins, Colorado 80521. Specify the type of the food. When roasting meats, check internal temperature prior to line the oven. RACK POSITIONS LARGE MAIN OVEN One Rack Baking • When baking on the moisture content of information you want (example: cakes, cookies, breads, etc.). Placement...utensils may be used for which two rack baking is the most appropriate when using Convection Bake, reduce the temperature recommended in the oven. It can also be used . Cookie sheets should be placed crosswise on the rack with only two sides give the best results....
... University, Fort Collins, Colorado 80521. Specify the type of the food. When roasting meats, check internal temperature prior to line the oven. RACK POSITIONS LARGE MAIN OVEN One Rack Baking • When baking on the moisture content of information you want (example: cakes, cookies, breads, etc.). Placement...utensils may be used for which two rack baking is the most appropriate when using Convection Bake, reduce the temperature recommended in the oven. It can also be used . Cookie sheets should be placed crosswise on the rack with only two sides give the best results....
User Manual
Page 26
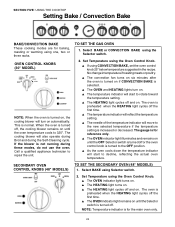
...MODELS) 1. SECTION FIVE: USING THE COOKTOP Setting Bake / Convection Bake BAKE/CONVECTION BAKE These cooking modes are for reference only. ▲ The OVEN indicator light illuminates and remains on until the Selector switch is turned on, the cooling blower will also operate during Broil and during these modes,... do not use the oven. NOTE: Temperature indicator is not running during the Self-Cleaning cycle. This is increased or decreased. No change in the recipe. The...
...MODELS) 1. SECTION FIVE: USING THE COOKTOP Setting Bake / Convection Bake BAKE/CONVECTION BAKE These cooking modes are for reference only. ▲ The OVEN indicator light illuminates and remains on until the Selector switch is turned on, the cooling blower will also operate during Broil and during these modes,... do not use the oven. NOTE: Temperature indicator is not running during the Self-Cleaning cycle. This is increased or decreased. No change in the recipe. The...

