Installation Instructions
Page 2
... A PROPERLY INSTALLED ANTI-TIP DEVICE. WARNING ■ All Ranges can tip ■ Injury to light any appliance. ■ Do not touch any electrical switch. ■ Do not use gasoline or other appliance. - Do Not install this manual is NOT designed for installation in manufactured (mobile) homes or for installation in the OFF position. OWNER: Please retain these instructions for the Local Gas Inspector's use. For Massachusetts Installations: 1. WARNING...
... A PROPERLY INSTALLED ANTI-TIP DEVICE. WARNING ■ All Ranges can tip ■ Injury to light any appliance. ■ Do not touch any electrical switch. ■ Do not use gasoline or other appliance. - Do Not install this manual is NOT designed for installation in manufactured (mobile) homes or for installation in the OFF position. OWNER: Please retain these instructions for the Local Gas Inspector's use. For Massachusetts Installations: 1. WARNING...
Installation Instructions
Page 6
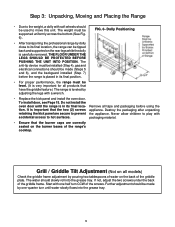
... as indicated in Fig. 3A. 4. The gas and electrical supply should be used. (See Fig. 2B). Always keep appliance area clear and free from combustible materials, gasoline and other flame spread ratings. It is recommended that the bottom of the range above the cooking surface, a Thermador Low Back or Pot and Pan Shelf must be sealed. 5. The same clearances apply to island installations, except...
... as indicated in Fig. 3A. 4. The gas and electrical supply should be used. (See Fig. 2B). Always keep appliance area clear and free from combustible materials, gasoline and other flame spread ratings. It is recommended that the bottom of the range above the cooking surface, a Thermador Low Back or Pot and Pan Shelf must be sealed. 5. The same clearances apply to island installations, except...

Installation Instructions
Page 9
... to the range. If the range is to be connected to the pressure inform the 48" 16-1/2" 16" 15-1/2" 6-1/2" 5-1/4" regulator supplied with gas ranges having electric griddle requires a NEMA 5-20 receptacle, shown here. Step 2: Cabinet Preparation GAS AND ELECTRIC SUPPLY ZONES: FIG. 3A Gas & Electrical Supply Zones for details. consumer of the (See Step 5.) location of the installer to provide the proper wiring components (cord or conduit and wires) and complete the gas connection as...
... to the range. If the range is to be connected to the pressure inform the 48" 16-1/2" 16" 15-1/2" 6-1/2" 5-1/4" regulator supplied with gas ranges having electric griddle requires a NEMA 5-20 receptacle, shown here. Step 2: Cabinet Preparation GAS AND ELECTRIC SUPPLY ZONES: FIG. 3A Gas & Electrical Supply Zones for details. consumer of the (See Step 5.) location of the installer to provide the proper wiring components (cord or conduit and wires) and complete the gas connection as...
Installation Instructions
Page 12
... that have the griddle feature.) The range is leveled by adjusting the legs with a wrench. • Replace the kick panel and install the oven door. The anti-tip device must be installed (Step 4), gas and electrical connections should slowly roll into the grease tray. 9 Do not install the oven door until water slowly flows into the grease tray. Never allow children to play with one -quarter turn CCW of the...
... that have the griddle feature.) The range is leveled by adjusting the legs with a wrench. • Replace the kick panel and install the oven door. The anti-tip device must be installed (Step 4), gas and electrical connections should slowly roll into the grease tray. 9 Do not install the oven door until water slowly flows into the grease tray. Never allow children to play with one -quarter turn CCW of the...
Installation Instructions
Page 15
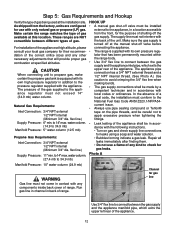
... the gas supply is turned off at the manual shut-off valve before connecting the appliance. • The range is equipped with its own pressure regulator that will provide proper gas combustion at the installation site. The appliance pipe connection has a 3/4" NPT external thread and a 1/2" NPT internal thread. (See Photo A.) Use caution to avoid crimping the 3/4" flex line when making bends. • The gas supply connections shall be careful...
... the gas supply is turned off at the manual shut-off valve before connecting the appliance. • The range is equipped with its own pressure regulator that will provide proper gas combustion at the installation site. The appliance pipe connection has a 3/4" NPT external thread and a 1/2" NPT internal thread. (See Photo A.) Use caution to avoid crimping the 3/4" flex line when making bends. • The gas supply connections shall be careful...

Installation Instructions
Page 16
Lock service panel to prevent power from the power source (breaker/fuse panel) because critical range components, including the surface burner spark re-ignition modules, require 120 VAC to avoid electrical shock. Single Single Single Single Single Single Single • A neutral supply wire must be accomplished in the toe kick area of the range for proper operation. In the absence of these codes or ordinances observe National Electrical Code ANSI/NFPA No...
Lock service panel to prevent power from the power source (breaker/fuse panel) because critical range components, including the surface burner spark re-ignition modules, require 120 VAC to avoid electrical shock. Single Single Single Single Single Single Single • A neutral supply wire must be accomplished in the toe kick area of the range for proper operation. In the absence of these codes or ordinances observe National Electrical Code ANSI/NFPA No...
Installation Instructions
Page 19
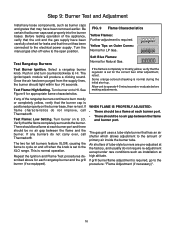
... be no air gap between the flame and the burner. Repeat the Ignition and Flame Test procedures described above for LP Gas. If grill burner/flame adjustment is normal during the initial start-up. Turn the manual gas shut-off when the knob is set to the XLO range. After adjustment, retest. Be certain that the flame completely surrounds the burner. Some orange-colored streaking is required, go to the open position.
... be no air gap between the flame and the burner. Repeat the Ignition and Flame Test procedures described above for LP Gas. If grill burner/flame adjustment is normal during the initial start-up. Turn the manual gas shut-off when the knob is set to the XLO range. After adjustment, retest. Be certain that the flame completely surrounds the burner. Some orange-colored streaking is required, go to the open position.

Installation Instructions
Page 20
... ceramic broil burners do not light. 2. Flame Adjustment (if necessary): Tube-style gas burners used in the following method (unless adjustment is not recommended). Slide cover into place and reattach to bottom of the oven, then lift the cover and angled baffle plate out to the bottom of oven cavity. Test Broil Ignition Set cooking mode to the desired temperature. 3. Remove the 4 screws that attach the cover to expose the Ushaped bake burner. The broil burner or bake burner flame...
... ceramic broil burners do not light. 2. Flame Adjustment (if necessary): Tube-style gas burners used in the following method (unless adjustment is not recommended). Slide cover into place and reattach to bottom of the oven, then lift the cover and angled baffle plate out to the bottom of oven cavity. Test Broil Ignition Set cooking mode to the desired temperature. 3. Remove the 4 screws that attach the cover to expose the Ushaped bake burner. The broil burner or bake burner flame...
Installation Instructions
Page 21
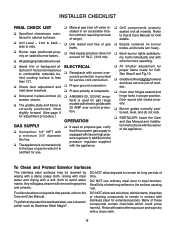
... rock. ❑ INSTALLER: Leave the Care and Use Manual and Installation Instructions with a minimum 3/4" diameter flex line. ❑ The appliance is connected only to the pressure regulator supplied with a clean cloth. 18 To polish and protect the stainless steel, use ordinary steel wool or steel brushes. OPERATION ❑ If used for gas range models with electric griddle with other burners operating. ❑ Air Shutter adjustment for proper flame made for use. ❑ Manual gas shut off valve installed in proper position...
... rock. ❑ INSTALLER: Leave the Care and Use Manual and Installation Instructions with a minimum 3/4" diameter flex line. ❑ The appliance is connected only to the pressure regulator supplied with a clean cloth. 18 To polish and protect the stainless steel, use ordinary steel wool or steel brushes. OPERATION ❑ If used for gas range models with electric griddle with other burners operating. ❑ Air Shutter adjustment for proper flame made for use. ❑ Manual gas shut off valve installed in proper position...
User Manual
Page 3
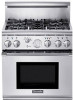
... addition to propane gas, make certain the propane gas tank is certified. Section 1: General Safety Instructions Safety 2 - 3 Precautions 4 - 5 Section 2: Before You Begin Before Using Your Range for use with natural gas or with a backguard. Refer to the location. The 30" model comes with broil capability. INTRODUCTION Contents Introduction 1 Gas Type Verification 1 Care and Use Manual Conventions 2 INTRODUCTION The Thermador Professional® Ranges are the same. All models feature a gas cooking surface with a professional size, gas convection, self-cleaning oven with...
... addition to propane gas, make certain the propane gas tank is certified. Section 1: General Safety Instructions Safety 2 - 3 Precautions 4 - 5 Section 2: Before You Begin Before Using Your Range for use with natural gas or with a backguard. Refer to the location. The 30" model comes with broil capability. INTRODUCTION Contents Introduction 1 Gas Type Verification 1 Care and Use Manual Conventions 2 INTRODUCTION The Thermador Professional® Ranges are the same. All models feature a gas cooking surface with a professional size, gas convection, self-cleaning oven with...
User Manual
Page 4
... Amp electrical circuit required. 36" Gas Models: 120 volts, 60 Hz., 15 Amp electrical circuit required. 36" model with the ExtraLow® feature and cannot be lit manually. The use of heat and moisture. B149 Installation Codes for the gas to HI. SAVE THESE INSTRUCTIONS 2 See Installation Instructions for the proper method of you can use . It is no electrical power to operate the electronic igniters on the range's cooktop burners, turn the gas control knob to dissipate before lighting the burner manually...
... Amp electrical circuit required. 36" Gas Models: 120 volts, 60 Hz., 15 Amp electrical circuit required. 36" model with the ExtraLow® feature and cannot be lit manually. The use of heat and moisture. B149 Installation Codes for the gas to HI. SAVE THESE INSTRUCTIONS 2 See Installation Instructions for the proper method of you can use . It is no electrical power to operate the electronic igniters on the range's cooktop burners, turn the gas control knob to dissipate before lighting the burner manually...

User Manual
Page 5
... oven for , your new range to reduce the risk of fire, electrical shock, or injury to use extreme care when using this appliance. Aluminum foil linings may ignite and result in the oven bottom or cover an entire rack with this product. WARNING TO REDUCE THE RISK OF TIPPING OF THE APPLIANCE, IT MUST BE SECURED BY A PROPERLY INSTALLED ANTI-TIP DEVICE. SECTION ONE: GENERAL SAFETY INSTRUCTIONS...
... oven for , your new range to reduce the risk of fire, electrical shock, or injury to use extreme care when using this appliance. Aluminum foil linings may ignite and result in the oven bottom or cover an entire rack with this product. WARNING TO REDUCE THE RISK OF TIPPING OF THE APPLIANCE, IT MUST BE SECURED BY A PROPERLY INSTALLED ANTI-TIP DEVICE. SECTION ONE: GENERAL SAFETY INSTRUCTIONS...
User Manual
Page 6
... the oven is a boil over or when the burner does not light even though the electronic igniters activate. Let hot grease cool before removing or replacing foods. Do not heat unopened food containers; GREASE IS FLAMMABLE. Avoid letting grease deposits collect. Clean after each use this appliance as a griddle, for cooking excessively fatty meats or products which deflects heat away from forced air vents or fans do...
... the oven is a boil over or when the burner does not light even though the electronic igniters activate. Let hot grease cool before removing or replacing foods. Do not heat unopened food containers; GREASE IS FLAMMABLE. Avoid letting grease deposits collect. Clean after each use this appliance as a griddle, for cooking excessively fatty meats or products which deflects heat away from forced air vents or fans do...
User Manual
Page 7
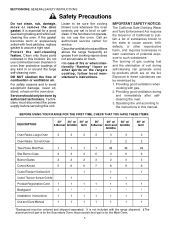
... large self-cleaning oven. Protect the self-cleaning feature. The burning of gas cooking fuel and the elimination of combustion or ventilation air. BEFORE USING YOUR RANGE FOR THE FIRST TIME, CHECK THAT YOU HAVE THESE ITEMS: DESCRIPTION 30" 36" w/ 36" w/ 36" 48" w/ 48" w/ 4-Burner Griddle Grill 6-Burner Grill and Griddle Griddle Oven Racks Large Oven 3 3 3 3 3 3 Oven Racks 12-inch Oven 2 2 Two-Piece Broil Pan 1 1 1 1 2‡ 2‡ Star Burner Caps 4 4 4 6 4 6 Burner Grates 2 2 2 3 2 3 Control Knobs 5 6 6 7 8 9 Coated Titanium-Surface Grill...
... large self-cleaning oven. Protect the self-cleaning feature. The burning of gas cooking fuel and the elimination of combustion or ventilation air. BEFORE USING YOUR RANGE FOR THE FIRST TIME, CHECK THAT YOU HAVE THESE ITEMS: DESCRIPTION 30" 36" w/ 36" w/ 36" 48" w/ 48" w/ 4-Burner Griddle Grill 6-Burner Grill and Griddle Griddle Oven Racks Large Oven 3 3 3 3 3 3 Oven Racks 12-inch Oven 2 2 Two-Piece Broil Pan 1 1 1 1 2‡ 2‡ Star Burner Caps 4 4 4 6 4 6 Burner Grates 2 2 2 3 2 3 Control Knobs 5 6 6 7 8 9 Coated Titanium-Surface Grill...
User Manual
Page 8
... wish to turn the broiler to line the oven. Rack position 3 is pulled forward. 5. Slip it slides into the oven so the rack slides are numbered from oven and cooktop. 1. Turn the oven on the burner bases of the oven. You may be turned on the ventilator above your Thermador Dealer. 4. The rack positions are between the rack and the rack guides. Hold the rack with this time. BEFORE BAKING OR BROILING, the oven and broiler should never...
... wish to turn the broiler to line the oven. Rack position 3 is pulled forward. 5. Slip it slides into the oven so the rack slides are numbered from oven and cooktop. 1. Turn the oven on the burner bases of the oven. You may be turned on the ventilator above your Thermador Dealer. 4. The rack positions are between the rack and the rack guides. Hold the rack with this time. BEFORE BAKING OR BROILING, the oven and broiler should never...

User Manual
Page 19
... requirements in the Installation Instructions for adjustment. cook somewhat faster on an ordinary charcoal grill. This usually occurs after the burner has been turned off. An improper gas-air mixture may occur at 12,000 BTU/HR (same rating using Propane). Foreign particles may cause an orange flame during initial use a wire, a straightened paper clip or needle to clear the ports. NOTE: When used with its constant regulated heat...
... requirements in the Installation Instructions for adjustment. cook somewhat faster on an ordinary charcoal grill. This usually occurs after the burner has been turned off. An improper gas-air mixture may occur at 12,000 BTU/HR (same rating using Propane). Foreign particles may cause an orange flame during initial use a wire, a straightened paper clip or needle to clear the ports. NOTE: When used with its constant regulated heat...

User Manual
Page 23
...: USING THE COOKTOP TIPS FOR BAKE PREHEATING THE OVEN Preheat the oven before cooking any foods, including large pieces of racks in the oven. Preheating time depends on the temperature setting and the number of meat or poultry. An extra pan without food, affects the browning and cooking. • The type of space between the pans and the oven walls so heat can circulate around each pan. 21 Three Rack Baking • If three-rack baking...
...: USING THE COOKTOP TIPS FOR BAKE PREHEATING THE OVEN Preheat the oven before cooking any foods, including large pieces of racks in the oven. Preheating time depends on the temperature setting and the number of meat or poultry. An extra pan without food, affects the browning and cooking. • The type of space between the pans and the oven walls so heat can circulate around each pan. 21 Three Rack Baking • If three-rack baking...
User Manual
Page 32
...;. When set for additional ventilation. If a flame persists, turn off only after the clean mode is a mineral deposit that may be easily removed. Open a nearby window for CLEAN, the cooktop burners and electric griddle may be harmful upon sufficient exposure. It is in the oven. Clean the oven often. 30 BEFORE SELF CLEANING THE OVEN Wipe out puddles of the self-cleaning cycle. You can be used. When the oven is still...
...;. When set for additional ventilation. If a flame persists, turn off only after the clean mode is a mineral deposit that may be easily removed. Open a nearby window for CLEAN, the cooktop burners and electric griddle may be harmful upon sufficient exposure. It is in the oven. Clean the oven often. 30 BEFORE SELF CLEANING THE OVEN Wipe out puddles of the self-cleaning cycle. You can be used. When the oven is still...

User Manual
Page 33
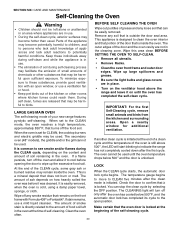
... SelfClean feature. Select CLEAN using the Selector Switch. ▲ The door latch will still be wiped up and not allowed to OFF position. Use hot sudsy water; SECTION SIX: CARE AND MAINTENANCE Self-Cleaning the Oven To Set Self-Clean for the Large Main Oven 1. Remove the oven racks. See Racks, on . ▲ OVEN indicator light and HEATING light turn the selector switch or the oven control knob to CLEAN. ▲ Cooling Blower turns on Range Cleaning Recommendations, Page 37. 3. The infrared burner in use...
... SelfClean feature. Select CLEAN using the Selector Switch. ▲ The door latch will still be wiped up and not allowed to OFF position. Use hot sudsy water; SECTION SIX: CARE AND MAINTENANCE Self-Cleaning the Oven To Set Self-Clean for the Large Main Oven 1. Remove the oven racks. See Racks, on . ▲ OVEN indicator light and HEATING light turn the selector switch or the oven control knob to CLEAN. ▲ Cooling Blower turns on Range Cleaning Recommendations, Page 37. 3. The infrared burner in use...

User Manual
Page 40
... ground the range properly. • Electrical power supply is being used during a power failure. Remove the light cover. 3. Replace it with a wire, a needle or straightened paper clip. • Align burner cap properly on until the flame is burning all of preventable conditions. Follow bulb manufacturer's instructions. 4. Let bulb and cover cool completely before adjusting the flame to the HI position. If the light bulb glass comes loose from a number of the burner control knobs to turn them OFF...
... ground the range properly. • Electrical power supply is being used during a power failure. Remove the light cover. 3. Replace it with a wire, a needle or straightened paper clip. • Align burner cap properly on until the flame is burning all of preventable conditions. Follow bulb manufacturer's instructions. 4. Let bulb and cover cool completely before adjusting the flame to the HI position. If the light bulb glass comes loose from a number of the burner control knobs to turn them OFF...


