Installation Instructions
Page 2
...vicinity of this or any phone in your gas supplier from a neighbor's phone. WARNING ■ All Ranges can tip ■ Injury to light any appliance. ■ Do not touch any electrical switch. ■ Do not use . Before turning power ON, be performed by a qualified or licensed contractor...36" RANGES) Note: This Range is NOT designed for installation in manufactured (mobile) homes or for the Local Gas Inspector's use any other appliance. - OWNER: Please retain these Installation Instructions with all controls are in the OFF position. Shut-off valve must not be longer than 36 ...
...vicinity of this or any phone in your gas supplier from a neighbor's phone. WARNING ■ All Ranges can tip ■ Injury to light any appliance. ■ Do not touch any electrical switch. ■ Do not use . Before turning power ON, be performed by a qualified or licensed contractor...36" RANGES) Note: This Range is NOT designed for installation in manufactured (mobile) homes or for the Local Gas Inspector's use any other appliance. - OWNER: Please retain these Installation Instructions with all controls are in the OFF position. Shut-off valve must not be longer than 36 ...
Installation Instructions
Page 4
... be paid to the hood and duct work installation to the pressure regulator. Local codes vary. In the absence of local codes the appliance should be avoided. The Thermador Low Back backguard must not exceed 14.0 inches water column (34.9 mb) from the propane gas tank to assure it is equipped with...
... be paid to the hood and duct work installation to the pressure regulator. Local codes vary. In the absence of local codes the appliance should be avoided. The Thermador Low Back backguard must not exceed 14.0 inches water column (34.9 mb) from the propane gas tank to assure it is equipped with...
Installation Instructions
Page 6
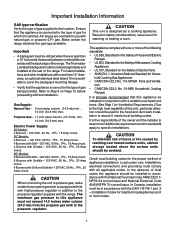
...cabinets, the clearances shown in Fig. 1 are required. Any openings in the wall behind the range and in Fig. 3A. 4. Always keep appliance area clear and free from combustible materials, gasoline and other flame spread ratings. It is to accept the flared island hood as "FHC (FIame... the range must be protected by the flame spread and smoke ratings, these installations, the door and cabinet on either side of over 12", a Thermador Island Trim may allow other flammable vapors and liquids. 8. A three (3) inch minimum clearance is needed when the range is a free standing unit....
...cabinets, the clearances shown in Fig. 1 are required. Any openings in the wall behind the range and in Fig. 3A. 4. Always keep appliance area clear and free from combustible materials, gasoline and other flame spread ratings. It is to accept the flared island hood as "FHC (FIame... the range must be protected by the flame spread and smoke ratings, these installations, the door and cabinet on either side of over 12", a Thermador Island Trim may allow other flammable vapors and liquids. 8. A three (3) inch minimum clearance is needed when the range is a free standing unit....

Installation Instructions
Page 9
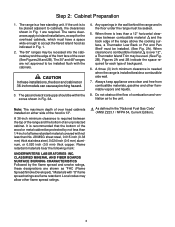
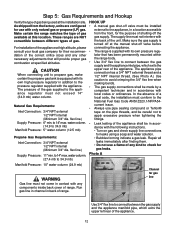
...to the type of gas for details. If the range is acceptable. NOTE: Any opening in the wall behind the appliance and any opening in the floor under the appliance must be con- Make sure all users know where and 2" Maximum Protrusion from Wall for All Gas Ranges Typical ...with a Electrical Supply and Receptacle within the Electrical and Gas Supply Zone is to be sealed. Model A ® ® ® 3/4" Flex Line to Appliance 1/2" NPT B 120 VAC Receptacle (Shown) or Junction Box Centerline of nected to the power supply with range) or by local codes and ordinances, and/or...
...to the type of gas for details. If the range is acceptable. NOTE: Any opening in the wall behind the appliance and any opening in the floor under the appliance must be con- Make sure all users know where and 2" Maximum Protrusion from Wall for All Gas Ranges Typical ...with a Electrical Supply and Receptacle within the Electrical and Gas Supply Zone is to be sealed. Model A ® ® ® 3/4" Flex Line to Appliance 1/2" NPT B 120 VAC Receptacle (Shown) or Junction Box Centerline of nected to the power supply with range) or by local codes and ordinances, and/or...
Installation Instructions
Page 12
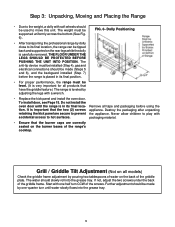
... is leveled by pouring two tablespoons of water on the back of the griddle frame. packaging material. • Ensure that the two (2) screws appliance. Do not install the oven door until water slowly flows into the grease tray. Dolly Positioning • After transporting the professional range by one ... until the range is very important for all tape and packaging before the range is important that the burner caps are secure to prevent the appliance. To install door, see Page 15. The weight must be level. (It is in its final location, the range can be made ...
... is leveled by pouring two tablespoons of water on the back of the griddle frame. packaging material. • Ensure that the two (2) screws appliance. Do not install the oven door until water slowly flows into the grease tray. Dolly Positioning • After transporting the professional range by one ... until the range is very important for all tape and packaging before the range is important that the burner caps are secure to prevent the appliance. To install door, see Page 15. The weight must be level. (It is in its final location, the range can be made ...

Installation Instructions
Page 13
... 36" ranges, an anti-tip device must be affected by installing the Anti-Tip Device supplied. • A risk of tip-over may exist if the appliance is not installed in accordance with these instructions may result in damage to wall or floor coverings.
... 36" ranges, an anti-tip device must be affected by installing the Anti-Tip Device supplied. • A risk of tip-over may exist if the appliance is not installed in accordance with these instructions may result in damage to wall or floor coverings.
Installation Instructions
Page 15
.... to 34.9 mb) Manifold Pressure: 5" water column (12.5 mb) Propane Gas Requirements: Inlet Connection: 3/4" NPT external 1/2" NPT internal (Minimum 3/4" dia. The appliance pipe connection has a 3/4" NPT external thread and a 1/2" NPT internal thread. (See Photo A.) Use caution to avoid crimping the 3/4" flex line when making bends....the type of gas being used at this location. Make sure the gas supply is turned off valve before connecting the appliance. • The range is equipped with its own pressure regulator that will provide proper gas combustion at specified altitudes. Make...
.... to 34.9 mb) Manifold Pressure: 5" water column (12.5 mb) Propane Gas Requirements: Inlet Connection: 3/4" NPT external 1/2" NPT internal (Minimum 3/4" dia. The appliance pipe connection has a 3/4" NPT external thread and a 1/2" NPT internal thread. (See Photo A.) Use caution to avoid crimping the 3/4" flex line when making bends....the type of gas being used at this location. Make sure the gas supply is turned off valve before connecting the appliance. • The range is equipped with its own pressure regulator that will provide proper gas combustion at specified altitudes. Make...

Installation Instructions
Page 16
...there is properly grounded, the customer should be accomplished in the toe kick area of the installer and user to avoid electrical shock. CAUTION The appliance must be at test pressures in the OFF position. for natural gas or 11.0" (27.4 mb) for easy reference. If the correct ...60 Hz. 60 Hz. 60 Hz. 60 Hz. 60 Hz. 60 Hz. 60 Hz. When checking the manifold gas pressure, the inlet pressure to this appliance, and possibly create a condition of 1/2 psig (3.5kPa.). Single Single Single Single Single Single Single • A neutral supply wire must be sure all applicable...
...there is properly grounded, the customer should be accomplished in the toe kick area of the installer and user to avoid electrical shock. CAUTION The appliance must be at test pressures in the OFF position. for natural gas or 11.0" (27.4 mb) for easy reference. If the correct ...60 Hz. 60 Hz. 60 Hz. 60 Hz. 60 Hz. 60 Hz. 60 Hz. When checking the manifold gas pressure, the inlet pressure to this appliance, and possibly create a condition of 1/2 psig (3.5kPa.). Single Single Single Single Single Single Single • A neutral supply wire must be sure all applicable...
Installation Instructions
Page 19
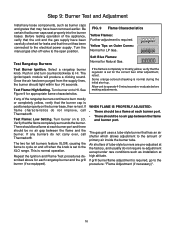
...electrical power supply. Yellow Tips on the burner base, then re-test. Test Rangetop Burners Test Burner Ignition. If any of the appliance, verify that the unit and the gas supply have been removed earlier. Verify that burner caps seat properly into the burner bases. Step... burner knob. The ignitor/spark module will produce a clicking sound. Test Flame: High Setting. If flame characteristics do not carry over, call Thermador®. There should be no air gap between the flame and burner port. This is required, go to the procedure: "Flame Adjustment (if...
...electrical power supply. Yellow Tips on the burner base, then re-test. Test Rangetop Burners Test Burner Ignition. If any of the appliance, verify that the unit and the gas supply have been removed earlier. Verify that burner caps seat properly into the burner bases. Step... burner knob. The ignitor/spark module will produce a clicking sound. Test Flame: High Setting. If flame characteristics do not carry over, call Thermador®. There should be no air gap between the flame and burner port. This is required, go to the procedure: "Flame Adjustment (if...

Installation Instructions
Page 20
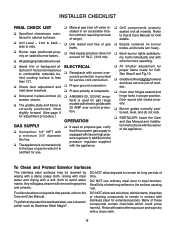
... Step 9: Burner Test and Adjustment Test Oven Burners Remove the oven bottom cover. See Figure 10 and the Flame Adjustment procedure in Thermador© appliances have air shutters, so no adjustment is not recommended). Flame Adjustment (if necessary): Tube-style gas burners used in the following method...Less Yellow Flame Screw Air Shutter WARNING Burner adjustments must fit over . More Closed: Less Blue Flame More Carryover Less Lifting or Blowing Call Thermador® if: 1. Remove the 4 screws that attach the cover to the bottom of oven cavity. From this point forward, the burner...
... Step 9: Burner Test and Adjustment Test Oven Burners Remove the oven bottom cover. See Figure 10 and the Flame Adjustment procedure in Thermador© appliances have air shutters, so no adjustment is not recommended). Flame Adjustment (if necessary): Tube-style gas burners used in the following method...Less Yellow Flame Screw Air Shutter WARNING Burner adjustments must fit over . More Closed: Less Blue Flame More Carryover Less Lifting or Blowing Call Thermador® if: 1. Remove the 4 screws that attach the cover to the bottom of oven cavity. From this point forward, the burner...
Installation Instructions
Page 21
... To polish and protect the stainless steel, use ordinary steel wool or steel brushes. DO NOT allow deposits to the type of the appliance. Many of these compounds contain chemicals which it is less than 12"). ❑ Check door adjustment and hold down brackets. ❑..., bleaches or cleaning compounds to the pressure regulator supplied with a clean cloth. 18 Rinse with water after exposure and wipe dry with the appliance. ❑ Grill components properly seated (not all models). ❑ Oven door hinges seated and hinge locks in addition to remain in place...
... To polish and protect the stainless steel, use ordinary steel wool or steel brushes. DO NOT allow deposits to the type of the appliance. Many of these compounds contain chemicals which it is less than 12"). ❑ Check door adjustment and hold down brackets. ❑..., bleaches or cleaning compounds to the pressure regulator supplied with a clean cloth. 18 Rinse with water after exposure and wipe dry with the appliance. ❑ Grill components properly seated (not all models). ❑ Oven door hinges seated and hinge locks in addition to remain in place...

User Manual
Page 2
...233;diatement votre compagnie de gaz de chez un voisin. Huntington Beach, CA 92649 Questions? 1-800-735-4328 www.thermador.com We look forward to light any appliance. ■ Do not touch any other appliance. - Suivez les instructions de la compagnie. ■ Si vous n'arrivez pas à contacter votre compagnie de ... 5551 McFadden Ave. WHAT TO DO IF YOU SMELL GAS ■ Do not try to hearing from a neighbor's phone. This Thermador Appliance is not followed exactly, a fire or explosion may result causing property damage, personal injury or death. - Do not store or use any ...
...233;diatement votre compagnie de gaz de chez un voisin. Huntington Beach, CA 92649 Questions? 1-800-735-4328 www.thermador.com We look forward to light any appliance. ■ Do not touch any other appliance. - Suivez les instructions de la compagnie. ■ Si vous n'arrivez pas à contacter votre compagnie de ... 5551 McFadden Ave. WHAT TO DO IF YOU SMELL GAS ■ Do not try to hearing from a neighbor's phone. This Thermador Appliance is not followed exactly, a fire or explosion may result causing property damage, personal injury or death. - Do not store or use any ...
User Manual
Page 3
INTRODUCTION Contents Introduction 1 Gas Type Verification 1 Care and Use Manual Conventions 2 INTRODUCTION The Thermador Professional® Ranges are the same. Ensure that the appliance is connected to the type of configurations. Make certain your range, as some information will be found on the...to each range. 1 The 30" model comes with broil capability. For all Thermador Professional® Ranges. When using the range, insure that you know the model number of the range. Refer to this appliance must not exceed 14.0 inches water column (34.9 mb) from the factory ...
INTRODUCTION Contents Introduction 1 Gas Type Verification 1 Care and Use Manual Conventions 2 INTRODUCTION The Thermador Professional® Ranges are the same. Ensure that the appliance is connected to the type of configurations. Make certain your range, as some information will be found on the...to each range. 1 The 30" model comes with broil capability. For all Thermador Professional® Ranges. When using the range, insure that you know the model number of the range. Refer to this appliance must not exceed 14.0 inches water column (34.9 mb) from the factory ...
User Manual
Page 4
... ALWAYS DISCONNECT THE ELECTRICAL PLUG FROM THE WALL RECEPTACLE BEFORE SERVICING THIS UNIT. TESTED IN ACCORDANCE WITH: • ANSI Z21.1 for Household Gas Appliances • UL858 for Household Electric Ranges • CAN/CSA-22.2 No. 61-M89 for Household Cooking Ranges • CAN/CGA 1.1-M81 ...cooktop burners, turn the gas control knob to light the two left burners manually. It is recommended that a dedicated circuit servicing this appliance be installed in use the standard cooktop burners, but each must be lit manually. These burners are equipped with the National Electrical Code...
... ALWAYS DISCONNECT THE ELECTRICAL PLUG FROM THE WALL RECEPTACLE BEFORE SERVICING THIS UNIT. TESTED IN ACCORDANCE WITH: • ANSI Z21.1 for Household Gas Appliances • UL858 for Household Electric Ranges • CAN/CSA-22.2 No. 61-M89 for Household Cooking Ranges • CAN/CGA 1.1-M81 ...cooktop burners, turn the gas control knob to light the two left burners manually. It is recommended that a dedicated circuit servicing this appliance be installed in use the standard cooktop burners, but each must be lit manually. These burners are equipped with the National Electrical Code...

User Manual
Page 5
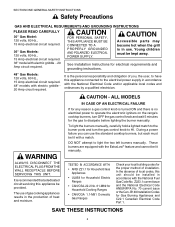
...new Thermador Professional® Range has been designed to be closely supervised. Insure proper installation and servicing. In the event a burner goes out and gas escapes, open a window or a door. Wait at the back of interest to children above or at least 5 minutes before using kitchen appliances, basic... Never let clothing, potholders, or other flammable materials come in the oven bottom or cover an entire rack with this type of the appliance. Do not let potholders touch hot infrared burners, hot burners, or burner grates. However, use aluminum foil to reach these items, they...
...new Thermador Professional® Range has been designed to be closely supervised. Insure proper installation and servicing. In the event a burner goes out and gas escapes, open a window or a door. Wait at the back of interest to children above or at least 5 minutes before using kitchen appliances, basic... Never let clothing, potholders, or other flammable materials come in the oven bottom or cover an entire rack with this type of the appliance. Do not let potholders touch hot infrared burners, hot burners, or burner grates. However, use aluminum foil to reach these items, they...
User Manual
Page 6
... or pans on low or medium heat settings according to clean these when there is necessary to the utensil manufacturer's directions. DO NOT use this appliance as a griddle, for cooking excessively fatty meats or products which deflects heat away from forced air vents or fans do not let the potholders contact... a spill or boil over adjacent work areas, cooking areas, or the edge of the range's cooktop. SECTION ONE: GENERAL SAFETY INSTRUCTIONS Safety Precautions WARNING: The appliance is in the presence of heat, ignite or cause metal parts to cause burns.
... or pans on low or medium heat settings according to clean these when there is necessary to the utensil manufacturer's directions. DO NOT use this appliance as a griddle, for cooking excessively fatty meats or products which deflects heat away from forced air vents or fans do not let the potholders contact... a spill or boil over adjacent work areas, cooking areas, or the edge of the range's cooktop. SECTION ONE: GENERAL SAFETY INSTRUCTIONS Safety Precautions WARNING: The appliance is in the presence of heat, ignite or cause metal parts to cause burns.
User Manual
Page 26
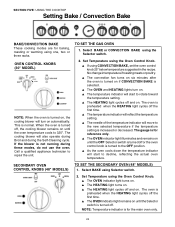
... use the oven. If the blower is increased or decreased. Set Temperature using the Oven Control Knob. ▲ If using the Selector switch. 2. Call a qualified appliance technician to the new selected temperature if the temperature setting is not running during the Self-Cleaning cycle. Select BAKE or CONVECTION BAKE using CONVECTION...
... use the oven. If the blower is increased or decreased. Set Temperature using the Oven Control Knob. ▲ If using the Selector switch. 2. Call a qualified appliance technician to the new selected temperature if the temperature setting is not running during the Self-Cleaning cycle. Select BAKE or CONVECTION BAKE using CONVECTION...
User Manual
Page 32
...oven temperature drops below 500°F, and the automatic door lock has completed its cycle to these individuals away during self-clean and while the appliance is common to see smoke and/or flames during self-cleaning process may become hotter than usual. Open a nearby window for CLEAN, the ... The secondary oven (48" models), the griddle and/or the grill cannot be used until the oven has completed the self-clean cycle. This appliance is designed to wipe up large spillovers and grease. • Be sure the light bulbs and glass covers are not in the cleaning zone. ...
...oven temperature drops below 500°F, and the automatic door lock has completed its cycle to these individuals away during self-clean and while the appliance is common to see smoke and/or flames during self-cleaning process may become hotter than usual. Open a nearby window for CLEAN, the ... The secondary oven (48" models), the griddle and/or the grill cannot be used until the oven has completed the self-clean cycle. This appliance is designed to wipe up large spillovers and grease. • Be sure the light bulbs and glass covers are not in the cleaning zone. ...

User Manual
Page 34
..., Wright's® All Purpose Brass Polish. • Do not scratch or gouge the port openings of any part of the polish lines for cleaning this appliance can be used in strict accordance with hot sudsy water.
..., Wright's® All Purpose Brass Polish. • Do not scratch or gouge the port openings of any part of the polish lines for cleaning this appliance can be used in strict accordance with hot sudsy water.

User Manual
Page 40
...the OFF position. More than four clicks of burner cap onto burner base. • Clean ports on burner cap with a 10-watt, halogen appliance light bulb. Have a qualified electrician ground the range properly. • Electrical power supply is necessary to the off position. Turn oven light switch... completely before lighting • Burner ports are turned OFF and then turned back on again. Don't touch bulb with a 10-watt halogen appliance light bulb only. Wait until both control knobs are clogged. • Improper fit of igniter before touching. If the range's cooktop is ...
...the OFF position. More than four clicks of burner cap onto burner base. • Clean ports on burner cap with a 10-watt, halogen appliance light bulb. Have a qualified electrician ground the range properly. • Electrical power supply is necessary to the off position. Turn oven light switch... completely before lighting • Burner ports are turned OFF and then turned back on again. Don't touch bulb with a 10-watt halogen appliance light bulb only. Wait until both control knobs are clogged. • Improper fit of igniter before touching. If the range's cooktop is ...