
Installation Manual
Page 14
... required if mounting bracket is not installed in place and engaged. --Failure to solid wood or metal) • Hammer • Pencil or other personal injury. THERMADOR Service Part No. To prevent accidental tipping of the range, attach it to children or adults. --See further Installation Instructions. Step 5: Installing Anti-Tip Device WARNING -
... required if mounting bracket is not installed in place and engaged. --Failure to solid wood or metal) • Hammer • Pencil or other personal injury. THERMADOR Service Part No. To prevent accidental tipping of the range, attach it to children or adults. --See further Installation Instructions. Step 5: Installing Anti-Tip Device WARNING -

Installation Manual
Page 19
... and varying backsplash widths, in some cases only one wall stud may be found at the mounting location. 4. Backsplash Installation (PA [30,36, 48] JBS) 3. Parts Included (10) 1" (25.4mm) screws Tools Needed Phillips screwdriver or drill 30", 36", 48" (760mm, 913mm, 1218mm) (1) Backsplash Tape measure 42" (1070mm) (1) Installation Guide Pencil...
... and varying backsplash widths, in some cases only one wall stud may be found at the mounting location. 4. Backsplash Installation (PA [30,36, 48] JBS) 3. Parts Included (10) 1" (25.4mm) screws Tools Needed Phillips screwdriver or drill 30", 36", 48" (760mm, 913mm, 1218mm) (1) Backsplash Tape measure 42" (1070mm) (1) Installation Guide Pencil...

Installation Manual
Page 23
...injury to persons, check to make sure all packaging has been removed from accessory devices before sliding range into place. Backguard Installation PRG366JG PRL366JG PRG364JDG PRL364JDG PRG486JDG PRL486JDG AVAILABLE FOR THESE MODELS: Pro Grand® 36" Gas Range 6 Burner Pro Grand® 36" Gas Range 6... load over 30 pounds (13.6kg) (13) T-20 Torx Stainless screws (16 or 14) T-20 Torx drill point screws (1) Installation Guide Low Back Parts Included (1) Low Back panel High Shelf (9 or 8) T-20 Torx stainless screws (8 or 6) T-20 Torx drill point screws Low Back (1) Installation Guide ...
...injury to persons, check to make sure all packaging has been removed from accessory devices before sliding range into place. Backguard Installation PRG366JG PRL366JG PRG364JDG PRL364JDG PRG486JDG PRL486JDG AVAILABLE FOR THESE MODELS: Pro Grand® 36" Gas Range 6 Burner Pro Grand® 36" Gas Range 6... load over 30 pounds (13.6kg) (13) T-20 Torx Stainless screws (16 or 14) T-20 Torx drill point screws (1) Installation Guide Low Back Parts Included (1) Low Back panel High Shelf (9 or 8) T-20 Torx stainless screws (8 or 6) T-20 Torx drill point screws Low Back (1) Installation Guide ...

Installation Manual
Page 27
Beneath the range, wrap the mated pieces around the leg. 4. The mating part has dimples (that the burner caps are correctly seated on all visible legs. Ensure that you know that the apparatus has been mounted to the ...
Beneath the range, wrap the mated pieces around the leg. 4. The mating part has dimples (that the burner caps are correctly seated on all visible legs. Ensure that you know that the apparatus has been mounted to the ...

Installation Manual
Page 28
... (x2) Figure 23: Toe Kick Panel Installation English 26 Toe Kick Panel (optional) (PA [36,48] JTKG) Toe Kick Parts Included (1) Toe Kick panel (4) T-20 Torx drill point screws 3. The mating part has extruded dimples on both sides for which the holes of the cast aluminum base (see Figure 21 on page... top, outer sleeve of the leg covers off the extruded dimples of the Toe Kick Panel should feel a definitive snap, letting you know that the part has been installed. 5.
... (x2) Figure 23: Toe Kick Panel Installation English 26 Toe Kick Panel (optional) (PA [36,48] JTKG) Toe Kick Parts Included (1) Toe Kick panel (4) T-20 Torx drill point screws 3. The mating part has extruded dimples on both sides for which the holes of the cast aluminum base (see Figure 21 on page... top, outer sleeve of the leg covers off the extruded dimples of the Toe Kick Panel should feel a definitive snap, letting you know that the part has been installed. 5.
Installation Manual
Page 96
...Parts, filters, descalers, stainless steel cleaners and more can be purchased in Canada. Some models are certified for products which are transported from the U.S. Consulte a un ingeniero de calefacción y ventilación para determinar sus requerimientos específicos de ventilación. www.thermador... la información más detallada, consulte las instrucciones de instalación que se incluyen con el producto o escriba a THERMADOR® indicando el número de modelo. Certains modèles sont approuvés pour le Canada. Consult with your specific...
...Parts, filters, descalers, stainless steel cleaners and more can be purchased in Canada. Some models are certified for products which are transported from the U.S. Consulte a un ingeniero de calefacción y ventilación para determinar sus requerimientos específicos de ventilación. www.thermador... la información más detallada, consulte las instrucciones de instalación que se incluyen con el producto o escriba a THERMADOR® indicando el número de modelo. Certains modèles sont approuvés pour le Canada. Consult with your specific...
Use and Care Manual
Page 5
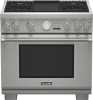
... Beach, CA 92649 Questions? 1-800-735-4328 www.thermador.com We look forward to hearing from you! Table of Contents Introduction 1 Safety 2 Important Safety Instructions 2 Before You Begin 7 Using Your Range for the First Time 7 Range Description 10 Parts Identification - 48" Range 10 Parts Identification - 36" Range 11 Using The Cooktop 12 ...34 Self-Cleaning the Oven 34 Cleaning Recommendations 36 Do-It-Yourself Maintenance 39 Before Calling For Service 41 Statement of Warranty 42 This THERMADOR® appliance is made by BSH Home Appliances Corporation 5551 McFadden Ave.
... Beach, CA 92649 Questions? 1-800-735-4328 www.thermador.com We look forward to hearing from you! Table of Contents Introduction 1 Safety 2 Important Safety Instructions 2 Before You Begin 7 Using Your Range for the First Time 7 Range Description 10 Parts Identification - 48" Range 10 Parts Identification - 36" Range 11 Using The Cooktop 12 ...34 Self-Cleaning the Oven 34 Cleaning Recommendations 36 Do-It-Yourself Maintenance 39 Before Calling For Service 41 Statement of Warranty 42 This THERMADOR® appliance is made by BSH Home Appliances Corporation 5551 McFadden Ave.

Use and Care Manual
Page 8
... turn OFF the gas control knob and wait 5 minutes for the proper method of the range. B149 Installation Codes for , your new THERMADOR PROFESSIONAL® range has been designed to be allowed to use the standard cooktop burners, but each must be left XLO® burners and...National Electrical Code ANSI/NFPA No. 70 current issue or the Can - When properly cared for Gas Burning Appliances and C22.1 Canadian Electrical Code Part 1. Follow the installation instructions provided with the ExtraLow® feature and cannot be seriously injured. Do not attempt to HI. English 3 During ...
... turn OFF the gas control knob and wait 5 minutes for the proper method of the range. B149 Installation Codes for , your new THERMADOR PROFESSIONAL® range has been designed to be allowed to use the standard cooktop burners, but each must be left XLO® burners and...National Electrical Code ANSI/NFPA No. 70 current issue or the Can - When properly cared for Gas Burning Appliances and C22.1 Canadian Electrical Code Part 1. Follow the installation instructions provided with the ExtraLow® feature and cannot be seriously injured. Do not attempt to HI. English 3 During ...
Use and Care Manual
Page 9
... use a towel or other bulky cloth in personal injury. Foil is being called. • You can fight the fire with your back to line any part of the appliance or place anything against the oven. they could result in the area where it . • The fire is near a window, be ...to accumulate on cooking fires. IMPORTANT SAFETY INSTRUCTIONS READ AND SAVE THESE INSTRUCTIONS Never use any part of the range or oven for the size of the cooktop burner. You may cause burns from any part of the oven or range. Heat oils slowly on hot surfaces may be allowed to turn...
... use a towel or other bulky cloth in personal injury. Foil is being called. • You can fight the fire with your back to line any part of the appliance or place anything against the oven. they could result in the area where it . • The fire is near a window, be ...to accumulate on cooking fires. IMPORTANT SAFETY INSTRUCTIONS READ AND SAVE THESE INSTRUCTIONS Never use any part of the range or oven for the size of the cooktop burner. You may cause burns from any part of the oven or range. Heat oils slowly on hot surfaces may be allowed to turn...
Use and Care Manual
Page 10
... the grill plate accessory for prolonged periods of time. RANGE TIPPING HAZARD: • All ranges can tip and injury can damage the cooktop or oven parts. Also, if the burner flames and igniter are suitable for cooking on safety considerations, never use of undersized pots and pans could expose a portion of...
... the grill plate accessory for prolonged periods of time. RANGE TIPPING HAZARD: • All ranges can tip and injury can damage the cooktop or oven parts. Also, if the burner flames and igniter are suitable for cooking on safety considerations, never use of undersized pots and pans could expose a portion of...
Use and Care Manual
Page 11
... Protect the self-cleaning feature. There is cool. Use only small quantities of alcohol in the presence of heat, ignite or cause metal parts to clean the range while it . Avoid letting grease deposits collect. After cleaning, check for service. The chemical that produces the spraying ...the oven door. Be sure all cooktop controls are set to BROIL or BAKE modes, after each use the oven. Clean only those parts indicated in use commercial oven cleaners or oven liner protective coatings of any other spirits on the range's cooktop, follow manufacturer's instructions....
... Protect the self-cleaning feature. There is cool. Use only small quantities of alcohol in the presence of heat, ignite or cause metal parts to clean the range while it . Avoid letting grease deposits collect. After cleaning, check for service. The chemical that produces the spraying ...the oven door. Be sure all cooktop controls are set to BROIL or BAKE modes, after each use the oven. Clean only those parts indicated in use commercial oven cleaners or oven liner protective coatings of any other spirits on the range's cooktop, follow manufacturer's instructions....
Use and Care Manual
Page 12
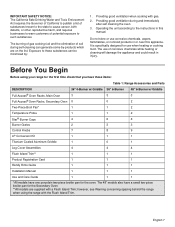
... fuel and the elimination of potential exposure to such substances. It is specifically designed for the oven. Exposure to these items: Table 1: Range Accessories and Parts DESCRIPTION Full Access® Oven Racks, Main Oven Full Access® Oven Racks, Secondary Oven Two-Piece Broil Pan* 36" 4-Burner w/ Griddle 3 0 1 36" 6-Burner 3 0 1 48...
... fuel and the elimination of potential exposure to such substances. It is specifically designed for the oven. Exposure to these items: Table 1: Range Accessories and Parts DESCRIPTION Full Access® Oven Racks, Main Oven Full Access® Oven Racks, Secondary Oven Two-Piece Broil Pan* 36" 4-Burner w/ Griddle 3 0 1 36" 6-Burner 3 0 1 48...

Use and Care Manual
Page 15
... Control Knobs 7. Temperature Gauge 9. Main Oven (3 racks included) 17. Control Panel Light Switch 13. Range Feet (4) 19. Secondary Oven (2 racks included) 18. Description Model and Parts Identification - 48" Range 11 11 22 22 55 8 66 7 7 78 7 9 9 1100 9 9 1100 1111 12 12 44 33 11 Figure 4: 48" Dual Fuel Control Panel 13...
... Control Knobs 7. Temperature Gauge 9. Main Oven (3 racks included) 17. Control Panel Light Switch 13. Range Feet (4) 19. Secondary Oven (2 racks included) 18. Description Model and Parts Identification - 48" Range 11 11 22 22 55 8 66 7 7 78 7 9 9 1100 9 9 1100 1111 12 12 44 33 11 Figure 4: 48" Dual Fuel Control Panel 13...
Use and Care Manual
Page 16
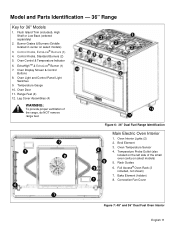
... Guides 6. Control Knobs, Standard Burners (2) 5. Oven Interior Lights (2) 2. Broil Element 3. Oven Light and Control Panel Light Switches 9. Oven Temperature Sensor 4. Oven Door 11. Model and Parts Identification - 36" Range Key for 36" Models 1. Burner Grates & Burners (Griddle located in center on select models) 5. ExtraHighTM & ExtraLow® Burner (1) 7. Oven Display Screen & Control...
... Guides 6. Control Knobs, Standard Burners (2) 5. Oven Interior Lights (2) 2. Broil Element 3. Oven Light and Control Panel Light Switches 9. Oven Temperature Sensor 4. Oven Door 11. Model and Parts Identification - 36" Range Key for 36" Models 1. Burner Grates & Burners (Griddle located in center on select models) 5. ExtraHighTM & ExtraLow® Burner (1) 7. Oven Display Screen & Control...
Use and Care Manual
Page 29
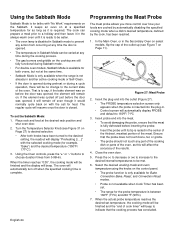
... the selected cooking mode (for example, "Bake") and the desired temperature ("350°F/ 177°C"). 3. The cook can be varied at any part of the cooking dish or parts of the oven, as it is required. Programming the Meat Probe The meat probe allows you more control over how your foods are...
... the selected cooking mode (for example, "Bake") and the desired temperature ("350°F/ 177°C"). 3. The cook can be varied at any part of the cooking dish or parts of the oven, as it is required. Programming the Meat Probe The meat probe allows you more control over how your foods are...
Use and Care Manual
Page 39
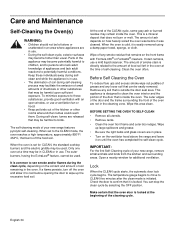
... new range, remove small animals and birds from the kitchen and surrounding areas. Lock When the CLEAN cycle starts, the automatic door lock cycle begins. Parts of food soil left alone or unattended in use a mild liquid cleanser. The self-cleaning mode of the oven are in use a ventilation fan or...
... new range, remove small animals and birds from the kitchen and surrounding areas. Lock When the CLEAN cycle starts, the automatic door lock cycle begins. Parts of food soil left alone or unattended in use a mild liquid cleanser. The self-cleaning mode of the oven are in use a ventilation fan or...
Use and Care Manual
Page 40
... 2. It is shut. 3. CAUTION: The interior of Successive Self-Clean Cycles The ovens are available immediately after five minutes. Most exterior parts of the range while it is in the oven do the job efficiently and effectively. Many products are regional in distribution and can be ...cleaner does not imply its package. Turn Oven Control Knob to complete. English 35 This does not constitute an endorsement. The omission of any part of this range. Try on Range Cleaning Recommendations, page 36. The heating elements in use . 2. To Set Self-Clean Ovens 1. ...
... 2. It is shut. 3. CAUTION: The interior of Successive Self-Clean Cycles The ovens are available immediately after five minutes. Most exterior parts of the range while it is in the oven do the job efficiently and effectively. Many products are regional in distribution and can be ...cleaner does not imply its package. Turn Oven Control Knob to complete. English 35 This does not constitute an endorsement. The omission of any part of this range. Try on Range Cleaning Recommendations, page 36. The heating elements in use . 2. To Set Self-Clean Ovens 1. ...
Use and Care Manual
Page 41
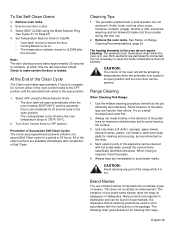
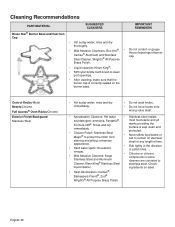
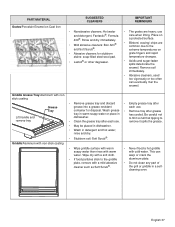
...®. vinegar. • Chlorine or chlorine • Mild Abrasive Cleaners: Siege compounds in the direction • Hard water spots: Household of burner cap. Cleaning Recommendations PART/MATERIAL SUGGESTED CLEANERS IMPORTANT REMINDERS Brass Star® Burner Base and Cast Iron Cap • Hot sudsy water; rinse and dry thoroughly. • Mild Abrasive...
...®. vinegar. • Chlorine or chlorine • Mild Abrasive Cleaners: Siege compounds in the direction • Hard water spots: Household of burner cap. Cleaning Recommendations PART/MATERIAL SUGGESTED CLEANERS IMPORTANT REMINDERS Brass Star® Burner Base and Cast Iron Cap • Hot sudsy water; rinse and dry thoroughly. • Mild Abrasive...
Use and Care Manual
Page 42
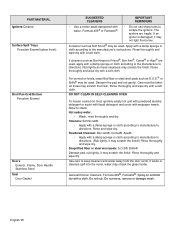
...soil immediately. • Abrasive cleaners, used too vigorously or too often can warp or crack the aluminum plate. • Do not clean any part of the grill or griddle in detergent and hot water; Wipe dry with a soft cloth. • If food particles stick to the extreme ... with non-stick coating • Wipe griddle surface with warm soapy water then rinse with cold water. This can eventually mar the enamel. PART/MATERIAL Grates/Porcelain Enamel on grate fingers and rapid temperature changes. • Acidic and sugar-laden spills deteriorate the enamel. use . container for...
...soil immediately. • Abrasive cleaners, used too vigorously or too often can warp or crack the aluminum plate. • Do not clean any part of the grill or griddle in detergent and hot water; Wipe dry with a soft cloth. • If food particles stick to the extreme ... with non-stick coating • Wipe griddle surface with warm soapy water then rinse with cold water. This can eventually mar the enamel. PART/MATERIAL Grates/Porcelain Enamel on grate fingers and rapid temperature changes. • Acidic and sugar-laden spills deteriorate the enamel. use . container for...
Use and Care Manual
Page 43
... with powdered laundry detergent or squirt with liquid detergent and cover with a damp sponge or cloth according to scrape the igniters. Rinse and wipe dry. PART/MATERIAL Igniters/Ceramic Surface Spill Trays Porcelain Enamel (gloss finish) Broil Pan Grid/Bottom Porcelain Enamel Doors Exterior, Frame, Door Handle Stainless Steel Seal Door...
... with powdered laundry detergent or squirt with liquid detergent and cover with a damp sponge or cloth according to scrape the igniters. Rinse and wipe dry. PART/MATERIAL Igniters/Ceramic Surface Spill Trays Porcelain Enamel (gloss finish) Broil Pan Grid/Bottom Porcelain Enamel Doors Exterior, Frame, Door Handle Stainless Steel Seal Door...
