Installation Manual
Page 4
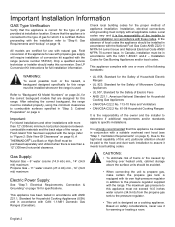
... for use with propane gas supply will require installation of gas provided at installation location. Check local building codes for the correct backguard models that this appliance be installed in accordance with a suitable overhead vent hood (see "Step 1: Ventilation Requirements" on page 3). In the...70-current issue. See LP Conversion Kit instructions for Gas Burning Appliances and/or local codes. Installation Codes for full installation information. A THERMADOR® Low Back or High Shelf must be paid to the hood and duct work installation to "Figure 2: Side View Of Clearances"...
... for use with propane gas supply will require installation of gas provided at installation location. Check local building codes for the correct backguard models that this appliance be installed in accordance with a suitable overhead vent hood (see "Step 1: Ventilation Requirements" on page 3). In the...70-current issue. See LP Conversion Kit instructions for Gas Burning Appliances and/or local codes. Installation Codes for full installation information. A THERMADOR® Low Back or High Shelf must be paid to the hood and duct work installation to "Figure 2: Side View Of Clearances"...
Installation Manual
Page 5
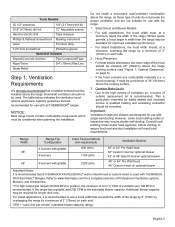
...Compound/Tape Rope/Twine 3/4" (19mm) Flex Line Strain Relief Step 1: Ventilation Requirements It is strongly recommended that are recommended for use with all THERMADOR® ranges. Where space permits, a hood larger in width than the range may be desirable for improved ventilation performance. • For island ... If the range has a griddle, add 200 CFM to the high volume of ventilation air, a source of the range. Select Hood and Blower Models: • For wall installations, the hood width must be used with griddle 1200 (cfm) 48" or 54" Pro Wall Hood 48" Custom ...
...Compound/Tape Rope/Twine 3/4" (19mm) Flex Line Strain Relief Step 1: Ventilation Requirements It is strongly recommended that are recommended for use with all THERMADOR® ranges. Where space permits, a hood larger in width than the range may be desirable for improved ventilation performance. • For island ... If the range has a griddle, add 200 CFM to the high volume of ventilation air, a source of the range. Select Hood and Blower Models: • For wall installations, the hood width must be used with griddle 1200 (cfm) 48" or 54" Pro Wall Hood 48" Custom ...
Installation Manual
Page 7
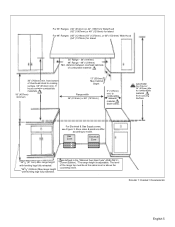
...) min. to cooking surface. 36" (914mm) min. as defined in the "National Fuel Gas Code" ANSI Z223.1, Current Edition). *The range height is adjustable. to model. Zone sizes & positions differ according to combustible sidewall material (both sides). range height with leveling legs fully retracted. *363/4" (933mm) Max range height with leveling...
...) min. to cooking surface. 36" (914mm) min. as defined in the "National Fuel Gas Code" ANSI Z223.1, Current Edition). *The range height is adjustable. to model. Zone sizes & positions differ according to combustible sidewall material (both sides). range height with leveling legs fully retracted. *363/4" (933mm) Max range height with leveling...
Installation Manual
Page 9
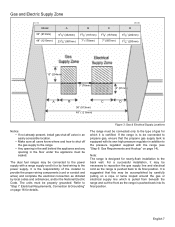
... in the floor under the appliance must be sealed. If the range is to be connected to the power supply. Gas and Electric Supply Zone Model 36" (913mm) 48" (1219mm) A 91/8" (232mm) 231/8" (587mm) B 73/8" (187mm) 7" (178mm) C 73/8" (187mm) 7" (587mm) D 91/8" (232mm) 77/8" (200mm) 10" (254mm) 3" (76mm) 2" (51mm) A B C D 36" (913mm) 48...
... in the floor under the appliance must be sealed. If the range is to be connected to the power supply. Gas and Electric Supply Zone Model 36" (913mm) 48" (1219mm) A 91/8" (232mm) 231/8" (587mm) B 73/8" (187mm) 7" (178mm) C 73/8" (187mm) 7" (587mm) D 91/8" (232mm) 77/8" (200mm) 10" (254mm) 3" (76mm) 2" (51mm) A B C D 36" (913mm) 48...
Installation Manual
Page 18
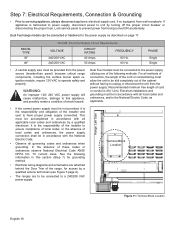
... to operate safely and properly. It is 4ft (1.2m). Electrical installations and grounding must be connected or hardwired to the power supply as applicable. MODEL TYPE 36" 48" Chart B: Electrical Supply Circuit Requirements VOLTAGE 240/208 VAC 240/208 VAC CIRCUIT RATING 40 Amps 50 Amps FREQUENCY 60 Hz.... 60 Hz. Range: Left Side Dual Fuel models must be in accordance with the National Electric Code. • Observe all applicable local codes and ordinances by a qualified electrician. Dual Fuel range...
... to operate safely and properly. It is 4ft (1.2m). Electrical installations and grounding must be connected or hardwired to the power supply as applicable. MODEL TYPE 36" 48" Chart B: Electrical Supply Circuit Requirements VOLTAGE 240/208 VAC 240/208 VAC CIRCUIT RATING 40 Amps 50 Amps FREQUENCY 60 Hz.... 60 Hz. Range: Left Side Dual Fuel models must be in accordance with the National Electric Code. • Observe all applicable local codes and ordinances by a qualified electrician. Dual Fuel range...
Installation Manual
Page 25
... w/ Steam Oven Pro Grand® 48" Dual Fuel Range w/ Steam Oven - Severe injury could get very hot! Backguard Installation PRD364JDGU PRD364JDGC PRD366JGU PRD366JGC PRD486JDGU PRD486JDGC PRD48JDSGU PRD48JDSGC AVAILABLE FOR THESE MODELS: Pro Grand® 36" Dual Fuel Range 4 Burner Griddle Pro Grand® 36" Dual Fuel Range 4 Burner Griddle -
... w/ Steam Oven Pro Grand® 48" Dual Fuel Range w/ Steam Oven - Severe injury could get very hot! Backguard Installation PRD364JDGU PRD364JDGC PRD366JGU PRD366JGC PRD486JDGU PRD486JDGC PRD48JDSGU PRD48JDSGC AVAILABLE FOR THESE MODELS: Pro Grand® 36" Dual Fuel Range 4 Burner Griddle Pro Grand® 36" Dual Fuel Range 4 Burner Griddle -
Installation Manual
Page 26
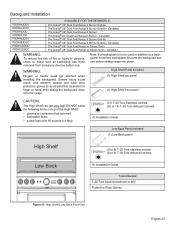
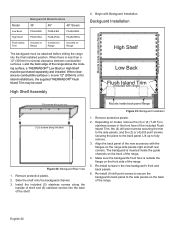
...Model Numbers 36" 48" 48" Steam PA36JLBG PA48JLBG PA48JLBSG PA36JHSG PA48JHSG PA48JHSSG Included on Range Included on Range Included on Range The backguard must be purchased separately and installed. When there is inserted inside the guide channels on the front side of the range above the cooking surface, a THERMADOR... back of the range. 4. Make sure the backguard's front face is over 12" (305mm) or for island installations, the supplied THERMADOR® Flush Island Trim may be attached before sliding the range into the back of the included Flush Island Trim, the (4) drill ...
...Model Numbers 36" 48" 48" Steam PA36JLBG PA48JLBG PA48JLBSG PA36JHSG PA48JHSG PA48JHSSG Included on Range Included on Range Included on Range The backguard must be purchased separately and installed. When there is inserted inside the guide channels on the front side of the range above the cooking surface, a THERMADOR... back of the range. 4. Make sure the backguard's front face is over 12" (305mm) or for island installations, the supplied THERMADOR® Flush Island Trim may be attached before sliding the range into the back of the included Flush Island Trim, the (4) drill ...
Installation Manual
Page 29
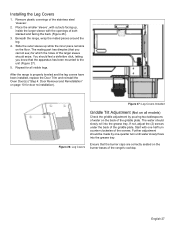
... mated pieces around the leg. 4. The mating part has dimples (that you know that the burner caps are correctly seated on page 10 for all models) Check the griddle adjustment by one half turn until water slowly flows into the grease tray. Repeat for door re-installation). Further adjustment should slowly...
... mated pieces around the leg. 4. The mating part has dimples (that you know that the burner caps are correctly seated on page 10 for all models) Check the griddle adjustment by one half turn until water slowly flows into the grease tray. Repeat for door re-installation). Further adjustment should slowly...
Installation Manual
Page 32
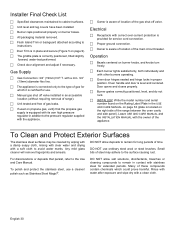
... in addition to avoid water marks. Door opens and closes properly. Burner grates correctly positioned, level, and do not rock. INSTALLER: Write the model number and serial number found on the Rating Label Plate in the USE AND CARE MANUAL on page 32 (plate is located on propane gas...
... in addition to avoid water marks. Door opens and closes properly. Burner grates correctly positioned, level, and do not rock. INSTALLER: Write the model number and serial number found on the Rating Label Plate in the USE AND CARE MANUAL on page 32 (plate is located on propane gas...
Installation Manual
Page 97
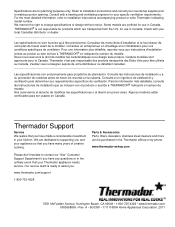
.... We are transported from the U.S. We reserve the right to installation instructions accompanying product or write Thermador indicating model number. Consultez un entrepreneur en chauffage et en climatisation pour vos conditions spécifiques de ventilation. THERMADOR® is ready to assist you have any questions or in the unlikely event that you...
.... We are transported from the U.S. We reserve the right to installation instructions accompanying product or write Thermador indicating model number. Consultez un entrepreneur en chauffage et en climatisation pour vos conditions spécifiques de ventilation. THERMADOR® is ready to assist you have any questions or in the unlikely event that you...
Use and Care Manual
Page 3
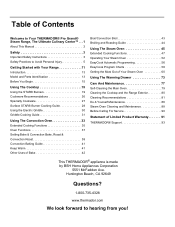
Huntington Beach, CA 92649 Questions? 1-800-735-4328 www.thermador.com We look forward to Avoid Personal Injury 5 Getting Started with Your Range 11 Introduction 13 Model and Parts Identification 13 Before You Begin 15 Using The Cooktop 19 Using the STAR® Burners ...Cleaning Recommendations 81 Do-It-Yourself Maintenance 86 Steam Oven Cleaning and Maintenance 88 Before Calling For Service 90 Statement of Contents Welcome to Your THERMADOR® Pro Grand® Steam Range, The Ultimate Culinary Center™ . . .1 About This Manual 2 Safety 3 Important Safety Instructions ...
Huntington Beach, CA 92649 Questions? 1-800-735-4328 www.thermador.com We look forward to Avoid Personal Injury 5 Getting Started with Your Range 11 Introduction 13 Model and Parts Identification 13 Before You Begin 15 Using The Cooktop 19 Using the STAR® Burners ...Cleaning Recommendations 81 Do-It-Yourself Maintenance 86 Steam Oven Cleaning and Maintenance 88 Before Calling For Service 90 Statement of Contents Welcome to Your THERMADOR® Pro Grand® Steam Range, The Ultimate Culinary Center™ . . .1 About This Manual 2 Safety 3 Important Safety Instructions ...

Use and Care Manual
Page 5
...1 Our award-winning products have your model and serial numbers of personal style, good taste, and an appreciation for the complete culinary experience. Pay special attention to the Important Safety Instructions located at the beginning of reliable service. Your Thermador product is the ultimate expression of your ...information by opening the oven door and pulling the tab on the label mounting plate located on the right side of cooking, owning a THERMADOR® kitchen is ready and waiting to ensure years of the manual. Before you ! Our products are a dedicated chef or simply...
...1 Our award-winning products have your model and serial numbers of personal style, good taste, and an appreciation for the complete culinary experience. Pay special attention to the Important Safety Instructions located at the beginning of reliable service. Your Thermador product is the ultimate expression of your ...information by opening the oven door and pulling the tab on the label mounting plate located on the right side of cooking, owning a THERMADOR® kitchen is ready and waiting to ensure years of the manual. Before you ! Our products are a dedicated chef or simply...
Use and Care Manual
Page 7
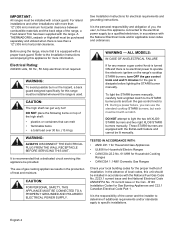
... supplier's instructions. • If you cannot reach your gas supplier, call your range and gas type are certified for use gasoline or other appliance. - All models are the same. CAUTION: When connecting the unit to propane gas, make certain the propane gas tank is moved. DO NOT store or use with...
... supplier's instructions. • If you cannot reach your gas supplier, call your range and gas type are certified for use gasoline or other appliance. - All models are the same. CAUTION: When connecting the unit to propane gas, make certain the propane gas tank is moved. DO NOT store or use with...
Use and Care Manual
Page 8
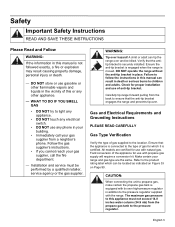
...STAR® burners manually. CAUTION: The high shelf can melt • flammable items • a total load over 30 lbs. (13.6 kg). ALL MODELS: IN CASE OF AN ELECTRICAL FAILURE If for any reason a gas control knob is turned ON and there is used. TESTED IN ACCORDANCE WITH: •... be provided. In the absence of local codes, this appliance for the gas to dissipate before lighting the STAR® burner manually. A THERMADOR® Lowback or Highshelf must be installed with the National Electrical Code and/or applicable local codes and ordinances. Z223.1 current issue and the...
...STAR® burners manually. CAUTION: The high shelf can melt • flammable items • a total load over 30 lbs. (13.6 kg). ALL MODELS: IN CASE OF AN ELECTRICAL FAILURE If for any reason a gas control knob is turned ON and there is used. TESTED IN ACCORDANCE WITH: •... be provided. In the absence of local codes, this appliance for the gas to dissipate before lighting the STAR® burner manually. A THERMADOR® Lowback or Highshelf must be installed with the National Electrical Code and/or applicable local codes and ordinances. Z223.1 current issue and the...
Use and Care Manual
Page 17
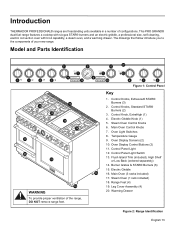
... Panel Light 12. Electric Griddle 18 16. Leg Cover Assembly (4) 20. Control Knob, ExtraHigh (1) 4. Main Oven (3 racks included) 17. Model and Parts Identification 1 1 2 2 5 8 6 OVEN LIGHT 7 350 300 400 250 450 200 100 500 BROIL CLEAN 9 > Kitchen Timer...Oven (1 rack included) 18. Electric Griddle Knob (1) 5. Warming Drawer Figure 2: Range Identification English 13 Temperature Gauge 9. Introduction THERMADOR PROFESSIONAL® ranges are freestanding units available in a number of the range, DO NOT remove range feet. This PRO GRAND...
... Panel Light 12. Electric Griddle 18 16. Leg Cover Assembly (4) 20. Control Knob, ExtraHigh (1) 4. Main Oven (3 racks included) 17. Model and Parts Identification 1 1 2 2 5 8 6 OVEN LIGHT 7 350 300 400 250 450 200 100 500 BROIL CLEAN 9 > Kitchen Timer...Oven (1 rack included) 18. Electric Griddle Knob (1) 5. Warming Drawer Figure 2: Range Identification English 13 Temperature Gauge 9. Introduction THERMADOR PROFESSIONAL® ranges are freestanding units available in a number of the range, DO NOT remove range feet. This PRO GRAND...
Use and Care Manual
Page 18
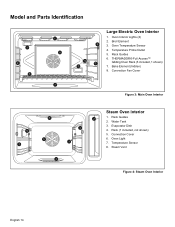
Temperature Probe Outlet 5. THERMADOR® Full Access™ 5 Gliding Oven Rack (3 included, 1 shown) 7. Temperature Sensor 8. Model and Parts Identification 1 5 6 2 8 7 3 1 Large Electric Oven Interior 1. Convection Fan Cover Figure 3: Main Oven Interior 6 1 8 5 1 7 3 Steam Oven Interior 1. Water Tank 3. Bake Element (hidden) 8. Rack Guides 2 2. Evaporator ...
Temperature Probe Outlet 5. THERMADOR® Full Access™ 5 Gliding Oven Rack (3 included, 1 shown) 7. Temperature Sensor 8. Model and Parts Identification 1 5 6 2 8 7 3 1 Large Electric Oven Interior 1. Convection Fan Cover Figure 3: Main Oven Interior 6 1 8 5 1 7 3 Steam Oven Interior 1. Water Tank 3. Bake Element (hidden) 8. Rack Guides 2 2. Evaporator ...
Use and Care Manual
Page 19
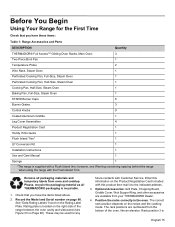
...to the indicated address. 3. Position the racks correctly in the oven. Check that you have these items: Table 1: Range Accessories and Parts DESCRIPTION Quantity THERMADOR® Full Access™ Gliding Oven Racks, Main Oven 3 Two-Piece Broil Pan 1 Temperature Probe 2 Wire Rack, Steam Oven 1 Perforated Cooking... trim; The correct rack position depends on the Rating Label Plate. The rack positions are available from oven and cooktop. Record the Model and Serial number on page 90. Rack position 3 is supplied with the Flush Island Trim. These may be used for the First...
...to the indicated address. 3. Position the racks correctly in the oven. Check that you have these items: Table 1: Range Accessories and Parts DESCRIPTION Quantity THERMADOR® Full Access™ Gliding Oven Racks, Main Oven 3 Two-Piece Broil Pan 1 Temperature Probe 2 Wire Rack, Steam Oven 1 Perforated Cooking... trim; The correct rack position depends on the Rating Label Plate. The rack positions are available from oven and cooktop. Record the Model and Serial number on page 90. Rack position 3 is supplied with the Flush Island Trim. These may be used for the First...
Use and Care Manual
Page 20
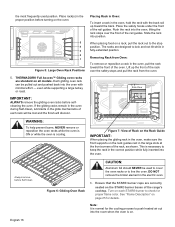
...oven. WARNING: To help prevent burns, NEVER remove or reposition the oven racks while the oven is ON or while the oven is on all models. Always remove before Self Clean CAUTION: Aluminum foil should NEVER be lost and the finish will be used position. Ensure that the STAR® ... stops over the safety stops and pull the rack from Oven: To remove or reposition a rack in the oven, pull the rack toward the back. THERMADOR® Full Access™ Gliding oven racks are correctly seated on the oven. 5 4 3 2 1 Figure 5: Large Oven Rack Positions Placing Rack in Oven: To insert a ...
...oven. WARNING: To help prevent burns, NEVER remove or reposition the oven racks while the oven is ON or while the oven is on all models. Always remove before Self Clean CAUTION: Aluminum foil should NEVER be lost and the finish will be used position. Ensure that the STAR® ... stops over the safety stops and pull the rack from Oven: To remove or reposition a rack in the oven, pull the rack toward the back. THERMADOR® Full Access™ Gliding oven racks are correctly seated on the oven. 5 4 3 2 1 Figure 5: Large Oven Rack Positions Placing Rack in Oven: To insert a ...

Use and Care Manual
Page 31
... of air for complete combustion. • Use a cover on a canner when bringing the contents to a boil. • Once the contents have reached a boil on all models. English 27 Figure 23: Flat-bottom Wok Pan Figure 24: Round-bottom Wok in Support Ring Standard Size Water Bath Canner 21 - 22 quarts (2.0 - 21...
... of air for complete combustion. • Use a cover on a canner when bringing the contents to a boil. • Once the contents have reached a boil on all models. English 27 Figure 23: Flat-bottom Wok Pan Figure 24: Round-bottom Wok in Support Ring Standard Size Water Bath Canner 21 - 22 quarts (2.0 - 21...
Use and Care Manual
Page 40
... turn off when the specified cooking time is complete. • If the door is opened during preheat or during Sabbath Mode. • For double oven models, Sabbath Mode is available for both ovens, but not at the same time. • Sabbath Mode is only available when the range is 190º...
... turn off when the specified cooking time is complete. • If the door is opened during preheat or during Sabbath Mode. • For double oven models, Sabbath Mode is available for both ovens, but not at the same time. • Sabbath Mode is only available when the range is 190º...


