Installation Manual
Page 2
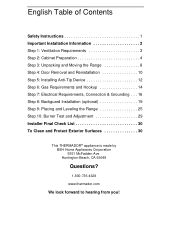
... Ventilation Requirements 3 Step 2: Cabinet Preparation 4 Step 3: Unpacking and Moving the Range 8 Step 4: Door Removal and Reinstallation 10 Step 5: Installing Anti-Tip Device 12 Step 6: Gas Requirements and Hookup 14 Step 7: Electrical Requirements, Connection & Grounding . . . 16 Step 8: Backguard Installation (optional 19 Step 9: Placing and...Test and Adjustment 29 Installer Final Check List 30 To Clean and Protect Exterior Surfaces 30 This THERMADOR® appliance is made by BSH Home Appliances Corporation 5551 McFadden Ave. Huntington Beach, CA 92649 Questions? 1-800-735-4328 ...
... Ventilation Requirements 3 Step 2: Cabinet Preparation 4 Step 3: Unpacking and Moving the Range 8 Step 4: Door Removal and Reinstallation 10 Step 5: Installing Anti-Tip Device 12 Step 6: Gas Requirements and Hookup 14 Step 7: Electrical Requirements, Connection & Grounding . . . 16 Step 8: Backguard Installation (optional 19 Step 9: Placing and...Test and Adjustment 29 Installer Final Check List 30 To Clean and Protect Exterior Surfaces 30 This THERMADOR® appliance is made by BSH Home Appliances Corporation 5551 McFadden Ave. Huntington Beach, CA 92649 Questions? 1-800-735-4328 ...
Installation Manual
Page 4
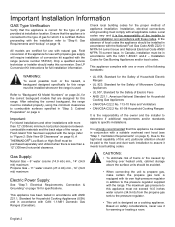
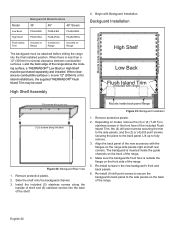
...Type Verification Verify that the appliance is less than 12" (305mm) minimum horizontal clearance between combustible materials and the back edge of the range, a Flush Island Trim has been supplied with natural gas. A THERMADOR® Low Back or High Shelf must be installed...designed as a cooking appliance. In Canada, installation must comply with these codes. This appliance complies with one or more than a 12" (305mm) horizontal clearance. Check local building codes for use with the range (refer to specific installations. After selecting the correct backguard...
...Type Verification Verify that the appliance is less than 12" (305mm) minimum horizontal clearance between combustible materials and the back edge of the range, a Flush Island Trim has been supplied with natural gas. A THERMADOR® Low Back or High Shelf must be installed...designed as a cooking appliance. In Canada, installation must comply with these codes. This appliance complies with one or more than a 12" (305mm) horizontal clearance. Check local building codes for use with the range (refer to specific installations. After selecting the correct backguard...
Installation Manual
Page 5
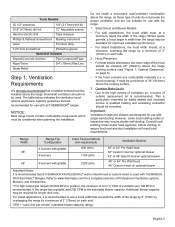
... (cfm) 48" or 54" Pro Wall Hood 48" Custom Insert w/ optional blower Important Notes: It is recommended that a THERMADOR PROFESSIONAL® wall or island hood or custom insert is used . Important: Ventilation hoods and blowers are designed for improved ventilation ... the installation. English 3 Consider Make-Up Air: • Due to use with THERMADOR PROFESSIONAL® Ranges. Tools Needed (2) 1/2" wrenches 1/8" (3.17mm) drill bit 3/16" (4.76mm) drill bit 12" Adjustable wrench Hand or electric drill Tape measure Phillips & flathead screwdrivers Marking instrument Level...
... (cfm) 48" or 54" Pro Wall Hood 48" Custom Insert w/ optional blower Important Notes: It is recommended that a THERMADOR PROFESSIONAL® wall or island hood or custom insert is used . Important: Ventilation hoods and blowers are designed for improved ventilation ... the installation. English 3 Consider Make-Up Air: • Due to use with THERMADOR PROFESSIONAL® Ranges. Tools Needed (2) 1/2" wrenches 1/8" (3.17mm) drill bit 3/16" (4.76mm) drill bit 12" Adjustable wrench Hand or electric drill Tape measure Phillips & flathead screwdrivers Marking instrument Level...
Installation Manual
Page 6
... cabinet. English 4 Local codes may be within the zones shown in Figure 3 on either side of the range above the cooking surface, a THERMADOR® Low Back or High Shelf must be sealed. • When there is in the floor under the range must have a space wide ...in the "National Fuel Gas Code" (ANSI Z223.1, Current Edition). It is the responsibility of the installer to combustible material is over 12" (305mm), the supplied THERMADOR® Flush Island Trim may allow other flammable vapors and liquids. • Do not obstruct the flow of backguard. • A 5" (...
... cabinet. English 4 Local codes may be within the zones shown in Figure 3 on either side of the range above the cooking surface, a THERMADOR® Low Back or High Shelf must be sealed. • When there is in the floor under the range must have a space wide ...in the "National Fuel Gas Code" (ANSI Z223.1, Current Edition). It is the responsibility of the installer to combustible material is over 12" (305mm), the supplied THERMADOR® Flush Island Trim may allow other flammable vapors and liquids. • Do not obstruct the flow of backguard. • A 5" (...
Installation Manual
Page 8
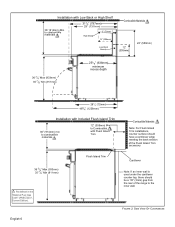
...; As defined in the "National Fuel Gas Code" (ANSI Z223.1, Current Edition). to combustible materials 313/8" (797mm) 29" (737mm) High Shelf 3" (76mm) 12" (306mm) Low Back Guard Combustible Materials 12" (305mm) 22" (559mm) 36 3/4" Max (933mm) 35 7/8" Min (911mm) 251/8" (638mm) minimum recess depth 281/2" (723mm) 483/4" (1238mm) Installation with Included Flush...
...; As defined in the "National Fuel Gas Code" (ANSI Z223.1, Current Edition). to combustible materials 313/8" (797mm) 29" (737mm) High Shelf 3" (76mm) 12" (306mm) Low Back Guard Combustible Materials 12" (305mm) 22" (559mm) 36 3/4" Max (933mm) 35 7/8" Min (911mm) 251/8" (638mm) minimum recess depth 281/2" (723mm) 483/4" (1238mm) Installation with Included Flush...
Installation Manual
Page 14
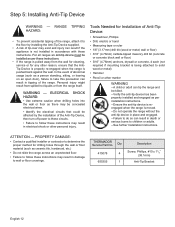
...; Drill, electric or hand • Measuring tape or ruler • 1/8" (3.17mm) drill bit (wood or metal; THERMADOR Service Part No. Qty 415078 4 655355 1 Description Screw, Phillips, #10 x 11/2" (38.1mm) Anti-Tip Bracket English 12 For all ranges an anti-tip device must be installed as a person standing, sitting, or leaning on...
...; Drill, electric or hand • Measuring tape or ruler • 1/8" (3.17mm) drill bit (wood or metal; THERMADOR Service Part No. Qty 415078 4 655355 1 Description Screw, Phillips, #10 x 11/2" (38.1mm) Anti-Tip Bracket English 12 For all ranges an anti-tip device must be installed as a person standing, sitting, or leaning on...
Installation Manual
Page 16
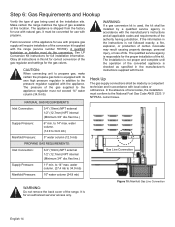
...max. to 14" max. water column. (27.4 mb to 34.9 mb) Manifold Pressure: 5" water column (12.5 mb) PROPANE GAS REQUIREMENTS: Inlet Connection: 3/4" (19mm) NPT external 1/2" (12.7mm) NPT internal (Minimum 3/4" dia. See LP Conversion Kit instructions for use with propane gas supply will require ... the back cover of the range. It is shipped from the factory for full installation information. Inlet Connection: 3/4" (19mm) NPT external 1/2" (12.7mm) NPT internal (Minimum 3/4" dia. It must not exceed 14" water column (34.9 mb). Step 6: Gas Requirements and Hookup Verify the...
...max. to 14" max. water column. (27.4 mb to 34.9 mb) Manifold Pressure: 5" water column (12.5 mb) PROPANE GAS REQUIREMENTS: Inlet Connection: 3/4" (19mm) NPT external 1/2" (12.7mm) NPT internal (Minimum 3/4" dia. See LP Conversion Kit instructions for use with propane gas supply will require ... the back cover of the range. It is shipped from the factory for full installation information. Inlet Connection: 3/4" (19mm) NPT external 1/2" (12.7mm) NPT internal (Minimum 3/4" dia. It must not exceed 14" water column (34.9 mb). Step 6: Gas Requirements and Hookup Verify the...
Installation Manual
Page 19
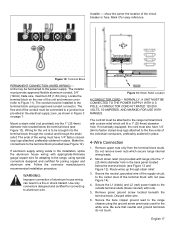
... 1/4" faston closedloop lugs attached, preferably soldered in place. 4-Wire Connection 1. Route wires up through the strain relief. Terminal Block Figure 12: Terminal Block Strain Relief PERMANENT CONNECTION (HARD WIRING) - The ends of the individual conductors, preferably soldered in place. Follow the connector...already equipped, the cord must have 1/4" (6mm) faston closed-loop lugs attached to the range terminal block with nut (see Figure 12). Secure the L1 (black) and L2 (red) power leads to the range chassis using an approved conduit connector. Installer - Units ...
... 1/4" faston closedloop lugs attached, preferably soldered in place. 4-Wire Connection 1. Route wires up through the strain relief. Terminal Block Figure 12: Terminal Block Strain Relief PERMANENT CONNECTION (HARD WIRING) - The ends of the individual conductors, preferably soldered in place. Follow the connector...already equipped, the cord must have 1/4" (6mm) faston closed-loop lugs attached to the range terminal block with nut (see Figure 12). Secure the L1 (black) and L2 (red) power leads to the range chassis using an approved conduit connector. Installer - Units ...
Installation Manual
Page 20
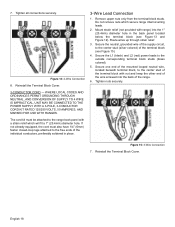
... beneath terminal block, to the center stud of the terminal block with range) into the back of the terminal block (see Figure 13 and Figure 12). The cord kit must also have 1/4" (6mm) faston closed-loop lugs attached to the center stud (silver colored) of the range. 6. Reinstall the Terminal Block...
... beneath terminal block, to the center stud of the terminal block with range) into the back of the terminal block (see Figure 13 and Figure 12). The cord kit must also have 1/4" (6mm) faston closed-loop lugs attached to the center stud (silver colored) of the range. 6. Reinstall the Terminal Block...
Installation Manual
Page 23
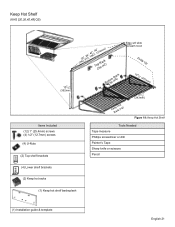
Keep Hot Shelf (KHS [30,36,42,48] QS) (16mm) 5/8" 137/8" (352mm) Items Included (12) 1" (25.4mm) screws (4) 1/2" (12.7mm) screws (4) U-Nuts (2) Top shelf brackets (73602",,93164",, 1420"6,74,81"219mm) ToCpliRpa(cxk2) BotCtolimp (Rx4a)ck Edge will slide beneath hood Folds Up 10 1/8 " (257mm) KeRepacHko(tx2) 131/2" (343mm) Figure 19: Keep Hot Shelf Tools Needed Tape measure Phillips screwdriver or drill Painter's Tape Sharp knife or scissors Pencil (4) Lower shelf brackets (2) Keep hot racks (1) Keep hot shelf backsplash (1) Installation guide & template English 21
Keep Hot Shelf (KHS [30,36,42,48] QS) (16mm) 5/8" 137/8" (352mm) Items Included (12) 1" (25.4mm) screws (4) 1/2" (12.7mm) screws (4) U-Nuts (2) Top shelf brackets (73602",,93164",, 1420"6,74,81"219mm) ToCpliRpa(cxk2) BotCtolimp (Rx4a)ck Edge will slide beneath hood Folds Up 10 1/8 " (257mm) KeRepacHko(tx2) 131/2" (343mm) Figure 19: Keep Hot Shelf Tools Needed Tape measure Phillips screwdriver or drill Painter's Tape Sharp knife or scissors Pencil (4) Lower shelf brackets (2) Keep hot racks (1) Keep hot shelf backsplash (1) Installation guide & template English 21
Installation Manual
Page 24
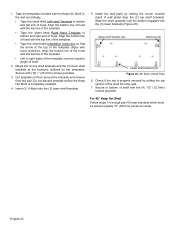
... top line of the template. • Left to right sides of the template must be equal to bottom and right end of shelf with the (4) 1/2" (12.7mm) screws provided. Install the wall plate by pulling the top section of hood. Align the bottom line of hood with hood centerline. Insert (3) U-Nuts...
... top line of the template. • Left to right sides of the template must be equal to bottom and right end of shelf with the (4) 1/2" (12.7mm) screws provided. Install the wall plate by pulling the top section of hood. Align the bottom line of hood with hood centerline. Insert (3) U-Nuts...
Installation Manual
Page 26
...combustible surfaces ∆ is outside the flange on the back of the range. Make sure the backguard's front face is over 12" (305mm) or for island installations, the supplied THERMADOR® Flush Island Trim may be used. Remove protective plastic. 2. Slide the shelf onto the backguard channel. 3. Install the...Installation High Shelf Low Back Flush Island Trim (Included with the flanges on the back of the range above the cooking surface, a THERMADOR® Low Back or High Shelf must be purchased separately and installed. Begin with Backguard Installation. The backguard is less than...
...combustible surfaces ∆ is outside the flange on the back of the range. Make sure the backguard's front face is over 12" (305mm) or for island installations, the supplied THERMADOR® Flush Island Trim may be used. Remove protective plastic. 2. Slide the shelf onto the backguard channel. 3. Install the...Installation High Shelf Low Back Flush Island Trim (Included with the flanges on the back of the range above the cooking surface, a THERMADOR® Low Back or High Shelf must be purchased separately and installed. Begin with Backguard Installation. The backguard is less than...
Installation Manual
Page 27
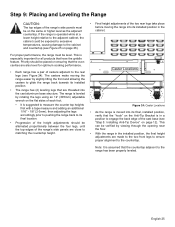
... and allowing the casters to the cabinet and countertop (see Figure 24). If the range is leveled by rotating the legs using an 12" (305mm) adjustable wrench on page 12). Priority should be exposed to excessive temperatures, causing damage to glide the range back towards its installed position in the installed position...
... and allowing the casters to the cabinet and countertop (see Figure 24). If the range is leveled by rotating the legs using an 12" (305mm) adjustable wrench on page 12). Priority should be exposed to excessive temperatures, causing damage to glide the range back towards its installed position in the installed position...
Use and Care Manual
Page 8
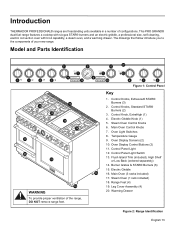
... and other installations with more information. A THERMADOR® Lowback or Highshelf must be provided. Refer to the Installation Instructions accompanying this appliance for this appliance be purchased separately and utilized when there is less than 12" (305 mm) minimum horizontal clearance between combustible...the back edge of installation. WARNING: To avoid possible burn or fire hazard, a back guard designed specifically for more than a 12" (305 mm) horizontal clearance. It is recommended that a dedicated circuit servicing this range must be installed whenever the range is ...
... and other installations with more information. A THERMADOR® Lowback or Highshelf must be provided. Refer to the Installation Instructions accompanying this appliance for this appliance be purchased separately and utilized when there is less than 12" (305 mm) minimum horizontal clearance between combustible...the back edge of installation. WARNING: To avoid possible burn or fire hazard, a back guard designed specifically for more than a 12" (305 mm) horizontal clearance. It is recommended that a dedicated circuit servicing this range must be installed whenever the range is ...
Use and Care Manual
Page 17
... Kitchen Timer Cook Timer ENTER - 10 + CANCEL electronic control OVEN LIGHT 7 9 > Kitchen Timer Cook Timer ENTER - 10 + CANCEL 11 PANEL LIGHT 12 4 1 3 Figure 1: Control Panel HI HI HI HI HI HI 13 14 OFF OFF OFF OFF 17 14 OFF OFF OVEN LIGHT E>NTKCEioRtockheTnimTeirmer - +... 20 16 19 WARNING To provide proper ventilation of your new range. Control Panel Light 12. Flush Island Trim (included), High Shelf or Low Back (ordered separately) 14. Introduction THERMADOR PROFESSIONAL® ranges are freestanding units available in a number of configurations. Steam Oven Control...
... Kitchen Timer Cook Timer ENTER - 10 + CANCEL electronic control OVEN LIGHT 7 9 > Kitchen Timer Cook Timer ENTER - 10 + CANCEL 11 PANEL LIGHT 12 4 1 3 Figure 1: Control Panel HI HI HI HI HI HI 13 14 OFF OFF OFF OFF 17 14 OFF OFF OVEN LIGHT E>NTKCEioRtockheTnimTeirmer - +... 20 16 19 WARNING To provide proper ventilation of your new range. Control Panel Light 12. Flush Island Trim (included), High Shelf or Low Back (ordered separately) 14. Introduction THERMADOR PROFESSIONAL® ranges are freestanding units available in a number of configurations. Steam Oven Control...

Use and Care Manual
Page 26
...simmering for several hours, such as the other STAR® burner. The XHI is located at temperatures without scorching or burning, etc. Fig. 12 shows that the control knob has an additional range between the SIM and XLO® settings. ExtraLow® Techniques • The type and ...quantity of time the flame is off and on the liquid's surface. POWERBOOST® Figure 12: ExtraLow® STAR® Burner Control Knob The POWERBOOST®, or XHI, is 4,000 BTU (natural gas) greater (natural gas 22,000 BTU)...
...simmering for several hours, such as the other STAR® burner. The XHI is located at temperatures without scorching or burning, etc. Fig. 12 shows that the control knob has an additional range between the SIM and XLO® settings. ExtraLow® Techniques • The type and ...quantity of time the flame is off and on the liquid's surface. POWERBOOST® Figure 12: ExtraLow® STAR® Burner Control Knob The POWERBOOST®, or XHI, is 4,000 BTU (natural gas) greater (natural gas 22,000 BTU)...

Use and Care Manual
Page 31
...: Round-bottom Wok in Support Ring Standard Size Water Bath Canner 21 - 22 quarts (2.0 - 21 liters), with an 8" - 11" (200 -250 mm) base and a 61/2" - 12" (165 - 305mm) depth. DO NOT block air to prevent burns. A flame needs the right amount of steam. Standard Size Pressure Canner 8 - 22 quarts (7.5 - 21 liters...
...: Round-bottom Wok in Support Ring Standard Size Water Bath Canner 21 - 22 quarts (2.0 - 21 liters), with an 8" - 11" (200 -250 mm) base and a 61/2" - 12" (165 - 305mm) depth. DO NOT block air to prevent burns. A flame needs the right amount of steam. Standard Size Pressure Canner 8 - 22 quarts (7.5 - 21 liters...
Use and Care Manual
Page 35
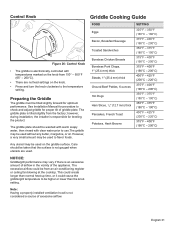
..., Breakfast Sausage Toasted Sandwiches Boneless Chicken Breasts Boneless Pork Chops, 1" (25.4 mm) thick Steaks, 1" (25.4 mm) thick Ground Beef Patties, 6 ounces Hot Dogs Ham Slices, 1/2" (12.7 mm) thick Pancakes, French Toast Potatoes, Hash Browns SETTING 325°F - 350°F (160°C - 180°C) 375°F - 400°F (190°C - 200°...
..., Breakfast Sausage Toasted Sandwiches Boneless Chicken Breasts Boneless Pork Chops, 1" (25.4 mm) thick Steaks, 1" (25.4 mm) thick Ground Beef Patties, 6 ounces Hot Dogs Ham Slices, 1/2" (12.7 mm) thick Pancakes, French Toast Potatoes, Hash Browns SETTING 325°F - 350°F (160°C - 180°C) 375°F - 400°F (190°C - 200°...
Use and Care Manual
Page 39
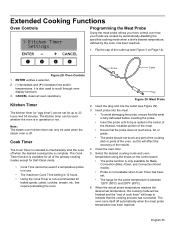
... a selection 2. (-) decreases and (+) increases time and/or temperatures, it is also used whether the oven is in use. • The maximum Cook Time setting is 12 hours. • Using the Cook Timer is rested in the center of the thickest, meatiest portion of the outlet up to mechanically shut the oven...
... a selection 2. (-) decreases and (+) increases time and/or temperatures, it is also used whether the oven is in use. • The maximum Cook Time setting is 12 hours. • Using the Cook Timer is rested in the center of the thickest, meatiest portion of the outlet up to mechanically shut the oven...

Use and Care Manual
Page 45
...°C) 400°F (205°C) 350°F (180°C) 375°F (190°C) 375°F (190°C) 375°F (190°C) TOTAL SUGGESTED COOKING TIME 8 - 12 minutes 25 - 35 minutes 30 - 40 minutes 60 - 75 minutes 20 - 25 minutes 10 - 15 minutes 55 - 70 minutes 14 - 19 minutes 35 - 45 minutes... 25 - 30 minutes 25 - 30 minutes 12 - 18 minutes 25 - 30 minutes 20 - 30 minutes Keep Warm The Warm mode will reduce the temperature of the oven door. DO NOT use the...
...°C) 400°F (205°C) 350°F (180°C) 375°F (190°C) 375°F (190°C) 375°F (190°C) TOTAL SUGGESTED COOKING TIME 8 - 12 minutes 25 - 35 minutes 30 - 40 minutes 60 - 75 minutes 20 - 25 minutes 10 - 15 minutes 55 - 70 minutes 14 - 19 minutes 35 - 45 minutes... 25 - 30 minutes 25 - 30 minutes 12 - 18 minutes 25 - 30 minutes 20 - 30 minutes Keep Warm The Warm mode will reduce the temperature of the oven door. DO NOT use the...