Installation Manual
Page 5
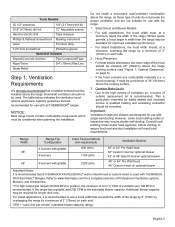
... with griddle 36" 6 burners 800 (cfm) 1100 (cfm) 36" or 42" Pro Wall Hood 36" Custom Insert w/ optional blower 42" or 48" Island Hood w/ optional blower 48" 6 burners with all THERMADOR® ranges. English 3 Consult local building codes and/or local agencies, before starting, to the estimated blower capacity. Additional blower capacity may be...
... with griddle 36" 6 burners 800 (cfm) 1100 (cfm) 36" or 42" Pro Wall Hood 36" Custom Insert w/ optional blower 42" or 48" Island Hood w/ optional blower 48" 6 burners with all THERMADOR® ranges. English 3 Consult local building codes and/or local agencies, before starting, to the estimated blower capacity. Additional blower capacity may be...
Installation Manual
Page 7
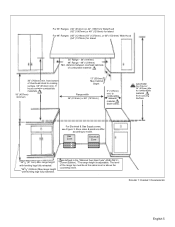
...For Electrical & Gas Supply zones, see Figure 3. CAUTION! If hood contains combustible materials. 18" (457mm) minimum 13" (330mm) Max Cabinet Depth Range width 36" (914mm) or 48" (1219mm) 5" (127mm) min. to cooking surface. 36" (914mm) min. as defined in the "National Fuel Gas Code" ANSI Z223.1,... Current Edition). *The range height is adjustable. For 36" Ranges {36" (914mm) or 42" (1067mm) Wide Hood {42" (1067mm) or 48" (1219mm) for Island For 48" Ranges {48" (1219mm) 54" (1372mm), or 60" (1524mm) Wide Hood {54" (1372mm) for ...
...For Electrical & Gas Supply zones, see Figure 3. CAUTION! If hood contains combustible materials. 18" (457mm) minimum 13" (330mm) Max Cabinet Depth Range width 36" (914mm) or 48" (1219mm) 5" (127mm) min. to cooking surface. 36" (914mm) min. as defined in the "National Fuel Gas Code" ANSI Z223.1,... Current Edition). *The range height is adjustable. For 36" Ranges {36" (914mm) or 42" (1067mm) Wide Hood {42" (1067mm) or 48" (1219mm) for Island For 48" Ranges {48" (1219mm) 54" (1372mm), or 60" (1524mm) Wide Hood {54" (1372mm) for ...
Installation Manual
Page 9
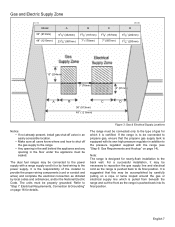
... the installer to the back wall. It is designed for details. For a successful installation, it is certified. Gas and Electric Supply Zone Model 36" (913mm) 48" (1219mm) A 91/8" (232mm) 231/8" (587mm) B 73/8" (187mm) 7" (178mm) C 73/8" (187mm) 7" (587mm) D 91/8" (232mm) 77/8" (200mm) 10" (254mm) 3" (76mm) 2" ... installation to provide the proper wiring components (cord or conduit and wires) and complete the electrical connection as the range is pushed back to the range. • Any opening in the wall behind the appliance and any opening in the floor under the appliance must...
... the installer to the back wall. It is designed for details. For a successful installation, it is certified. Gas and Electric Supply Zone Model 36" (913mm) 48" (1219mm) A 91/8" (232mm) 231/8" (587mm) B 73/8" (187mm) 7" (178mm) C 73/8" (187mm) 7" (587mm) D 91/8" (232mm) 77/8" (200mm) 10" (254mm) 3" (76mm) 2" ... installation to provide the proper wiring components (cord or conduit and wires) and complete the electrical connection as the range is pushed back to the range. • Any opening in the wall behind the appliance and any opening in the floor under the appliance must...
Installation Manual
Page 10
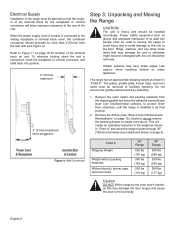
...receptacle or conduit connector, and slide back into position. 2" (51mm) maximum Step 3: Unpacking and Moving the Range CAUTION: The unit is installed in its final position. 2. Figure 4: Wall Connection Chart A Shipping Weight Weight... without packing materials Without door(s), burner caps, and oven racks 36" Range 420 lbs (191 kg) 360 lbs (163 kg) 260 lbs (118 kg) 48" Range 590 lbs (268 kg) 530 lbs (240 kg) 390 lbs (177... kg) Caution DO NOT lift the range by the oven door's handle, as gloves and...
...receptacle or conduit connector, and slide back into position. 2" (51mm) maximum Step 3: Unpacking and Moving the Range CAUTION: The unit is installed in its final position. 2. Figure 4: Wall Connection Chart A Shipping Weight Weight... without packing materials Without door(s), burner caps, and oven racks 36" Range 420 lbs (191 kg) 360 lbs (163 kg) 260 lbs (118 kg) 48" Range 590 lbs (268 kg) 530 lbs (240 kg) 390 lbs (177... kg) Caution DO NOT lift the range by the oven door's handle, as gloves and...
Installation Manual
Page 17
Installer is responsible for ensuring that has been permanently mounted inside the range. • Make sure the gas supply is turned off at the manual shut-off the gas supply. Do not attempt any adjustment of any kind ... a gas leak. When checking the manifold gas pressure, the inlet pressure to the regulator should be installed external to or less than 1/2 psig (3.5kPa.). The range is 48" (1219mm); The appliance and its own pressure regulator that the installation, gas connections, and grounding comply with the back of the unit.
Installer is responsible for ensuring that has been permanently mounted inside the range. • Make sure the gas supply is turned off at the manual shut-off the gas supply. Do not attempt any adjustment of any kind ... a gas leak. When checking the manifold gas pressure, the inlet pressure to the regulator should be installed external to or less than 1/2 psig (3.5kPa.). The range is 48" (1219mm); The appliance and its own pressure regulator that the installation, gas connections, and grounding comply with the back of the unit.
Installation Manual
Page 18
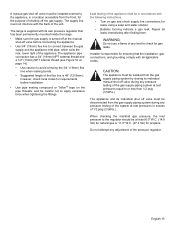
... Prior to servicing appliance, always disconnect appliance electrical supply cord, if so equipped, from the power source (breaker/fuse panel) because critical range components, including the surface burner spark reignition module, require 120 VAC to operate safely and properly. WARNING: An improper 120/ 240 VAC ...turning off the proper circuit breaker or disconnecting the proper fuse. Dual Fuel range models can be connected to unplug or disconnect the unit from being turned ON accidentally. MODEL TYPE 36" 48" Chart B: Electrical Supply Circuit Requirements VOLTAGE 240/208 VAC 240/208 ...
... Prior to servicing appliance, always disconnect appliance electrical supply cord, if so equipped, from the power source (breaker/fuse panel) because critical range components, including the surface burner spark reignition module, require 120 VAC to operate safely and properly. WARNING: An improper 120/ 240 VAC ...turning off the proper circuit breaker or disconnecting the proper fuse. Dual Fuel range models can be connected to unplug or disconnect the unit from being turned ON accidentally. MODEL TYPE 36" 48" Chart B: Electrical Supply Circuit Requirements VOLTAGE 240/208 VAC 240/208 ...
Installation Manual
Page 21
... usually installed with a 16" or 24" (406mm or 1372mm) space on backsplash until after installation is complete. • If range is already installed, refer to the manufacture's instructions to disconnect gas and power supplies. Remove protective plastic. Before you begin read these...across top & bottom Figure 16: Backsplash Installation English 19 Backsplash Installation (PA [30,36, 48] JBS) 3. Parts Included Tools Needed (10) 1" (25.4mm) Phillips screwdriver or screws drill 30", 36", 48" (760mm, 913mm, 1218mm) (1) Backsplash Tape measure 42" (1070mm) (1) Installation Guide Pencil...
... usually installed with a 16" or 24" (406mm or 1372mm) space on backsplash until after installation is complete. • If range is already installed, refer to the manufacture's instructions to disconnect gas and power supplies. Remove protective plastic. Before you begin read these...across top & bottom Figure 16: Backsplash Installation English 19 Backsplash Installation (PA [30,36, 48] JBS) 3. Parts Included Tools Needed (10) 1" (25.4mm) Phillips screwdriver or screws drill 30", 36", 48" (760mm, 913mm, 1218mm) (1) Backsplash Tape measure 42" (1070mm) (1) Installation Guide Pencil...
Installation Manual
Page 25
...48" Dual Fuel Range 6 Burner Griddle - Use extreme caution and wear thick protective gloves to avoid potential laceration to a backguard, install the backsplash first and the backguard second before use. Severe injury could get very hot! Backguard Installation PRD364JDGU PRD364JDGC PRD366JGU PRD366JGC PRD486JDGU PRD486JDGC PRD48JDSGU... PRD48JDSGC AVAILABLE FOR THESE MODELS: Pro Grand® 36" Dual Fuel Range 4 Burner Griddle Pro Grand® 36" Dual Fuel Range 4 Burner Griddle - Canadian WARNING: ...
...48" Dual Fuel Range 6 Burner Griddle - Use extreme caution and wear thick protective gloves to avoid potential laceration to a backguard, install the backsplash first and the backguard second before use. Severe injury could get very hot! Backguard Installation PRD364JDGU PRD364JDGC PRD366JGU PRD366JGC PRD486JDGU PRD486JDGC PRD48JDSGU... PRD48JDSGC AVAILABLE FOR THESE MODELS: Pro Grand® 36" Dual Fuel Range 4 Burner Griddle Pro Grand® 36" Dual Fuel Range 4 Burner Griddle - Canadian WARNING: ...
Installation Manual
Page 26
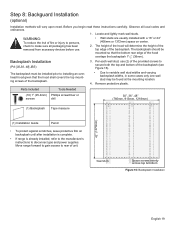
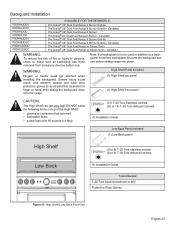
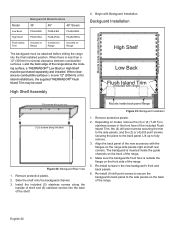
... Trim Backguard Kit Model Numbers 36" 48" 48" Steam PA36JLBG PA48JLBG PA48JLBSG PA36JHSG PA48JHSG PA48JHSSG Included on Range Included on Range Included on Range The backguard must be purchased separately and installed. When there is over 12" (305mm) or for island installations, the supplied THERMADOR® Flush Island Trim may be ...combustible surfaces ∆ is less than a 12" (305mm) horizontal clearance between combustible surfaces ∆ and the back edge of the range above the cooking surface, a THERMADOR® Low Back or High Shelf must be attached before sliding the...
... Trim Backguard Kit Model Numbers 36" 48" 48" Steam PA36JLBG PA48JLBG PA48JLBSG PA36JHSG PA48JHSG PA48JHSSG Included on Range Included on Range Included on Range The backguard must be purchased separately and installed. When there is over 12" (305mm) or for island installations, the supplied THERMADOR® Flush Island Trim may be ...combustible surfaces ∆ is less than a 12" (305mm) horizontal clearance between combustible surfaces ∆ and the back edge of the range above the cooking surface, a THERMADOR® Low Back or High Shelf must be attached before sliding the...
Installation Manual
Page 30
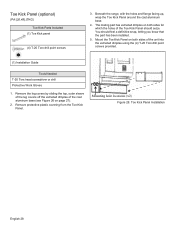
... locations (x2) Figure 28: Toe Kick Panel Installation English 28 Toe Kick Panel (optional) (PA [36,48] JTKG) Toe Kick Parts Included (1) Toe Kick panel (4) T-20 Torx drill point screws 3. You should seize. Beneath the range, with the holes and flange facing up, wrap the Toe Kick Panel around the cast aluminum...
... locations (x2) Figure 28: Toe Kick Panel Installation English 28 Toe Kick Panel (optional) (PA [36,48] JTKG) Toe Kick Parts Included (1) Toe Kick panel (4) T-20 Torx drill point screws 3. You should seize. Beneath the range, with the holes and flange facing up, wrap the Toe Kick Panel around the cast aluminum...


