Design Guide - Pro Grand Ranges
Page 5
... 60 hz, 4 wire, single-phase power supply. the supply line must be installed external to the lp Conversion instructions for complete details before installing. MODEL prD304eg prD366eg prD366epg prD364eDg prD364eDpg prD486eDg prD486eDpg REQUIRED CIRCUIT BREAKER 240/208v aC, 60hz 35 amp 35 amp 35 amp ...35 amp 35 amp 50 amp 50 amp ALL-GAS: thermador pro grand all -gas...
... 60 hz, 4 wire, single-phase power supply. the supply line must be installed external to the lp Conversion instructions for complete details before installing. MODEL prD304eg prD366eg prD366epg prD364eDg prD364eDpg prD486eDg prD486eDpg REQUIRED CIRCUIT BREAKER 240/208v aC, 60hz 35 amp 35 amp 35 amp ...35 amp 35 amp 50 amp 50 amp ALL-GAS: thermador pro grand all -gas...

Design Guide - Pro Grand Ranges
Page 8
... above cooking surface to the lp Conversion instructions for use with propane. if the location/job site requires conversion from cooking surface to the ventilation section or www.thermador.com for island installations, where there is also available. field conversion must be installed in inches 1.800.735.4328 | thermaDOr.COm 25 refer to combustible side...
... above cooking surface to the lp Conversion instructions for use with propane. if the location/job site requires conversion from cooking surface to the ventilation section or www.thermador.com for island installations, where there is also available. field conversion must be installed in inches 1.800.735.4328 | thermaDOr.COm 25 refer to combustible side...
Design Guide - Pro Grand Ranges
Page 10
... Custom inserts would provide the appropriate depth from natural gas to the lp Conversion instructions for a complete selection of 27-inches. Downdraft ventilation should not be installed whenever the range is used. CAUTION: to the ventilation section or www.thermador.com for further information. refer to avoid possible burn or fire hazard...
... Custom inserts would provide the appropriate depth from natural gas to the lp Conversion instructions for a complete selection of 27-inches. Downdraft ventilation should not be installed whenever the range is used. CAUTION: to the ventilation section or www.thermador.com for further information. refer to avoid possible burn or fire hazard...
Design Guide - Pro Grand Ranges
Page 12
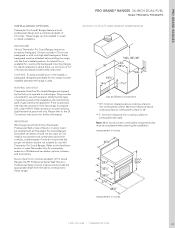
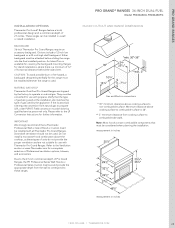
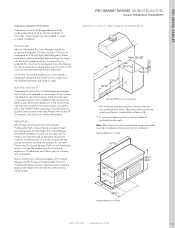
...backguard. Note: most hoods contain combustible components that a thermador professional Wall or island hood or Custom insert be attached before sliding the range into the final installed position. refer to the lp Conversion instructions for this range must be done by qualifi...ed service personnel only. PRO GRAND RANGES INSTALLATION OPTIONS thermador pro grand® ranges feature a bold, professional design ...
...backguard. Note: most hoods contain combustible components that a thermador professional Wall or island hood or Custom insert be attached before sliding the range into the final installed position. refer to the lp Conversion instructions for this range must be done by qualifi...ed service personnel only. PRO GRAND RANGES INSTALLATION OPTIONS thermador pro grand® ranges feature a bold, professional design ...
Design Guide - Pro Grand Ranges
Page 14
... is 36". ** 3" minimum clearance from natural gas to the lp Conversion instructions for this range must be installed in inches 1.800.735.4328 | thermaDOr.COm 31 please refer to propane (lp), order plpkit. PRO GRAND® RANGES 48-INCh DUAL-FUEL Models: PRD486EDG, PRD486EDPG 48-inCh CUtOUt anD range DimensiOns gas and electric connections...
... is 36". ** 3" minimum clearance from natural gas to the lp Conversion instructions for this range must be installed in inches 1.800.735.4328 | thermaDOr.COm 31 please refer to propane (lp), order plpkit. PRO GRAND® RANGES 48-INCh DUAL-FUEL Models: PRD486EDG, PRD486EDPG 48-inCh CUtOUt anD range DimensiOns gas and electric connections...
Installation Instructions
Page 2
... may result causing property damage, personal injury or death. - WARNING: If the information in this appliance is being installed. 2. INSTALLER: Please leave these Installation Instructions with all controls are in the vicinity of this range outdoors. OWNER: Please retain these instructions for installation in your building. ■ Immediately call your gas supplier, call the fire department. -
... may result causing property damage, personal injury or death. - WARNING: If the information in this appliance is being installed. 2. INSTALLER: Please leave these Installation Instructions with all controls are in the vicinity of this range outdoors. OWNER: Please retain these instructions for installation in your building. ■ Immediately call your gas supplier, call the fire department. -

Installation Instructions
Page 13
...back against the wall. WARNING • ALL RANGES CAN TIP • INJURY TO PERSONS COULD RESULT • INSTALL ANTI-TIP DEVICES PACKED WITH RANGE • SEE INSTALLATION INSTRUCTIONS WARNING ELECTRICAL SHOCK HAZARD • Use extreme caution when drilling holes into the wall or floor. To prevent ...accidental tipping of the range, attach it to the floor, wall or cabinet by the installation of the Anti-Tip Device, ...
...back against the wall. WARNING • ALL RANGES CAN TIP • INJURY TO PERSONS COULD RESULT • INSTALL ANTI-TIP DEVICES PACKED WITH RANGE • SEE INSTALLATION INSTRUCTIONS WARNING ELECTRICAL SHOCK HAZARD • Use extreme caution when drilling holes into the wall or floor. To prevent ...accidental tipping of the range, attach it to the floor, wall or cabinet by the installation of the Anti-Tip Device, ...
Installation Instructions
Page 15
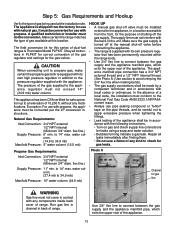
...installer must not exceed 14" (34.9 mb) water column. This appliance has been CSA certified for this location. Repair all instructions...line must be in accordance with the following instructions. • Turn on gas and check...testing of a local code, the installation must not come in a location ...instructions. Propane Gas Requirements: Photo A Inlet Connection: 3/4" NPT external 1/2" NPT internal (Minimum 3/4" diam. Make sure the gas supply is turned off at the installation...; A manual gas shut-off valve must be installed external to the appliance, in contact with natural ...
...installer must not exceed 14" (34.9 mb) water column. This appliance has been CSA certified for this location. Repair all instructions...line must be in accordance with the following instructions. • Turn on gas and check...testing of a local code, the installation must not come in a location ...instructions. Propane Gas Requirements: Photo A Inlet Connection: 3/4" NPT external 1/2" NPT internal (Minimum 3/4" diam. Make sure the gas supply is turned off at the installation...; A manual gas shut-off valve must be installed external to the appliance, in contact with natural ...
Installation Instructions
Page 23
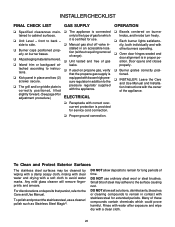
...of gas for extended periods. Door opens and closes properly. ❑ Burner grates correctly positioned. ❑ INSTALLER: Leave the Care and Use Manual and Installation Instructions with a clean cloth. 20 front to remain for service cord connection. ❑ Proper ground connection. ...gas shut off valve in contact with stainless steel for which could prove harmful. For discolorations or deposits that persist, refer to instructions. ❑ If used on burner knobs, and knobs turn freely. ❑ Each burner lights satisfactorily, both individually and ...
...of gas for extended periods. Door opens and closes properly. ❑ Burner grates correctly positioned. ❑ INSTALLER: Leave the Care and Use Manual and Installation Instructions with a clean cloth. 20 front to remain for service cord connection. ❑ Proper ground connection. ...gas shut off valve in contact with stainless steel for which could prove harmful. For discolorations or deposits that persist, refer to instructions. ❑ If used on burner knobs, and knobs turn freely. ❑ Each burner lights satisfactorily, both individually and ...
User Manual
Page 2
...paration agréé ou la compagnie de gaz. Follow the gas supplier's instructions. ■ If you ! Installation and service must be performed by BSH Home Appliances Corporation 5551 McFadden Ave. Suivez les instructions de la compagnie. ■ Si vous n'arrivez pas à contacter votre ... ou la mort. - Huntington Beach, CA 92649 Questions? 1-800-735-4328 www.thermador.com We look forward to light any appliance. ■ Do not touch any other appliance. - This Thermador Appliance is not followed exactly, a fire or explosion may result causing property damage, ...
...paration agréé ou la compagnie de gaz. Follow the gas supplier's instructions. ■ If you ! Installation and service must be performed by BSH Home Appliances Corporation 5551 McFadden Ave. Suivez les instructions de la compagnie. ■ Si vous n'arrivez pas à contacter votre ... ou la mort. - Huntington Beach, CA 92649 Questions? 1-800-735-4328 www.thermador.com We look forward to light any appliance. ■ Do not touch any other appliance. - This Thermador Appliance is not followed exactly, a fire or explosion may result causing property damage, ...
User Manual
Page 3
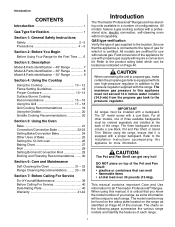
... Calling For Service Do-It-Yourself Maintenance 39 Before Calling For Service 40 Data Rating Plate 40 Warranty 41-42 Introduction The Thermador Professional® Ranges are certified for use with propane gas supply will be located as identified on Page 40 of this manual...plastics or containers that it is equipped with its own high-pressure regulator in a number of gas for more information. Refer to the Installation Instructions accompanying this manual, it is certified. Refer to the product rating label which it is equipped with a proper backguard. When using ...
... Calling For Service Do-It-Yourself Maintenance 39 Before Calling For Service 40 Data Rating Plate 40 Warranty 41-42 Introduction The Thermador Professional® Ranges are certified for use with propane gas supply will be located as identified on Page 40 of this manual...plastics or containers that it is equipped with its own high-pressure regulator in a number of gas for more information. Refer to the Installation Instructions accompanying this manual, it is certified. Refer to the product rating label which it is equipped with a proper backguard. When using ...
User Manual
Page 4
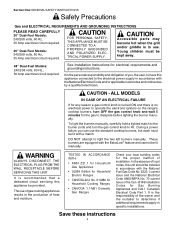
... WARNING ALWAYS DISCONNECT THE ELECTRICAL PLUG FROM THE WALL RECEPTACLE BEFORE SERVICING THIS UNIT. B149 Installation Codes for electrical requirements and grounding instructions. See Installation Instructions for Gas Burning Appliances and C22.1 Canadian Electrical Code Part 1. To light the burners ...circuit servicing this unit should be provided. Save these instructions 2 CAUTION - During a power failure you , the user, to have this appliance connected to determine if additional requirements apply in specific installations. TESTED IN ACCORDANCE WITH: • ANSI Z21.1 ...
... WARNING ALWAYS DISCONNECT THE ELECTRICAL PLUG FROM THE WALL RECEPTACLE BEFORE SERVICING THIS UNIT. B149 Installation Codes for electrical requirements and grounding instructions. See Installation Instructions for Gas Burning Appliances and C22.1 Canadian Electrical Code Part 1. To light the burners ...circuit servicing this unit should be provided. Save these instructions 2 CAUTION - During a power failure you , the user, to have this appliance connected to determine if additional requirements apply in specific installations. TESTED IN ACCORDANCE WITH: • ANSI Z21.1 ...
User Manual
Page 5
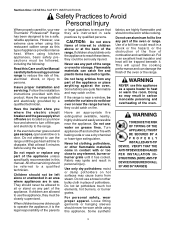
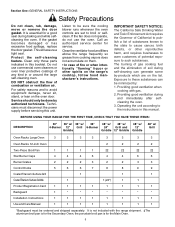
When using kitchen appliances, basic safety precautions must be closely supervised. Follow the installation instructions provided with this manual. Have the range installed and electrically grounded by qualified persons. Have the installer show you know how and where to turn off and smother fire with or too close to... any part of the appliance. All other servicing should not be seriously injured. Children should be worn while using your new Thermador Professional® ...
When using kitchen appliances, basic safety precautions must be closely supervised. Follow the installation instructions provided with this manual. Have the range installed and electrically grounded by qualified persons. Have the installer show you know how and where to turn off and smother fire with or too close to... any part of the appliance. All other servicing should not be seriously injured. Children should be worn while using your new Thermador Professional® ...
User Manual
Page 7
...-Piece Broil Pan Star Burner Caps 1 1 1 1 2‡ 2‡ 2‡ 2‡ 4 4 4 6 4 4 6 6 Burner Grates 2 2 2 3 2 2 3 3 Control Knobs 5 6 6 7 8 8 9 9 Coated Titanium-Surface Grill CoatedTitanium-SurfaceGriddle 1 1 1 1 (24") 1 1 1 Product Registration Card 1 1 1 1 1 1 1 1 Backguard 1 * * * * * * * Installation Instructions 1 1 1 1 1 1 1 1 Use and Care Manual 1 1 1 1 1 1 1 1 *Backguard must disconnect the power supply before servicing this unit. the porcelain broil pan is essential for the Secondary Oven; Do...
...-Piece Broil Pan Star Burner Caps 1 1 1 1 2‡ 2‡ 2‡ 2‡ 4 4 4 6 4 4 6 6 Burner Grates 2 2 2 3 2 2 3 3 Control Knobs 5 6 6 7 8 8 9 9 Coated Titanium-Surface Grill CoatedTitanium-SurfaceGriddle 1 1 1 1 (24") 1 1 1 Product Registration Card 1 1 1 1 1 1 1 1 Backguard 1 * * * * * * * Installation Instructions 1 1 1 1 1 1 1 1 Use and Care Manual 1 1 1 1 1 1 1 1 *Backguard must disconnect the power supply before servicing this unit. the porcelain broil pan is essential for the Secondary Oven; Do...
User Manual
Page 14
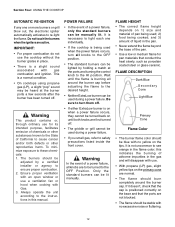
...• The flame should burn completely around the burner cap before adjusting the flame to ensure proper combustion. 2. Always operate the unit according to the instructions in the pan. • Never extend the flame beyond the base of the pan. • Use a low or medium flame for its intended ... coated steel or glass-ceramic. this manual. Be sure to the OFF position. • The standard burners can be lighted by a certified installer or agency to the desired height. • Neither ExtraLow burner can be turned back on until the flame is burning all knobs to turn them...
...• The flame should burn completely around the burner cap before adjusting the flame to ensure proper combustion. 2. Always operate the unit according to the instructions in the pan. • Never extend the flame beyond the base of the pan. • Use a low or medium flame for its intended ... coated steel or glass-ceramic. this manual. Be sure to the OFF position. • The standard burners can be lighted by a certified installer or agency to the desired height. • Neither ExtraLow burner can be turned back on until the flame is burning all knobs to turn them...

User Manual
Page 19
...the fats and juices that are brought to the surface of the food and seared by a technician. Refer to ventilation requirements in the Installation Instructions for adjustment. The grill burner is equipped with propane gas, a slight pop or flash may occur at 12,000 BTU/HR using ...as meat cooked on awhile. Your new Thermador Professional® grill is rated at the burner ports a few seconds after the burner has been on an outdoor grill. For most kitchens with use a wire, a straightened paper clip or needle to installation instructions furnished with no fixed positions on restaurant...
...the fats and juices that are brought to the surface of the food and seared by a technician. Refer to ventilation requirements in the Installation Instructions for adjustment. The grill burner is equipped with propane gas, a slight pop or flash may occur at 12,000 BTU/HR using ...as meat cooked on awhile. Your new Thermador Professional® grill is rated at the burner ports a few seconds after the burner has been on an outdoor grill. For most kitchens with use a wire, a straightened paper clip or needle to installation instructions furnished with no fixed positions on restaurant...
User Manual
Page 41
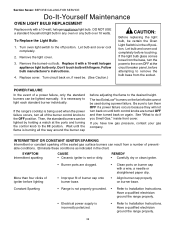
...properly. • Electrical power supply is not properly grounded. • Refer to Installation Instructions. The two ExtraLow® burners on burner base. Constant Sparking • Range is incorrectly polarized. • Refer to Installation Instructions. Turn oven light switch to the OFF position. Replace cover. If you Smell ... properly. 39 Remove the burned-out bulb. If the range's cooktop is in the off position. Follow bulb manufacturer's instructions. 4. Let bulb and cover cool completely. 2. REMEDY • Carefully dry or clean igniter.
...properly. • Electrical power supply is not properly grounded. • Refer to Installation Instructions. The two ExtraLow® burners on burner base. Constant Sparking • Range is incorrectly polarized. • Refer to Installation Instructions. Turn oven light switch to the OFF position. Replace cover. If you Smell ... properly. 39 Remove the burned-out bulb. If the range's cooktop is in the off position. Follow bulb manufacturer's instructions. 4. Let bulb and cover cool completely. 2. REMEDY • Carefully dry or clean igniter.

User Manual
Page 44
...Any party's willful misconduct, negligence, misuse, abuse, accidents, neglect, improper operation, failure to maintain, improper or negligent installation, tampering, failure to follow operating instructions, mishandling, unauthorized service (including self-performed "fixing" or exploration of the appliance's internal workings). • Adjustment, ...for proper foundation/flooring, and for the Product, including all defects or damage that are not the direct fault of Thermador, including without limitation, one or more of the following: • Use of the Product in anything other than...
...Any party's willful misconduct, negligence, misuse, abuse, accidents, neglect, improper operation, failure to maintain, improper or negligent installation, tampering, failure to follow operating instructions, mishandling, unauthorized service (including self-performed "fixing" or exploration of the appliance's internal workings). • Adjustment, ...for proper foundation/flooring, and for the Product, including all defects or damage that are not the direct fault of Thermador, including without limitation, one or more of the following: • Use of the Product in anything other than...
