
Installation Instructions
Page 14
... composed of range ® ® ® 2-1/2" (typical either side) 11 Step 4: Installing Anti-Tip Device 30 and 36 Inch Ranges (Figures 7A and 7B) Thermador Service Part No. MOUNTING ANTI-TIP BRACKET The alternative floor mounted bracket shall be fastened to solid wood or metal. • Use appropriate anchors when fastening the...
... composed of range ® ® ® 2-1/2" (typical either side) 11 Step 4: Installing Anti-Tip Device 30 and 36 Inch Ranges (Figures 7A and 7B) Thermador Service Part No. MOUNTING ANTI-TIP BRACKET The alternative floor mounted bracket shall be fastened to solid wood or metal. • Use appropriate anchors when fastening the...
User Manual
Page 3
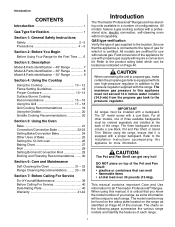
...- 5 Section 2: Before You Begin Before Using Your Range for the First Time ...... 6 Section 3: Description Model & Parts Identification - 48" Range 7 Model & Parts Identification - 36" Range 8 Model & Parts Identification - 30" Range 9 Section 4: Using the Cooktop Using the Cooktop 10 - 12 Flame Setting Guidelines 12 Proper ...Service Do-It-Yourself Maintenance 39 Before Calling For Service 40 Data Rating Plate 40 Warranty 41-42 Introduction The Thermador Professional® Ranges are certified for use with the range. IMPORTANT All ranges must not exceed 14.0 inches water...
...- 5 Section 2: Before You Begin Before Using Your Range for the First Time ...... 6 Section 3: Description Model & Parts Identification - 48" Range 7 Model & Parts Identification - 36" Range 8 Model & Parts Identification - 30" Range 9 Section 4: Using the Cooktop Using the Cooktop 10 - 12 Flame Setting Guidelines 12 Proper ...Service Do-It-Yourself Maintenance 39 Before Calling For Service 40 Data Rating Plate 40 Warranty 41-42 Introduction The Thermador Professional® Ranges are certified for use with the range. IMPORTANT All ranges must not exceed 14.0 inches water...
User Manual
Page 4
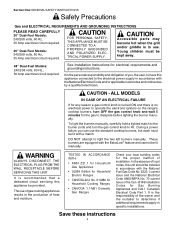
See Installation Instructions for Gas Burning Appliances and C22.1 Canadian Electrical Code Part 1. CAUTION - To light the burners manually, carefully hold a lighted match to the burner ports and turn OFF the gas control knob and wait 5 minutes for ... the ExtraLow® feature and cannot be kept away. 48" Dual-Fuel Models: 240/208 volts, 60 Hz., 50 Amp electrical circuit required. CAUTION Accessible parts may become hot when the grill and/or griddle is the responsibility of installation.
See Installation Instructions for Gas Burning Appliances and C22.1 Canadian Electrical Code Part 1. CAUTION - To light the burners manually, carefully hold a lighted match to the burner ports and turn OFF the gas control knob and wait 5 minutes for ... the ExtraLow® feature and cannot be kept away. 48" Dual-Fuel Models: 240/208 volts, 60 Hz., 50 Amp electrical circuit required. CAUTION Accessible parts may become hot when the grill and/or griddle is the responsibility of installation.
User Manual
Page 5
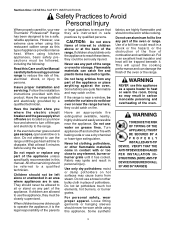
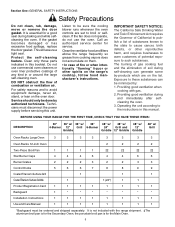
...seriously injured. Children should not be left alone or unattended in place of potholders. CAUTION: Do not store items of interest to any part of the appliance. Never let clothing, potholders, or other bulky cloth in an area where appliances are highly flammable and should never ...in contact with or too close to children above or at least 5 minutes before using your new Thermador Professional® Range has been designed to be allowed to line any part of the appliance unless specifically recommended in personal injury. Insure proper installation and servicing. Do not ...
...seriously injured. Children should not be left alone or unattended in place of potholders. CAUTION: Do not store items of interest to any part of the appliance. Never let clothing, potholders, or other bulky cloth in an area where appliances are highly flammable and should never ...in contact with or too close to children above or at least 5 minutes before using your new Thermador Professional® Range has been designed to be allowed to line any part of the appliance unless specifically recommended in personal injury. Insure proper installation and servicing. Do not ...
User Manual
Page 6
...utensils inward so they extend beyond the bottom of the oven door, will escape into the room. This can damage the cooktop or oven parts. Hold the handle of the pan to it. Follow directions provided by -products. Be sure all cooktop controls are turned off the burner...a griddle, for cooking. Before self-cleaning the oven, remove the broiler pan, oven racks and any type of heat, ignite or cause metal parts to clean the range. Do not heat unopened food containers; Avoid letting grease deposits collect. Avoid steam burns; do not blow flammable material toward the...
...utensils inward so they extend beyond the bottom of the oven door, will escape into the room. This can damage the cooktop or oven parts. Hold the handle of the pan to it. Follow directions provided by -products. Be sure all cooktop controls are turned off the burner...a griddle, for cooking. Before self-cleaning the oven, remove the broiler pan, oven racks and any type of heat, ignite or cause metal parts to clean the range. Do not heat unopened food containers; Avoid letting grease deposits collect. Avoid steam burns; do not blow flammable material toward the...
User Manual
Page 7
If the gasket becomes damaged or has excessive food spillage, replace the door gasket. Clean only those parts indicated in this manual. DO NOT obstruct the flow of substances known to the state to cause cancer, birth defects, or other spirits on the ...
If the gasket becomes damaged or has excessive food spillage, replace the door gasket. Clean only those parts indicated in this manual. DO NOT obstruct the flow of substances known to the state to cause cancer, birth defects, or other spirits on the ...

User Manual
Page 9
...) 20. Viewing Window 12. Kick Panel (Product Rating Label Located Behind Kick Panel) 14. Broil Element 17. Oven Door 11. Section Three: DESCRIPTION Model and Parts Identification Key for 48" Models 1. 22" Pot and Pan Shelf, 12" Low Back, or Island Trim - Gas Grill 4.
...) 20. Viewing Window 12. Kick Panel (Product Rating Label Located Behind Kick Panel) 14. Broil Element 17. Oven Door 11. Section Three: DESCRIPTION Model and Parts Identification Key for 48" Models 1. 22" Pot and Pan Shelf, 12" Low Back, or Island Trim - Gas Grill 4.

User Manual
Page 10
... 7. Viewing Window 9. Burner Grates & Burners 3. Oven Door 8. Range Feet (4) 2 3 4 65 7 8 WARNING: To provide proper ventilation, do NOT remove range feet. Section Three: DESCRIPTION Model and Parts Identification Key for 36" Models 1. 22" Pot and Pan Shelf, 12" Low Back or 4" Island Trim -
... 7. Viewing Window 9. Burner Grates & Burners 3. Oven Door 8. Range Feet (4) 2 3 4 65 7 8 WARNING: To provide proper ventilation, do NOT remove range feet. Section Three: DESCRIPTION Model and Parts Identification Key for 36" Models 1. 22" Pot and Pan Shelf, 12" Low Back or 4" Island Trim -

User Manual
Page 11
Section Three: DESCRIPTION Model and Parts Identification Key for 30" Models 1. 9" Low Back (Island Trim - Range Feet (4) 2 3 5 6 7 8 WARNING: To provide proper ventila- Burner Grates & Burners 3. Viewing Window 9. and Pot and Pan ...
Section Three: DESCRIPTION Model and Parts Identification Key for 30" Models 1. 9" Low Back (Island Trim - Range Feet (4) 2 3 5 6 7 8 WARNING: To provide proper ventila- Burner Grates & Burners 3. Viewing Window 9. and Pot and Pan ...
User Manual
Page 33
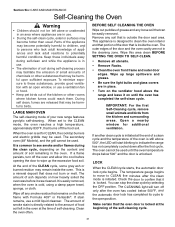
... in the cleaning zone. Check the door to move t o CLEAN five minutes after the oven has cooled below 500° and the door is initiated. Parts of the appliance may be easily removed. During self clean, fumes are not in the oven. IMPORTANT: For the first Self-Cleaning cycle, remove small...
... in the cleaning zone. Check the door to move t o CLEAN five minutes after the oven has cooled below 500° and the door is initiated. Parts of the appliance may be easily removed. During self clean, fumes are not in the oven. IMPORTANT: For the first Self-Cleaning cycle, remove small...

User Manual
Page 35
...or steel wool soap pads for maximum effectiveness and to indicate a type of brand names is seated on the chart. 4. Any part of this range. Always wipe dry immediately to clean port openings. • Reassemble as recommended on the base. COOKTOP CLEANING RECOMMENDATIONS... Part / Material Suggested Cleaners Important Reminders Brass Burner Base and Cast Iron Cap Burner Base Burner Cap Star® Burner Components •...
...or steel wool soap pads for maximum effectiveness and to indicate a type of brand names is seated on the chart. 4. Any part of this range. Always wipe dry immediately to clean port openings. • Reassemble as recommended on the base. COOKTOP CLEANING RECOMMENDATIONS... Part / Material Suggested Cleaners Important Reminders Brass Burner Base and Cast Iron Cap Burner Base Burner Cap Star® Burner Components •...

User Manual
Page 36
... Cleaner, Kleen King® Stainless Steel liquid cleaner. • Heat discoloration: Cameo®, Barkeepers Friend®, Zud®. Section Six: CARE AND MAINTENANCE Cleaning Recommendations Part / Material Exterior Finish /Back Guard Stainless Steel Grates: /Porcelain Enamel on grate fingers and rapid temperature changes. • Acidic and sugar-laden spills deteriorate the...
... Cleaner, Kleen King® Stainless Steel liquid cleaner. • Heat discoloration: Cameo®, Barkeepers Friend®, Zud®. Section Six: CARE AND MAINTENANCE Cleaning Recommendations Part / Material Exterior Finish /Back Guard Stainless Steel Grates: /Porcelain Enamel on grate fingers and rapid temperature changes. • Acidic and sugar-laden spills deteriorate the...

User Manual
Page 37
...particles stick to the weight of the grill or griddle in dishwasher. This can warp or crack the aluminum plate. • Do not clean any part of the 24" griddle, do not remove. 35 To clean, wipe with a mild abrasive cleaner such as Soft Scrub®. • The...with warm soapy water then rinse with cold water. Rinse with clear water and dry with a soft cloth. Section Six: CARE AND MAINTENANCE Cleaning Recommendations Part / Material Suggested Cleaners Important Reminders 12" and 24" Griddle or Grill / Titanium-surfaced • Remove drip tray(s) and discard grease into a ...
...particles stick to the weight of the grill or griddle in dishwasher. This can warp or crack the aluminum plate. • Do not clean any part of the 24" griddle, do not remove. 35 To clean, wipe with a mild abrasive cleaner such as Soft Scrub®. • The...with warm soapy water then rinse with cold water. Rinse with clear water and dry with a soft cloth. Section Six: CARE AND MAINTENANCE Cleaning Recommendations Part / Material Suggested Cleaners Important Reminders 12" and 24" Griddle or Grill / Titanium-surfaced • Remove drip tray(s) and discard grease into a ...

User Manual
Page 38
Section Six: CARE AND MAINTENANCE Cleaning Recommendations Part / Material Suggested Cleaners Important Reminders Igniters / Ceramic Surface Spill Trays/ Stainless Steel • Use a cotton swab dampened with care. • Do not use sharp tool ...
Section Six: CARE AND MAINTENANCE Cleaning Recommendations Part / Material Suggested Cleaners Important Reminders Igniters / Ceramic Surface Spill Trays/ Stainless Steel • Use a cotton swab dampened with care. • Do not use sharp tool ...

User Manual
Page 39
...; Apply with wet paper towels. Close the door and allow it may be easily removed with household ammonia. Section Six: CARE AND MAINTENANCE Cleaning Recommendations Part/Material OVEN Broil Pan Grid Porcelain Aluminum (secondary oven) Broil Pan Bottom Porcelain Enamel Aluminum (secondary oven) Cavity Porcelain Enamel on Steel Large Main Oven...
...; Apply with wet paper towels. Close the door and allow it may be easily removed with household ammonia. Section Six: CARE AND MAINTENANCE Cleaning Recommendations Part/Material OVEN Broil Pan Grid Porcelain Aluminum (secondary oven) Broil Pan Bottom Porcelain Enamel Aluminum (secondary oven) Cavity Porcelain Enamel on Steel Large Main Oven...

User Manual
Page 40
...damp sponge or cloth according to manufacturer's directions. General Kitchen Cleaners: Formula 409®, Fantastik®. • Spray on a small part of cooking oil and rub it lightly over the side rails. Do not move, remove or damage mesh. 38 Cleaners: Soft Scrub®...stand for discoloration before cleaning the entire rack. • Apply a generous coating. Section Six: CARE AND MAINTENANCE Cleaning Recommendations Part/Material Front Frame Stainless Steel Oven Racks Nickel Plated DOOR Exterior, Frame, Handle, Heat Deflector Stainless Steel Interior Porcelain Enamel Seal...
...damp sponge or cloth according to manufacturer's directions. General Kitchen Cleaners: Formula 409®, Fantastik®. • Spray on a small part of cooking oil and rub it lightly over the side rails. Do not move, remove or damage mesh. 38 Cleaners: Soft Scrub®...stand for discoloration before cleaning the entire rack. • Apply a generous coating. Section Six: CARE AND MAINTENANCE Cleaning Recommendations Part/Material Front Frame Stainless Steel Oven Racks Nickel Plated DOOR Exterior, Frame, Handle, Heat Deflector Stainless Steel Interior Porcelain Enamel Seal...

User Manual
Page 43
... of purchase, and shall not be extended with respect to such parts. Thermador's sole liability and responsibility hereunder is reasonably inaccessible, hazardous, threatening, or treacherous locale, surroundings, or environment; Thermador is the best way for resale, or commercial use an un-authorized...if it is under no responsibility or liability for repairs or work on Thermador products, and who possess, in Thermador's opinion, a superior reputation for labor and parts and ship the parts to the nearest authorized service provider, but you choose to you in materials...
... of purchase, and shall not be extended with respect to such parts. Thermador's sole liability and responsibility hereunder is reasonably inaccessible, hazardous, threatening, or treacherous locale, surroundings, or environment; Thermador is the best way for resale, or commercial use an un-authorized...if it is under no responsibility or liability for repairs or work on Thermador products, and who possess, in Thermador's opinion, a superior reputation for labor and parts and ship the parts to the nearest authorized service provider, but you choose to you in materials...

User Manual
Page 44
... TIME AWAY FROM WORK, HOTELS AND/OR RESTAURANT MEALS, REMODELLING EXPENSES IN EXCESS OF DIRECT DAMAGES WHICH ARE DEFINITIVELY CAUSED EXCLUSIVELY BY THERMADOR, OR OTHERWISE. Products on which the serial numbers have any liability or responsibility whatsoever for any alterations including without limitation cabinetry, walls...EXPRESS OR IMPLIED. service visits to teach you are scratches, nicks, minor dents, and cosmetic damages on external surfaces and exposed parts; THIS WARRANTY GIVES YOU SPECIFIC LEGAL RIGHTS, AND YOU MAY ALSO HAVE OTHER RIGHTS WHICH VARY FROM STATE TO STATE. and ...
... TIME AWAY FROM WORK, HOTELS AND/OR RESTAURANT MEALS, REMODELLING EXPENSES IN EXCESS OF DIRECT DAMAGES WHICH ARE DEFINITIVELY CAUSED EXCLUSIVELY BY THERMADOR, OR OTHERWISE. Products on which the serial numbers have any liability or responsibility whatsoever for any alterations including without limitation cabinetry, walls...EXPRESS OR IMPLIED. service visits to teach you are scratches, nicks, minor dents, and cosmetic damages on external surfaces and exposed parts; THIS WARRANTY GIVES YOU SPECIFIC LEGAL RIGHTS, AND YOU MAY ALSO HAVE OTHER RIGHTS WHICH VARY FROM STATE TO STATE. and ...
