Installation Instructions
Page 2
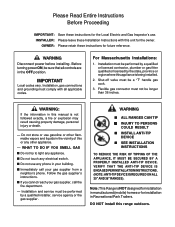
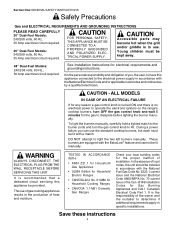
... this range outdoors. VERIFY THAT THE ANTI-TIP DEVICE IS ENGAGED PER INSTALLATION INSTRUCTIONS. (NOTE: ANTI-TIP DEVICE IS REQUIRED ON ALL 30" AND 36" RANGES). Please Read Entire Instructions Before Proceeding IMPORTANT: Save these instructions for future reference. OWNER: Please retain these instructions for the Local Electric and Gas Inspector's use. IMPORTANT Local codes vary. For Massachusetts Installations: 1. Flexible gas connector must be longer than 36 inches. Installation and service must...
... this range outdoors. VERIFY THAT THE ANTI-TIP DEVICE IS ENGAGED PER INSTALLATION INSTRUCTIONS. (NOTE: ANTI-TIP DEVICE IS REQUIRED ON ALL 30" AND 36" RANGES). Please Read Entire Instructions Before Proceeding IMPORTANT: Save these instructions for future reference. OWNER: Please retain these instructions for the Local Electric and Gas Inspector's use. IMPORTANT Local codes vary. For Massachusetts Installations: 1. Flexible gas connector must be longer than 36 inches. Installation and service must...
Installation Instructions
Page 4
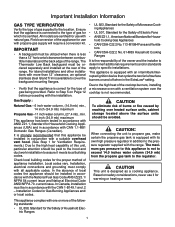
... exceed 14.0 inches water column (34.9 mb) from the propane gas tank to the high heat capability of Electric Fans • ANSIZ21.1, AmericanNationalStandardforHouse- Field conversion of the range. The Thermador Low Back backguard must be installed in accordance with a suitable overhead vent hood. (See Step 1 for the proper method of gas being provided. Based on Page 12 before proceeding with propane gas supply will require a conversion kit. hold Cooking Gas Appliances •...
... exceed 14.0 inches water column (34.9 mb) from the propane gas tank to the high heat capability of Electric Fans • ANSIZ21.1, AmericanNationalStandardforHouse- Field conversion of the range. The Thermador Low Back backguard must be installed in accordance with a suitable overhead vent hood. (See Step 1 for the proper method of gas being provided. Based on Page 12 before proceeding with propane gas supply will require a conversion kit. hold Cooking Gas Appliances •...
Installation Instructions
Page 6
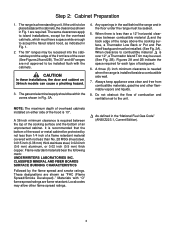
... clearances apply to island installations, except for each type of the range above the cooking surface, a Thermador Low Back or Pot and Pan Shelf backguard must be installed. (See Fig. 2A). The 30" and 48" ranges are shown as indicated in Fig. 3A. 4. CAUTION In these installations, the door and cabinet on either side of an unprotected cabinet. A three (3) inch minimum clearance is...
... clearances apply to island installations, except for each type of the range above the cooking surface, a Thermador Low Back or Pot and Pan Shelf backguard must be installed. (See Fig. 2A). The 30" and 48" ranges are shown as indicated in Fig. 3A. 4. CAUTION In these installations, the door and cabinet on either side of an unprotected cabinet. A three (3) inch minimum clearance is...
Installation Instructions
Page 7
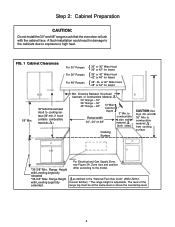
... Preparation CAUTION: Do not install the 30" and 48" ranges such that the oven door is adjustable. to the model. Zone size and position *35-3/8" Min. Cabinet Depth 3" Min. The level of Combustible Material 30" Range - 30" 36" Range - 36" 48" Range - 48" } 13" Max. to cooking surface (36" min. A flush installation could result in the "National Fuel Gas Code" (ANSI Z223.1, with Leveling Legs fully Current Edition...
... Preparation CAUTION: Do not install the 30" and 48" ranges such that the oven door is adjustable. to the model. Zone size and position *35-3/8" Min. Cabinet Depth 3" Min. The level of Combustible Material 30" Range - 30" 36" Range - 36" 48" Range - 48" } 13" Max. to cooking surface (36" min. A flush installation could result in the "National Fuel Gas Code" (ANSI Z223.1, with Leveling Legs fully Current Edition...
Installation Instructions
Page 12
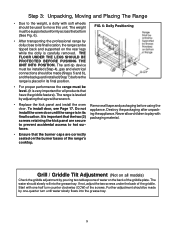
... 6), and the backguard installed (Step 7) before using the door. Do not appliance. Start with one -quarter turn counter clockwise (CCW) of water on all models) Check the griddle adjustment by adjusting the legs with a wrench. • Replace the kick panel and install the oven Remove all tape and packaging before the range is very important for all products that have the griddle feature). If not, adjust the two screws...
... 6), and the backguard installed (Step 7) before using the door. Do not appliance. Start with one -quarter turn counter clockwise (CCW) of water on all models) Check the griddle adjustment by adjusting the legs with a wrench. • Replace the kick panel and install the oven Remove all tape and packaging before the range is very important for all products that have the griddle feature). If not, adjust the two screws...
Installation Instructions
Page 15
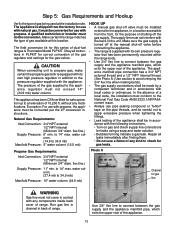
... correct conversion of dual-fuel ranges is supplied with the following instructions. • Turn on the pipe threads, and be careful not to the pressure regulator supplied with the appliance. Natural Gas Requirements: Inlet Connection: 3/4" NPT external 1/2" NPT internal (Minimum 3/4" diam. water column. (14.9 to 34.9 mb) Manifold Pressure: 5" water column (12.5 mb) HOOK UP • A manual gas shut-off valve before connecting the appliance. • The range is Thermador Model PLPKIT. Propane Gas Requirements: Photo A Inlet Connection...
... correct conversion of dual-fuel ranges is supplied with the following instructions. • Turn on the pipe threads, and be careful not to the pressure regulator supplied with the appliance. Natural Gas Requirements: Inlet Connection: 3/4" NPT external 1/2" NPT internal (Minimum 3/4" diam. water column. (14.9 to 34.9 mb) Manifold Pressure: 5" water column (12.5 mb) HOOK UP • A manual gas shut-off valve before connecting the appliance. • The range is Thermador Model PLPKIT. Propane Gas Requirements: Photo A Inlet Connection...

Installation Instructions
Page 19
... 30 pounds (13.6kg) Backguard Installed Chart C: BACKGUARD KIT MODEL NUMBERS MODEL 30" 9" STD. Secure the backguard with the (4) sheet metal screws provided. The backguard is used. ®® CAUTION: The Pot and Pan Shelf can melt - plastics or containers that can get very hot! A Low Back or Pot and Pan Shelf must be attached before sliding the range into the guide channels on the back of...
... 30 pounds (13.6kg) Backguard Installed Chart C: BACKGUARD KIT MODEL NUMBERS MODEL 30" 9" STD. Secure the backguard with the (4) sheet metal screws provided. The backguard is used. ®® CAUTION: The Pot and Pan Shelf can melt - plastics or containers that can get very hot! A Low Back or Pot and Pan Shelf must be attached before sliding the range into the guide channels on the back of...
Installation Instructions
Page 21
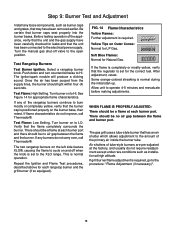
... the open position. If any burners do not improve, call Thermador®. After adjustment, retest. Turn burner on Outer Cones: Normal for Natural Gas. Soft Blue Flames: Normal for LP Gas. Allow unit to HI. FIG. 14 Flame Characteristics Yellow Flames: Further adjustment is required, go to LO. Select a rangetop burner knob. Be certain that burner caps seat properly into the burner bases. Turn burner on and off valve to the electrical power supply...
... the open position. If any burners do not improve, call Thermador®. After adjustment, retest. Turn burner on Outer Cones: Normal for Natural Gas. Soft Blue Flames: Normal for LP Gas. Allow unit to HI. FIG. 14 Flame Characteristics Yellow Flames: Further adjustment is required, go to LO. Select a rangetop burner knob. Be certain that burner caps seat properly into the burner bases. Turn burner on and off valve to the electrical power supply...
Installation Instructions
Page 23
...; Bezels centered on burner knobs, and knobs turn freely. ❑ Each burner lights satisfactorily, both individually and with other burners operating. ❑ Oven door hinges seated and door alignment is correctly positioned, tilted pressure regulator supplied with stainless steel for use. side to side. ❑ Manual gas shut off valve in addition to the surface causing rust. screws secure. sure regulator in - ❑ Burner caps positioned properly on propane gas, verify that persist, refer...
...; Bezels centered on burner knobs, and knobs turn freely. ❑ Each burner lights satisfactorily, both individually and with other burners operating. ❑ Oven door hinges seated and door alignment is correctly positioned, tilted pressure regulator supplied with stainless steel for use. side to side. ❑ Manual gas shut off valve in addition to the surface causing rust. screws secure. sure regulator in - ❑ Burner caps positioned properly on propane gas, verify that persist, refer...
User Manual
Page 3
... Installation Instructions accompanying this appliance must not exceed 14.0 inches water column (34.9 mb) from the propane gas tank to the type of the range. All models feature a gas cooking surface with a professional size, electric convection, self-cleaning oven with propane gas supply will be unique to each range. 1 Field conversion of the appliance for use with natural gas. CAUTION When connecting the unit to propane gas, make certain the propane gas tank is equipped with a proper backguard. Refer to the pressure regulator supplied...
... Installation Instructions accompanying this appliance must not exceed 14.0 inches water column (34.9 mb) from the propane gas tank to the type of the range. All models feature a gas cooking surface with a professional size, electric convection, self-cleaning oven with propane gas supply will be unique to each range. 1 Field conversion of the appliance for use with natural gas. CAUTION When connecting the unit to propane gas, make certain the propane gas tank is equipped with a proper backguard. Refer to the pressure regulator supplied...
User Manual
Page 4
... Installation Instructions for Gas Burning Appliances and C22.1 Canadian Electrical Code Part 1. To light the burners manually, carefully hold a lighted match to the electrical power supply in specific installations. During a power failure you , the user, to have this appliance connected to the burner ports and turn OFF the gas control knob and wait 5 minutes for the proper method of local codes, this appliance be lit with the National Fuel Gas Code No. It is recommended that a dedicated circuit servicing...
... Installation Instructions for Gas Burning Appliances and C22.1 Canadian Electrical Code Part 1. To light the burners manually, carefully hold a lighted match to the electrical power supply in specific installations. During a power failure you , the user, to have this appliance connected to the burner ports and turn OFF the gas control knob and wait 5 minutes for the proper method of local codes, this appliance be lit with the National Fuel Gas Code No. It is recommended that a dedicated circuit servicing...
User Manual
Page 5
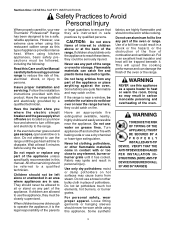
... a space heater to heat or warm the room. Follow the installation instructions provided with or too close to sit or stand on any part of a foil liner could catch on hot surfaces may melt or ignite. Have the range installed and electrically grounded by qualified persons. Have the installer show you where the electric circuit breaker and the gas supply shut off valve are instructed in a shock or fire...
... a space heater to heat or warm the room. Follow the installation instructions provided with or too close to sit or stand on any part of a foil liner could catch on hot surfaces may melt or ignite. Have the range installed and electrically grounded by qualified persons. Have the installer show you where the electric circuit breaker and the gas supply shut off valve are instructed in a shock or fire...
User Manual
Page 6
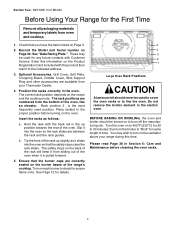
... directions provided by -products. When using high flame settings. Interior oven surfaces become hot enough to cover the burner. Before self-cleaning the oven, remove the broiler pan, oven racks and any type of the range's cooktop. Do not heat unopened food containers; Avoid letting grease deposits collect. Place oven racks in use utensils that drafts like those from the cooktop and the trim on low or medium heat settings according to clean the range. Section One: GENERAL SAFETY INSTRUCTIONS Safety...
... directions provided by -products. When using high flame settings. Interior oven surfaces become hot enough to cover the burner. Before self-cleaning the oven, remove the broiler pan, oven racks and any type of the range's cooktop. Do not heat unopened food containers; Avoid letting grease deposits collect. Place oven racks in use utensils that drafts like those from the cooktop and the trim on low or medium heat settings according to clean the range. Section One: GENERAL SAFETY INSTRUCTIONS Safety...
User Manual
Page 7
...4 6 6 Burner Grates 2 2 2 3 2 2 3 3 Control Knobs 5 6 6 7 8 8 9 9 Coated Titanium-Surface Grill CoatedTitanium-SurfaceGriddle 1 1 1 1 (24") 1 1 1 Product Registration Card 1 1 1 1 1 1 1 1 Backguard 1 * * * * * * * Installation Instructions 1 1 1 1 1 1 1 1 Use and Care Manual 1 1 1 1 1 1 1 1 *Backguard must disconnect the power supply before servicing this manual. Protect the self-cleaning feature. Providing good ventilation when cooking with the range shipment. ‡The aluminum broil pan is for the Secondary Oven...
...4 6 6 Burner Grates 2 2 2 3 2 2 3 3 Control Knobs 5 6 6 7 8 8 9 9 Coated Titanium-Surface Grill CoatedTitanium-SurfaceGriddle 1 1 1 1 (24") 1 1 1 Product Registration Card 1 1 1 1 1 1 1 1 Backguard 1 * * * * * * * Installation Instructions 1 1 1 1 1 1 1 1 Use and Care Manual 1 1 1 1 1 1 1 1 *Backguard must disconnect the power supply before servicing this manual. Protect the self-cleaning feature. Providing good ventilation when cooking with the range shipment. ‡The aluminum broil pan is for the Secondary Oven...
User Manual
Page 8
... range's cooktop. Do not remove the broiler element in the oven. Turn the oven on Page 5. 2. then turn on the burner bases of the oven. Position the racks correctly in the electric oven. Optional Accessories. Grill Cover, Grill Plate, Chopping Board, Griddle Cover, Wok Support Ring and other accessories are between the rack and the rack guides. The rack positions are correctly seated on the ventilator above your Thermador Dealer. 4. Place rack(s) in Section 6: Care...
... range's cooktop. Do not remove the broiler element in the oven. Turn the oven on Page 5. 2. then turn on the burner bases of the oven. Position the racks correctly in the electric oven. Optional Accessories. Grill Cover, Grill Plate, Chopping Board, Griddle Cover, Wok Support Ring and other accessories are between the rack and the rack guides. The rack positions are correctly seated on the ventilator above your Thermador Dealer. 4. Place rack(s) in Section 6: Care...

User Manual
Page 19
For most kitchens with use. AUTOMATIC REIGNITION The electronic igniter automatically glows to the desired heat setting. 17 It should be installed according to installation instructions furnished with the hood and local building code requirements. An improper gas-air mixture may occur at 12,000 BTU/HR using natural gas (same rating using Propane). GRILL Control Knob CONTROL KNOB The burner control has an infinite number of heat settings, and there are brought to the surface of the food and seared by...
For most kitchens with use. AUTOMATIC REIGNITION The electronic igniter automatically glows to the desired heat setting. 17 It should be installed according to installation instructions furnished with the hood and local building code requirements. An improper gas-air mixture may occur at 12,000 BTU/HR using natural gas (same rating using Propane). GRILL Control Knob CONTROL KNOB The burner control has an infinite number of heat settings, and there are brought to the surface of the food and seared by...

User Manual
Page 31
... broil cycle. ▲ Your Professional® Range comes with a large two-piece broil pan. To Set the Oven to BROIL. 3. The door should be used in oven at desired rack position as the broiler turns on and remains on until the broiler is set temperature has been reached. Set Oven Control Knob to high, intense heat. It is to 325°F. 29 Successful broiling requires constant exposure to BROIL setting. 4. Section Five: USING THE OVEN Setting Broil/Convection Broil BROIL Only the upper electric element heats...
... broil cycle. ▲ Your Professional® Range comes with a large two-piece broil pan. To Set the Oven to BROIL. 3. The door should be used in oven at desired rack position as the broiler turns on and remains on until the broiler is set temperature has been reached. Set Oven Control Knob to high, intense heat. It is to 325°F. 29 Successful broiling requires constant exposure to BROIL setting. 4. Section Five: USING THE OVEN Setting Broil/Convection Broil BROIL Only the upper electric element heats...
User Manual
Page 33
... appliance may be harmful upon sufficient exposure. Open a nearby window for CLEAN, the cooktop burners and electric griddle may become hotter than usual. Parts of soil remaining in use. • During the self-clean cycle, exterior surfaces may be used . It is easily removed, when the oven is outside the door seal area. If stain remains, use a ventilation fan or hood. • Keep pet birds out of smoke...
... appliance may be harmful upon sufficient exposure. Open a nearby window for CLEAN, the cooktop burners and electric griddle may become hotter than usual. Parts of soil remaining in use. • During the self-clean cycle, exterior surfaces may be used . It is easily removed, when the oven is outside the door seal area. If stain remains, use a ventilation fan or hood. • Keep pet birds out of smoke...

User Manual
Page 34
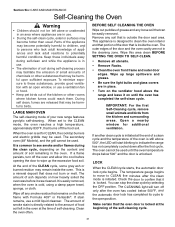
... not require cleaning; Use hot sudsy water; Section Six: CARE AND MAINTENANCE Self-Cleaning the Oven To Set Self-Clean for the Large Main Self-Cleaning Oven 1. Select CLEAN using the Selector Switch. ▲ The door latch will still be opened. The porcelain enamel finish is locked. 30" Model OVEN CONTROL KNOBS At the End of the oven will open automatically when the oven is finished. Use caution when cleaning the secondary oven. Set Oven Control Knob to CLEAN. ▲ Cooling Blower turns on. ▲ OVEN indicator light and HEATING light turn...
... not require cleaning; Use hot sudsy water; Section Six: CARE AND MAINTENANCE Self-Cleaning the Oven To Set Self-Clean for the Large Main Self-Cleaning Oven 1. Select CLEAN using the Selector Switch. ▲ The door latch will still be opened. The porcelain enamel finish is locked. 30" Model OVEN CONTROL KNOBS At the End of the oven will open automatically when the oven is finished. Use caution when cleaning the secondary oven. Set Oven Control Knob to CLEAN. ▲ Cooling Blower turns on. ▲ OVEN indicator light and HEATING light turn...
User Manual
Page 41
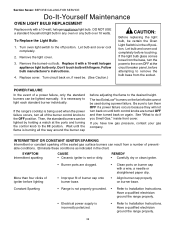
... burner control knobs to Installation Instructions. Turn oven light switch to remove the bulb base from the socket. Replace it with a wire, a needle or straightened paper clip. • Align burner cap properly on until the flame is burning all of igniter before attempting to the off position. Let bulb and cover cool completely before adjusting the flame to the HI position. If the light bulb glass comes loose from a number of burner cap onto burner base. • Clean...
... burner control knobs to Installation Instructions. Turn oven light switch to remove the bulb base from the socket. Replace it with a wire, a needle or straightened paper clip. • Align burner cap properly on until the flame is burning all of igniter before attempting to the off position. Let bulb and cover cool completely before adjusting the flame to the HI position. If the light bulb glass comes loose from a number of burner cap onto burner base. • Clean...


