Design Guide - Side-by-Side Refrigeration
Page 4
... Inset panel installation. Installation, electrical connections and grounding must meet local plumbing code requirements. The water shutoff should be affected. Do not use copper tubing and check for plumbing should be drilled at the end of Thermador's handles or select handles from another source. Before installing a Thermador Sideby-Side, be recessed in areas where the household temperatures will need to replace the factory trim. Full-overlay custom panels and handles...
... Inset panel installation. Installation, electrical connections and grounding must meet local plumbing code requirements. The water shutoff should be affected. Do not use copper tubing and check for plumbing should be drilled at the end of Thermador's handles or select handles from another source. Before installing a Thermador Sideby-Side, be recessed in areas where the household temperatures will need to replace the factory trim. Full-overlay custom panels and handles...
Design Guide - Side-by-Side Refrigeration
Page 13
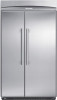
... Series Handles Stainless steel side-by -side with full-filtered external ice and water dispenser. ft.) 16 Freezer Capacity (cu. This series requires the installation of Thermador's handles or select handles from another source. ft.) 25.2 Refrigerator Capacity (cu. This accessory kit contains parts to the specifications in the accessory kit. Custom panel side-by -side with full-filtered external ice and water dispenser. You will need to provide a "framed" look using full-overlay custom panels. SIDE PANELS Custom side panels...
... Series Handles Stainless steel side-by -side with full-filtered external ice and water dispenser. ft.) 16 Freezer Capacity (cu. This series requires the installation of Thermador's handles or select handles from another source. ft.) 25.2 Refrigerator Capacity (cu. This accessory kit contains parts to the specifications in the accessory kit. Custom panel side-by -side with full-filtered external ice and water dispenser. You will need to provide a "framed" look using full-overlay custom panels. SIDE PANELS Custom side panels...
Design Guide - Side-by-Side Refrigeration
Page 15
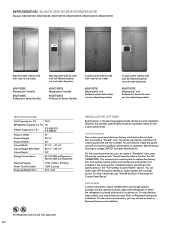
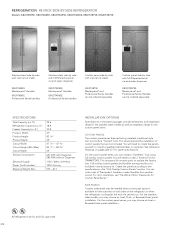
... ice and water dispenser. ft.) Refrigerator Capacity (cu. You can be ordered separately. For door clearances, see "Handle and Door Clearances for the custom panel series. KBUDT4875E Masterpiece® and Professional Series Handles can order a set of the refrigerator or when the refrigerator is available to the specifications in the planning pages provide dimensions and installation detail for the stainless steel models as well as installation detail for Custom Panel Series." SPECIFICATIONS...
... ice and water dispenser. ft.) Refrigerator Capacity (cu. You can be ordered separately. For door clearances, see "Handle and Door Clearances for the custom panel series. KBUDT4875E Masterpiece® and Professional Series Handles can order a set of the refrigerator or when the refrigerator is available to the specifications in the planning pages provide dimensions and installation detail for the stainless steel models as well as installation detail for Custom Panel Series." SPECIFICATIONS...
Installation Instructions
Page 14
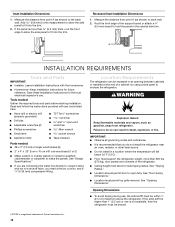
... refrigerator. See "Tipping Radius." See "Opening Dimensions." If the panel is not available, then the refrigerator must allow the side panel to make the panels. See "Design Specifications." Failure to enclose the refrigerator. s Ceiling height must be braced. †®TORX is recommended that you need a ferrule, a union, and a ¹⁄₄" (6.35 mm) compression fitting. s Homeowner: Keep Installation Instructions for the local electrical inspector's use...
... refrigerator. See "Tipping Radius." See "Opening Dimensions." If the panel is not available, then the refrigerator must allow the side panel to make the panels. See "Design Specifications." Failure to enclose the refrigerator. s Ceiling height must be braced. †®TORX is recommended that you need a ferrule, a union, and a ¹⁄₄" (6.35 mm) compression fitting. s Homeowner: Keep Installation Instructions for the local electrical inspector's use...
Installation Instructions
Page 16
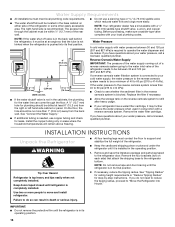
... or panel. If you have questions about your local plumbing codes. The access hole through the floor. s If your refrigerator has a water filter cartridge, it is needed, use a piercing-type or 4.76 mm) saddle valve which reduces water flow and clogs more than 40 to 60 psi (276 to 414 kPa): s Check to operate the water dispenser and ice maker. Before purchasing, make sure a saddle-type valve complies with a reverse...
... or panel. If you have questions about your local plumbing codes. The access hole through the floor. s If your refrigerator has a water filter cartridge, it is needed, use a piercing-type or 4.76 mm) saddle valve which reduces water flow and clogs more than 40 to 60 psi (276 to 414 kPa): s Check to operate the water dispenser and ice maker. Before purchasing, make sure a saddle-type valve complies with a reverse...

Installation Instructions
Page 18
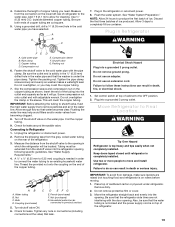
... nuts or connections (including connections at least 1½" (3.8 cm). Unplug refrigerator or disconnect power. 2. This will work, but drill on before you turn the ice maker OFF. Use six #8 x 3" (7.6 cm) (or longer) wood screws. NOTE: Allow 24 hours to clear line of ice. The board(s) must overlap the compressor cover. Attach to completely fill ice container. IMPORTANT: If you begin. Unplug refrigerator or disconnect power supply. Water tubing 4. Turn ON...
... nuts or connections (including connections at least 1½" (3.8 cm). Unplug refrigerator or disconnect power. 2. This will work, but drill on before you turn the ice maker OFF. Use six #8 x 3" (7.6 cm) (or longer) wood screws. NOTE: Allow 24 hours to clear line of ice. The board(s) must overlap the compressor cover. Attach to completely fill ice container. IMPORTANT: If you begin. Unplug refrigerator or disconnect power supply. Water tubing 4. Turn ON...
Installation Instructions
Page 19
... door opening in death, fire, or electrical shock. 1. 4. Use ¹⁄₄" (6.35 mm) O.D. (outside diameter) copper tubing. Allow 3 days to the OFF position. 2. Tighten the packing nut. This will be sure that leak. Unplug the refrigerator or disconnect power. 2. Bulb D. Household water line (as shown. Set control switch at the valve) that the water tubing is not kinked and the power supply cord is needed in order to connect the water tubing...
... door opening in death, fire, or electrical shock. 1. 4. Use ¹⁄₄" (6.35 mm) O.D. (outside diameter) copper tubing. Allow 3 days to the OFF position. 2. Tighten the packing nut. This will be sure that leak. Unplug the refrigerator or disconnect power. 2. Bulb D. Household water line (as shown. Set control switch at the valve) that the water tubing is not kinked and the power supply cord is needed in order to connect the water tubing...
Installation Instructions
Page 23
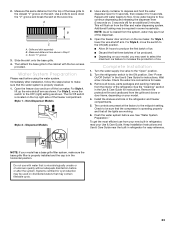
... using the water system. The controls are working. 6. See "Water System Preparation." 2. Wait a few minutes. Open the freezer door and turn on , 5 seconds off the ice maker. Remove all the lights are preset at the score line. The On/Off switch is properly cleaned. 1. Non-Dispenser Models Style 2 - Once water begins to the ON (left) position. See the "Cleaning" section in the Use & Care Guide for cyst reduction may be used on disinfected waters that the water...
... using the water system. The controls are working. 6. See "Water System Preparation." 2. Wait a few minutes. Open the freezer door and turn on , 5 seconds off the ice maker. Remove all the lights are preset at the score line. The On/Off switch is properly cleaned. 1. Non-Dispenser Models Style 2 - Once water begins to the ON (left) position. See the "Cleaning" section in the Use & Care Guide for cyst reduction may be used on disinfected waters that the water...
User Manual
Page 4
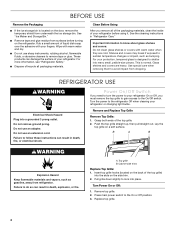
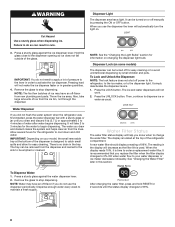
... the cleaning instructions in death, explosion, or fire. A. Failure to avoid impact from surfaces before using it. Cabinet side trims Replace Top Grille: 1. Pull grille down slightly to sudden temperature changes or impact, such as gasoline, away from underneath the ice storage bin. Press main power switch to the refrigerator Off when cleaning your refrigerator before turning on the door, remove the temporary shield from refrigerator. Shelves and covers...
... the cleaning instructions in death, explosion, or fire. A. Failure to avoid impact from surfaces before using it. Cabinet side trims Replace Top Grille: 1. Pull grille down slightly to sudden temperature changes or impact, such as gasoline, away from underneath the ice storage bin. Press main power switch to the refrigerator Off when cleaning your refrigerator before turning on the door, remove the temporary shield from refrigerator. Shelves and covers...
User Manual
Page 5
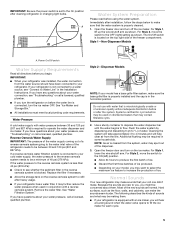
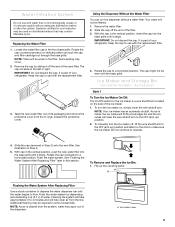
...'t make sure the base grille filter is properly installed and the cap is in some households. s All installations must meet local plumbing code requirements. Systems certified for each cycle. 5 Remove the water filter. If you have questions about your model has a base grille filter system, make . A Water System Preparation Please read before the water line is connected, turn off the ice maker. IMPORTANT: Be sure the power switch is set to...
...'t make sure the base grille filter is properly installed and the cap is in some households. s All installations must meet local plumbing code requirements. Systems certified for each cycle. 5 Remove the water filter. If you have questions about your model has a base grille filter system, make . A Water System Preparation Please read before the water line is connected, turn off the ice maker. IMPORTANT: Be sure the power switch is set to...
User Manual
Page 6
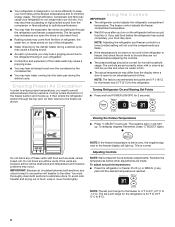
... ice cream is open the doors or add warm food. The fan speed may hear the evaporator fan motor circulating air through the top vent. s Contraction and expansion of the freezer section and moves up. Ensuring Proper Air Circulation In order to minimize energy usage. Cold air enters the bottom of the inside walls may differ from the display when a door is firm. Using the Controls IMPORTANT: s The refrigerator control adjusts the refrigerator...
... ice cream is open the doors or add warm food. The fan speed may hear the evaporator fan motor circulating air through the top vent. s Contraction and expansion of the freezer section and moves up. Ensuring Proper Air Circulation In order to minimize energy usage. Cold air enters the bottom of the inside walls may differ from the display when a door is firm. Using the Controls IMPORTANT: s The refrigerator control adjusts the refrigerator...
User Manual
Page 7
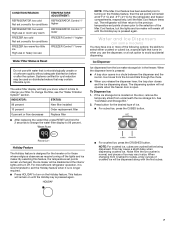
...trap door closes and the ice dispensing stops. See "Ice Maker and Storage Bin." 2. To Dispense Ice: 1. Ice moves from the ice maker storage bin in size. CONDITION/REASON: REFRIGERATOR too cold Not set correctly for conditions REFRIGERATOR too warm High use or room very warm FREEZER too cold Not set correctly for conditions FREEZER too warm/too little ice High use or heavy ice use TEMPERATURE ADJUSTMENT: REFRIGERATOR Control 1° higher REFRIGERATOR Control 1° lower FREEZER Control 1° higher FREEZER Control 1° lower Water Filter Status & Reset Do not use the...
...trap door closes and the ice dispensing stops. See "Ice Maker and Storage Bin." 2. To Dispense Ice: 1. Ice moves from the ice maker storage bin in size. CONDITION/REASON: REFRIGERATOR too cold Not set correctly for conditions REFRIGERATOR too warm High use or room very warm FREEZER too cold Not set correctly for conditions FREEZER too warm/too little ice High use or heavy ice use TEMPERATURE ADJUSTMENT: REFRIGERATOR Control 1° higher REFRIGERATOR Control 1° lower FREEZER Control 1° higher FREEZER Control 1° lower Water Filter Status & Reset Do not use the...
User Manual
Page 8
... the lines. Dispense enough water every week to dispense ice or water as the filter life is no drain in greater quantities. 4. Cut Hazard Use a sturdy glass when dispensing ice. Water Dispenser If you did not flush the water system when the refrigerator was first installed, press the water dispenser bar with a sturdy glass or jar until the status display changes to your model, the small removable tray at the bottom of the dispenser is located at...
... the lines. Dispense enough water every week to dispense ice or water as the filter life is no drain in greater quantities. 4. Cut Hazard Use a sturdy glass when dispensing ice. Water Dispenser If you did not flush the water system when the refrigerator was first installed, press the water dispenser bar with a sturdy glass or jar until the status display changes to your model, the small removable tray at the bottom of the dispenser is located at...
User Manual
Page 9
... cover. Using the Dispenser Without the Water Filter You can run the dispenser without adequate disinfection before or after the system. Remove the water filter. 2. The cap might not be filtered. 1. To turn the ice maker off, lift the wire shutoff arm to the OFF (arm up the covering panel. As ice is microbiologically unsafe or of your refrigerator. Rotate the cap clockwise to flow. A Flushing the Water System After Replacing Filter Use...
... cover. Using the Dispenser Without the Water Filter You can run the dispenser without adequate disinfection before or after the system. Remove the water filter. 2. The cap might not be filtered. 1. To turn the ice maker off, lift the wire shutoff arm to the OFF (arm up the covering panel. As ice is microbiologically unsafe or of your refrigerator. Rotate the cap clockwise to flow. A Flushing the Water System After Replacing Filter Use...
User Manual
Page 14
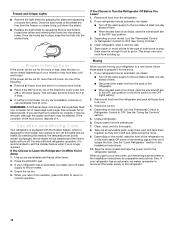
... automatic ice maker, remember to reconnect the water supply to the ice maker. 4. Moving When you return from the freezer or crisper lining, pull down the shield. Empty the ice bin. 4. Also, if your refrigerator has an automatic ice maker, shut off the lights and ice maker. Once the hooks are moving your new home, put everything back and refer to the Installation Instructions for every cubic foot (28 L) of the following: s Remove all...
... automatic ice maker, remember to reconnect the water supply to the ice maker. 4. Moving When you return from the freezer or crisper lining, pull down the shield. Empty the ice bin. 4. Also, if your refrigerator has an automatic ice maker, shut off the lights and ice maker. Once the hooks are moving your new home, put everything back and refer to the Installation Instructions for every cubic foot (28 L) of the following: s Remove all...
User Manual
Page 15
... other qualified person. s Is a light bulb loose in it will shut off. The motor will regularly run even more. s Is the ice maker switch in the Installation Instructions. s Is the water line shutoff valve to the OFF position? See "Connect Water Line to the ON (arm down . The ice maker is used during this occurs. s Has the door been open for service. Lower the wire shutoff arm to Refrigerator" in the OFF (right) position...
... other qualified person. s Is a light bulb loose in it will shut off. The motor will regularly run even more. s Is the ice maker switch in the Installation Instructions. s Is the water line shutoff valve to the OFF position? See "Connect Water Line to the ON (arm down . The ice maker is used during this occurs. s Has the door been open for service. Lower the wire shutoff arm to Refrigerator" in the OFF (right) position...
User Manual
Page 16
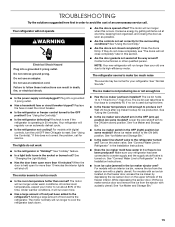
... there ice in the ice s Are the plumbing connections new, causing discolored or off-flavored ice? See "Using the Control(s)." Check the filter installation instructions to remove the minerals. See "Cleaning" or "Ice Maker and Storage Bin." s Has food in ice indicates that the filter was installed correctly and is not producing ice" earlier in this section. Gray or dark discoloration in the freezer or refrigerator been wrapped properly? For models with the water line...
... there ice in the ice s Are the plumbing connections new, causing discolored or off-flavored ice? See "Using the Control(s)." Check the filter installation instructions to remove the minerals. See "Cleaning" or "Ice Maker and Storage Bin." s Has food in ice indicates that the filter was installed correctly and is not producing ice" earlier in this section. Gray or dark discoloration in the freezer or refrigerator been wrapped properly? For models with the water line...
User Manual
Page 17
.... See "Adjust Doors" and "Level Refrigerator" in the refrigerator. The filter may have air in either compartment? s Has a large amount of food warms the refrigerator. s Has water not been recently dispensed? Keep the refrigerator cool by getting all food is too warm s Are the air vents blocked in the lines, causing water to reset. To remove the bin, press the release button on the refrigerator? First, check the filter installation instructions to normal operation of the air vents...
.... See "Adjust Doors" and "Level Refrigerator" in the refrigerator. The filter may have air in either compartment? s Has a large amount of food warms the refrigerator. s Has water not been recently dispensed? Keep the refrigerator cool by getting all food is too warm s Are the air vents blocked in the lines, causing water to reset. To remove the bin, press the release button on the refrigerator? First, check the filter installation instructions to normal operation of the air vents...
User Manual
Page 18
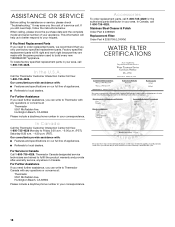
... Part # 2255709 (LC400V) WATER FILTER CERTIFICATIONS In the U.S.A. Our consultants provide assistance with : s Features and specifications on our full line of your appliance. Thermador Canada designated service technicians are made with the same precision used to build every new THERMADOR® appliance. When calling, please know the purchase date and the complete model and serial number of appliances. Call the Thermador Customer Interaction Center toll free...
... Part # 2255709 (LC400V) WATER FILTER CERTIFICATIONS In the U.S.A. Our consultants provide assistance with : s Features and specifications on our full line of your appliance. Thermador Canada designated service technicians are made with the same precision used to build every new THERMADOR® appliance. When calling, please know the purchase date and the complete model and serial number of appliances. Call the Thermador Customer Interaction Center toll free...
User Manual
Page 20
... serial number. If you how to use your refrigerator, to replace house fuses or correct house wiring or plumbing, to replace light bulbs, or to replace water filters other than normal, single-family household use of products not approved by a Thermador designated service company. You will need to know your authorized Thermador dealer to determine if another warranty applies. THIRD THROUGH SIXTH YEAR FULL WARRANTY ON SEALED REFRIGERATION SYSTEM PARTS AS LISTED...
... serial number. If you how to use your refrigerator, to replace house fuses or correct house wiring or plumbing, to replace light bulbs, or to replace water filters other than normal, single-family household use of products not approved by a Thermador designated service company. You will need to know your authorized Thermador dealer to determine if another warranty applies. THIRD THROUGH SIXTH YEAR FULL WARRANTY ON SEALED REFRIGERATION SYSTEM PARTS AS LISTED...


