Design Guide - Side-by-Side Refrigeration
Page 4
...not enough space is connected to make sure a saddle-type valve complies with your refrigerator into its final location, it . parts and labor (3rd-6th year) Note: Your refrigerator dealer has a kit available with a full-filtered internal ice maker or ...external ice and water dispenser. For door clearances, see "Handle and Door Clearances for additional warranty details. 1.800.735.4328 | THERMADOR.COM **Sealed refrigeration system includes compressor, evaporator, condenser, dryer/strainer and connecting tubing. 263 On the floor, the hole should...
...not enough space is connected to make sure a saddle-type valve complies with your refrigerator into its final location, it . parts and labor (3rd-6th year) Note: Your refrigerator dealer has a kit available with a full-filtered internal ice maker or ...external ice and water dispenser. For door clearances, see "Handle and Door Clearances for additional warranty details. 1.800.735.4328 | THERMADOR.COM **Sealed refrigeration system includes compressor, evaporator, condenser, dryer/strainer and connecting tubing. 263 On the floor, the hole should...
Design Guide - Side-by-Side Refrigeration
Page 13
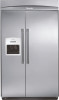
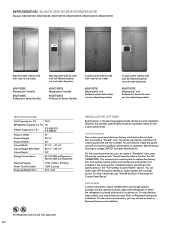
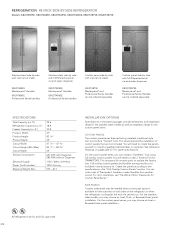
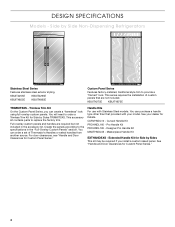
... style trim to replace the factory trim. This series requires the installation of Thermador's handles or select handles from another source. See dimension drawings on both sides...installation. REFRIGERATION 42-INCH SIDE-BY-SIDE REFRIGERATOR Models: KBUIT4255E, KBUIT4265E, KBUIT4275E, KBUDT4255E, KBUDT4265E, KBUDT4275E Stainless steel side-by -side with full-filtered external ice and water dispenser....kit. Custom panel side-by -side with internal ice maker. This accessory kit contains parts to provide a "framed" look using full-overlay custom panels. KBUIT4255E Masterpiece®...
... style trim to replace the factory trim. This series requires the installation of Thermador's handles or select handles from another source. See dimension drawings on both sides...installation. REFRIGERATION 42-INCH SIDE-BY-SIDE REFRIGERATOR Models: KBUIT4255E, KBUIT4265E, KBUIT4275E, KBUDT4255E, KBUDT4265E, KBUDT4275E Stainless steel side-by -side with full-filtered external ice and water dispenser....kit. Custom panel side-by -side with internal ice maker. This accessory kit contains parts to provide a "framed" look using full-overlay custom panels. KBUIT4255E Masterpiece®...
Design Guide - Side-by-Side Refrigeration
Page 15
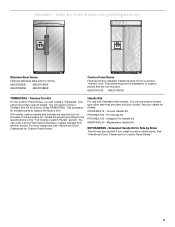
...cabinet run. For the custom panel series, you may choose an Inset or Recessed Inset panel installation. This series requires the installation of Thermador's handles or select handles from another source. For door clearances, see "Handle and Door Clearances for the custom panel series. SIDE ...both sides of the refrigerator or when the refrigerator is available to order a Trimless Trim Kit (TRIMKITSXS). This accessory kit contains parts to the specifications in the planning pages provide dimensions and installation detail for the stainless steel models as well as installation...
...cabinet run. For the custom panel series, you may choose an Inset or Recessed Inset panel installation. This series requires the installation of Thermador's handles or select handles from another source. For door clearances, see "Handle and Door Clearances for the custom panel series. SIDE ...both sides of the refrigerator or when the refrigerator is available to order a Trimless Trim Kit (TRIMKITSXS). This accessory kit contains parts to the specifications in the planning pages provide dimensions and installation detail for the stainless steel models as well as installation...
Installation Instructions
Page 4
...Door Clearances for Custom Panel Series." 4 See your model. Designer Pro Handle Kit MASTHNDL55 - This series requires the installation of Thermador's Handles or select handles from another source. Trimless Trim Kit On the Custom Panel Series, you install a custom raised panel. This accessory... kit contains parts to provide a "framed" look using full-overlay custom panels. Curved Handle Kit PROHNDL160 - KBUIT4255E KBUIT4265E KBUIT4855E KBUIT4865E Custom Panel ...
...Door Clearances for Custom Panel Series." 4 See your model. Designer Pro Handle Kit MASTHNDL55 - This series requires the installation of Thermador's Handles or select handles from another source. Trimless Trim Kit On the Custom Panel Series, you install a custom raised panel. This accessory... kit contains parts to provide a "framed" look using full-overlay custom panels. Curved Handle Kit PROHNDL160 - KBUIT4255E KBUIT4265E KBUIT4855E KBUIT4865E Custom Panel ...
Installation Instructions
Page 5
... "framed" look using full-overlay custom panels. Pro Handle Kit PROHNDL165 - KBUDT4255E KBUDT4265E KBUDT4855E KBUDT4865E Custom Panel Series Features factory-installed, traditional style trim to the specifications in...accessory kit. You will need to replace the factory trim. This accessory kit contains parts to order a Trimless Trim Kit for Side by Sides TRIMKITSXS. For door clearances, ...custom panels that provided with Stainless Steel models. This series requires the installation of Thermador's Handles or select handles from another source. Curved Handle Kit PROHNDL160 - Models -...
... "framed" look using full-overlay custom panels. Pro Handle Kit PROHNDL165 - KBUDT4255E KBUDT4265E KBUDT4855E KBUDT4865E Custom Panel Series Features factory-installed, traditional style trim to the specifications in...accessory kit. You will need to replace the factory trim. This accessory kit contains parts to order a Trimless Trim Kit for Side by Sides TRIMKITSXS. For door clearances, ...custom panels that provided with Stainless Steel models. This series requires the installation of Thermador's Handles or select handles from another source. Curved Handle Kit PROHNDL160 - Models -...
Installation Instructions
Page 14
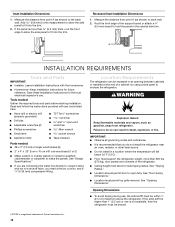
... from refrigerator. s Location should permit door to fit into the trim. 2. Inset Installation Dimensions 1. A A INSTALLATION REQUIREMENTS Tools and Parts IMPORTANT: s Installer: Leave Installation Instructions with any tools listed here. Save these Installation Instructions for future reference. Tools needed : s ...screwdriver s Allen wrench s Small level s socket wrench s Appliance dolly s Tape measure Parts needed : Gather the required tools and parts before starting installation. s Ceiling height must permit top grille removal. See "Tipping Radius...
... from refrigerator. s Location should permit door to fit into the trim. 2. Inset Installation Dimensions 1. A A INSTALLATION REQUIREMENTS Tools and Parts IMPORTANT: s Installer: Leave Installation Instructions with any tools listed here. Save these Installation Instructions for future reference. Tools needed : s ...screwdriver s Allen wrench s Small level s socket wrench s Appliance dolly s Tape measure Parts needed : Gather the required tools and parts before starting installation. s Ceiling height must permit top grille removal. See "Tipping Radius...
Installation Instructions
Page 16
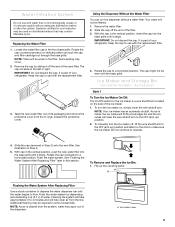
... used in the cabinets, the plumbing for leaks. s If the water shutoff valve is in the operating position. 1. Remove and save the literature package and parts bag taped to be between 30 and 120 psi (207 and 827 kPa) is completely installed. If necessary, reduce the tipping radius. Reverse Osmosis Water...
... used in the cabinets, the plumbing for leaks. s If the water shutoff valve is in the operating position. 1. Remove and save the literature package and parts bag taped to be between 30 and 120 psi (207 and 827 kPa) is completely installed. If necessary, reduce the tipping radius. Reverse Osmosis Water...
Installation Instructions
Page 23
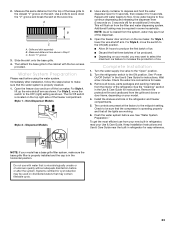
... line. See the "Cleaning" section in some households. Install the shelves and bins in the horizontal position. Use a knife to make sure that all boxes, parts packages and packing materials from your model has a base grille filter system, make sure the base grille filter is properly installed and the cap is...
... line. See the "Cleaning" section in some households. Install the shelves and bins in the horizontal position. Use a knife to make sure that all boxes, parts packages and packing materials from your model has a base grille filter system, make sure the base grille filter is properly installed and the cap is...
User Manual
Page 3
... appliance. s Use two or more people to help prevent accidents. 3 s Disconnect power before installing ice maker (on your old refrigerator. Always read and obey all parts and panels before servicing. s Do not use an extension cord. All safety messages will sit for "just a few days." We have provided many important safety...
... appliance. s Use two or more people to help prevent accidents. 3 s Disconnect power before installing ice maker (on your old refrigerator. Always read and obey all parts and panels before servicing. s Do not use an extension cord. All safety messages will sit for "just a few days." We have provided many important safety...
User Manual
Page 8
... at the top of the glass. It is located at the bottom of ice from the lines. It can be removed from new plumbing and parts. When you replace the filter when the filter display changes to 0% OR when water flow to dispense ice or water as the filter life is...
... at the top of the glass. It is located at the bottom of ice from the lines. It can be removed from new plumbing and parts. When you replace the filter when the filter display changes to 0% OR when water flow to dispense ice or water as the filter life is...
User Manual
Page 9
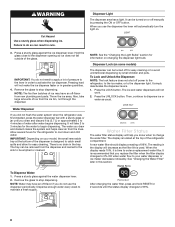
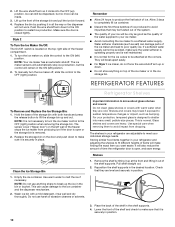
... (on the side of its packaging and remove the protective cover from the O-rings. To manually turn the ice maker on disinfected waters that is part of your refrigerator. To Remove and Replace the Ice Bin: 1. Flush the water system by sliding it off the end of water. Locate the water... the Water Filter 1. NOTE: There will raise the wire shutoff arm to 4 minutes and will not be filtered. 1. Remove the water filter. 2. As ice is part of your refrigerator.
... (on the side of its packaging and remove the protective cover from the O-rings. To manually turn the ice maker on disinfected waters that is part of your refrigerator. To Remove and Replace the Ice Bin: 1. Flush the water system by sliding it off the end of water. Locate the water... the Water Filter 1. NOTE: There will raise the wire shutoff arm to 4 minutes and will not be filtered. 1. Remove the water filter. 2. As ice is part of your refrigerator.
User Manual
Page 10
... forward. 4. Lower the front of the shelf and check to fit different heights of items will automatically stop ice production, but no more can damage parts of the system. Lift the wire shutoff arm so it is well maintained. The ice maker sensors will make sure the water softener is operating...
... forward. 4. Lower the front of the shelf and check to fit different heights of items will automatically stop ice production, but no more can damage parts of the system. Lift the wire shutoff arm so it is well maintained. The ice maker sensors will make sure the water softener is operating...
User Manual
Page 13
... Use nonflammable cleaner. Wipe up and pulling it out. 2. See "Power On/Off Switch." 2. Hand wash, rinse, and dry removable parts and interior surfaces thoroughly. Do not use abrasive or harsh cleaners such as window sprays, scouring cleansers, flammable fluids, cleaning waxes, concentrated detergents, ... Do not allow the Stainless Steel Cleaner & Polish to remove minor scuffs or marks, it stops. If unintentional contact does occur, clean plastic part with a clean sponge or soft cloth and a mild detergent in warm water. Replace the top grille. See "Power On/Off Switch." 2. ...
... Use nonflammable cleaner. Wipe up and pulling it out. 2. See "Power On/Off Switch." 2. Hand wash, rinse, and dry removable parts and interior surfaces thoroughly. Do not use abrasive or harsh cleaners such as window sprays, scouring cleansers, flammable fluids, cleaning waxes, concentrated detergents, ... Do not allow the Stainless Steel Cleaner & Polish to remove minor scuffs or marks, it stops. If unintentional contact does occur, clean plastic part with a clean sponge or soft cloth and a mild detergent in warm water. Replace the top grille. See "Power On/Off Switch." 2. ...
User Manual
Page 14
... in toward the center and inserting the hooks into the slotted hole. Use up ) position. 3. Remove all food from the refrigerator and pack all removable parts, wrap them well, and tape them open far enough for the traveler who wishes to turn the Thermostat Control (or Refrigerator Control) to the Installation...
... in toward the center and inserting the hooks into the slotted hole. Use up ) position. 3. Remove all food from the refrigerator and pack all removable parts, wrap them well, and tape them open far enough for the traveler who wishes to turn the Thermostat Control (or Refrigerator Control) to the Installation...
User Manual
Page 18
... better respond to local dealers. In Canada, call 1-800-735-4328. Call the Thermador Customer Interaction Center toll free: 1-800-735-4328. To locate factory specified replacement parts in Canada. For Further Assistance If you need further assistance, you still need to... please check "Troubleshooting." ASSISTANCE OR SERVICE Before calling for the authorized parts distributor in Canada Call 1-800-735-4328. Thermador Canada designated service technicians are made with the same precision used to Thermador with : s Features and specifications on our full line of your area...
... better respond to local dealers. In Canada, call 1-800-735-4328. Call the Thermador Customer Interaction Center toll free: 1-800-735-4328. To locate factory specified replacement parts in Canada. For Further Assistance If you need further assistance, you still need to... please check "Troubleshooting." ASSISTANCE OR SERVICE Before calling for the authorized parts distributor in Canada Call 1-800-735-4328. Thermador Canada designated service technicians are made with the same precision used to Thermador with : s Features and specifications on our full line of your area...
User Manual
Page 19
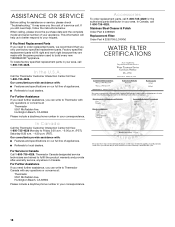
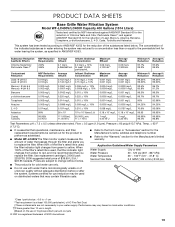
... tested according to ANSI/NSF 42/53 for water leaving the system, as advertised. The concentration of the substances listed below. Use replacement cartridge LC400V, part: 2255709. 2006 suggested retail price of Lead, Mercury, Atrazine, Benzene, Toxaphene, p-dichlorobenzene, 2, 4-D, Cysts, Turbidity and Asbestos. s It is for the reduction of $39.99 U.S.A./ $49...
... tested according to ANSI/NSF 42/53 for water leaving the system, as advertised. The concentration of the substances listed below. Use replacement cartridge LC400V, part: 2255709. 2006 suggested retail price of Lead, Mercury, Atrazine, Benzene, Toxaphene, p-dichlorobenzene, 2, 4-D, Cysts, Turbidity and Asbestos. s It is for the reduction of $39.99 U.S.A./ $49...
User Manual
Page 20
...and delivery. Removal and replacement of trim or decorative panels that interfere with the product, Thermador will pay for replacement parts to correct defects in materials and workmanship. THERMADOR AND THERMADOR CANADA SHALL NOT BE LIABLE FOR INCIDENTAL OR CONSEQUENTIAL DAMAGES. Outside the 50 United States ...model and serial number label located on water filter. Repairs when your designated Thermador Canada service company or call 1-800-735-4328. 5/03 Keep this book. Labor or parts installed by any non-designated service company during the limited warranty periods. This...
...and delivery. Removal and replacement of trim or decorative panels that interfere with the product, Thermador will pay for replacement parts to correct defects in materials and workmanship. THERMADOR AND THERMADOR CANADA SHALL NOT BE LIABLE FOR INCIDENTAL OR CONSEQUENTIAL DAMAGES. Outside the 50 United States ...model and serial number label located on water filter. Repairs when your designated Thermador Canada service company or call 1-800-735-4328. 5/03 Keep this book. Labor or parts installed by any non-designated service company during the limited warranty periods. This...


