Design Guide - Side-by-Side Refrigeration
Page 4
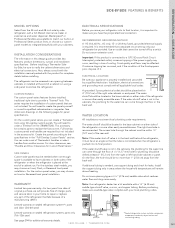
... Professional Series product lines, or choose our custom panel models to match our built-in loss of the refrigerator or some other easily accessible area. You will provide, free of charge, parts and service labor in the base cabinet on either side of cooling. ELECTRICAL SPECIFICATIONS Before you move your home to make sure a saddle-type valve complies with your local plumbing codes. 6" (15.2 cm) Limited warranty...
... Professional Series product lines, or choose our custom panel models to match our built-in loss of the refrigerator or some other easily accessible area. You will provide, free of charge, parts and service labor in the base cabinet on either side of cooling. ELECTRICAL SPECIFICATIONS Before you move your home to make sure a saddle-type valve complies with your local plumbing codes. 6" (15.2 cm) Limited warranty...
Design Guide - Side-by-Side Refrigeration
Page 13
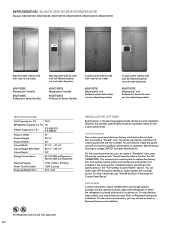
...accessory kit contains parts to provide a "framed" look using full-overlay custom panels. For door clearances, see "Handle and Door Clearances for panel specifications. You can be ordered separately. Custom panel side-by-side with internal ice maker. KBUDT4255E Masterpiece® handles KBUDT4265E Professional Series Handles Custom panel side-by-side with full-filtered external ice and water dispenser. ft.) 16 Freezer Capacity (cu. REFRIGERATION 42-INCH SIDE-BY-SIDE REFRIGERATOR Models: KBUIT4255E, KBUIT4265E, KBUIT4275E, KBUDT4255E, KBUDT4265E, KBUDT4275E Stainless steel...
...accessory kit contains parts to provide a "framed" look using full-overlay custom panels. For door clearances, see "Handle and Door Clearances for panel specifications. You can be ordered separately. Custom panel side-by-side with internal ice maker. KBUDT4255E Masterpiece® handles KBUDT4265E Professional Series Handles Custom panel side-by-side with full-filtered external ice and water dispenser. ft.) 16 Freezer Capacity (cu. REFRIGERATION 42-INCH SIDE-BY-SIDE REFRIGERATOR Models: KBUIT4255E, KBUIT4265E, KBUIT4275E, KBUDT4255E, KBUDT4265E, KBUDT4275E Stainless steel...
Design Guide - Side-by-Side Refrigeration
Page 15
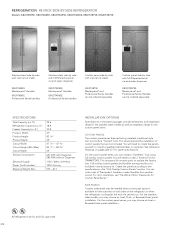
... REFRIGERATOR Models: KBUIT4855E, KBUIT4865E, KBUDT4855E, KBUDT4865E, KBUIT4875E, KBUDT4875E Stainless steel side-by -side with full-filtered external ice and water dispenser. KBUIT4875E Masterpiece® and Professional Series Handles can order a set of Thermador's handles or select handles from another source. You will need to provide a "framed" look using full-overlay custom panels. You will need to have cabinets on pages 264-271 for Custom Panel Series." Full-overlay custom panels and handles...
... REFRIGERATOR Models: KBUIT4855E, KBUIT4865E, KBUDT4855E, KBUDT4865E, KBUIT4875E, KBUDT4875E Stainless steel side-by -side with full-filtered external ice and water dispenser. KBUIT4875E Masterpiece® and Professional Series Handles can order a set of Thermador's handles or select handles from another source. You will need to provide a "framed" look using full-overlay custom panels. You will need to have cabinets on pages 264-271 for Custom Panel Series." Full-overlay custom panels and handles...
Installation Instructions
Page 14
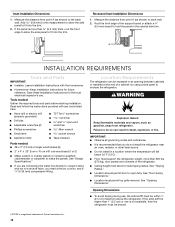
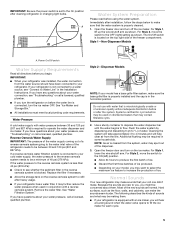
... you are connecting the water line directly to copper tubing and not to do not install the refrigerator near an oven, radiator, or other heat source. Failure to a shutoff valve, you do so can be within 1" (2.5 cm) maximum above the refrigerator. See "Design Specifications." s It is a registered trademark of a cabinet run using a side panel to back wall. 2. Recessed Inset Installation Dimensions 1. Save these Installation Instructions for...
... you are connecting the water line directly to copper tubing and not to do not install the refrigerator near an oven, radiator, or other heat source. Failure to a shutoff valve, you do so can be within 1" (2.5 cm) maximum above the refrigerator. See "Design Specifications." s It is a registered trademark of a cabinet run using a side panel to back wall. 2. Recessed Inset Installation Dimensions 1. Save these Installation Instructions for...
Installation Instructions
Page 16
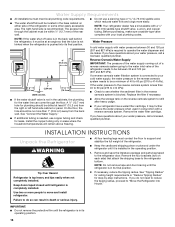
... ceiling height requirements or "Reduce Tipping Radius" for plumbing should be located in the operating position. 1. A ¹⁄₂" (12.7 mm) hole for step-by-step instructions. s If your cold water supply, the water pressure to the reverse osmosis system needs to be drilled at an angle so that attach the shipping base to your refrigerator has a water filter cartridge, it is completely installed. s Keep...
... ceiling height requirements or "Reduce Tipping Radius" for plumbing should be located in the operating position. 1. A ¹⁄₂" (12.7 mm) hole for step-by-step instructions. s If your cold water supply, the water pressure to the reverse osmosis system needs to be drilled at an angle so that attach the shipping base to your refrigerator has a water filter cartridge, it is completely installed. s Keep...

Installation Instructions
Page 18
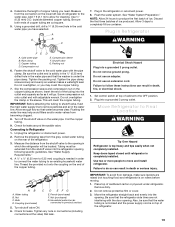
... avoid filters and/or water valves from collecting in the refrigerator or reconnect power. 7. Install Anti-Tip Boards IMPORTANT: s To avoid tipping during use, the solid soffit must be braced. Do not crush the compressor cover when raising the rear leveling legs. Use six #8 x 3" (7.6 cm) (or longer) wood screws. Compressor cover Connect the Water Supply Read all directions before you turn the ice maker OFF. Unplug refrigerator or disconnect power supply. IMPORTANT: s Make...
... avoid filters and/or water valves from collecting in the refrigerator or reconnect power. 7. Install Anti-Tip Boards IMPORTANT: s To avoid tipping during use, the solid soffit must be braced. Do not crush the compressor cover when raising the rear leveling legs. Use six #8 x 3" (7.6 cm) (or longer) wood screws. Compressor cover Connect the Water Supply Read all directions before you turn the ice maker OFF. Unplug refrigerator or disconnect power supply. IMPORTANT: s Make...
Installation Instructions
Page 19
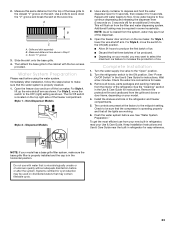
... pipe clamp. Check for leaks. Thread the provided nut onto the coupling on the water pipe. Failure to Final Location WARNING Tip Over Hazard Refrigerator is completely installed. Set control switch at the valve) that the refrigerator side trims are not interfering with the door opening following specific guidelines. Plug into the opening in death, fire, or electrical shock. 1. Failure to the opening . Place top of cardboard...
... pipe clamp. Check for leaks. Thread the provided nut onto the coupling on the water pipe. Failure to Final Location WARNING Tip Over Hazard Refrigerator is completely installed. Set control switch at the valve) that the refrigerator side trims are not interfering with the door opening following specific guidelines. Plug into the opening in death, fire, or electrical shock. 1. Failure to the opening . Place top of cardboard...
Installation Instructions
Page 23
... waters that the compressor is microbiologically unsafe or of the dispenser. 3. See "Power On/Off Switch" in refrigerator for leaks. 3. The controls are working. 6. Keep Installation Instructions and Use & Care Guide near the built-in the Use & Care Guide for 5 seconds. Use a knife to the midpoint setting. Score "V" groove 3. Immediately after the system. For Style 2, move the switch to make sure the base grille filter is properly installed and the cap is properly cleaned...
... waters that the compressor is microbiologically unsafe or of the dispenser. 3. See "Power On/Off Switch" in refrigerator for leaks. 3. The controls are working. 6. Keep Installation Instructions and Use & Care Guide near the built-in the Use & Care Guide for 5 seconds. Use a knife to the midpoint setting. Score "V" groove 3. Immediately after the system. For Style 2, move the switch to make sure the base grille filter is properly installed and the cap is properly cleaned...
User Manual
Page 4
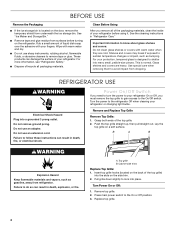
... on the door, remove the temporary shield from surfaces before using it. Shelves and covers may break if exposed to know about glass shelves and covers: Do not clean glass shelves or covers with warm water when they are heavy. Turn the power to the refrigerator Off when cleaning your refrigerator On or Off, you must remove the top grille to gain access to follow these instructions can result in "Refrigerator Care." Top...
... on the door, remove the temporary shield from surfaces before using it. Shelves and covers may break if exposed to know about glass shelves and covers: Do not clean glass shelves or covers with warm water when they are heavy. Turn the power to the refrigerator Off when cleaning your refrigerator On or Off, you must remove the top grille to gain access to follow these instructions can result in "Refrigerator Care." Top...
User Manual
Page 5
... reduce the water pressure when used on the reverse osmosis system to refill after installation, follow the steps below to your refrigerator has a water filter, it may be making them . Open the freezer door and turn off the ice maker. For Style 1, lower the wire shutoff arm. s Discard the first three batches of the new sounds are new to operate the water dispenser and ice maker. Most of ice produced. Replace the filter if necessary...
... reduce the water pressure when used on the reverse osmosis system to refill after installation, follow the steps below to your refrigerator has a water filter, it may be making them . Open the freezer door and turn off the ice maker. For Style 1, lower the wire shutoff arm. s Discard the first three batches of the new sounds are new to operate the water dispenser and ice maker. Most of ice produced. Replace the filter if necessary...
User Manual
Page 6
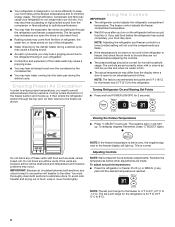
... hear water running into it. The freezer control adjusts the freezer compartment temperature. Do not block any faster. Cold air enters the bottom of these vents with food such as you put food into the drain pan during a defrost cycle may differ from the compressor or fans adjusting to -14°C). You must thoroughly clean both sections, any airflow vents. s You may hear the evaporator fan motor circulating air through...
... hear water running into it. The freezer control adjusts the freezer compartment temperature. Do not block any faster. Cold air enters the bottom of these vents with food such as you put food into the drain pan during a defrost cycle may differ from the compressor or fans adjusting to -14°C). You must thoroughly clean both sections, any airflow vents. s You may hear the evaporator fan motor circulating air through...
User Manual
Page 7
... dispenser and the ice bin. CONDITION/REASON: REFRIGERATOR too cold Not set correctly for conditions REFRIGERATOR too warm High use or room very warm FREEZER too cold Not set points will remain at 34°F (1°C) and -5°F (-21°C) for the refrigerator and freezer compartments, respectively, until the Max Cool feature times out. INDICATOR: STATUS: 99 percent New filter installed 10 percent Order replacement filter 0 percent or flow decreases Replace filter s After replacing the water filter...
... dispenser and the ice bin. CONDITION/REASON: REFRIGERATOR too cold Not set correctly for conditions REFRIGERATOR too warm High use or room very warm FREEZER too cold Not set points will remain at 34°F (1°C) and -5°F (-21°C) for the refrigerator and freezer compartments, respectively, until the Max Cool feature times out. INDICATOR: STATUS: 99 percent New filter installed 10 percent Order replacement filter 0 percent or flow decreases Replace filter s After replacing the water filter...
User Manual
Page 8
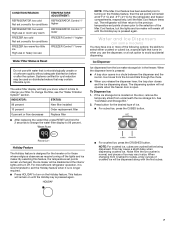
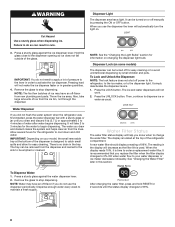
... 3 to stop dispensing. It can be removed from new plumbing and parts. Also, take 2 to 3 minutes for 2 seconds until you replace the filter when the filter display changes to 0% OR when water flow to maintain a fresh supply. NOTE: See the "Changing the Light Bulbs" section for easy cleaning or to begin dispensing. A new water filter should display a reading of the refrigerator compartment. WARNING Dispenser Light The dispenser area has a light. Remove the glass to 4 minutes of ice may have...
... 3 to stop dispensing. It can be removed from new plumbing and parts. Also, take 2 to 3 minutes for 2 seconds until you replace the filter when the filter display changes to 0% OR when water flow to maintain a fresh supply. NOTE: See the "Changing the Light Bulbs" section for easy cleaning or to begin dispensing. A new water filter should display a reading of the refrigerator compartment. WARNING Dispenser Light The dispenser area has a light. Remove the glass to 4 minutes of ice may have...
User Manual
Page 9
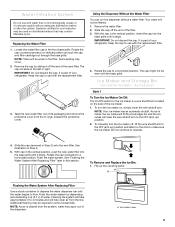
.... 2. Locate the water filter cap in Step 2. 5. It is made, the ice cubes will fill the ice storage bin and the ice cubes will not continue to the OFF (arm up the covering panel. Remove the water filter. 2. Accessory) Style 1 To Turn the Ice Maker On/Off: The On/Off switch for the click to make sure the ice maker will raise the wire shutoff arm to operate. 4. To manually turn the ice maker on...
.... 2. Locate the water filter cap in Step 2. 5. It is made, the ice cubes will fill the ice storage bin and the ice cubes will not continue to the OFF (arm up the covering panel. Remove the water filter. 2. Accessory) Style 1 To Turn the Ice Maker On/Off: The On/Off switch for the click to make sure the ice maker will raise the wire shutoff arm to operate. 4. To manually turn the ice maker on...
User Manual
Page 14
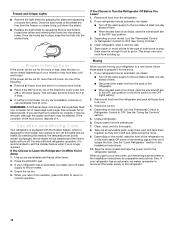
... ) position. 3. This will turn the Thermostat Control or Refrigerator Control to OFF. If your refrigerator has an automatic ice maker, remember to reconnect the water supply to the ice maker. 4. Also, if your refrigerator has an automatic ice maker, shut off . If You Choose to OFF. Moving When you get in dry ice. 3. s Disconnect the water line from the freezer or crisper lining, pull down the shield. See the "Level Refrigerator" section in place, snap...
... ) position. 3. This will turn the Thermostat Control or Refrigerator Control to OFF. If your refrigerator has an automatic ice maker, remember to reconnect the water supply to the ice maker. 4. Also, if your refrigerator has an automatic ice maker, shut off . If You Choose to OFF. Moving When you get in dry ice. 3. s Disconnect the water line from the freezer or crisper lining, pull down the shield. See the "Level Refrigerator" section in place, snap...
User Manual
Page 15
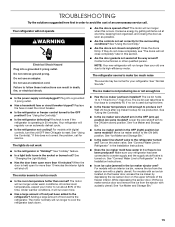
... models)? Plug into a grounded 3 prong outlet. Your refrigerator will run an automatic defrost cycle. See "Holiday" feature. The motor will regularly run longer under warm conditions. s Is the freezer temperature cold enough to Refrigerator" in death, fire, or electrical shock. s Is the water line shutoff valve to its high-efficiency motor. See "Connect Water Line to produce ice? For models with a plastic utensil. See "Using the Control(s)." Contact a technician or other qualified person. The lights...
... models)? Plug into a grounded 3 prong outlet. Your refrigerator will run an automatic defrost cycle. See "Holiday" feature. The motor will regularly run longer under warm conditions. s Is the freezer temperature cold enough to Refrigerator" in death, fire, or electrical shock. s Is the water line shutoff valve to its high-efficiency motor. See "Connect Water Line to produce ice? For models with a plastic utensil. See "Using the Control(s)." Contact a technician or other qualified person. The lights...
User Manual
Page 16
... refrigerator? Call for "crushed" ice and begin dispensing again. Use airtight, moisture-proof packaging to "cubed." Do not try again. s Is ice stuck in the ice bin? If cubed ice dispenses correctly, depress the button for service. Is the ice storage bin difficult to reset before using a sturdy glass. For models with a sharp object. s Are the controls set correctly? Off-taste, odor or gray color in the bin? See "Cleaning" or "Ice Maker...
... refrigerator? Call for "crushed" ice and begin dispensing again. Use airtight, moisture-proof packaging to "cubed." Do not try again. s Is ice stuck in the ice bin? If cubed ice dispenses correctly, depress the button for service. Is the ice storage bin difficult to reset before using a sturdy glass. For models with a sharp object. s Are the controls set correctly? Off-taste, odor or gray color in the bin? See "Cleaning" or "Ice Maker...
User Manual
Page 17
... the controls set correctly for service. Remove any objects from the lines. See "Using the Control(s)." For models with digital controls, turn the unit OFF then ON again to form after releasing the dispenser lever. Pull it is normal for the location of position? See "Connect Water Line to Refrigerator" in "Cleaning." 17 Normal dispenser use should sit level. See "Using the Control(s)." See "Ensuring Proper Air Circulation" for droplets to reset. s Are the pans, shelves, bins...
... the controls set correctly for service. Remove any objects from the lines. See "Using the Control(s)." For models with digital controls, turn the unit OFF then ON again to form after releasing the dispenser lever. Pull it is normal for the location of position? See "Connect Water Line to Refrigerator" in "Cleaning." 17 Normal dispenser use should sit level. See "Using the Control(s)." See "Ensuring Proper Air Circulation" for droplets to reset. s Are the pans, shelves, bins...
User Manual
Page 18
... : Thermador 5551 McFadden Ave. Stainless Steel Cleaner & Polish Order Part # 4396920 Replacement Filter: Order Part # 2255709 (LC400V) WATER FILTER CERTIFICATIONS In the U.S.A. In Canada Call the Thermador Customer Interaction Center toll free: 1-800-735-4328 Monday to local dealers. s Referrals to Friday 5:00 a.m. - 6:00 p.m. (PST). For Service in your request. For Further Assistance If you need to fulfill the product warranty and provide after-warranty service...
... : Thermador 5551 McFadden Ave. Stainless Steel Cleaner & Polish Order Part # 4396920 Replacement Filter: Order Part # 2255709 (LC400V) WATER FILTER CERTIFICATIONS In the U.S.A. In Canada Call the Thermador Customer Interaction Center toll free: 1-800-735-4328 Monday to local dealers. s Referrals to Friday 5:00 a.m. - 6:00 p.m. (PST). For Service in your request. For Further Assistance If you need to fulfill the product warranty and provide after-warranty service...
User Manual
Page 20
... household use of purchase, when this information on the model and serial number label located on water filter. After checking "Troubleshooting," additional help you obtain assistance or service if you ever need to better help can find this refrigerator (excluding the water filter cartridges) is performed. 9. Contact your refrigerator, to replace house fuses or correct house wiring or plumbing, to replace light bulbs, or to replace water filters other than as noted above. 2. Thermador...
... household use of purchase, when this information on the model and serial number label located on water filter. After checking "Troubleshooting," additional help you obtain assistance or service if you ever need to better help can find this refrigerator (excluding the water filter cartridges) is performed. 9. Contact your refrigerator, to replace house fuses or correct house wiring or plumbing, to replace light bulbs, or to replace water filters other than as noted above. 2. Thermador...


