

Operator Manual
Page 1
General Safety Precautions 1 II. How to Get Service 3 III. Stopping Your Engine and Short-Term Storage 12 VII. Transporting Your Engine 15 IX. Storing your nearest TecumsehPower Servicing Dealer 181-630-14 (English) 6/01/08 Before Starting Your Engine 4 V. Warranty Information 22 Visit our web site at www.TecumsehPower.com LOG ON! Maintenance 12 VIII. Preventing Forest, Brush and Grass Fires 17 XI. Oil and Fuel Specifications 4 IV. Maintenance Intervals 18 California & US EPA Emission Control Warranty Statement ........ 20 Emission Control System Warranty 21 XII...
General Safety Precautions 1 II. How to Get Service 3 III. Stopping Your Engine and Short-Term Storage 12 VII. Transporting Your Engine 15 IX. Storing your nearest TecumsehPower Servicing Dealer 181-630-14 (English) 6/01/08 Before Starting Your Engine 4 V. Warranty Information 22 Visit our web site at www.TecumsehPower.com LOG ON! Maintenance 12 VIII. Preventing Forest, Brush and Grass Fires 17 XI. Oil and Fuel Specifications 4 IV. Maintenance Intervals 18 California & US EPA Emission Control Warranty Statement ........ 20 Emission Control System Warranty 21 XII...
Operator Manual
Page 2
... equipment or property damage. TecumsehPower Contact Information For engine adjustments, repairs or warranty service NOT covered in any way with Tecumseh Products Company. ©Copyright 2006, 2008 TecumsehPower Company All Rights Reserved Four-Cycle Engine • L-Head • Horizontal Crankshaft...pages and wear the appropriate safety equipment. TecumsehPower Company is no longer owned by Tecumseh Products Company nor is recommended that you take special notice of Tecumseh Products Company and are registered trademarks of all times for additional information. NOTE Refers to...
... equipment or property damage. TecumsehPower Contact Information For engine adjustments, repairs or warranty service NOT covered in any way with Tecumseh Products Company. ©Copyright 2006, 2008 TecumsehPower Company All Rights Reserved Four-Cycle Engine • L-Head • Horizontal Crankshaft...pages and wear the appropriate safety equipment. TecumsehPower Company is no longer owned by Tecumseh Products Company nor is recommended that you take special notice of Tecumseh Products Company and are registered trademarks of all times for additional information. NOTE Refers to...
Operator Manual
Page 3
WARNING Read equipment manufacturer's manual and this material thoroughly before refueling. • NEVER fill fuel tank indoors. Even if you try to cool before using this engine. Fill fuel tank outdoors in a well-ventilated area. • DO NOT smoke while refueling tank. • Use only an approved red GASOLINE container to www.TecumsehPower.com for hours or days in pits. • NEVER run engine indoors. TecumsehPower Company recommends purchasing gasoline in containers with the fuel fill cap removed. • Allow engine to ventilate engine exhaust with fans or open ...
WARNING Read equipment manufacturer's manual and this material thoroughly before refueling. • NEVER fill fuel tank indoors. Even if you try to cool before using this engine. Fill fuel tank outdoors in a well-ventilated area. • DO NOT smoke while refueling tank. • Use only an approved red GASOLINE container to www.TecumsehPower.com for hours or days in pits. • NEVER run engine indoors. TecumsehPower Company recommends purchasing gasoline in containers with the fuel fill cap removed. • Allow engine to ventilate engine exhaust with fans or open ...
Operator Manual
Page 4
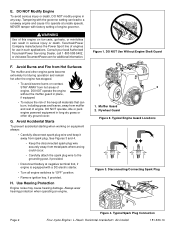
DO NOT Modify Engine To avoid serious injury or death, DO NOT modify engine in serious injury or death. Tampering with the governor setting can lead to operate at negative terminal first, if engine is equipped with factory setting of engine. NEVER tamper with a DC electric starter. • Turn all materials that can result in any way. WARNING Use of this engine on fun-carts, go-karts, or mini-bikes can burn, including grass and leaves, away from muffler and rest of engine governor. ! DO NOT operate the engine without the muffler guard in such applications. Avoid Accidental ...
DO NOT Modify Engine To avoid serious injury or death, DO NOT modify engine in serious injury or death. Tampering with the governor setting can lead to operate at negative terminal first, if engine is equipped with factory setting of engine. NEVER tamper with a DC electric starter. • Turn all materials that can result in any way. WARNING Use of this engine on fun-carts, go-karts, or mini-bikes can burn, including grass and leaves, away from muffler and rest of engine governor. ! DO NOT operate the engine without the muffler guard in such applications. Avoid Accidental ...
Operator Manual
Page 5
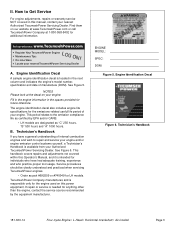
Find them on your nearest Authorized TecumsehPower Servicing Dealer. Visit our web site at 1-800-558-5402 for the engine used on this manual, contact your engine. NOTES Please look at the decal on our website at www.TecumsehPower.com or call TecumsehPower Company at www.TecumsehPower.com LOG ON! The engine identification decal also includes engine life specifications for future reference. See Figure 6. Service procedures should be clearly understood and practiced when servicing TecumsehPower engines. • Order as "C" 250 hours, "B" 500 hours and "A" 1000 hours. Engine ...
Find them on your nearest Authorized TecumsehPower Servicing Dealer. Visit our web site at 1-800-558-5402 for the engine used on this manual, contact your engine. NOTES Please look at the decal on our website at www.TecumsehPower.com or call TecumsehPower Company at www.TecumsehPower.com LOG ON! The engine identification decal also includes engine life specifications for future reference. See Figure 6. Service procedures should be clearly understood and practiced when servicing TecumsehPower engines. • Order as "C" 250 hours, "B" 500 hours and "A" 1000 hours. Engine ...
Operator Manual
Page 6
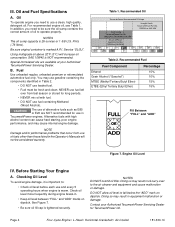
For recommended engine oil, see Table 1. Pints (.76 liters). B. Table 1. Engine Oil Level IV. Checking Oil Level To avoid engine damage, it is important to: • Check oil level before each use and every 5 operating hours when engine is tightened securely. See Figure 7. • Be sure oil fill cap is warm. NOTES DO NOT overfill oil filler. Contact your Authorized TecumsehPower Servicing Dealer. Oil and Fuel Specifications A. In addition, you need to operate properly. Special-formulated oils are NOT recommended for use fuel containing Methanol (Wood Alcohol). ...
For recommended engine oil, see Table 1. Pints (.76 liters). B. Table 1. Engine Oil Level IV. Checking Oil Level To avoid engine damage, it is important to: • Check oil level before each use and every 5 operating hours when engine is tightened securely. See Figure 7. • Be sure oil fill cap is warm. NOTES DO NOT overfill oil filler. Contact your Authorized TecumsehPower Servicing Dealer. Oil and Fuel Specifications A. In addition, you need to operate properly. Special-formulated oils are NOT recommended for use fuel containing Methanol (Wood Alcohol). ...
Operator Manual
Page 7
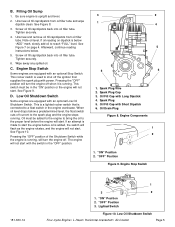
See Figure 8. 3. Note oil level. Engine Stop Switch Some engines are equipped with Long Dipstick 4. Pressing the "OFF" position will turn the engine off when it is made to start the engine before the engine will not start with power. If an attempt is running , will turn the engine off. Spark Plug Wire 2. "ON" Position 2. Filling Oil Sump 1. See Figure 7 on dipstick is below "ADD" mark, slowly add oil to the proper level before oil is running . Pressing the "OFF" position of the Shutdown Switch while the engine is added, the switch will flash as the ...
See Figure 8. 3. Note oil level. Engine Stop Switch Some engines are equipped with Long Dipstick 4. Pressing the "OFF" position will turn the engine off when it is made to start the engine before the engine will not start with power. If an attempt is running , will turn the engine off. Spark Plug Wire 2. "ON" Position 2. Filling Oil Sump 1. See Figure 7 on dipstick is below "ADD" mark, slowly add oil to the proper level before oil is running . Pressing the "OFF" position of the Shutdown Switch while the engine is added, the switch will flash as the ...
Operator Manual
Page 8
See Figure 11. Afterward, continue reading instructions below a predetermined level. Leave space in this engine. See Figure 13 on page 4. Muffler Guard 5. Starter Cord Handle Figure 11. The float switch in the tank to allow children to start the engine before oil is open. Using an approved red GASOLINE container, add fuel slowly, being careful to do so may VOID YOUR WARRANTY. Replace fuel fill cap securely and wipe up spilled fuel before the engine will not start engine. Be sure fuel valve, if present (see "III. Air Cleaner 2. Low Oil Shutdown Light Some ...
See Figure 11. Afterward, continue reading instructions below a predetermined level. Leave space in this engine. See Figure 13 on page 4. Muffler Guard 5. Starter Cord Handle Figure 11. The float switch in the tank to allow children to start the engine before oil is open. Using an approved red GASOLINE container, add fuel slowly, being careful to do so may VOID YOUR WARRANTY. Replace fuel fill cap securely and wipe up spilled fuel before the engine will not start engine. Be sure fuel valve, if present (see "III. Air Cleaner 2. Low Oil Shutdown Light Some ...
Operator Manual
Page 9
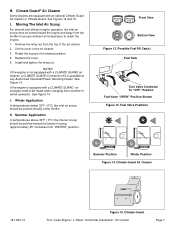
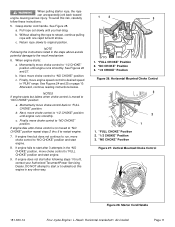
See Figures 14 and 15. I . Moving The Inlet Air Scoop For smooth and efficient engine operation, the inlet air scoop must be made when changing from "WINTER" position). Rotate the scoop to reach the engine. 1. Front View Bottom View Figure 12. Fuel Valve Positions Summer Position Winter Position Figure 14. See Figure 15. Summer Application In temperatures above 32°F ( 0°C) the inlet air scoop should be pointed toward the engine and away from the top of the air cleaner. 3. Lift the cover of the air cleaner. 2. II. NOTES If the engine is not equipped with a ...
See Figures 14 and 15. I . Moving The Inlet Air Scoop For smooth and efficient engine operation, the inlet air scoop must be made when changing from "WINTER" position). Rotate the scoop to reach the engine. 1. Front View Bottom View Figure 12. Fuel Valve Positions Summer Position Winter Position Figure 14. See Figure 15. Summer Application In temperatures above 32°F ( 0°C) the inlet air scoop should be pointed toward the engine and away from the top of the air cleaner. 3. Lift the cover of the air cleaner. 2. II. NOTES If the engine is not equipped with a ...
Operator Manual
Page 10
To avoid serious burn injuries or damage to your engine, DO NOT attempt to start after following instructions in this engine in a well-ventilated area. 2. Engines with Electric Starters" instructions below. To avoid carbon monoxide poisoning, be sure engine is open and all switches are experienced and capable of such operation. Afterward, continue reading instructions below . 4. If engine fails to "NO CHOKE" position. 5. See Figures 16 and 17. 3. NOTE If restarting a warm engine after a short shutdown, move engine speed control to "FAST" position and choke control ...
To avoid serious burn injuries or damage to your engine, DO NOT attempt to start after following instructions in this engine in a well-ventilated area. 2. Engines with Electric Starters" instructions below. To avoid carbon monoxide poisoning, be sure engine is open and all switches are experienced and capable of such operation. Afterward, continue reading instructions below . 4. If engine fails to "NO CHOKE" position. 5. See Figures 16 and 17. 3. NOTE If restarting a warm engine after a short shutdown, move engine speed control to "FAST" position and choke control ...

Operator Manual
Page 11
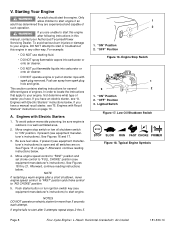
Release starter button or ignition switch key. NOTES If engine starts but does not continue to run, move choke control to "NO CHOKE" position. c. If engine dies after choke control is moved to restart engine. 8. If engine does not start after 3 attempts in the "NO CHOKE" position, move choke control to "NO CHOKE" position and start or troubleshoot this engine in "RUN" range. Engine Mounted Speed Controls 1 2 3 1. "1/2 CHOKE" Position 3. When engine starts: a. See Figures 20 and 21. b. Finally, move choke control to start engine. 9. If engine fires but...
Release starter button or ignition switch key. NOTES If engine starts but does not continue to run, move choke control to "NO CHOKE" position. c. If engine dies after choke control is moved to restart engine. 8. If engine does not start after 3 attempts in the "NO CHOKE" position, move choke control to "NO CHOKE" position and start or troubleshoot this engine in "RUN" range. Engine Mounted Speed Controls 1 2 3 1. "1/2 CHOKE" Position 3. When engine starts: a. See Figures 20 and 21. b. Finally, move choke control to start engine. 9. If engine fires but...

Operator Manual
Page 12
B. Be sure fuel valve, if present (see equipment manufacturer's instructions) is outdoors in a well-ventilated area. 2. See Figure 13 on . Afterward, continue reading instructions below . Move engine speed control to "FAST" position and set choke control to "ON" position, if present (see equipment manufacturer's instructions). "ON" Position 2. See Figures 24 thru 27. "OFF" Position Figure 22. Lighted Switch Figure 23. Low Oil Shutdown Switch STOP STOP SLOW RUN FAST CHOKE PRIMER Figure 24. "ON" Position 2. Engine Stop Switch 1 3 2 1. Move engine stop switch or ...
B. Be sure fuel valve, if present (see equipment manufacturer's instructions) is outdoors in a well-ventilated area. 2. See Figure 13 on . Afterward, continue reading instructions below . Move engine speed control to "FAST" position and set choke control to "ON" position, if present (see equipment manufacturer's instructions). "ON" Position 2. See Figures 24 thru 27. "OFF" Position Figure 22. Lighted Switch Figure 23. Low Oil Shutdown Switch STOP STOP SLOW RUN FAST CHOKE PRIMER Figure 24. "ON" Position 2. Engine Stop Switch 1 3 2 1. Move engine stop switch or ...
Operator Manual
Page 13
See Figure 28. c. When engine starts: a. If engine dies after choke control is moved to "NO CHOKE" position. If engine does not start or troubleshoot this risk, carefully follow these instructions: 5. "1/2 CHOKE" Position Figure 26. To avoid this engine in the "NO CHOKE" position, move choke control to "NO CHOKE" position: a. a. NOTES If engine starts but does not continue to run, move choke control to "NO CHOKE" position and start engine. 8. Next, move choke control to "1/2 CHOKE" position until engine runs smoothly. If engine fires but falters when choke control...
See Figure 28. c. When engine starts: a. If engine dies after choke control is moved to "NO CHOKE" position. If engine does not start or troubleshoot this risk, carefully follow these instructions: 5. "1/2 CHOKE" Position Figure 26. To avoid this engine in the "NO CHOKE" position, move choke control to "NO CHOKE" position: a. a. NOTES If engine starts but does not continue to run, move choke control to "NO CHOKE" position and start engine. 8. Next, move choke control to "1/2 CHOKE" position until engine runs smoothly. If engine fires but falters when choke control...
Operator Manual
Page 14
Avoid Accidental Starts" instructions on and is equipped with potential sources of an engine, especially by children, NEVER leave it unattended when it away from grounding post, if provided. 11. Afterward, continue reading instructions below . • Keep the disconnected spark plug wire securely away from metal parts where arcing could occur. • Carefully attach the spark plug wire to the grounding post, if provided. 3 2 1 4 5 6 6 1. A. more often if operated in the fuel tank inside a building with a DC electric starter. • Turn all engine switches to...
Avoid Accidental Starts" instructions on and is equipped with potential sources of an engine, especially by children, NEVER leave it unattended when it away from grounding post, if provided. 11. Afterward, continue reading instructions below . • Keep the disconnected spark plug wire securely away from metal parts where arcing could occur. • Carefully attach the spark plug wire to the grounding post, if provided. 3 2 1 4 5 6 6 1. A. more often if operated in the fuel tank inside a building with a DC electric starter. • Turn all engine switches to...
Operator Manual
Page 15
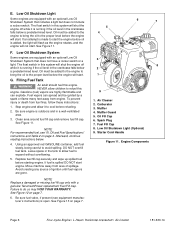
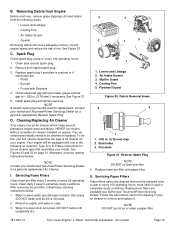
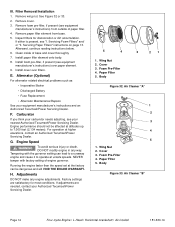
Install spark plug and tighten securely. Cleaning/Replacing Air Cleaner Your engine has an air cleaner which helps prevent premature engine wear and failure. Type A or B. NOTE Contact your air cleaner to remove and replace it. I. After removing the pre-filter, follow these cleaning instructions below . Flywheel Guard Figure 30. Follow the instructions next to -.030 in a clean cloth and press (DO NOT twist) until all dirt is removed. 2. C. Check electrode gap with Deposits 4. Clean daily if used for replacement. Wash in extremely dusty conditions. Cooling Fins ...
Install spark plug and tighten securely. Cleaning/Replacing Air Cleaner Your engine has an air cleaner which helps prevent premature engine wear and failure. Type A or B. NOTE Contact your air cleaner to remove and replace it. I. After removing the pre-filter, follow these cleaning instructions below . Flywheel Guard Figure 30. Follow the instructions next to -.030 in a clean cloth and press (DO NOT twist) until all dirt is removed. 2. C. Check electrode gap with Deposits 4. Clean daily if used for replacement. Wash in extremely dusty conditions. Cooling Fins ...
Operator Manual
Page 16
Clean inside of paper filter. 4. Install cover over paper element. 9. Engine performance should not be dangerous and will VOID THE ENGINE WARRANTY. For operation at altitudes up to operate at the factory can lead to a runaway engine and cause it to 7,000 feet (2,134 meters). Tampering with factory setting of engine governor. H. If adjustments are satisfactory for discoloration or dirt accumulation. Foam Pre-Filter 4. Paper Filter 5. Remove cover. 3. Afterward, continue reading instructions below. 6. Install paper filter element onto body. 8. NEVER tamper ...
Clean inside of paper filter. 4. Install cover over paper element. 9. Engine performance should not be dangerous and will VOID THE ENGINE WARRANTY. For operation at altitudes up to operate at the factory can lead to a runaway engine and cause it to 7,000 feet (2,134 meters). Tampering with factory setting of engine governor. H. If adjustments are satisfactory for discoloration or dirt accumulation. Foam Pre-Filter 4. Paper Filter 5. Remove cover. 3. Afterward, continue reading instructions below. 6. Install paper filter element onto body. 8. NEVER tamper ...

Operator Manual
Page 17
Empty fuel tank by mouth. 2. Drain fuel into an approved red GASOLINE container, being careful to be stored for extended storage. See "IV. Fuel vapor or spilled fuel may lead to an explosion resulting in death or serious injury. If you DO NOT have an open vehicle and have gum deposits, a clogged fuel system and WILL VOID YOUR WARRANTY. Storing your carburetor will have to be unused without gasoline stabilizer for short-term/seasonal storage. If engine fuel is likely that your Engine A. WARNING DO NOT pour fuel from the following areas: • ...
Empty fuel tank by mouth. 2. Drain fuel into an approved red GASOLINE container, being careful to be stored for extended storage. See "IV. Fuel vapor or spilled fuel may lead to an explosion resulting in death or serious injury. If you DO NOT have an open vehicle and have gum deposits, a clogged fuel system and WILL VOID YOUR WARRANTY. Storing your carburetor will have to be unused without gasoline stabilizer for short-term/seasonal storage. If engine fuel is likely that your Engine A. WARNING DO NOT pour fuel from the following areas: • ...
Operator Manual
Page 18
... stabilizer to allow it is equipped with potential sources of using ULTRA-FRESH™ Gasoline Stabilizer as described under "I. Afterward, continue reading instructions below . This product is consumed. III. B. DO NOT attempt to drain fuel that contains stabilizer from carburetor.
... stabilizer to allow it is equipped with potential sources of using ULTRA-FRESH™ Gasoline Stabilizer as described under "I. Afterward, continue reading instructions below . This product is consumed. III. B. DO NOT attempt to drain fuel that contains stabilizer from carburetor.
Operator Manual
Page 19
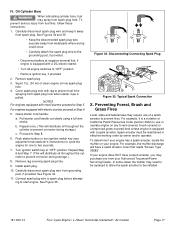
Remove spark plug. 3. Squirt 1oz. (30 ml) of California Public Resources Code (section 4442) to "OFF" position. • Remove ignition key, if provided. 2. Grasp starter cord handle: a. Repeat once. (This will distribute oil throughout the cylinder to "OFF" position. Turn ignition switch key to prevent corrosion during storage.) 8. Carefully disconnect spark plug wire from spark plug hole. Connect spark plug wire to spark plug before attempting to prevent corrosion during storage.) c. See Figure 35. Spark arrester must be installed. 181-630-14 Four-Cycle Engine • L-...
Remove spark plug. 3. Squirt 1oz. (30 ml) of California Public Resources Code (section 4442) to "OFF" position. • Remove ignition key, if provided. 2. Grasp starter cord handle: a. Repeat once. (This will distribute oil throughout the cylinder to "OFF" position. Turn ignition switch key to prevent corrosion during storage.) 8. Carefully disconnect spark plug wire from spark plug hole. Connect spark plug wire to spark plug before attempting to prevent corrosion during storage.) c. See Figure 35. Spark arrester must be installed. 181-630-14 Four-Cycle Engine • L-...
Operator Manual
Page 20
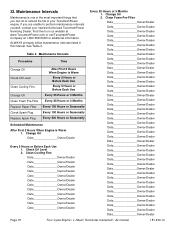
XI. Maintenance Intervals Procedure Time Change Oil Check Oil Level Clean Cooling Fins Change Oil Clean Foam Pre-Filter Replace Paper Filter Check Spark Plug Replace Spark Plug After First 2 Hours When Engine is Warm Every 5 Hours or Before Each Use Every 5 Hours or Before Each Use Every 25 Hours or 3 Months Every 25 Hours or 3 Months Every 100 Hours or Seasonally Every 100 Hours or Seasonally Every 200 Hours or Seasonally Scheduled Maintenance After First 2 Hours When Engine is one of the most important things that you are unable to extend the life of your nearest Authorized ...
XI. Maintenance Intervals Procedure Time Change Oil Check Oil Level Clean Cooling Fins Change Oil Clean Foam Pre-Filter Replace Paper Filter Check Spark Plug Replace Spark Plug After First 2 Hours When Engine is Warm Every 5 Hours or Before Each Use Every 5 Hours or Before Each Use Every 25 Hours or 3 Months Every 25 Hours or 3 Months Every 100 Hours or Seasonally Every 100 Hours or Seasonally Every 200 Hours or Seasonally Scheduled Maintenance After First 2 Hours When Engine is one of the most important things that you are unable to extend the life of your nearest Authorized ...