
User Guide
Page 15
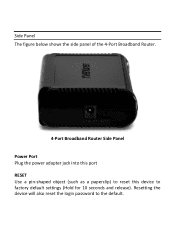
Resetting the device will also reset the login password to factory default settings (Hold for 10 seconds and release). Side Panel The figure below shows the side panel of the 4-Port Broadband Router. 4-Port Broadband Router Side Panel Power Port Plug the power adapter jack into this port RESET Use a pin-shaped object (such as a paperclip) to reset this device to the default.
Resetting the device will also reset the login password to factory default settings (Hold for 10 seconds and release). Side Panel The figure below shows the side panel of the 4-Port Broadband Router. 4-Port Broadband Router Side Panel Power Port Plug the power adapter jack into this port RESET Use a pin-shaped object (such as a paperclip) to reset this device to the default.
User Guide
Page 24
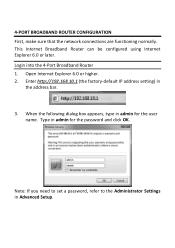
Enter http://192.168.10.1 (the factory-default IP address setting) in Advanced Setup. When the following dialog box appears, type in admin for the user name. Login into the 4-Port Broadband Router 1. Type in admin for the password and click OK. This Internet Broadband Router can be configured using Internet Explorer 6.0 or later. 4-PORT BROADBAND ROUTER CONFIGURATION First, make sure that the network connections are functioning normally. Open Internet Explorer 6.0 or higher. 2. Note: If you need to set a password, refer to the Administrator Settings in the address bar. 3.
Enter http://192.168.10.1 (the factory-default IP address setting) in Advanced Setup. When the following dialog box appears, type in admin for the user name. Login into the 4-Port Broadband Router 1. Type in admin for the password and click OK. This Internet Broadband Router can be configured using Internet Explorer 6.0 or later. 4-PORT BROADBAND ROUTER CONFIGURATION First, make sure that the network connections are functioning normally. Open Internet Explorer 6.0 or higher. 2. Note: If you need to set a password, refer to the Administrator Settings in the address bar. 3.
User Guide
Page 28
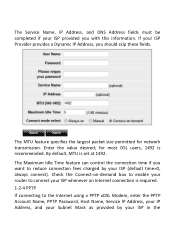
... the Connect-on-demand box to enable your router to connect your ISP whenever an Internet connection is set at 1492. for network transmission. By default, MTU is required. 1-2-4 PPTP If connecting to reduce connection fees charged by your ISP Provider provides a Dynamic IP Address, you with this information....Time feature can control the connection time if you want to the Internet using a PPTP xDSL Modem, enter the PPTP Account Name, PPTP Password, Host Name, Service IP Address, your IP Address, and your Subnet Mask as provided by your ISP provided you should skip these fields.
... the Connect-on-demand box to enable your router to connect your ISP whenever an Internet connection is set at 1492. for network transmission. By default, MTU is required. 1-2-4 PPTP If connecting to reduce connection fees charged by your ISP Provider provides a Dynamic IP Address, you with this information....Time feature can control the connection time if you want to the Internet using a PPTP xDSL Modem, enter the PPTP Account Name, PPTP Password, Host Name, Service IP Address, your IP Address, and your Subnet Mask as provided by your ISP provided you should skip these fields.
User Guide
Page 40
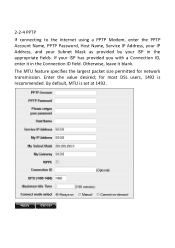
Enter the value desired; By default, MTU is recommended. Otherwise, leave it in the appropriate fields. The MTU feature specifies the largest packet size permitted for most DSL users, 1492 is set at 1492. If your ISP in the Connection ID field. for network transmission. 2-2-4 PPTP If connecting to the Internet using a PPTP Modem, enter the PPTP Account Name, PPTP Password, Host Name, Service IP Address, your IP Address, and your Subnet Mask as provided by your ISP has provided you with a Connection ID, enter it blank.
Enter the value desired; By default, MTU is recommended. Otherwise, leave it in the appropriate fields. The MTU feature specifies the largest packet size permitted for most DSL users, 1492 is set at 1492. If your ISP in the Connection ID field. for network transmission. 2-2-4 PPTP If connecting to the Internet using a PPTP Modem, enter the PPTP Account Name, PPTP Password, Host Name, Service IP Address, your IP Address, and your Subnet Mask as provided by your ISP has provided you with a Connection ID, enter it blank.

User Guide
Page 43
... IP addresses to your Dynamic DNS service provider. 2-3 LAN To set the LAN's IP Address and configure DHCP server settings. 2-3-1 LAN Settings The default value is between the IP Pool Starting Address and the IP Pool Ending Address. You may change the IP Pool range value. Enter the username... provided by your Dynamic DNS service provider. Password Enter the password provided by your needs. The client can get an IP Address that is 192.168.10.1 for the IP address and 255.255.255...
... IP addresses to your Dynamic DNS service provider. 2-3 LAN To set the LAN's IP Address and configure DHCP server settings. 2-3-1 LAN Settings The default value is between the IP Pool Starting Address and the IP Pool Ending Address. You may change the IP Pool range value. Enter the username... provided by your Dynamic DNS service provider. Password Enter the password provided by your needs. The client can get an IP Address that is 192.168.10.1 for the IP address and 255.255.255...

Quick Installation Guide
Page 4
... Address Secondary DNS Address 3. PPPoE (Dial-Up xDSL) User Name: _________ Password Verify Password Service Name (Optional IP Address (Optional e.g. 215.24.24.129) MTU (546-1492 default setting: 1492) Maximum Idle Time (1-60 minutes default setting: 5) Connect mode select: Always on (default setting), Manual or Connect-on -demand Primary DNS Address Secondary DNS Address...
... Address Secondary DNS Address 3. PPPoE (Dial-Up xDSL) User Name: _________ Password Verify Password Service Name (Optional IP Address (Optional e.g. 215.24.24.129) MTU (546-1492 default setting: 1492) Maximum Idle Time (1-60 minutes default setting: 5) Connect mode select: Always on (default setting), Manual or Connect-on -demand Primary DNS Address Secondary DNS Address...

Quick Installation Guide
Page 7
ENGLISH FRANÇAIS DEUTSCH 3. Open your time zone and then click Next. 5. By default: User Name: admin Password: admin Note: User name and Password are Dynamic IP (Cable Modem) and PPPoE (Dial-Up xDSL). 2.You may have different options. 5 ESPAÑOL Follow the wizard instructions to configure some ... not be able to complete the configuration. Click Quick Setup. 4. Configure the settings based on the proper Internet Connection type. Enter the User Name and Password and then click OK. Configure the Router 1.
ENGLISH FRANÇAIS DEUTSCH 3. Open your time zone and then click Next. 5. By default: User Name: admin Password: admin Note: User name and Password are Dynamic IP (Cable Modem) and PPPoE (Dial-Up xDSL). 2.You may have different options. 5 ESPAÑOL Follow the wizard instructions to configure some ... not be able to complete the configuration. Click Quick Setup. 4. Configure the settings based on the proper Internet Connection type. Enter the User Name and Password and then click OK. Configure the Router 1.
Quick Installation Guide
Page 10
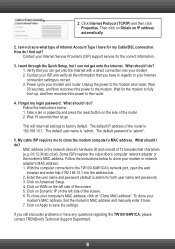
.... Click on WAN on Apply to clone the modem computer's MAC address. Contact your modem. 2. What should I do ? 1. Wait 15 seconds then let go. The default password is "admin. Some ISPs register the subscriber's computer network adapter or the modem's MAC address. Follow the instructions below : 1. Click on the left side of... and consist of the screen. 6. 2. Click on Dynamic IP on the side of the screen. 5. I do I have any questions regarding the TW100-S4W1CA, please contact TRENDnet's Technical Support Department. 8
.... Click on WAN on Apply to clone the modem computer's MAC address. Contact your modem. 2. What should I do ? 1. Wait 15 seconds then let go. The default password is "admin. Some ISPs register the subscriber's computer network adapter or the modem's MAC address. Follow the instructions below : 1. Click on the left side of... and consist of the screen. 6. 2. Click on Dynamic IP on the side of the screen. 5. I do I have any questions regarding the TW100-S4W1CA, please contact TRENDnet's Technical Support Department. 8
