

Users Guide
Page 5
... included) Network Uplink Port Gigabit Ethernet network uplink port Display Interface HDMI up to 4K resolution and VGA up to eight PoE cameras*. TRENDnet User's Guide Product Overview TV‐NVR408 Package Contents The package includes: NVR Power cord (1.8 m/6 ft.) Network cable (1.8 m / 6 ft.) &#... in and out ports 5 PoE+ Ports Plug and play TRENDnet PoE network cameras* to 12TB of continuous video from which the product was purchased. © Copyright 2018 TRENDnet. The TV‐NVR408 features advanced video playback and comes with a total power budget...
... included) Network Uplink Port Gigabit Ethernet network uplink port Display Interface HDMI up to 4K resolution and VGA up to eight PoE cameras*. TRENDnet User's Guide Product Overview TV‐NVR408 Package Contents The package includes: NVR Power cord (1.8 m/6 ft.) Network cable (1.8 m / 6 ft.) &#... in and out ports 5 PoE+ Ports Plug and play TRENDnet PoE network cameras* to 12TB of continuous video from which the product was purchased. © Copyright 2018 TRENDnet. The TV‐NVR408 features advanced video playback and comes with a total power budget...
Users Guide
Page 6
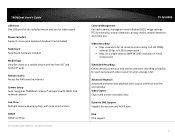
All Rights Reserved. TV‐NVR408 Camera Management For each camera with video overwrite when storage is full Advanced Playback Advanced archived video playback with auto‐scan function ONVIF ONVIF certified © Copyright 2018 TRENDnet. for a single camera: 8MP 4K UHD resolution in H.265 ...with the free iOS® and Android™ apps Remote Access Access the NVR over the internet Camera Setup Auto‐recognizes TRENDnet cameras* and works with ONVIF PoE network cameras Live View Multiple camera viewing options with a quick reference timeline and calendar Video...
All Rights Reserved. TV‐NVR408 Camera Management For each camera with video overwrite when storage is full Advanced Playback Advanced archived video playback with auto‐scan function ONVIF ONVIF certified © Copyright 2018 TRENDnet. for a single camera: 8MP 4K UHD resolution in H.265 ...with the free iOS® and Android™ apps Remote Access Access the NVR over the internet Camera Setup Auto‐recognizes TRENDnet cameras* and works with ONVIF PoE network cameras Live View Multiple camera viewing options with a quick reference timeline and calendar Video...

Users Guide
Page 7
... PoE: Connect 802.3at (30W Max.) cameras. Push button: Switch between cameras Menu Toggle between menu selections controls: © Copyright 2018 TRENDnet. Network Port: Connect to monitor or HDTV with 1024 x 768 resolution or higher. HDMI: Connect to your office or home network for .... 7 Grounding Connect to optical mouse and/or external USB flash drive for file import or export. TRENDnet User's Guide Product Hardware Features Front View LED Rear View TV‐NVR408 Network port HDMI Port Audio Ports Power port USB 2.0 port Push button control Menu controls USB: Connect...
... PoE: Connect 802.3at (30W Max.) cameras. Push button: Switch between cameras Menu Toggle between menu selections controls: © Copyright 2018 TRENDnet. Network Port: Connect to monitor or HDTV with 1024 x 768 resolution or higher. HDMI: Connect to your office or home network for .... 7 Grounding Connect to optical mouse and/or external USB flash drive for file import or export. TRENDnet User's Guide Product Hardware Features Front View LED Rear View TV‐NVR408 Network port HDMI Port Audio Ports Power port USB 2.0 port Push button control Menu controls USB: Connect...

Users Guide
Page 8
TV‐NVR408 2. All Rights Reserved. 8 If you are accessing the DVR the first time, please activate the device by following the password setup. 3. Select Language and click Apply to complete these basic settings. Create the unlock pattern for the first time, the device will be activated. 4. TRENDnet User's Guide Setup Wizard If you are accessing the DVR for quick access later. Once the new password is set, the device will go through these information. 1. Please follow the onscreen display to continue © Copyright 2018 TRENDnet.
TV‐NVR408 2. All Rights Reserved. 8 If you are accessing the DVR the first time, please activate the device by following the password setup. 3. Select Language and click Apply to complete these basic settings. Create the unlock pattern for the first time, the device will be activated. 4. TRENDnet User's Guide Setup Wizard If you are accessing the DVR for quick access later. Once the new password is set, the device will go through these information. 1. Please follow the onscreen display to continue © Copyright 2018 TRENDnet.

Users Guide
Page 9
TRENDnet User's Guide 5. Enter the password again 7. TV‐NVR408 6. Click the selection list to the right of Time Zone. 5. Date Format 7. Select your time zone. Date 8. Time Zone 6. Time © Copyright 2018 TRENDnet. All Rights Reserved. 9
TRENDnet User's Guide 5. Enter the password again 7. TV‐NVR408 6. Click the selection list to the right of Time Zone. 5. Date Format 7. Select your time zone. Date 8. Time Zone 6. Time © Copyright 2018 TRENDnet. All Rights Reserved. 9

Users Guide
Page 10
TV‐NVR408 10. TRENDnet User's Guide 8. All Rights Reserved. 10 Click the selection list to the right of System Time and then enter the time with 24‐hour format then click Next. 9. Click the selection list to the right of Date Format and then select a date format. Click the selection list to the right of System Date. 11. Display current network type Select the year by clicking on left or right arrow. Select the month by clicking on left or right arrow. Select the day by clicking on the date. © Copyright 2018 TRENDnet.
TV‐NVR408 10. TRENDnet User's Guide 8. All Rights Reserved. 10 Click the selection list to the right of System Time and then enter the time with 24‐hour format then click Next. 9. Click the selection list to the right of Date Format and then select a date format. Click the selection list to the right of System Date. 11. Display current network type Select the year by clicking on left or right arrow. Select the month by clicking on left or right arrow. Select the day by clicking on the date. © Copyright 2018 TRENDnet.

Users Guide
Page 11
TV‐NVR408 13. Configure the port related settings here. Then click OK. © Copyright 2018 TRENDnet. Select the hard drive and then click Init to clean up the video on the hard drive. TRENDnet User's Guide 12. All Rights Reserved. 11 Click OK to exit the wizard if you are running the setup wizard in later time and want to initiate your hard drive if you have a brand new installation.
TV‐NVR408 13. Configure the port related settings here. Then click OK. © Copyright 2018 TRENDnet. Select the hard drive and then click Init to clean up the video on the hard drive. TRENDnet User's Guide 12. All Rights Reserved. 11 Click OK to exit the wizard if you are running the setup wizard in later time and want to initiate your hard drive if you have a brand new installation.

Users Guide
Page 12
TV‐NVR408 Start Recording You can also be . Click OK to start recording immediately just with a few clicks. Instant Playback Move your mouse pointer over the camera ... Reserved. Choose Start Recording and then Continuous Record. 15. This settings can start continuous recording. Click Yes to complete the Wizard installation. © Copyright 2018 TRENDnet. The instant playback tool bar will come up...
TV‐NVR408 Start Recording You can also be . Click OK to start recording immediately just with a few clicks. Instant Playback Move your mouse pointer over the camera ... Reserved. Choose Start Recording and then Continuous Record. 15. This settings can start continuous recording. Click Yes to complete the Wizard installation. © Copyright 2018 TRENDnet. The instant playback tool bar will come up...

Users Guide
Page 13
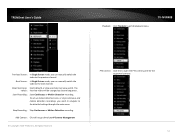
TV‐NVR408 Single Screen: Display video live view one at the same time. Click on Single Screen and then choose the camera you want. (The video you ...;Screen and then choose from 2 x 2,1+5,1+7 or 3 x 3 to switch to show the main menu (see page 19 for Main Menu instructions) © Copyright 2018 TRENDnet. TRENDnet User's Guide System Management (local) With the basic system setup, your system is now up , and manage your network video recorder. By default, the video...
TV‐NVR408 Single Screen: Display video live view one at the same time. Click on Single Screen and then choose the camera you want. (The video you ...;Screen and then choose from 2 x 2,1+5,1+7 or 3 x 3 to switch to show the main menu (see page 19 for Main Menu instructions) © Copyright 2018 TRENDnet. TRENDnet User's Guide System Management (local) With the basic system setup, your system is now up , and manage your network video recorder. By default, the video...
Users Guide
Page 14
Start Recording: Start Continuous or Motion Detection recording. Add Camera: Click this to open the PTZ control panel for the supported cameras 14 TV‐NVR408 Previous Screen: In Single Screen mode, you can manually switch the video to the next channel. Stop/ Start Auto‐ Start (default) or stop continuous ... switch: live view switch. To set up motion detection area, or stop automatic live view video will be changed by channel sequence. All Rights Reserved. TRENDnet User's Guide Playback: Click Playback to go directly to IP Camera Management © Copyright 2018...
Start Recording: Start Continuous or Motion Detection recording. Add Camera: Click this to open the PTZ control panel for the supported cameras 14 TV‐NVR408 Previous Screen: In Single Screen mode, you can manually switch the video to the next channel. Stop/ Start Auto‐ Start (default) or stop continuous ... switch: live view switch. To set up motion detection area, or stop automatic live view video will be changed by channel sequence. All Rights Reserved. TRENDnet User's Guide Playback: Click Playback to go directly to IP Camera Management © Copyright 2018...

Users Guide
Page 15
TRENDnet User's Guide Picture Mode: Select a monitor display setting from Standard, Bright, Gentle, and Vivid of your choice. All Rights Reserved. 15 Click OK to confirm your choice. TV‐NVR408 © Copyright 2018 TRENDnet.
TRENDnet User's Guide Picture Mode: Select a monitor display setting from Standard, Bright, Gentle, and Vivid of your choice. All Rights Reserved. 15 Click OK to confirm your choice. TV‐NVR408 © Copyright 2018 TRENDnet.
Users Guide
Page 16
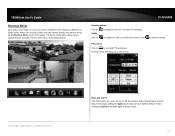
...Speed. PTZ control Click on selected channel. The PTZ menu will show up the Shortcut Menu. All Rights Reserved. TV‐NVR408 Instant playback Click on the screen. © Copyright 2018 TRENDnet. Click to perform the frequent adjustments of recording. Each step can have farther distance when sliding the Speed toward the... you want to playback the last 5 minutes of the video. Adjust the distance of each step of the video shows active (yellow frame). TRENDnet User's Guide Shortcut Menu Each video in live view has a short cut menu to mute the audio.
...Speed. PTZ control Click on selected channel. The PTZ menu will show up the Shortcut Menu. All Rights Reserved. TV‐NVR408 Instant playback Click on the screen. © Copyright 2018 TRENDnet. Click to perform the frequent adjustments of recording. Each step can have farther distance when sliding the Speed toward the... you want to playback the last 5 minutes of the video. Adjust the distance of each step of the video shows active (yellow frame). TRENDnet User's Guide Shortcut Menu Each video in live view has a short cut menu to mute the audio.

Users Guide
Page 17
Click the button again to access the preset settings, click on camera models) TV‐NVR408 PTZ Configuration Quickly access the PTZ presets by clicking the One‐touch button and to stop moving. Special features (Feature availability depends on the ... and make the pointed spot the center of the video. The camera will turning it around continuously. to exit the zoom mode. © Copyright 2018 TRENDnet. Bring up on to zoom out that area. Zoom Out: Drag area from left to enable digital zoom. Turn on or turn off external lighting...
Click the button again to access the preset settings, click on camera models) TV‐NVR408 PTZ Configuration Quickly access the PTZ presets by clicking the One‐touch button and to stop moving. Special features (Feature availability depends on the ... and make the pointed spot the center of the video. The camera will turning it around continuously. to exit the zoom mode. © Copyright 2018 TRENDnet. Bring up on to zoom out that area. Zoom Out: Drag area from left to enable digital zoom. Turn on or turn off external lighting...

Users Guide
Page 18
...strategy set up the good enough video buffer to manage the live view playback timing is delayed. Default: 128 © Copyright 2018 TRENDnet. TV‐NVR408 Live view strategy Click on to take care of video delivery. It makes the communication more saturated. All Rights Reserved. The Real&#...fluency while maintain the network robustness. Default: 128 Use the slider or enter a number (0‐255) to adjust the video display settings. TRENDnet User's Guide Image settings Click on to adjust the color saturation. When the network is congested, the video may be more robust, but...
...strategy set up the good enough video buffer to manage the live view playback timing is delayed. Default: 128 © Copyright 2018 TRENDnet. TV‐NVR408 Live view strategy Click on to take care of video delivery. It makes the communication more saturated. All Rights Reserved. The Real&#...fluency while maintain the network robustness. Default: 128 Use the slider or enter a number (0‐255) to adjust the video display settings. TRENDnet User's Guide Image settings Click on to adjust the color saturation. When the network is congested, the video may be more robust, but...

Users Guide
Page 19
TV‐NVR408 Login to the Management Pages The NVR will be popped out. All Rights Reserved. 19 Mouse over the Menu and click the button to the management page. The short menu will ask you to enter the password every time you are viewing the live video. Enter the password and then click on OK to bring up the main menu. © Copyright 2018 TRENDnet. TRENDnet User's Guide Using the Main Menu Right click your mouse while you want to login to bring up the Main Menu.
TV‐NVR408 Login to the Management Pages The NVR will be popped out. All Rights Reserved. 19 Mouse over the Menu and click the button to the management page. The short menu will ask you to enter the password every time you are viewing the live video. Enter the password and then click on OK to bring up the main menu. © Copyright 2018 TRENDnet. TRENDnet User's Guide Using the Main Menu Right click your mouse while you want to login to bring up the Main Menu.

Users Guide
Page 20
http://www.trendnet.com/support/helpdesk © Copyright 2018 TRENDnet. Run the utility and select the device that requires the password reset and click on Forgot Password. 2. All Rights Reserved. TV‐NVR408 20 Click Export to default or use the utility. The utility can reset the device password by going into the management pages and reset the unit to export the XML file then contact our helpdesk. TRENDnet User's Guide Restore Default Password You can be downloaded at http://www.trendnet.com/camerautility 1.
http://www.trendnet.com/support/helpdesk © Copyright 2018 TRENDnet. Run the utility and select the device that requires the password reset and click on Forgot Password. 2. All Rights Reserved. TV‐NVR408 20 Click Export to default or use the utility. The utility can reset the device password by going into the management pages and reset the unit to export the XML file then contact our helpdesk. TRENDnet User's Guide Restore Default Password You can be downloaded at http://www.trendnet.com/camerautility 1.

Users Guide
Page 21
Just plug‐in , log out, restart, or shut down the NVR. © Copyright 2018 TRENDnet. Log out from NVR management When you have done the NVR settings and managements, you need to shut down your NVR gently. Note: You can ... power down . Shutdown your NVR Click Reboot to gracefully end the recording sessions and prepare the hard drive for 24/7 operation. The Shutdown sub TV‐NVR408 Rebooting your NVR Bring up . Click Shutdown to reboot your NVR Make sure the power supply is showing up the main menu. The default setting...
Just plug‐in , log out, restart, or shut down the NVR. © Copyright 2018 TRENDnet. Log out from NVR management When you have done the NVR settings and managements, you need to shut down your NVR gently. Note: You can ... power down . Shutdown your NVR Click Reboot to gracefully end the recording sessions and prepare the hard drive for 24/7 operation. The Shutdown sub TV‐NVR408 Rebooting your NVR Bring up . Click Shutdown to reboot your NVR Make sure the power supply is showing up the main menu. The default setting...

Users Guide
Page 22
... groups. Protocol: This is compatible with its factory default setting, the NVR will be found on your camera directly or set it up on TRENDnet website. TV‐NVR408 sequential number as camera access password. Model Number: This is the IP address detected by bring up the main menu. Edit: Click this ©...
... groups. Protocol: This is compatible with its factory default setting, the NVR will be found on your camera directly or set it up on TRENDnet website. TV‐NVR408 sequential number as camera access password. Model Number: This is the IP address detected by bring up the main menu. Edit: Click this ©...

Users Guide
Page 23
..., more network capacity is available now. © Copyright 2018 TRENDnet. TV‐IP320PI and TRENDnet 3 cameras are synchronized. You can process total 25Mbps video streams. This Bandwidth: reference number indicates how much more detailed information will detect the camera and install it automatically. TV‐NVR408 Plug‐and‐Play installation This is valuable...
..., more network capacity is available now. © Copyright 2018 TRENDnet. TV‐IP320PI and TRENDnet 3 cameras are synchronized. You can process total 25Mbps video streams. This Bandwidth: reference number indicates how much more detailed information will detect the camera and install it automatically. TV‐NVR408 Plug‐and‐Play installation This is valuable...

Users Guide
Page 24
TV‐NVR408 3. Management port. (See compatible camera list for more details) 5. Enter the camera IP address. 4. Choose the camera video channel number or leave it with default channel 1. © Copyright 2018 TRENDnet. Select the protocol. (See compatible camera list for more details) 2. TRENDnet User's Guide Manual installation 1. Click the Edit icon and then select Manual on Adding Method. All Rights Reserved. 24
TV‐NVR408 3. Management port. (See compatible camera list for more details) 5. Enter the camera IP address. 4. Choose the camera video channel number or leave it with default channel 1. © Copyright 2018 TRENDnet. Select the protocol. (See compatible camera list for more details) 2. TRENDnet User's Guide Manual installation 1. Click the Edit icon and then select Manual on Adding Method. All Rights Reserved. 24