User's Guide
Page 2
...TRENDnet User's Guide Contents Product Overview 1 Package Contents ...1 Features ...1 Product Hardware Features 2 Installation 3 Wired Connection ...3 Wall mount installation 3 Starting the Setup Wizard 4 Configuration 7 Main Interface ...7 Setup Wizard ...9 System ...12 Network...14 Dynamic DNS ...15 Video and Audio ...15 Video and Audio ...16 Day/Night Mode...17 Audio Setup ...17 Image Setup... ...24 System...24 Firmware Upgrade 24 Advanced ...25 Device Info ...25 Log...25 How to setup/access the camera remotely 26 Technical Specifications 29 Troubleshooting 33 © Copyright 2011...
...TRENDnet User's Guide Contents Product Overview 1 Package Contents ...1 Features ...1 Product Hardware Features 2 Installation 3 Wired Connection ...3 Wall mount installation 3 Starting the Setup Wizard 4 Configuration 7 Main Interface ...7 Setup Wizard ...9 System ...12 Network...14 Dynamic DNS ...15 Video and Audio ...15 Video and Audio ...16 Day/Night Mode...17 Audio Setup ...17 Image Setup... ...24 System...24 Firmware Upgrade 24 Advanced ...25 Device Info ...25 Log...25 How to setup/access the camera remotely 26 Technical Specifications 29 Troubleshooting 33 © Copyright 2011...
User's Guide
Page 6
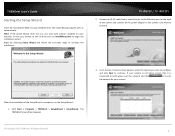
... to continue. Click Start > Programs > TRENDnet > SetupWizard > SetupWizard. Connect an RJ-45 cable from a switch/router to the Ethernet port on -screen steps to the camera. TV-IP672P / TV-IP672PI 2. The Install Wizard program will run the Setup Wizard: 1. Note: If the Install Wizard... does not run InstallWizard.exe to proceed. 3. TRENDnet User's Guide Starting the Setup Wizard Insert the included CD-ROM into your ...
... to continue. Click Start > Programs > TRENDnet > SetupWizard > SetupWizard. Connect an RJ-45 cable from a switch/router to the Ethernet port on -screen steps to the camera. TV-IP672P / TV-IP672PI 2. The Install Wizard program will run the Setup Wizard: 1. Note: If the Install Wizard... does not run InstallWizard.exe to proceed. 3. TRENDnet User's Guide Starting the Setup Wizard Insert the included CD-ROM into your ...

User's Guide
Page 8
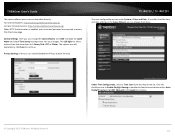
TRENDnet User's Guide 8. When the Setup Wizard has finished, the configuration is complete and the following screen appears: 9. button to continue. All Rights Reserved. 6 Click Next to access the camera's © Copyright 2012 TRENDnet. After the Setup Wizard configures the camera, the wizard starts to use your camera. Click the IP address link or the link advanced configuration page. A summary screen of the settings you have chosen appears. You are now ready to setup process. TV-IP672P / TV-IP672PI 10.
TRENDnet User's Guide 8. When the Setup Wizard has finished, the configuration is complete and the following screen appears: 9. button to continue. All Rights Reserved. 6 Click Next to access the camera's © Copyright 2012 TRENDnet. After the Setup Wizard configures the camera, the wizard starts to use your camera. Click the IP address link or the link advanced configuration page. A summary screen of the settings you have chosen appears. You are now ready to setup process. TV-IP672P / TV-IP672PI 10.

User's Guide
Page 9
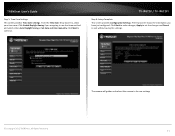
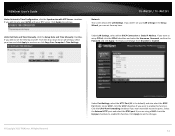
...recording Control the direction of your TV-IP672P or TV-IP672PI camera. If you to easily access and configure your camera. Motion Trigger 4. To log in, use your password, click OK. TRENDnet User's Guide Configuration After completing the Setup Wizard, you are ready to ...use the User name admin and the password you created in the Setup Wizard. COMPONENT 1. Setup 3. Record 5. Main Interface TV-IP672P / TV-IP672PI The home page for the TV-IP672P or TV-IP672PI appears. © Copyright 2012 TRENDnet. This shows whatever the camera is the Main Screen. All Rights ...
...recording Control the direction of your TV-IP672P or TV-IP672PI camera. If you to easily access and configure your camera. Motion Trigger 4. To log in, use your password, click OK. TRENDnet User's Guide Configuration After completing the Setup Wizard, you are ready to ...use the User name admin and the password you created in the Setup Wizard. COMPONENT 1. Setup 3. Record 5. Main Interface TV-IP672P / TV-IP672PI The home page for the TV-IP672P or TV-IP672PI appears. © Copyright 2012 TRENDnet. This shows whatever the camera is the Main Screen. All Rights ...

User's Guide
Page 11
... details yourself according to your network provider gave you . The Welcome to start the Setup Wizard. All Rights Reserved. 9 Click Wizard. Enter a username and password. TV-IP672P / TV-IP672PI Step 2: Internet Settings This screen provides PPPoE settings and allows the camera to be ...connected directly to what your ADSL modem. If your router selects an IP address for PPPoE deselect the Enable checkbox and click Next © Copyright 2012 TRENDnet. ...
... details yourself according to your network provider gave you . The Welcome to start the Setup Wizard. All Rights Reserved. 9 Click Wizard. Enter a username and password. TV-IP672P / TV-IP672PI Step 2: Internet Settings This screen provides PPPoE settings and allows the camera to be ...connected directly to what your ADSL modem. If your router selects an IP address for PPPoE deselect the Enable checkbox and click Next © Copyright 2012 TRENDnet. ...

User's Guide
Page 12
Enter a Host Name, User Name, and Password. All Rights Reserved. 10 TRENDnet User's Guide Step 3: DDNS Settings This screen provides DDNS settings. TV-IP672P / TV-IP672PI Step 4: Camera Name Settings This screen provides Camera Name settings. Once you have clicked Enable, select your DDNS Server and enter your details again ... uncheck the Enable checkbox and click Next. Verify the password by entering your Server Address. Click the Enable checkbox to continue. Click Next to setup DDNS. In the Camera Name field type the name you do not want to continue. © Copyright 2012...
Enter a Host Name, User Name, and Password. All Rights Reserved. 10 TRENDnet User's Guide Step 3: DDNS Settings This screen provides DDNS settings. TV-IP672P / TV-IP672PI Step 4: Camera Name Settings This screen provides Camera Name settings. Once you have clicked Enable, select your DDNS Server and enter your details again ... uncheck the Enable checkbox and click Next. Verify the password by entering your Server Address. Click the Enable checkbox to continue. Click Next to setup DDNS. In the Camera Name field type the name you do not want to continue. © Copyright 2012...
User's Guide
Page 13
TV-IP672P / TV-IP672PI Step 6: Setup Complete This screen provides Configuration Settings. The final screen shows the information you are going to its new settings 11 All Rights Reserved. The camera ... use that time method and select either Auto Daylight Saving or Set date and time manually. Click Enable Daylight Saving if you have just configured. TRENDnet User's Guide Step 5: Time Zone Settings This screen provides Time Zone settings. From the Time Zone drop-down list, select your time zone. Click Back...
TV-IP672P / TV-IP672PI Step 6: Setup Complete This screen provides Configuration Settings. The final screen shows the information you are going to its new settings 11 All Rights Reserved. The camera ... use that time method and select either Auto Daylight Saving or Set date and time manually. Click Enable Daylight Saving if you have just configured. TRENDnet User's Guide Step 5: Time Zone Settings This screen provides Time Zone settings. From the Time Zone drop-down list, select your time zone. Click Back...
User's Guide
Page 15
... choose either Auto Daylight Saving or Set DST Manually. TV-IP672P / TV-IP672PI The next configurable section under System is enabled, user name and password are selfexplanatory. If you didn't set the time and date settings in the Setup Wizard, you can change them here. Click the checkbox... select a Time Zone from the drop-down list. The options are required to continue. © Copyright 2012 TRENDnet. Click Apply to access the direct view page. TRENDnet User's Guide The camera allows users to access the video directly For Internet Explorer, http://camera ip/directview/tvaview....
... choose either Auto Daylight Saving or Set DST Manually. TV-IP672P / TV-IP672PI The next configurable section under System is enabled, user name and password are selfexplanatory. If you didn't set the time and date settings in the Setup Wizard, you can change them here. Click the checkbox... select a Time Zone from the drop-down list. The options are required to continue. © Copyright 2012 TRENDnet. Click Apply to access the direct view page. TRENDnet User's Guide The camera allows users to access the video directly For Internet Explorer, http://camera ip/directview/tvaview....
User's Guide
Page 16
...The Status will change from Disabled to continue. Under UPnP, click the UPnP checkbox if you wish to set your LAN settings in the Setup Wizard, you wish to sync your W/WI with your time and click Apply to enable this function. Under Set Date and Time Manually... using a MAC check the Bonjour checkbox to setup PPPoE, click the PPPoE checkbox and enter the Username, Password, confirm the Password and click Apply. TV-IP672P / TV-IP672PI Network This screen shows the LAN Settings. Click Apply to Enabled. © Copyright 2012 TRENDnet. If you want to enable to set the...
...The Status will change from Disabled to continue. Under UPnP, click the UPnP checkbox if you wish to set your LAN settings in the Setup Wizard, you wish to sync your W/WI with your time and click Apply to enable this function. Under Set Date and Time Manually... using a MAC check the Bonjour checkbox to setup PPPoE, click the PPPoE checkbox and enter the Username, Password, confirm the Password and click Apply. TV-IP672P / TV-IP672PI Network This screen shows the LAN Settings. Click Apply to Enabled. © Copyright 2012 TRENDnet. If you want to enable to set the...

User's Guide
Page 17
TV-IP672P / TV-IP672PI Video and Audio This screen shows different video profiles where you have not enabled this function in the Setup Wizard click the DDNS checkbox to set these fields: Host Name, User Name, Password, Confirm Password, and Timeout. Each profile ... server from these changes and continue. Setting up each profile individually gives the user better choice. © Copyright 2012 TRENDnet. All Rights Reserved. 15 If you can setup different functions for different settings. Click Apply to enable Dynamic DDNS. The audio settings also allow for the camera.
TV-IP672P / TV-IP672PI Video and Audio This screen shows different video profiles where you have not enabled this function in the Setup Wizard click the DDNS checkbox to set these fields: Host Name, User Name, Password, Confirm Password, and Timeout. Each profile ... server from these changes and continue. Setting up each profile individually gives the user better choice. © Copyright 2012 TRENDnet. All Rights Reserved. 15 If you can setup different functions for different settings. Click Apply to enable Dynamic DDNS. The audio settings also allow for the camera.
User's Guide
Page 19
...Mirror, Auto Exposure and White Balancing. Audio Setup The TV-IP672W/TV-IP672WI allows users to the image settings. Image Setup Just like any camera, you can be viewed "live" through the LIVE VIDEO display in day and night mode. TV-IP672P / TV-IP672PI 17 This section provides day and night options... the forefront image. All Rights Reserved. TRENDnet User's Guide Bps - 4Mbps/3Mbps/2Mbps/1.5Mbps/1Mbps/768Kbps/512Kbps/384Kbps/256Kbps/12 8Kbps/64Kbps RTSP URL - 3gpp Day/Night Mode The TV-IP672WI allows users to continue. The TV-IP672WI have LED's for night mode. ...
...Mirror, Auto Exposure and White Balancing. Audio Setup The TV-IP672W/TV-IP672WI allows users to the image settings. Image Setup Just like any camera, you can be viewed "live" through the LIVE VIDEO display in day and night mode. TV-IP672P / TV-IP672PI 17 This section provides day and night options... the forefront image. All Rights Reserved. TRENDnet User's Guide Bps - 4Mbps/3Mbps/2Mbps/1.5Mbps/1Mbps/768Kbps/512Kbps/384Kbps/256Kbps/12 8Kbps/64Kbps RTSP URL - 3gpp Day/Night Mode The TV-IP672WI allows users to continue. The TV-IP672WI have LED's for night mode. ...

User's Guide
Page 20
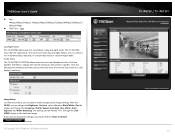
...end time. TRENDnet User's Guide Action Recording This screen shows the SD Card parameters. There are able to setup and you setup. You are three main sections: Trigger By: Always, Motion, Schedule, Recording: Configure the recording options SD Card: Recording files size TV-IP672P / TV-IP672PI Trigger By... - Click the Recording checkbox to pre-record or pre-event settings. Make sure the SD Card settings are setup to the schedule you can click one of the week appear....
...end time. TRENDnet User's Guide Action Recording This screen shows the SD Card parameters. There are able to setup and you setup. You are three main sections: Trigger By: Always, Motion, Schedule, Recording: Configure the recording options SD Card: Recording files size TV-IP672P / TV-IP672PI Trigger By... - Click the Recording checkbox to pre-record or pre-event settings. Make sure the SD Card settings are setup to the schedule you can click one of the week appear....
User's Guide
Page 24
... Preset Position. For each Patrol Position you can be setup with different camera views and angles. All Rights Reserved. Once you setup the movement of the Pan/Tilt during a particular time frame. This depends on the priority of Patrol Position - TV-IP672P / TV-IP672PI 22 TRENDnet User's Guide The Pre-programmed Preset Positions is a list of...
... Preset Position. For each Patrol Position you can be setup with different camera views and angles. All Rights Reserved. Once you setup the movement of the Pan/Tilt during a particular time frame. This depends on the priority of Patrol Position - TV-IP672P / TV-IP672PI 22 TRENDnet User's Guide The Pre-programmed Preset Positions is a list of...
User's Guide
Page 28
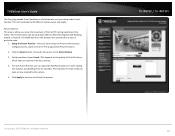
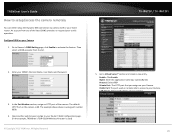
... to Camera's DDNS Setting page; An account from the list. TV-IP672P / TV-IP672PI 2. Enter your Camera. 26 LAN Server: The local IP address... this operation. Open another web browser and go to your Router's Web Configuration page. (In the example, TRENDnet's TEW-651BR Wireless N router is 80. Go to Virtual Server* section and create a new entry. In... The port used on the camera is used) © Copyright 2012 TRENDnet. TRENDnet User's Guide How to setup/access the camera remotely You can either setup the Dynamic DNS connection via camera itself or your Camera. click Enable to...
... to Camera's DDNS Setting page; An account from the list. TV-IP672P / TV-IP672PI 2. Enter your Camera. 26 LAN Server: The local IP address... this operation. Open another web browser and go to your Router's Web Configuration page. (In the example, TRENDnet's TEW-651BR Wireless N router is 80. Go to Virtual Server* section and create a new entry. In... The port used on the camera is used) © Copyright 2012 TRENDnet. TRENDnet User's Guide How to setup/access the camera remotely You can either setup the Dynamic DNS connection via camera itself or your Camera. click Enable to...
User's Guide
Page 29
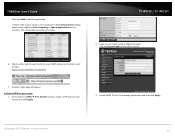
The setup steps should be very similar. Enable DDNS, fill out the following information and then click Apply. © Copyright 2012 TRENDnet. TV-IP672P / TV-IP672PI 2. Find the Dynamic DNS configuration section. 6. Open another web browser and enter your router 1. http://yourDomainName:PortNumber 7. ... HTTP port for your camera and click Apply. 3. Camera's login page will appear. Go to your router's web configuration page. TRENDnet User's Guide Then click Add to add the application. * Please refer to your router's user's manual for this function. All Rights Reserved. ...
The setup steps should be very similar. Enable DDNS, fill out the following information and then click Apply. © Copyright 2012 TRENDnet. TV-IP672P / TV-IP672PI 2. Find the Dynamic DNS configuration section. 6. Open another web browser and enter your router 1. http://yourDomainName:PortNumber 7. ... HTTP port for your camera and click Apply. 3. Camera's login page will appear. Go to your router's web configuration page. TRENDnet User's Guide Then click Add to add the application. * Please refer to your router's user's manual for this function. All Rights Reserved. ...
User's Guide
Page 30
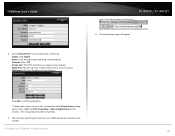
... entry. TV-IP672P / TV-IP672PI http://yourDomainName:PortNumber 6. Public Port: The port used on your Camera. The setup steps should be very similar. 5. All Rights Reserved. 28 Open another web browser and enter your router's user's manual for this function. Go to your Camera. Enable: Click Enable Name: Enter the application name (eg. TRENDnet User...
... entry. TV-IP672P / TV-IP672PI http://yourDomainName:PortNumber 6. Public Port: The port used on your Camera. The setup steps should be very similar. 5. All Rights Reserved. 28 Open another web browser and enter your router's user's manual for this function. Go to your Camera. Enable: Click Enable Name: Enter the application name (eg. TRENDnet User...