User's Guide
Page 2
... Administration ...31 Status ...32 System Status ...32 Video Status...33 Wireless Status (for TV-IP600W only 34 Network Status...35 Active Users ...36 Configuration ...37 System Configuration...37 Video Settings ...39 Wireless Setup (for TV-IP600W only 41 Network Settings ...46 User ...48 Date/Time...50 Upload ...51 E-mail ...55 Tools...59 FTP Server Test...59 E-mail Test ...59 ii
... Administration ...31 Status ...32 System Status ...32 Video Status...33 Wireless Status (for TV-IP600W only 34 Network Status...35 Active Users ...36 Configuration ...37 System Configuration...37 Video Settings ...39 Wireless Setup (for TV-IP600W only 41 Network Settings ...46 User ...48 Date/Time...50 Upload ...51 E-mail ...55 Tools...59 FTP Server Test...59 E-mail Test ...59 ii

User's Guide
Page 3
... Schedule Recording with IPView Pro 2.0 76 Setup Motion Detection and Digital Input with IPView Pro 2.0 77 PLAYING VIDEO FILES ON A COMPUTER 80 Load Saved Video Files ...81 Play Video Files ...82 ffdshow ...83 APPENDIX ...89 A. Frequently Asked Questions 89 B. Troubleshooting...93 D. Time Zone Table...98 E. Adjusting Internet Camera Focus 101 G. Technical Specifications...102...
... Schedule Recording with IPView Pro 2.0 76 Setup Motion Detection and Digital Input with IPView Pro 2.0 77 PLAYING VIDEO FILES ON A COMPUTER 80 Load Saved Video Files ...81 Play Video Files ...82 ffdshow ...83 APPENDIX ...89 A. Frequently Asked Questions 89 B. Troubleshooting...93 D. Time Zone Table...98 E. Adjusting Internet Camera Focus 101 G. Technical Specifications...102...
User's Guide
Page 6
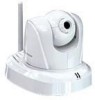
TV-IP600/W Wireless Network Camera Unpacking the Package Open the shipping carton and carefully remove all items. Check that you have the following: • One TV-IP600 or TV-IP600W Internet Camera Server • One Detachable Antenna (TV-IP600W only) • One Multi-Language Quick Installation Guide • One Installation CD-ROM containing User Guide, IPView Pro 2.0 application and Setup Wizard • One External...
TV-IP600/W Wireless Network Camera Unpacking the Package Open the shipping carton and carefully remove all items. Check that you have the following: • One TV-IP600 or TV-IP600W Internet Camera Server • One Detachable Antenna (TV-IP600W only) • One Multi-Language Quick Installation Guide • One Installation CD-ROM containing User Guide, IPView Pro 2.0 application and Setup Wizard • One External...

User's Guide
Page 7
TV-IP600/W Wireless Network Camera System Requirements Networking • Local Area Network: 10Base-T Ethernet or 100Base-TX Fast Ethernet • Wireless Local Area Network: IEEE 802.11b/g Wireless LAN (TV-IP600W only) Computer • CPU: 1.3GHz or above • Memory: 128 MB or above • VGA Resolution: 1024 x 768 or above (Independent Display Card recommended) • Network Card o For cabled connections: 10BASE-T Ethernet...
TV-IP600/W Wireless Network Camera System Requirements Networking • Local Area Network: 10Base-T Ethernet or 100Base-TX Fast Ethernet • Wireless Local Area Network: IEEE 802.11b/g Wireless LAN (TV-IP600W only) Computer • CPU: 1.3GHz or above • Memory: 128 MB or above • VGA Resolution: 1024 x 768 or above (Independent Display Card recommended) • Network Card o For cabled connections: 10BASE-T Ethernet...
User's Guide
Page 13
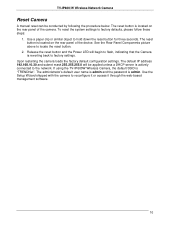
... If using the TV-IP600W Wireless Camera, the default SSID is admin. The reset button is located on the rear panel of the camera. The default IP address 192.168.10.30 and subnet mask 255.255.255.0 will begin to flash, indicating that the Camera is reverting back to...clip or similar object to reconfigure it or access it through the web-based management software. 10 Use the Setup Wizard shipped with the camera to hold down the reset button for three seconds. TV-IP600/W Wireless Network Camera Reset Camera A manual reset can be applied unless a DHCP server is actively connected to the...
... If using the TV-IP600W Wireless Camera, the default SSID is admin. The reset button is located on the rear panel of the camera. The default IP address 192.168.10.30 and subnet mask 255.255.255.0 will begin to flash, indicating that the Camera is reverting back to...clip or similar object to reconfigure it or access it through the web-based management software. 10 Use the Setup Wizard shipped with the camera to hold down the reset button for three seconds. TV-IP600/W Wireless Network Camera Reset Camera A manual reset can be applied unless a DHCP server is actively connected to the...

User's Guide
Page 16
... running Windows, launch the SetupWizard on the installation CD-ROM and follow the setup instructions. SetupWizard This section describes how to install the SetupWizard and how to use the SetupWizard to setup and install your Camera with the utility. TV-IP600/W Wireless Network Camera 5 Using the Utility This chapter describes the software utilities for the Auto-Run...
... running Windows, launch the SetupWizard on the installation CD-ROM and follow the setup instructions. SetupWizard This section describes how to install the SetupWizard and how to use the SetupWizard to setup and install your Camera with the utility. TV-IP600/W Wireless Network Camera 5 Using the Utility This chapter describes the software utilities for the Auto-Run...

User's Guide
Page 22
Change Password The following screen allows you to change the default admin password: Carry out the following if you want to change the admin password: ƒ Tick the Change Password checkbox ƒ Type in a New Password in the New Password field and confirm it in the Confirm Password field ƒ Click the Next button to proceed to the next Setup window If you don't want to change the admin password, leave the checkbox un-ticked and click Next. 19 TV-IP600/W Wireless Network Camera SetupWizard-
Change Password The following screen allows you to change the default admin password: Carry out the following if you want to change the admin password: ƒ Tick the Change Password checkbox ƒ Type in a New Password in the New Password field and confirm it in the Confirm Password field ƒ Click the Next button to proceed to the next Setup window If you don't want to change the admin password, leave the checkbox un-ticked and click Next. 19 TV-IP600/W Wireless Network Camera SetupWizard-

User's Guide
Page 24
Select a Connection Option - PPPoE If your connection method is PPPoE, click the PPPoE radio button and click Next: The following window appears: ƒ Type the User Name used to connect to your PPPoE connection in the User Name field. ƒ Type the Password of the PPPoE User Name in the Password field and confirm it in the Confirm Password field. ƒ Click Next to proceed to the next setup window. 21 TV-IP600/W Wireless Network Camera SetupWizard -
Select a Connection Option - PPPoE If your connection method is PPPoE, click the PPPoE radio button and click Next: The following window appears: ƒ Type the User Name used to connect to your PPPoE connection in the User Name field. ƒ Type the Password of the PPPoE User Name in the Password field and confirm it in the Confirm Password field. ƒ Click Next to proceed to the next setup window. 21 TV-IP600/W Wireless Network Camera SetupWizard -

User's Guide
Page 26
TV-IP600/W Wireless Network Camera SetupWizard- Fixed IP If your connection method is Fixed IP, click the Fixed IP radio button: The following window appears: ƒ Type in the IP Address, Subnet Mask, Default Gateway, Primary DNS Server IP address and Secondary DNS Server IP Address in the appropriate fields. ƒ Click Next to proceed to the next setup window. 23 Select a Connection Option-
TV-IP600/W Wireless Network Camera SetupWizard- Fixed IP If your connection method is Fixed IP, click the Fixed IP radio button: The following window appears: ƒ Type in the IP Address, Subnet Mask, Default Gateway, Primary DNS Server IP address and Secondary DNS Server IP Address in the appropriate fields. ƒ Click Next to proceed to the next setup window. 23 Select a Connection Option-

User's Guide
Page 27
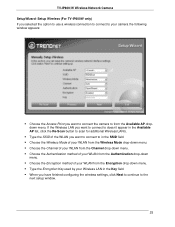
Setup Wireless (For TV-IP600W only) After choosing your connection method, the following window appears: ƒ Choose if you want to connect to your camera using the wireless connection or not by clicking the appropriate radio button. ƒ Click Next to continue. 24 TV-IP600/W Wireless Network Camera SetupWizard-
Setup Wireless (For TV-IP600W only) After choosing your connection method, the following window appears: ƒ Choose if you want to connect to your camera using the wireless connection or not by clicking the appropriate radio button. ƒ Click Next to continue. 24 TV-IP600/W Wireless Network Camera SetupWizard-
User's Guide
Page 28
... Authentication drop-down menu. ƒ Choose the Encryption method of the WLAN you want to connect the camera to the next setup window. 25 TV-IP600/W Wireless Network Camera SetupWizard- Setup Wireless (For TV-IP600W only) If you selected the option to use a wireless connection to connect to your Wireless LAN in the Key field. ƒ When you have finished configuring the...
... Authentication drop-down menu. ƒ Choose the Encryption method of the WLAN you want to connect the camera to the next setup window. 25 TV-IP600/W Wireless Network Camera SetupWizard- Setup Wireless (For TV-IP600W only) If you selected the option to use a wireless connection to connect to your Wireless LAN in the Key field. ƒ When you have finished configuring the...

User's Guide
Page 31
Complete After the camera has restarted, the following window will appear: ƒ Click the hyper-link to connect to the camera web interface. ƒ If you want to setup an additional camera, click the Setup Another Camera button. ƒ When you have finished, click the Exit button to close the Setup Wizard. 28 TV-IP600/W Wireless Network Camera SetupWizard-
Complete After the camera has restarted, the following window will appear: ƒ Click the hyper-link to connect to the camera web interface. ƒ If you want to setup an additional camera, click the Setup Another Camera button. ƒ When you have finished, click the Exit button to close the Setup Wizard. 28 TV-IP600/W Wireless Network Camera SetupWizard-
User's Guide
Page 32
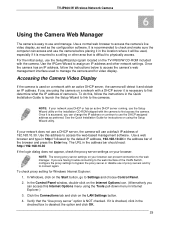
... IP address of the browser and press the Enter key. If you are using the Setup Wizard utility. See the Quick Installation Guide for instructions on using the camera on the Internet Options icon. (Alternatively you can prevent connection to Settings and choose Control Panel. 2....bypass the proxy server or disable use and manage. TV-IP600/W Wireless Network Camera 6 Using the Camera Web Manager The camera is easy to physically access. To check proxy setting for video display. Use the IPCam Wizard to check and make sure the computer can access this Internet Options menu ...
... IP address of the browser and press the Enter key. If you are using the Setup Wizard utility. See the Quick Installation Guide for instructions on using the camera on the Internet Options icon. (Alternatively you can prevent connection to Settings and choose Control Panel. 2....bypass the proxy server or disable use and manage. TV-IP600/W Wireless Network Camera 6 Using the Camera Web Manager The camera is easy to physically access. To check proxy setting for video display. Use the IPCam Wizard to check and make sure the computer can access this Internet Options menu ...
User's Guide
Page 44
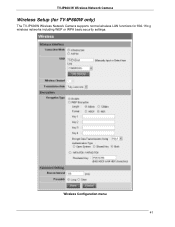
Wireless Configuration menu 41 TV-IP600/W Wireless Network Camera Wireless Setup (for TV-IP600W only) The TV-IP600W Wireless Network Camera supports normal wireless LAN functions for 802.11b/g wireless networks including WEP or WPA basic security settings.
Wireless Configuration menu 41 TV-IP600/W Wireless Network Camera Wireless Setup (for TV-IP600W only) The TV-IP600W Wireless Network Camera supports normal wireless LAN functions for 802.11b/g wireless networks including WEP or WPA basic security settings.
User's Guide
Page 47
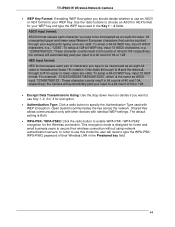
... this mode the user will automatically pad your input to a bit count of their wireless connection without using network authentication servers. To setup a 64-bit WEP key, input 5 ASCII characters, e.g., '12345'. the camera will automatically pad your input to a bit count of 40 and 104 respectively; Open...format causes each character you type to be inputted through to F (in bit counts of 64 or 128. To setup a 64-bit WEP key, input 10 HEX format. TV-IP600/W Wireless Network Camera • WEP Key Format: If enabling WEP Encryption you should decide whether to use Key 1, 2, 3 or...
... this mode the user will automatically pad your input to a bit count of their wireless connection without using network authentication servers. To setup a 64-bit WEP key, input 5 ASCII characters, e.g., '12345'. the camera will automatically pad your input to a bit count of 40 and 104 respectively; Open...format causes each character you type to be inputted through to F (in bit counts of 64 or 128. To setup a 64-bit WEP key, input 10 HEX format. TV-IP600/W Wireless Network Camera • WEP Key Format: If enabling WEP Encryption you should decide whether to use Key 1, 2, 3 or...

User's Guide
Page 49
TV-IP600/W Wireless Network Camera Network Settings Click the Network Setup link to view menus for IP network settings, PPPoE configuration, DDNS, HTTP port configuration and UPnP configuration. Network Setup menus 46
TV-IP600/W Wireless Network Camera Network Settings Click the Network Setup link to view menus for IP network settings, PPPoE configuration, DDNS, HTTP port configuration and UPnP configuration. Network Setup menus 46

User's Guide
Page 52
Delete User menu • Delete User: Use this section to add new users and define the privileges of the new user. TV-IP600/W Wireless Network Camera Define Users Use this drop-down menu to select the user you want to delete and click the Delete button. • User List: This list ...displays the current users setup on your Camera. 49 Define Users menu • Add User: Type a name for the new user in the User Name field, a password...
Delete User menu • Delete User: Use this section to add new users and define the privileges of the new user. TV-IP600/W Wireless Network Camera Define Users Use this drop-down menu to select the user you want to delete and click the Delete button. • User List: This list ...displays the current users setup on your Camera. 49 Define Users menu • Add User: Type a name for the new user in the User Name field, a password...
User's Guide
Page 53
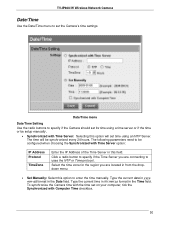
...set time using a time server or if the time or be setup manually, • Synchronized with Computer Time checkbox. 50 Select the time zone for the region you are located in this option will be configured when choosing the Synchronized with Time Server option: IP Address Protocol TimeZone...; Set Manually: Select this option to specify if the Camera should set on your computer, tick the Synchronized with Time Server: Selecting this field. Type the current date in yyyymm-dd format in the Time field. TV-IP600/W Wireless Network Camera Date/Time Use the Date/Time menu to set the...
...set time using a time server or if the time or be setup manually, • Synchronized with Computer Time checkbox. 50 Select the time zone for the region you are located in this option will be configured when choosing the Synchronized with Time Server option: IP Address Protocol TimeZone...; Set Manually: Select this option to specify if the Camera should set on your computer, tick the Synchronized with Time Server: Selecting this field. Type the current date in yyyymm-dd format in the Time field. TV-IP600/W Wireless Network Camera Date/Time Use the Date/Time menu to set the...
User's Guide
Page 54
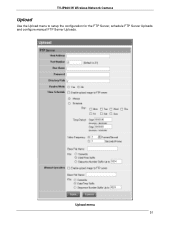
Upload menu 51 TV-IP600/W Wireless Network Camera Upload Use the Upload menu to setup the configuration for the FTP Server, schedule FTP Server Uploads and configure manual FTP Server Uploads.
Upload menu 51 TV-IP600/W Wireless Network Camera Upload Use the Upload menu to setup the configuration for the FTP Server, schedule FTP Server Uploads and configure manual FTP Server Uploads.

User's Guide
Page 58
E-mail menu 55 TV-IP600/W Wireless Network Camera E-mail Use the E-mail menu to setup the configuration of the E-mail account, time schedule and manual operation settings.
E-mail menu 55 TV-IP600/W Wireless Network Camera E-mail Use the E-mail menu to setup the configuration of the E-mail account, time schedule and manual operation settings.