TRENDnet TV-H510 Support and Manuals
Get Help and Manuals for this TRENDnet item
View All Support Options Below
Free TRENDnet TV-H510 manuals!
Problems with TRENDnet TV-H510?
Ask a Question
Free TRENDnet TV-H510 manuals!
Problems with TRENDnet TV-H510?
Ask a Question
Popular TRENDnet TV-H510 Manual Pages
Datasheet - Page 1

...*
• IP-66 certified aluminum construction protects against camera theft and an easy-install camera mount system reduces IP camera installation time. internet cameras
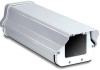
Outdoor Camera Enclosure with Heater and Fan
TV-H510 (V1.0R)
The Outdoor Camera Enclosure with Heater and Fan (model TV-H510) protects TRENDnet Internet security cameras from the rigors of accepting a padlock (sold separately...
Datasheet - Page 2

... visit http://www.trendnet.com. Outdoor Camera Enclosure with Heater and Fan
TV-H510 (V1.0R)
SPECIFICATIONS
Hardware
Supported Devices
Protection Level Blower Fan and Heater Housing Material Glass Window Size Power Supply Dimensions Weight Adjustment
• TV-IP100-N, TV-IP100W-N, TV-IP201, TV-IP201P, TV-IP201W, TV-IP301, TV-IP301W, TV-IP501P, TV-IP501W, TV-IP512P, TV-IP512WN
• IP66...
Quick Installation Guide - Page 3

...hand before installation.
? IP camera (TV-IP100-N, TV-IP100W-N, TV-IP201, TV-IP201P, TV-IP201W, TV-IP301, TV-IP301W, TV-IP501P, TV-IP501W, TV-IP512P, TV-IP512WN**)
? If you start
Package Contents
? TV-H510 ? Users must provide the items themselves. Power Adapter (12V DC, 0.6A) ? 1 x Wall Mount Bracket ? 4 x Hex Screws ? 4 x Mounting Screws ? 4 x Mounting Screw Anchors ? 4 x Mounting Washers...
Quick Installation Guide - Page 4

Move the metal grounding bar towards the back of the TV-H510 and secure it with the screws.
2
English 2. Hardware Installation
Note: Configure your IP Camera to match your network before installing the device. Hardware Installation
1. Remove the screws from the metal grounding bar.
3. Lift up the latch and pull the roof upward.
2.
Quick Installation Guide - Page 5

4. Remove the black bracket from the camera enclosure.
5. Connect the black bracket back inside the enclosure. Move the camera as possible. Use a screw to mount the base of the IP camera to the glass as close to the black bracket.
6. This example shows a TRENDnet TV-IP100W-N.
7. Insert the TV-H510 power adapter, the IP Camera's power adapter and Ethernet cable through the...
Quick Installation Guide - Page 6

Close and secure the back panel.
12. Connect the Ethernet cable and power adapter to the provided 12V DC, 0.6A power adapter.
11. Connect the power terminal to the camera
10. Plug the TV-H510's power adapter and the camera power adapter into an available power outlet.
4
English Insert the TV-H510's power adapter, the IP Camera's power adapter and Ethernet cable through the hole.
9. 8.
Quick Installation Guide - Page 7

... IP camera.
2. Follow steps 1-6 in the Hardware installation section above.
3. Installing External Antenna to perform steps 3, 4, 5 and 8 for each surge arrester (TEW-ASAK).
1. Insert the TV-H510 power adapter, the IP Camera's power adapter and TEW-ASAK(s) through hole.
5
English Insert the TEW-ASAK(s), the TV-H510's power adapter and the IP camera's power adapter through the mounting bracket...
Quick Installation Guide - Page 8

5. Follow the directions in the Hardware installation section above.
8. TEW-A014D).
6
English Connect the SMA end of the TEW-ASAK(s) to your external antenna (eg. Connect the IP camera's power adapter to the IP camera.
7. Follow steps 10-12 in the QIG for the TEW-ASAK(s) to connect the surge arrester to the IP camera.
6.
Quick Installation Guide - Page 9

Place the mounting bracket against the wall and mark each marked position. Mounting the Camera Housing
1. Make sure the drill bit matches the size of the four holes with a pencil.
2. Drill holes for the screw anchors at each of the provided screw anchors.
3. Insert screw anchors into the holes.
7
English
Quick Installation Guide - Page 10

... secure it. Align the wall mount bracket with the screw anchors, and then use the provided wood screws and washers to the enclosure.
5. For detailed information regarding the TV-H510 configuration and advanced settings, please visit TRENDnet's website at www.trendnet.com
Register Your Product
To ensure the highest level of customer service and support, please take a moment to...
Quick Installation Guide - Page 11

... have any questions regarding the TV-H510, please contact TRENDnet's Technical Support Department.
9 A1: First, make sure that you are using a day/night camera with auto iris lens, make sure to push the camera all the may to the front so that its not in the enclosure, the image is touching the glass. Troubleshooting
Q1: After I do? What...
Quick Installation Guide - Page 12

... SOLE REMEDY SHALL BE, AT TRENDNET'S OPTION, REPAIR OR REPLACEMENT. All products that are no user serviceable parts inside the product.
Products returned to customer the purchase price paid for a Return Material Authorization (RMA) number, accompanied by any warranty. Replacement products may be pre-authorized by any unauthorized service center.
TV-H510 - 2-Years Limited Warranty
If...
Quick Installation Guide - Page 13

... OF REVENUE OR PROFITS, LOSS OF BUSINESS, LOSS OF INFORMATION OR DATE, OR OTHER FINANCIAL LOSS ARISING OUT OF OR IN CONNECTION WITH THE SALE, INSTALLATION, MAINTENANCE, USE, PERFORMANCE, FAILURE, OR INTERRUPTION OF THE POSSIBILITY OF SUCH DAMAGES, AND LIMITS ITS LIABILITY TO REPAIR, REPLACEMENT, OR REFUND OF THE PURCHASE PRICE PAID, AT TRENDNET'S OPTION.
Quick Installation Guide - Page 14

Waste electrical and electronic products must accept any interference received. NOTE: THE MANUFACTURER IS NOT RESPONSIBLE FOR ANY RADIO OR TV INTERFERENCE CAUSED BY UNAUTHORIZED MODIFICATIONS TO THIS EQUIPMENT. SUCH MODIFICATIONS COULD VOID THE USER'S AUTHORITY TO OPERATE THE EQUIPMENT. Certifications This equipment has been tested ...
Quick Installation Guide - Page 15

TRENDnet. All Rights Reserved. Go to register your product online. Product Warranty Registration
Please take a moment to TRENDnet's website at http://www.trendnet.com/register
20675 Manhattan Place Torrance, CA 90501 USA
Copyright ©2009.
TRENDnet TV-H510 Reviews
We have not received any reviews for TRENDnet yet.