Datasheet
Page 1
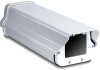
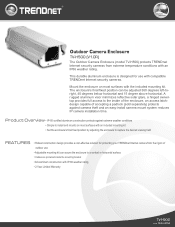
... mounting bracket • All aluminum construction with compatible TRENDnet Internet security cameras. This durable aluminum enclosure is designed for protecting your TRENDnet Internet camera from extreme temperature conditions with the included mounting kit. internet cameras Outdoor Camera Enclosure TV-H500 (V1.0R) The Outdoor Camera Enclosure (model TV-H500) protects TRENDnet Internet security cameras from the rigors of accepting a padlock...
... mounting bracket • All aluminum construction with compatible TRENDnet Internet security cameras. This durable aluminum enclosure is designed for protecting your TRENDnet Internet camera from extreme temperature conditions with the included mounting kit. internet cameras Outdoor Camera Enclosure TV-H500 (V1.0R) The Outdoor Camera Enclosure (model TV-H500) protects TRENDnet Internet security cameras from the rigors of accepting a padlock...
Datasheet
Page 2
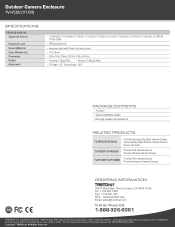
... Please Call: 1-888-326-6061 TRENDnet is subject to TRENDnet products and is a registered trademark. All Rights Reserved. Outdoor Camera Enclosure TV-H500 (V1.0R) SPECIFICATIONS Hardware Supported Devices Protection Level Housing Material Glass Window Size Dimensions Weight Adjustment • TV-IP100-N, TV-IP100W-N, TV-IP201, TV-IP201P, TV-IP201W, TV-IP301, TV-IP301W, TV-IP501P, TV-IP501W, TV-IP512P, TV-IP512WN • IP66 weatherproof •...
... Please Call: 1-888-326-6061 TRENDnet is subject to TRENDnet products and is a registered trademark. All Rights Reserved. Outdoor Camera Enclosure TV-H500 (V1.0R) SPECIFICATIONS Hardware Supported Devices Protection Level Housing Material Glass Window Size Dimensions Weight Adjustment • TV-IP100-N, TV-IP100W-N, TV-IP201, TV-IP201P, TV-IP201W, TV-IP301, TV-IP301W, TV-IP501P, TV-IP501W, TV-IP512P, TV-IP512WN • IP66 weatherproof •...
Quick Installation Guide
Page 4
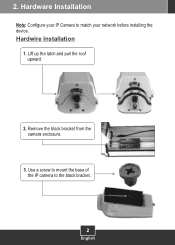
Hardwire Installation 1. Lift up the latch and pull the roof upward. 2. 2. Remove the black bracket from the camera enclosure. 3. Hardware Installation Note: Configure your IP Camera to the black bracket. 2 English Use a screw to mount the base of the IP camera to match your network before installing the device.
Hardwire Installation 1. Lift up the latch and pull the roof upward. 2. 2. Remove the black bracket from the camera enclosure. 3. Hardware Installation Note: Configure your IP Camera to the black bracket. 2 English Use a screw to mount the base of the IP camera to match your network before installing the device.

Quick Installation Guide
Page 5
Connect the Ethernet cable and power adapter to the glass as close to the camera. 3 English Move the camera as possible. Insert the IP Camera's power adapter and Ethernet cable through the mounting bracket. 6. Connect the black bracket back inside the enclosure. Insert the IP Camera's power adapter and Ethernet cable through the hole. 7. 4. This example shows a TRENDnet TV-IP100W-N. 5.
Connect the Ethernet cable and power adapter to the glass as close to the camera. 3 English Move the camera as possible. Insert the IP Camera's power adapter and Ethernet cable through the mounting bracket. 6. Connect the black bracket back inside the enclosure. Insert the IP Camera's power adapter and Ethernet cable through the hole. 7. 4. This example shows a TRENDnet TV-IP100W-N. 5.

Quick Installation Guide
Page 10
For detailed information regarding the TV-H500 configuration and advanced settings, please visit TRENDnet's website at : www.trendnet.com/register Thank you for choosing TRENDnet 8 English Your installation is now complete. Use the hex screws and Allen wrench to secure the mounting bracket to register your product Online at www.trendnet.com Register Your Product To ensure the highest level of customer service and support, please take a moment to the enclosure. 5. Align the wall mount bracket with the screw anchors, and then use the provided wood screws and washers to secure it. 4.
For detailed information regarding the TV-H500 configuration and advanced settings, please visit TRENDnet's website at : www.trendnet.com/register Thank you for choosing TRENDnet 8 English Your installation is now complete. Use the hex screws and Allen wrench to secure the mounting bracket to register your product Online at www.trendnet.com Register Your Product To ensure the highest level of customer service and support, please take a moment to the enclosure. 5. Align the wall mount bracket with the screw anchors, and then use the provided wood screws and washers to secure it. 4.
Quick Installation Guide
Page 11
If you still encounter problems or have adjusted the focus on your camera. Troubleshooting Q1: After I do? A1: First, make sure to push the camera all the may to the front so that the lens is distorted. Second, mount the TV-H500 so that you are using a day/night camera with auto iris lens, make sure that its not in the enclosure, the image is touching the glass. Third, if you have any questions regarding the TV-H500, please contact TRENDnet's Technical Support Department. 9 What should I put my IP Camera in direct view of the sun.
If you still encounter problems or have adjusted the focus on your camera. Troubleshooting Q1: After I do? A1: First, make sure to push the camera all the may to the front so that the lens is distorted. Second, mount the TV-H500 so that you are using a day/night camera with auto iris lens, make sure that its not in the enclosure, the image is touching the glass. Third, if you have any questions regarding the TV-H500, please contact TRENDnet's Technical Support Department. 9 What should I put my IP Camera in direct view of the sun.